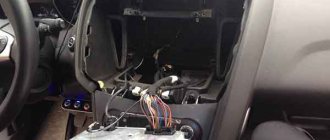
When car owners are not satisfied with the sound of the car radio, additional equipment is installed in the car. These may be the following nodes:
- Amplifier
- Crossovers
- Acustic systems
- Subwoofer
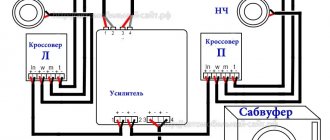
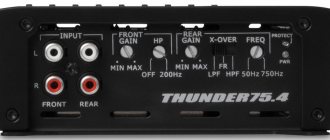
This set of technical means allows you not only to increase the sound volume, but also to significantly improve the quality of music playback. The question of how to connect a car amplifier is not as simple as it seems. The simplest version uses a ULF and two front speakers, providing high-quality stereophonic sound. A more complex option involves connecting two front and two rear speaker systems. The maximum configuration is implemented according to the 4+1 scheme and includes four speakers and a subwoofer. In addition, the automotive system provides crossovers, which are adjustable high- and low-pass filters. They also perform the function of frequency division of the signal into separate speakers for each channel.
Often, various problems arise when connecting on-board electronics. Typically, difficulties arise when supplying power to the output device and connecting speaker systems to it. You can connect a car amplifier yourself, but to do this you need to have basic skills in electrical engineering and working with tools. Most often, a crackling sound from the operation of the ignition system is heard in the speakers, and the sound in the speakers is distorted with limited high frequencies. There may be several reasons that cause such shortcomings. Often the sound quality is affected by the poor quality of the amplifier and speakers when technical equipment is purchased secondhand, but it happens that branded equipment sounds very bad. Correctly connecting the amplifier to the car will get rid of all problems.
How to properly connect an amplifier in a car
There are three main problems related to the layout of automotive audio equipment. This is the wrong choice of connecting wires, their illiterate laying and poor-quality grounding, or rather the connection of equipment to the car body. Connecting the amplifier to the car must be done with wires of the appropriate cross-section. Any metal wire has a certain resistance. The thinner the wire, the higher its resistance, so you cannot install it with SHVVP wire, which is widely used in everyday life. Many companies produce copper-plated wire containing steel conductors coated with a thin layer of sputtered copper. It is unacceptable to use such wires to connect a car amplifier. This will not only greatly reduce the sound quality, but may also cause a fire. To work, you need to purchase special cables designed for such installation.
To understand how to connect an audio amplifier in a car
, you need to calculate the current in the circuit. To do this, you need to divide the amplifier power by the supply voltage. Since the device is powered by a car battery, the total power of the channels must be divided by 12 volts. A two-channel device with a power of 60 watts per channel has a total power of 120 watts. It is customary to increase the power by 1.5-2 times due to uneven consumption, so in this case a power of 240 watts is considered. 240 watts/12 volts = 20 amps. Based on this value, the wire cross-section is selected. The power of a four-channel system with a subwoofer reaches 800 watts or more, so all connecting cables must have the appropriate cross-section. The thin wire will heat up, which may cause a fire. When choosing a cable, it should be chosen with a reserve in terms of power and length. It is not recommended to wire the wires under tension. To reduce distortion, you often have to look for the correct position of the wires relative to each other.
Diagram for connecting speakers through an amplifier in a car does not allow parallel laying of power cables and wires going to the speakers. This leads to interference in acoustic systems.
Possible problems and their solutions
During the operation of the presented car radio, various types of problems may occur. Their appearance is often caused by incorrect connection of underwater leads or a malfunction of third-party devices. In addition, malfunctions of the radio may be associated with power outages.
It is worth noting that in most cases, almost every malfunction has certain symptoms, based on which it is possible to determine its cause. With all this, it is worth noting that in order to eliminate a certain number of malfunctions, the owner will need at least minimal knowledge of electrical engineering and the presence of some measuring instruments.
Let's try to highlight the most common cases of problems.
Doesn't turn on
If, after installing the radio, it refuses to show signs of life, the following diagnostic measures should be carried out:
- make sure that the underwater leads are tightly connected;
- check the availability of power;
- make sure there is mass.
If all of the above measures do not lead to the desired result, there is a need to conduct a comprehensive diagnosis, which involves:
- checking the throttle and fuse L951;
- checking the voltage value of the Q952 stabilizer (operating voltage is 5V);
- checking the presence of a key on transistor Q609;
- checking the serviceability of MK/KK quartz oscillators.
If all of the above steps fail to identify the problem, it is highly likely that the problem lies in the IC601/IC901 microcontroller.
Doesn't turn off
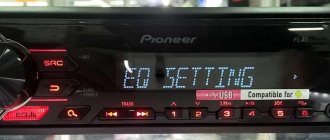
Often, owners of Pioneer radios are faced with the fact that they simply cannot turn off the radio. Solving this problem will not be difficult if you find out some of the features of the devices of the presented type.
The shutdown algorithm looks like this:
- press key 2 and get to the Menu section;
- enable the Sustem tab;
- activate the PW SAVE function;
- turn off the radio by pressing the off button.
After saving the listed settings, to turn off the radio it will be enough to use key 1. When resetting the settings due to disconnecting the battery, etc., the specified algorithm should be repeated.
Connect the amplifier to the car
To know how to properly connect a car audio amplifier in a car, you need to understand the markings of connecting cables. In automotive technical systems, it is customary to use the American wire cross-section standard - AWG. There, the wire cross-section varies from the thinnest “8Ga” - with a diameter of 3.2 mm to “0Ga” with a diameter of 8.2 mm. There are even thinner wires that are marked with numbers 10, 12 or 16, but they are not used in powerful audio devices. When choosing a wire cross-section, the length of the working segment is also taken into account. Since audio equipment is often placed in the trunk of a car, a wire length of about 5 meters is considered. With a current of 20 amperes and a working length of 5 meters, you need to choose a wire with a cross-section of “4Ga”, which corresponds to a diameter of 5.18 mm. The cross-section of such a cable is 21.15 mm2.
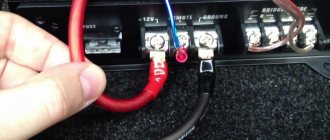
It is very important when connecting power to a powerful output stage to use a fuse, which should be installed on the positive wire at a distance of no more than 30 cm from the battery terminal.
There are several designs of fuses. The cable is tightened with screws on both sides, and the housing itself is easy to attach next to the terminal. Automatic fuses, which must turn off when a certain current is exceeded, are not popular among car enthusiasts, as there are cases of them sticking, which leads to serious damage.
Installation of 1 din radio
Before highlighting the installation features of various car radios, let's take a short historical excursion. The fact is that in the mid-80s, leading companies producing car audio systems came to the conclusion that it was necessary to unify all radios.
In other words, standardize the sizes of the presented devices. Thus, after some time, the so-called DIN appeared, which received the status of an international standard.
The fundamental parameters of this standard are the width and height of the radio. Thus, the 1 din standard corresponds to dimensions of 178×50 mm. 2 din differs only in height, which is already 100 mm.
All of the above information must be taken into account when choosing a radio.
Let's look at a case where there was a need to install a 1 din standard car radio. It is worth noting that this standard is considered the most common. In this regard, difficulties should not arise when installing a new radio. As a rule, the installation of most standard radios is carried out in accordance with the 1 din standard.
On the subject: How to remove a hernia on a car wheel and why it is dangerous
However, a situation may arise when there is a 2 din standard socket in the car console. In this case, when installing a radio that meets the 1 din standard, you will only have to purchase a special adapter frame.
Connecting speakers to an amplifier in a car
Connecting a car amplifier to speakers is not difficult if there are only two channels. On the back wall of the device there are screw terminals for connecting speakers. They indicate the polarity of the connection. Signs “+” and “–” are also available on speaker systems. It is enough to use the correct connecting cables and not make the wrong polarity when connecting. The REM (Remout Control) wire or remote control is designed to turn on the amplifier from the car radio. When it is turned on, a control voltage of +12 V is supplied to the wire and the device turns on. The connection diagram of a car amplifier to the radio implies automatic control of the power supply of the power unit, but some car enthusiasts install a toggle switch and supply the switching voltage through it.
Principle of operation
To understand the operation of the device, you do not need to have the appropriate education and delve into the circuit diagram of the amplifier. It’s just necessary to take a closer look at how the signal appears that goes from the car radio directly to the amplifier itself. It is known that the signal that arrives at this device has a low amplitude. After it passes through the amplifier, it produces the appropriate level that is necessary to reproduce sound. However, this is only one side of this issue. More precisely, the amplifier generates a new sample signal. Moreover, this signal is a copy of the one that arrives at its input from the car radio.
How to connect a sound amplifier in a car
Organizing four channels, crossovers and a subwoofer poses some difficulties. The abundance of connecting wires imposes certain installation requirements. To connect the amplifier to the speakers in the car, use standard sets of connecting cables, which can be purchased in specialized stores. Connecting four speaker systems is carried out according to a similar principle, since all the necessary markings are on the device body. The main thing is not to confuse the polarity of connecting the speakers. Many car enthusiasts equip the interior of their car with a subwoofer. This is a powerful speaker system that allows you to reproduce low frequencies in the range from 20 to 120 Hz. Most models allow the connection of a subwoofer. This output of the final stage is organized using a bridge circuit.
Proper connection of the amplifier in the car guarantees high quality sound reproduction without interference or distortion. When connecting car audio equipment, it is very important to select a grounding point.
All components of audio equipment must be grounded at one point in the body. Otherwise, ground loops may occur, causing severe noise. The correct option is to ground the audio equipment to the negative terminal of the battery or to the point where it connects to the car body. For grounding we use stranded copper wires. The grounding point “under the bolt” must be thoroughly cleaned of oxides and degreased. To connect wires, it is best to use gold-plated terminals and connectors. Such connection of the amplifier in the car will provide
the most reliable contact, which will not depend on vibration and shaking. The housings of all elements included in the sound reproduction system must be reliably isolated from the car body. The wires leading to the speaker systems should not be parallel to the power cables.
Instructions
To correctly connect all car radio connectors according to the diagram, you should read the instruction manual. First, let's start with marking and pinout of wires.
What you need to know about wire markings?
By examining the markings, you will prevent errors that may appear during the connection process. The device package includes not only a circuit diagram, the necessary plugs and adapters, but also two main ISO connectors. These connectors are standard, which is why they come with the car radio. Each of these connectors contains a group of contacts consisting of eight parts. One of these connectors is intended for connecting electronic wiring, and speakers are connected to the second connector of the car radio with remote control and amplifier.
You can connect a wired car radio yourself, there are two ways. To make the connection without errors, you can purchase an adapter for installation. When connecting the device, car owners proceed simply by disconnecting the connector from the wires, and then these wires are connected to the mating part by twisting them. To properly connect the device, plugs, adapters and connectors are connected in accordance with the pinout and the diagram that comes with the kit. Please note that no matter which car radio is equipped with wiring, the elements of which may have different colors.
Universal battery
We suggest you familiarize yourself with what functions the wiring has and how they are connected. The yellowish wire must be connected directly to the battery; for proper connection, the circuit must be supplemented with a fuse. There is also a reddish wire in the car radio; it is needed to turn on the system when the ignition is on, so the reddish cable is connected through the lock. Under no circumstances should these two wires be connected to each other, because as a result, the pinout circuit will contribute to an accelerated battery level.
Connection diagram for an amplifier in a car
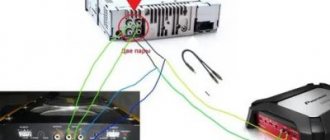
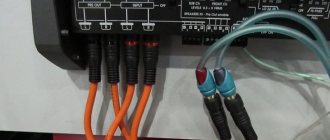
Connecting car speakers to an amplifier is carried out with copper stranded wires, which can be laid in the lower part of the cabin or on top under the decorative upholstery. The top connection is considered more reliable. The subwoofer is usually placed in the trunk of a car, so it should be securely mounted. The amplifier output is implemented in the form of screw terminals or via RCA connectors (Tulip). In the second case, it is better to purchase a ready-made set of connecting cables.
Connecting a car amplifier to a radio is not difficult , since its outputs and inputs of the amplifier are equipped with RCA connectors. The outputs of the left and right channels of the car radio are connected to similar input connectors of the terminal device. All screw connections should be tightened to maximum torque to ensure reliable contact when driving on any road. If you do everything correctly, according to the descriptions and drawings, then there will be no problems connecting a sound amplifier in the car.
rav />Review and test of the Stinger Car Z3 radar detector – reviews
The stylish Stinger Car Z3 radar detector, made in the shape of a sports car, will definitely appeal to those drivers who value style, speed and safety on the road. This device belongs to the middle price range; you can purchase it for 4,990 rubles. By spending this money, you will receive the following set of characteristics:
- detection of X, K, Ka bands, as well as short-pulse Ultra-X, Ultra-K, Short-Pulse, Instant-ON, POP;
- there is protection from detection by VG-2 direction finders;
- detection of laser speed control systems using an omnidirectional optical lens that receives optical rays in a 360-degree sector;
- identification of “ARROWS” from a distance of up to one kilometer.
To make it easy to work with the Stinger Car Z3 radar detector, it is equipped with a convenient LED display with an intuitive menu. When a radar pulse is detected, the driver will be informed through audio and visual alerts. There are also miniature strobes installed in place of the “car” headlights.
To prevent the driver from being unnecessarily distracted by false alarms, the device is equipped with a system for screening and filtering interference. Using three sensitivity modes - CITY1, CITY2 and HIGHWAY - you can select the most optimal detector sensitivity. It is possible to independently disable reception of unused bands, including VG-2.
Even despite its good characteristics, this radar detector is not without the most common problem - false alarms. However, it is possible to distinguish a false signal from a real threat thanks to the received signal intensity sensor; there is also a “Geiger counter” effect.
The user can independently choose the settings that suit him - display brightness, sound volume. All settings made are saved in memory. Beginners will understand the principles of operation thanks to the demo mode. The device automatically turns on after electricity enters the car's network and independently scans at all frequencies.
The radar detector comes with all the necessary elements to connect it to the network via the cigarette lighter. Installation is carried out on the windshield or dashboard using a magnet.