Pioneer is a popular brand known all over the world. The radios serve their owners for a long time and are easy to set up.
Our tips are extremely simple and you will quickly understand the installation principles. There is a detailed wiring diagram for the Pioneer radio.
Preparatory work
- Remove the old car radio if it is installed in your car. Before doing this, you will need to disconnect the battery.
- Remove the trim.
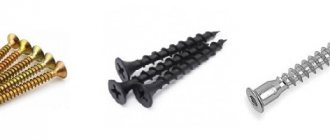
- Use a screwdriver to unscrew the screws securing the air duct cover.
- Remove the device and turn off the on-board computer display, then remove the screen from the bracket.
Video: dismantling a radio in a car without tools
What to do if there is interference on the radio from the DVR
Many car enthusiasts are familiar with the situation when, after installing a DVR, interference appears when listening to the radio. A negative impact on sound quality occurs even when the DVR is placed in the cabin in full accordance with the operating instructions.
Radio interference is only possible when the power supply is plugged into the car's cigarette lighter. When the DVR operates autonomously (from a backup built-in battery, if available in the design), such problems do not occur.
One of the possible reasons for radio interference from a working DVR is the presence of electromagnetic radiation from the recorder's power supply and connecting cable. The power of such radiation is small, but given that these components of the device have practically no protection, the effect on the operation of the radio can be quite noticeable.
The appearance of interference is also facilitated by the small distance between the connecting cable of the car DVR and the cable connecting the radio antenna to the radio itself. The wire leading to the antenna is also practically devoid of protection from electronic radiation.
This results in a situation where the DVR's power supply and its cable emit waves, which are immediately received by the antenna and broadcast through the speakers. It is clear that these waves do not carry any information and can only be an obstacle to comfortable listening to the radio.
The driver can try to fix this problem himself. This will require a minimum of parts and certain skills in handling electronic devices.
First, you can try replacing the switching power adapter of the DVR with a linear one. Secondly, either replacement or additional protection of the antenna cable from electromagnetic radiation is required. Shielding the cable will help protect it from extraneous radio waves.
Significantly more complex from a technical point of view is the method in which the DVR is powered not from the cigarette lighter, but directly from the vehicle’s on-board network. The absence of a power supply allows you to get rid of most interference when listening to radio stations. True, few people can install a DVR into a car network absolutely correctly and competently. Therefore, it is better to leave this procedure to specialists.
Another way that can reduce the amount of interference on the radio is to separate the active antenna of the radio and any parts of the DVR that serve as sources of electromagnetic radiation to the maximum possible distance.
If a problem such as radio interference from a working DVR appears, you should not immediately try to make changes to the design of the gadgets (this means replacing the power supply or connecting without using a cigarette lighter). First, you should try less complicated methods, for example, removing the antenna from the recorder or additional protection of the connecting cables.
If the driver does not have proper experience in handling electronic devices, it is better to entrust any work to specialists. Any error can lead to failure of not only the DVR or radio itself, but the entire power system of the car.
In this video, a motorist solves the problem and eliminates the interference.
ravid.ru
Wire marking
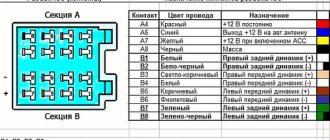
Before you connect the Pioneer radio, find out what functions each of the wiring performs. Included with the device is a pair of ISO connectors for connection, each of them consists of 8 pins. The 1st is for the power supply, the 2nd is for the sound reproduction system. It happens that the car does not have the required port. In this case, disconnect the ISO, then connect using mechanical twisting. Multi-colored electrical wires are easy to identify. Each of them performs its own functions.
Purpose and connection of wiring
- Yellow. For batteries, supplied through a fuse.
- Red. Connects to the ignition. Red and yellow cannot be connected to each other, as the battery will quickly discharge.
- Black. Negative, it is fixed to the car body.
- White and blue. They come from the antenna, subwoofer and amplifier.
- Gray. For the right column (positive terminal). The gray wire with a black stripe is connected to the same speaker (minus terminal).
- White. It is connected to the positive terminal of the front left speaker, and the white one with a black stripe is connected to the negative terminal.
- Green. It is connected to the positive terminal of the left rear speaker, green with a black stripe - to the negative terminal.
- Violet. For the rear right column (plus), with a strip - minus.
By connecting the wires according to the instructions, you will ensure proper operation of the player.
Description of the Pioneer car radio
Modern Pioneer tape recorders came to us from the last century. Constantly improving, this technology meets the requirements of modern formats. Can read information from memory cards, USB phones, etc.
Radio Pioneer
The popularity of the device is not lost, but on the contrary, it is gaining strength. Since the quality is excellent, and installation is not difficult. Reliability, durability and excellent sound level continue to delight audio connoisseurs.
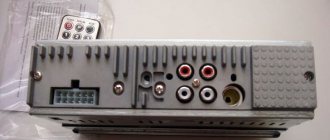
Direct connection
There is a compartment for installation in the interior of each car. Sometimes the niche is hidden under the panel. Before installation, the panel is removed, leaving a small compartment in its place. The counter wiring is removed from the niche. Then the wires are connected (see photo). After this, the device is installed in the compartment. After connecting all the wiring, you will need to insulate them, otherwise breakdowns and short circuits may occur. You can securely secure the wiring with a plastic clamp.
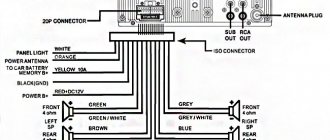
Pinout
Today, as a rule, identical ISO connectors are installed. Therefore, replacing it will not be difficult: you just need to rearrange the plug. If a plug gets lost or broken, remember or label each wire to connect the device. The pinout is shown in detail in the schematic drawings. If you follow the instructions, you can easily do everything yourself, and then enjoy music on the road at any time.
Dimensions and connectors
This can be a single-block or double-block (1 and 2 din) device. The 2 din version is twice as high as 1 din, so it is worth calculating the size of the niche in advance. The connector found in the car may differ from the one installed in the radio. If it is missing, install an adapter. This method of connecting a new Pioneer car radio is very simple. We provide you with a complete list of recommendations to make things easier for you.
1 din connection
To carry out the work, you will need a screwdriver and plastic clamps.
If you use a standard pioneer car radio connection diagram with the appropriate ISO connectors, then there will be no difficulties.
If you don’t have them inside your car, connect the wires this way:
- dismantle the panel;
- remove the plugs from the wires, connect the wires as shown in the picture;
- insulate all wiring connections;
- secure the clamps.
2 din connection
It is better to connect a Pioneer brand car radio so that the power comes from the batteries.
This way the device can be turned on at full power. This will significantly reduce interference. Note:
- If your car does not have battery wiring, use stranded copper wire. Those sold together with a Pioneer brand car radio are not suitable. It is important that the wire is long enough to reach from the niche to the battery. Install a fuse (20 A) at a distance of half a meter from the battery.
- Do not twist the wiring from the 2 din device due to possible interference and low power.
- Insulate each wire.
Connection to multifunction steering wheel
To properly install the player in a car with a multifunction steering wheel, use an adapter. It can be universal or specialized. The video shows all the steps well, so it won’t be difficult for you to do this work in your car. Thanks to the adapter, you can easily connect the device.
Adapter connection:
- disconnect the battery from the car network;
- remove the radio;
- connect the adapter cable to the car radio, and the adapter to the ISO connector;
- configure the buttons on the multifunction steering wheel;
- connect the battery.
Do-it-yourself installation of a 1 din radio
The necessary tools are a screwdriver and a set of plastic clamps.
If you work according to the standard scheme with ISO connectors, then no problems will arise - you just need to follow the rules described above and connect the connectors to the mating parts.
Connector 10487
If your car does not have the ability to use the conventional option, you will have to resort to a more complex wiring procedure. It works as follows.
- Using a screwdriver, remove the decorative panel from the mounting location.
- We remove the plugs from the wires and connect the wires with the mating ones in the right places, according to the color scheme.
- We insulate each connection point as carefully as possible to prevent short circuit damage.
- To increase reliability, it is recommended to connect the wires with clamps.
- If your radio comes with steel plates with eyelets, place them on the sides of the head unit. This will make it possible to easily remove the equipment from its seat.
How to set up your device
Before you start listening to your favorite artists in the car or catching up on the news on the radio, learn how Pioneer works. First, understand all the functions. Follow simple rules and you will quickly solve all difficulties.
Setting up your Pioneer radio will not take much time. Follow our simple recommendations:
- Connect the speakers and insert batteries into the remote control.
- Use the joystick located on the control panel. Set options.
- Select and adjust individual functions one by one in the “Menu” section.
Instructions
To correctly connect all car radio connectors according to the diagram, you should read the operating instructions. First of all, let's start with the marking and pinout of the wires.
What you need to know about wire markings?
By studying the markings, you will prevent errors that may occur during the connection. The device package includes not only a circuit diagram, the necessary plugs and adapters, but also two main ISO connectors. These connectors are standard, so they come with the car radio. Each of these connectors contains a group of contacts consisting of eight elements. One of these connectors is intended for connecting electrical wiring, and speakers are connected to the second connector of the car radio with remote control and amplifier.
You can connect a wired car radio yourself - there are two methods. To make the connection without errors, you can purchase an adapter for installation. When connecting a device, car enthusiasts do it simpler - the connector is disconnected from the wires, and then these wires are connected to the mating part by twisting them. To properly connect the device, plugs, adapters and connectors are connected in accordance with the pinout and the diagram that comes with the kit. Please note that any car radio is equipped with wiring, the elements of which may have different colors.
Universal battery connection diagram
We suggest you familiarize yourself with what functions the wiring has and how they are connected. The yellow wire must be connected directly to the battery; for proper connection, the circuit must be supplemented with a fuse. There is also a red wire in the car radio; it is necessary to turn on the system when the ignition is on, so the red cable is connected through the lock. Under no circumstances should these two wires be connected to each other, since as a result of this, the pinout circuit will contribute to the accelerated discharge of the battery.
The black wire is the negative wire, it is usually thicker than the others, and should be connected to the vehicle body. Each of the cables that comes with a car radio with or without an amplifier performs certain tasks. For example, if the wire is white and has a blue stripe on it, then when connected to the connector it will be responsible for the operation of the antenna, amplifier, and also the subwoofer, if available.
As for the gray wire, it needs to be connected to the positive connector of the speaker located in front on the right. A similar cable with a black stripe is connected to the minus of the same speaker. The same situation is with the white cable, as well as the white wire with a black stripe - they need to be connected to the left column (the author of the video is Anton Eremin).
Connecting the rear speakers of a car radio with an amplifier is carried out according to a similar scheme. In particular, the green wire (to the positive) must be connected to the rear left column, and the green element with a black stripe is connected to the negative plug of the car column. Following the diagram and pinout, the purple element is connected to the right column, in particular to the plus, and a similar wire with a black stripe is connected to the minus with your own hands. If the diagram and pinout are not followed, there is a possibility that the car radio may short out, so be careful.
How to connect?
After you have connected all the adapters and plugs of the radio with the remote control according to the diagram, let's move on to the issue of connecting the system. It is necessary to take into account that all plugs, as well as cable pinouts, are standard, so it will be difficult to make a mistake. Simply inserting the plug into the socket is not a problem, but sometimes car enthusiasts choose a more complex installation process when it comes to manual connection. To do this, the cables need to be disconnected from the plug and connected depending on their functionality.
Having connected the elements, they must be insulated as much as possible to prevent system failure as a result of a short circuit. To prevent the components from becoming disconnected from the adapters, it is advisable to additionally secure them using special plastic clamps. On all vehicles, there is a place on the dashboard for installing a multimedia system; sometimes this place is hidden by a plastic cover, which must be disconnected immediately before installation. You can use a screwdriver for this.
Diagram of connecting wires to the connector
By opening the decorative panel or dismantling the old radio, you will see all the wires that are required to connect the adapters and outputs of the radio in accordance with the diagram. Based on the diagram, all cables and adapters are connected, after which the multimedia system is installed at the installation site.
Functions
- Advanced Remote Control App (Pioneer ARC). The app turns your compatible iPhone or Android smartphone into a powerful touchscreen remote control that lets you easily control and customize your compatible Pioneer car stereo's features.
- Compatible with Android. Connect and play music on your device without any apps
- USB input. Connect any device with a USB interface cable to charge your device or enjoy clear, crisp audio.
- 5-band Graphical EQ. Adjust the audio output to adjust playback to suit your preferences.
- FLAC. Ability to play FLAC lossless digital audio files in the car using a dedicated CD-quality output without the need for conversion.
Audio
Front speakers
Having configured the radio receiver, as well as connecting sound sources, you can focus on sound quality.
- After adjusting the volume, press the knob to get to the settings menu.
- Here they look for the “Audio” item.
- By pressing the handle, you enter this menu.
- After looking through it, they find the Fader instruction.
- Click on the knob to get to this submenu.
- As usual, select the Fader menu (it should blink).
- Turn the knob and set the value to 15 units.
- Swing the knob to the left once to return to the “Audio” menu.
- Now you need to find a high-pass filter - HIGH PASS FILTER (HPF).
- Included in the menu.
- On the screen, most likely, the HPF is also zero.
- Twist the handle and set it to 50.
- Swing the handle to the left to exit the menu.
Rear speakers
The front speakers work cleanly, now it’s time to switch the rear speakers on the shelf into subwoofer mode - fortunately Pioneer can do this too.
- Turn off the radio.
- Press and hold the power button (as if you were going to set up the “demo” mode).
- Once in the menu, look for the inscription in the form of SW Kontrol.
- By pushing down the handle, you enter this menu.
- By rotating it, the parameter is set to SW.
- Confirm by pressing the handle again.
- Press the power button to save parameters and exit the menu.
- Then they return to the “Audio” menu (press the volume knob and rotate to select).
- By pressing the handle, you enter the menu.
- Here they look for the inscription SW SETTING1. Click on the handle to enter.
- Of the three options presented in the menu, you need to choose one of two - Normal or Rev.
- Having chosen, swing the knob to the left - return to “Audio”.
- Turning the knob clockwise will highlight the SW SETTING2 menu.
- They enter it by pressing the handle. The factory setting will show 80 HZ 0. Rotate the knob to decrease the first value.
- Having chosen what you want, swing the knob to the right to change the second parameter. This is the power level. The range here is from minus six to plus six. It will not be possible to give optimal parameters - it all depends on the quality of the speakers used.
- Press Band to exit the menu.
Before moving on to the next settings, check at different volumes how the selected settings work. If you don’t like something, repeat the steps described, trying other values.
Loudness compensation
This option is hidden in the same “Audio” menu.
- Enter the menu, find the Loudness parameter.
- Select by pressing the knob.
- There are three values available here - High, Middle, Low (respectively high, medium, low).
- This parameter is responsible for adjusting frequencies at low volume levels. It is also impossible to give optimal settings here - they are set experimentally.
- Swing the knob to the left to go to “Audio” or from settings by pressing Band.
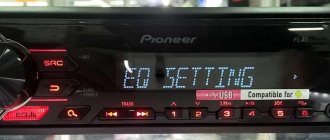
Equalizer settings
For advanced music lovers, here are a few more equalizer settings. They are hidden in the same “Audio” menu.
- Once in the menu, rotate the knob to select the EQ SETTING parameter.
- Enter this menu (depending on the model, you may need to enter another menu here). The three parameters offered in this menu are responsible separately for the settings of the low, mid, and high frequencies.
- Set according to your preferences. On some models, you can select several preset settings here. Depending on the speakers and your own preferences, adjust these parameters.
The settings here are no different from others - select by pressing, change by rotating, going to a higher level by swinging the knob to the left.
Sound settings
In order for the radio to play juicily and reproduce low frequencies well, you need to adjust the equalizer curve and adjust the cutoff of low or high frequencies. The equipment supports adjusting the sound balance between speakers; there is a separate function for dynamic bass boost (BASS BOOST).
The sound quality is affected by the bitrate of audio recordings stored on laser discs or removable storage devices. If the recording quality is low, it is impossible to correct the sound picture using the settings.
Equalizer
Equalizer curves with standard parameters are stored in memory; to select the required value, use the menu (EQ Settings subsection). Radio tape recorders support creating your own sound picture by recording parameters in a separate memory cell.
High and low pass filter subwoofer
Setting up the slice is done through the menu, where you need to find the Crossover parameter. The function is supported only by some equipment; the setting algorithm depends on the modification of the acoustic device. Some models allow you to set individual characteristics for each speaker. The cutting height is selected from the list of suggested values.
Video: “deep” settings menu + disabling DEMO mode + disabling time
Turn off the demo
To disable the demo mode, turn off the car radio, and then turn it on again by long pressing the SRC button (maybe the SOURCE button), after which we get to the start settings menu, where using the joystick or the right-left buttons we find the DEMO ON sub-item, and then change it parameter to OFF.
How to adjust the bass
To adjust the bass level, you need to switch the rear speakers to subwoofer mode, which is described in detail in subparagraph 1. Also, to obtain richer bass, correct adjustment of low frequencies through the equalizer, as well as activation of the BASS BOOST function, which is disabled by default, can help. To do this, turn off and then turn on the radio using the SRC (SOURCE) button, and go to the preset menu, where we look for the BASS BOOST sub-item, after which we activate it.
Depending on the Pioneer audio recorder used in the car, there may be other parameters, which you can familiarize yourself with by carefully reading the instructions for the device, which is included in the kit or can be downloaded via the Internet.
Possible problems and their solutions
During the operation of the presented car radio, various types of problems may occur. Their appearance is often caused by incorrect connection of underwater leads or a malfunction of third-party devices. In addition, malfunctions of the radio may be associated with power outages.
It is worth noting that in most cases, almost every malfunction has certain symptoms, based on which it is possible to determine its cause. With all this, it is worth noting that in order to eliminate a certain number of malfunctions, the owner will need at least minimal knowledge of electrical engineering and the presence of some measuring instruments.
Let's try to highlight the most common cases of problems.
Doesn't turn on
If, after installing the radio, it refuses to show signs of life, the following diagnostic measures should be carried out:
- make sure that the underwater leads are tightly connected;
- check the availability of power;
- make sure there is mass.
If all of the above measures do not lead to the desired result, there is a need to conduct a comprehensive diagnosis, which involves:
- checking the throttle and fuse L951;
- checking the voltage value of the Q952 stabilizer (operating voltage is 5V);
- checking the presence of a key on transistor Q609;
- checking the serviceability of MK/KK quartz oscillators.
If all of the above steps fail to identify the problem, it is highly likely that the problem lies in the IC601/IC901 microcontroller.