Everyone needs a radio in their car. The older generation can listen to the news or chanson, middle-aged people can enjoy jazz, rock and classics, and young people can have fun and loudly “sway” to electronic music or rap.
In this article, we will not touch upon complex Hi-Fi and Hi-End systems that require serious investment - the purchase of an expensive head unit, cables, amplifiers, capacitors and sound processors. As well as calculating subwoofer enclosures, complex podiums, and adjusting the frequency response.
Therefore, we will consider 3 types of simple car audio systems with minimal financial investment.
Three-way front and subwoofer
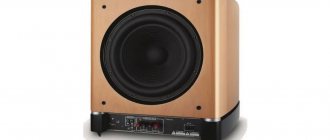
The three-band front is designed to improve the impression of the audio system and increase the intensity of the sound, and the subwoofer is to correct the error in the lower register for fuller sound. Speakers in a three-way front reproduce sound louder and more accurately, since the emitters of the corresponding sound band have a narrow directivity. Each of them reproduces a narrower range, so the system's speakers are less loaded than with a "two-way front and subwoofer" design.
In practice, there are 2 popular implementations of this system: 1. Three-band front on passive crossovers. In it, special attention must be paid to the location of the speakers. The system setup is based on connecting the top of the subwoofer and the bottom of the midbass and setting the sensitivity of the amplifier input signal. 2. Channel amplification from the radio. The equipment has three pairs of preamplifiers, while four pairs are required to set up the system. It is necessary to resort to certain tricks: you should split the RCA midbass using 2 Y-splitters. Important! It is necessary to choose the right midbass RCA, since it is located approximately at the same distance from the driver with the subwoofer. Channel system setup is much more complicated than the 1st scheme discussed. When setting cutoffs for each type of speaker, it is necessary to take into account individual audio delays, tonal balance and crossover slopes. Without the appropriate knowledge and skills, it is impossible to achieve impeccable sound. Inexperienced car enthusiasts should use a microphone or seek professional help.
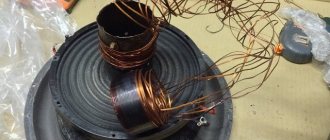
How to remove a standard speaker and attach a new one
Further work will require patience and attentiveness from you. Only compliance with the sequence of actions below guarantees correct installation of the speakers.
- Once you have access to the speaker, unscrew the fasteners and pull the speaker out towards you. Disconnect the connector with wires.
Unscrew the fasteners and pull the speaker towards you. Disconnect the connector with wires
- If the standard speakers are attached with plastic rivets, do not drill them out, but pick them up with a screwdriver, grab them with pliers and pull them out of the mounting sockets. In this case, the rivets will most likely be broken.
- After removing the stock speaker, try on the new speaker. Ideally, it can be installed on the old seat. Assess whether the column will interfere with the operation of mechanisms hidden behind the casing.
It is advisable to cover the door (the area of the door near the speaker) with sound insulation, vibroplast or something similar
- Before attaching the speaker, it is advisable to cover the door (the area of the door near the speaker) with sound insulation, vibroplast or similar material. This will significantly improve the sound of the speakers.
Two-way front and subwoofer
This is the most common audio system for cars, as it consists of a small number of components and is easy to install. The composition of the system can be arbitrary (subwoofer, tweeters, etc.) or strictly regulated (two-component speaker system). Ease of installation does not mean that the sound will be of poor quality. The sound depends on the correct settings of the car audio circuit in the vehicle.
The system can be configured according to 2 standard schemes: The first option involves setting up crossover filtering mechanisms and adjusting the sensitivity level of input signals on the Gain amplifier. To further adjust the system, you must: 1. turn on the HPF low-pass filter on the car radio (as well as on the amplifier) for the 1st and 2nd signals; 2. adjust the cutoff for the 3rd and 4th channels (in the 80 Hz area); 3. enable LPF; 4. set the cutoff equal to the cutoff of the 1st or 2nd channel (can be a little higher). On the amplifier, you first need to adjust the sensitivity of the input signals for the 1st and 2nd channels, and then “adjust” the sensitivity of the 3rd and 4th channels to these criteria. The second option involves channel configuration of the system. This method is used for a processor radio. All its parameters are adjusted on the GU (with the exception of signal sensitivity). Getting the ideal sound depends on the standard acoustics, or more precisely, the upper mid-bass and low-end tweeters. Their cutoff is adjusted around 80 Hz. Important! 1. The size of the midbass can be cut in the region of 67-70 Hz, provided that they accurately reproduce the sound below 80 Hz. 2. In the non-processor “Two-way front and subwoofer” system, the bass may fail in the cutoff area. This drawback can be corrected by changing the poles of the subwoofer speaker wire (or switching the phase of the device on the radio if such a function is available).
Component Audio Source Locations
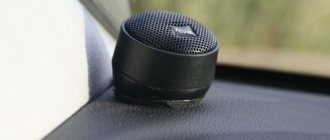
The sound quality of coaxial speakers satisfies most motorists, but not all. The design disadvantage of coaxial sound is that high-frequency tweeters are placed in inaccessible places along with the front speakers. To overcome this disadvantage, component systems with speakers spaced apart in space are used.
The peculiarities of high-frequency sound propagation require that, firstly, the tweeters be oriented towards the listener, and, secondly, that there are no obstacles between them and the ear.
Due to the layout of car interiors, it is difficult to choose the ideal location for tweeters. The most acceptable compromise between price and quality is to place the low- and mid-frequency speakers in their standard place and move the high-frequency drivers to the dashboard or the A-pillar.
Connecting tweeters
The installation procedure for component speakers is given below:
- With the battery turned off, install the crossovers in a place protected from dust, moisture and vibration. Connect the crossover filters directly to the output of the radio. Place the wires under the casing.
When installing crossovers, make sure that they are reliably protected from dust, moisture and vibration
- Connect the tweeters to the crossovers using a temporary circuit without fastening.
- If there are no crossovers, connect the high-frequency speakers in parallel with the main ones through a capacitor connected to the open circuit (do not use an electrolytic one) with a capacity of about 1–1.5 μF.
- Apply power and select the most suitable location for mounting the tweeters, based on sound quality. Disconnect the battery.
- If necessary, drill holes in the panel for tweeters. If using cabinet speakers, mount them in the chosen location, route the wires and connect them to the crossovers.
If you decide to use cabinet speakers, securely attach them to the corners of the dashboard
Subtleties of connecting car subwoofers
Connecting a single-coil subwoofer to a monoblock is not at all difficult. It is much more difficult if there are two voice coils or you need to connect several subwoofers.
There are 4 options for connecting a two-coil subwoofer (or several subwoofers): • serial connection; • parallel connection; • combined connection; • connecting each element separately. Each coil switching option is universal. Parallel and series connections achieve opposite effects. In the first case, the total resistance of the coils is reduced by 2 times. For example: when connecting coils with a resistance of 8 ohms each, the total resistance will be 4 ohms. With a series connection type, the resistances of the coils are summed up (increases 2 times). For example: with a series resistance of coils of 3 ohms, each total resistance will be 6 ohms. To obtain more visual information, let’s consider each coil switching option in more detail. 1. Connecting each element separately This connection method is used in cases where there is no monoblock. Using it, you can connect a two-coil subwoofer to a less powerful amplifier. The only correction: the Gain controls should be approximately at the same level, and the resistance of the coils should correspond to the real (operating) power. 2. Parallel connection Due to the reduction in resistance by 2 times, the amplifier can increase the operating load. However, in this case there can be no talk of impeccable sound - as the power increases, the amplifier's control over the subwoofer decreases, which leads to “smeared bass”. 3. Serial connection With it you can achieve more accurate sound. This subwoofer connection scheme is only possible with a powerful amplifier. 4. Combined connection This option involves the simultaneous use of serial and parallel connections. It is used to achieve better sound. The choice of connecting two-coil subwoofers depends on the power of the amplifier and the resistance of the voice coils.
How to connect speakers to the front or back door
It happens that the new column, coinciding with the old one in diameter, does not “sit” on the standard podium (ring or protrusion) or turns out to be thicker and begins to stick out too much. Sometimes the stand is completely missing. In this case, proceed as follows:
- Install a new podium: it is necessary in order to raise the speaker if the latter rests on the door mechanisms. It also plays the role of a rigid and elastic support for the diffuser, improves the radiation pattern, preventing sound from “escaping” under the casing. You can buy the podium in the same place as the speakers, or make it yourself.
- Use suitable plastic housings from faulty speakers as a base, or use a jigsaw to make a podium out of plywood. If necessary, cut out several rings and glue them together.
It is advisable to impregnate a wooden podium with a protective compound and cover it with a sealant
- Before installation, it is advisable to impregnate a wooden podium with a protective compound and cover it with a sealant. The column is attached to the base through a thin rubber gasket.
- If the diameter of the new column is larger than the old one, first widen the mounting hole using a jigsaw, drill and file.
- Connect the connector, secure the column with screws or bolts and nuts on the podium. Reassemble the door in the reverse order of disassembling it.
Video: how to install acoustics on a car
Features of connecting a capacitor
Connecting a capacitor is not difficult, it is only important to remember some features of connecting the power cable: • from the positive terminal of the battery it is connected to the positive contact of the capacitor, and from the positive terminal of the amplifier; • from the negative terminal ABK the cable is connected to the negative terminal of the capacitor, and from the capacitor - to the negative terminal of the amplifier.
The capacitor and amplifier must be parallel to each other. Good to know! The capacitor must be connected at a minimum distance from the amplifier (no more than 50 cm). The shorter this distance, the greater the effect of the capacitor. The capacitor must be charged before connecting. Otherwise, a short circuit may occur when connecting a discharged device. This rule must be followed impeccably for high-power capacitors. To charge the capacitor, you can use the resistor included with the device. If you don’t have one, then a 12 Volt light bulb will do just fine. The positive cable of the battery is connected directly to the battery, and the negative cable is connected using a resistor to the negative battery. After charging is complete, the negative wire is connected to the battery. The charging time for the device is indicated in the instructions or up to 12-13 Volts on the capacitor voltmeter. If the device is charged using a light bulb, then the extinguishing of the light bulb's spiral can be used as a guide to the end of charging.
Preparatory work: how to remove the trim
Before carrying out work, turn off the ignition and disconnect the negative cable from the battery. Then do this:
- Often there is no speaker panel, and the speakers are hidden behind a non-removable mesh (grid) of the door trim. In this case, remove the door handles that interfere with dismantling. If there are fastenings with self-tapping screws, remove the protective plugs and unscrew the screws. Then remove the trim.
Slowly rocking, remove the panel, releasing one fastener after another.
- If the standard speakers are covered with a separate decorative panel, carefully pick it up in the least visible place and pull it, roughly identifying the attachment points. Slowly rocking, remove the panel, releasing one fastener after another.
Remove door handles and other body parts that interfere with dismantling
- If fastening with plastic clips, hook the trim in a less visible place, being careful not to leave scratches on the surface. Remove it, releasing the latches sequentially around the perimeter of the door.
Switching between car radio and amplifier
Toggle switching of sources allows you to turn off the amplifier without compromising the sound. This method avoids having to constantly start the engine to recharge the battery. Thanks to it, the battery remains intact and music is played. The improved car audio connection diagram involves the use of 3 toggle switches (one 2-pin and two 6-pin). When you move the toggle switches to the lower position, sound comes from the amplifier; if you move the control to the upper position, the sound will come from the subwoofer.
* Bi-channel amplification To connect the power, you must select connecting cables with a large cross-section. The rating of the complete fuse for the battery must be equal to or greater than the sum of the ratings of all fuses of the amplifier and radio. For example: if the fuse of the radio is 15 A, and the amplifier is 20 A, then the battery fuse rating should be at least 40-45 A. The connection cable is usually blue. To turn on the device remotely, a standard cross-section wire is suitable. To make the task easier, you can purchase a ready-made set of cables. It differs for 2- and 4-channel amplifiers. When purchasing a set of connecting connection wires, additionally purchase 5 m of ground wire. In the standard kit, its length does not exceed 1 m. The radio and its amplifier are connected using RCA, shaped like a tulip bud. The amplifier has an “Input” connector for this plug (for the radio - “Real”, “Front”, etc.). So, the blue cable is connected to the “REM” pin, the black wire to the “GND”. The subwoofer can be connected to the amplifier using a bridge circuit. When choosing this option, the power of the channels is summed. Please note that most bridged amplifiers will not drive loads below 4 ohms. You cannot connect speakers and a subwoofer to the amplifier at the same time, as the equipment may burn out. A detailed diagram for connecting music to a car with an amplifier is indicated on the device itself or in the instructions. * Connecting a four-channel amplifier To prevent interference in the speaker, run the power and signal wires on opposite sides of the vehicle body. Don't forget about the common fuse. When connecting, it is necessary to take into account all three fuses: two amplifiers and one radio. * Connecting a radio The main mistake that car enthusiasts make when connecting a car radio is connecting its positive wire from the cigarette lighter. This leads to the fact that the power of the audio equipment is reduced (a flashing light appears on the radio and the sound quality is distorted). We strongly recommend connecting the radio using a high-quality battery cable using an additional fuse. Moreover, the closer the fuse is to the battery, the higher the protection of the power cable (not the battery, as many people mistakenly think). The most common wire is 8 Ga. The maximum permissible fuse for it is 50 A. The following rule applies: you can install a fuse of a lower rating, but you cannot install a larger one. It is necessary to firmly attach the wire to the body so that during vibration it, along with the fuse, does not move into the moving parts of the engine. The area where the fuse is located must be dry. Any ingress of moisture will cause the fuse to lose its performance. The radio is equipped with 2 positive wires. Power (yellow) is responsible for the device’s memory, and red is for controlling the radio. The negative (black) wire of the radio can be connected to the car body. However, it is better to attach it to the negative terminal of the battery to avoid interference or interference. The REM cable (blue) is essentially the control cable. It is responsible for automatically turning on the amplifier when the car radio is turned on. Particular difficulties arise with connecting speaker wires, since each color scheme corresponds to a specific speaker: • white ones are connected to the left front speaker; • gray—to the right front speaker; • green wires - to the left rear speaker; • purple wires - to the right rear speaker. Any pair of speaker wires contains a cable with a black stripe - this is the negative wire (the other is made in a monotonous color design). If the speaker wires are connected incorrectly, problems with sound distortion and interference will arise. If the color scheme is not followed, the balance adjustment will be incorrect. If the polarity is reversed, the rear speakers will work out of phase, which means a complete lack of bass. 2 car radio connection schemes are widely used. Their main difference is the different way they connect the positive wires. * Simplified car radio connection diagram It involves connecting the positive wires in series to each other and connecting them to the battery positive. These simple car audio connection diagrams are appropriate for low power consumption of the radio. With high power consumption, the battery can be completely discharged, so it is better to use the diagram below. * Diagram for connecting a car radio via a button. The main advantage of the diagram is manual control of the radio, thanks to which the device settings are not lost. The main thing is to decide on the location for the button. Sometimes car enthusiasts connect the car radio through the ignition switch, which is not entirely convenient, since the music is played only when the key is in the ignition. Helpful advice! When installing the radio, do not cut the wires. It’s better to use connectors and adapters, which will allow you to quickly replace the device with a new one in the future. * Practical implementation A simple diagram for connecting car audio: connecting the yellow wire to the 12 Volt power supply, and the red wire to the side lights. The relay coil must be connected to the ashtray light bulb connector. In this scheme, the radio automatically turns on when the side lights are turned on. Music is played without turning on the ignition, which saves the budget. Lower energy consumption of marker light bulbs can be achieved by replacing them with LED ones. A well-reproduced car audio connection diagram is the basis for ideal sound.
Internal acoustic screen
Pros:
- There is no need to damage the door card, which preserves the interior of the car;
- All elements of the internal screen are hidden under the casing, so there is no need to perform any decorative work for the speakers to not only sound beautiful, but also look decent;
- A powerful speaker will be held more securely, which will allow it to be “swinged” more strongly.
Minuses:
- The speaker will look like a standard speaker. If the emphasis is not only on the beauty of the music, but also on external changes, then it is worth using an external screen;
- The bass won't be as bouncy;
- In such a screen, the loudspeaker will be installed in only one position. Often standard equipment directs the sound wave from the speaker to the feet. This screen option will not allow you to change the tilt angle of the column.
Wiring issue
When installing wiring, there are several important rules to consider.
- If there are no specialized holes in the doors for pulling wires through, you will have to drill them yourself.
- The wire should not pass through metal and plastic without protection. For safety reasons, it is recommended to use spacer rings. They are fixed on the inside and prevent contact of the wiring with the casing.
- The cable to the head unit should be laid under the interior trim. The best option is to secure the cable from the speakers to the main wiring using electrical tape.
Why do we need diagrams?
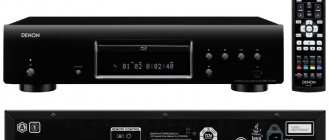
Studying the diagram of a vitek vt car radio
The schematic diagram of the control unit will help a beginner understand the purpose and operation of electronic components, and a professional will help clarify the rating and marking of a burnt radio component. The diagrams show the pinout of the connectors, without which it is simply impossible to carry out the installation correctly. Circuits are also needed when it is necessary to create an audio system in a car that would reproduce music of all genres equally well. Although this is an ideal, we must strive for this, and the scheme helps with this like nothing else.
Note. For example, to competently reproduce classical music, acoustics must produce good detail, transparency and natural sound not only of instruments, but also of a live voice. To reproduce natural electronic music, other tasks are set, such as high sound pressure and the presence of components with good output.
All of the above indicates that first you need to decide on the most preferred direction of music for the user, and only then build a scheme.
Sound settings
After connecting all the wires, you need to know how to set up music in the car. This procedure means setting the sound frequency on the amplifier separately for the speakers and subwoofer. In addition, sound sensitivity requires adjustment.
Conventionally, we will assume that the amplifier has sound filters of better quality compared to the radio. Therefore, we will carry out the setup procedure with the radio settings at “0”.
To properly install music in the car and configure it, you must follow the instructions:
- Install a sound filter for the subwoofer on the amplifier - LPF. Set the frequency response for the crossover in the range of 50-70 hertz. A “crossover” should be understood as an electronic board that includes several sound filters at different frequencies.
- Install the front sound filter - HPF. Crossover frequency is from 70 to 90 hertz.
- Set the sensitivity on the amplifier to o. Set the volume on the head unit to full volume. Next, gradually increase the sensitivity adjustment on the amplifier until sound distortion occurs. After this, reduce the sensitivity a little.
How to seal the hood and tune the fog lamp plugs of the new Kalina?
This completes the basic music setup in the car.
External acoustic screen
Pros:
- Since a significant part of the screen is located outside the door card, there are many more ideas for implementing different design solutions than in the previous version;
- Inside the screen, some of the sound waves are absorbed, and the desired sound is reflected, making the sound cleaner and the bass deeper;
- The column can be directed in any direction. Car audio enthusiasts often configure their speakers so that most of the sound waves are directed toward the top of the cabin.
Minuses:
- Since the speaker will be attached to the outside of the screen, the case must be as durable as possible;
- It will take time to create the design, as well as money to purchase additional material;
- If you don’t have the skills to install speakers, you can not only ruin the sound, but also break the speaker itself (in addition to the fact that it itself vibrates when the sound is loud, the vibrations intensify while driving, which is why the membrane can quickly tear);
- A certain angle of inclination is required.