Many of us love listening to music. But everyone prefers their own direction. Therefore, in order not to disturb others, we use headphones. In addition, they allow you to watch movies or play games without disturbing the peace of your household.
But, like any other device, headphones can fail. Of course, you can purchase a new model. However, you can try to revive the old ones. To do this, they should be properly disassembled so as not to be completely damaged. Let's look at the main ways to disassemble the most popular types of headphones. After all, having learned this information, you can “revive” any model.
How to disassemble the headphone plug
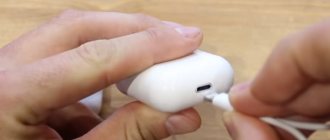
Before you start disassembling the plug, you need to make sure that the breakdown lies precisely in it. To do this, carefully remember the cable near the tip. Most often, the cause of a gadget malfunction is a bend in the wire at the point where it is attached to the plug. Extraneous sounds when listening to audio files will confirm the breakdown; it could be crackling or noise. This means that you need to disassemble the plug and eliminate the problem.
To do this, follow these steps:
- Take pliers or wire cutters and carefully disconnect the plug from the wire.
- The metal tip must be removed carefully so as not to damage the core and contacts. Do not break the soldered wires - their color will help you solder the wires in the desired sequence. If you are using a headset equipped with a microphone, removing the braid will reveal not three, but four wires.
- Separate the damaged cable and clean it. To solder the core, it is enough to strip five millimeters of the cable. To protect the wires of the headphones, they are coated with a special varnish. It will interfere with soldering, so the varnish must be removed. This can be done by carefully cleaning the wires or burning them with a lighter.
- Make a new braid for the plug. You can make it from the cap of a regular ballpoint pen. Place heat shrink tubing onto the cable. It will protect the cable from repeated damage. Solder the wires to the corresponding contacts on the plug. The wires are painted in different colors, so it will be easy to find the ones you need.
To check the functionality of the gadget, use a tester. If the device is not at hand, turn on any audio file. If everything works properly and you do not hear any extraneous noise, heat the cap by first lubricating the heat-shrink tube with epoxy resin.
Reasons for JBL headset failure
In fact, there may not be so many breakdowns in wireless headphones. Especially those when you need to disassemble them. If, of course, we are talking about those that we can fix at home with simple tools: a soldering iron, a screwdriver, a knife. The most common problem with headphones (and not only wireless ones) is a broken wire. This happens even with TWS headphones, which have no wires at all, except for conducting contact inside the case.
Another common problem is an “outdated” battery. Especially if you are unlucky enough to purchase counterfeit products. In which the battery inside the case can swell after 6 months of active use of the headphones.
How to disassemble vacuum headphones
Vacuum headphones are one of the most popular. They are small, lightweight, and allow you to enjoy music anywhere. They most often break in the place where the cable connects to the device’s speaker. Your algorithm should look like this:
- Find the seam on the bowl body. Use a thin object, such as a knife, to pry it open. To completely separate the bowl, gently press it with pliers.
- When the casing slides apart, the inside of the device will be revealed to you. The speaker and cables are located there. Take a soldering iron and disconnect the damaged wires. Before doing this, mark the insulation colors. A felt-tip pen or marker will help you avoid getting tangled in the veins.
- Cut off the damaged section from the main wire. Peel the working core from the braid and solder it to the contacts located on the speaker. Don't forget about color matching.
To check the correctness of the work, connect the headphones to an external device and turn on the music. If they work properly, connect the halves of the bowl and carefully glue them together. You can repair your Bluetooth headset in the same way.
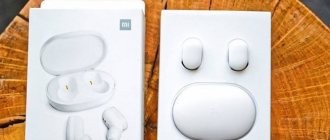
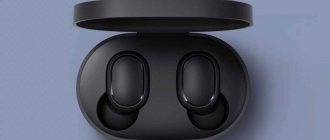
How wireless TWS headphones work: autopsy results of Xiaomi Redmi AirDots
Content
- Background
- Disassembly of TWS headphones Xiaomi Redmi AirDots
- Conclusion
Background
This article appeared thanks to a sad event: one of the Xiaomi Redmi AirDots TWS headphones (left) was not only dropped, but also crushed! This is nothing, nothing like this happens in life...
But every cloud has a silver lining: but there is an opportunity to thoroughly study the internal structure of TWS (True Wireless Stereo) headphones, which will be presented in the following story.
This is what the Xiaomi Redmi AirDots headphones (aka Mi True Wireless Earbuds Basic) looked like during life (without a case):
The image is from the headphone card on the Yandex.Market price comparison service .
Looking ahead a little, I will say that the part of the headphones that is facing the reader in the picture is not just a back cover, but a cover combined with a button (it will also be disassembled).
Disassembly of TWS headphones Xiaomi Redmi AirDots
Now let's examine what the earphone turned into after the event described above.
Here and below, all pictures are clickable.
The same thing, but from a different perspective:
Here you can see the motherboard, battery and the part of the case that holds the headphone speaker.
An examination of the body halves showed that they were connected without glue, only with latches. So, with enough care, they can be separated without damage and without extreme effort.
The markings on the battery are not very clear; but you can read that the capacity is 0.16 Watt*hours (Wh), which approximately corresponds (in mA*h) to the officially declared 40 mA*h. This is not much, but the dimensions are extremely limited, you won’t run away!
Now we study the main part of the headphones - the motherboard.
This is how it looks with the side facing the back cover (i.e. outward from the user):
In the center there is a single mechanical button, with which the headphone is controlled. If you press the pin in the center of the button, you will hear a characteristic and clear click when the button is activated. The button press stroke is small, approximately 0.5 mm.
Many other TWS headphones use touch controls, but mechanical ones also have their advantage: there are no false positives.
There are two LEDs above the button. The white-transparent LED is actually red; and yellow is actually white.
To the right of the button is a 40 MHz crystal oscillator.
The most mysterious part on this side of the board is the rectangular black and white piece at the bottom of the board.
It is also voluminous (has a noticeable height), let’s look at this detail from the side:
I can assume that this is a 3D antenna for the Bluetooth channel. But I am no more than 10% confident in my assumption; There are simply no other assumptions at all.
Now let's look at the front side of the motherboard:
The central part of the entire device is the RTL8763BFR chip (Realtek). The chip supports Bluetooth 5.0; The AptX protocol is not supported (many people are interested in it, but it is not and cannot be here). A detailed description of the chip is here (PDF, English)
In addition to all other wiring, the board has two miniature winding elements (chokes). One of them (with a yellow dot) is located to the right of the main chip, and the second is located under the yellow wire.
The microphone is located behind matte plastic at the top of the board.
Now let's examine the remaining details of the structure.
Let's remove the silicone ear pad and look at the half of the case with the speaker and charging contacts:
To protect against dirt, a very fine mesh is installed in front of the speaker. The dirt won't go away!
Now let's completely break down the speaker and look at the voice coil and magnetic system.
Here is the voice coil with the emitter:
According to official specifications, the diameter of the sound emitter is 7.2 mm.
And here is the magnetic system:
A small hole is noticeable in the bottom of the magnetic system, probably made to improve bass reproduction.
The magnetic system is small but strong. It stays securely on the wall of the refrigerator.
Now let's look at the back side of the housing half with the contact pads:
Here you can see the board itself with contact pads and another mysterious detail (since it is not connected to anything): two shiny stripes on the sides of the board with contacts. These are miniature magnets that help the earphone stay in the case and thereby prevent unexpected interruptions in the charging process.
And finally, let’s disassemble the other half of the case into its component parts, on which the mechanical button is attached:
On the right here is the actual second half of the case, and on the left is the button that is inserted into this half of the case and held in place by latches.
At the bottom of the case there is a noticeable thin hole through which light from the LEDs passes.
Uf-f-f-f... That's all for the mechanical part. What remains is the philosophical part (conclusion).
Conclusion
First, a few words about the TWS headphones that accidentally became the heroes of the article - Xiaomi Redmi AirDots.
These are one of the most inexpensive TWS headphones on the market.
They can be classified as “strong mid-rangers” with a good price-quality ratio. To study public opinion about these headphones, it is useful to read reviews from owners using the following links to Yandex.Market.
Such relatively inexpensive headphones are good if you don’t yet know for sure whether you need TWS headphones or not.
If you like them, then you can upgrade to more expensive models.
TWS headphones are “in trend” now, but they also have their own specific problems.
As an example, we can note, for example, the low battery life compared to “regular” Bluetooth headphones; as well as an increased likelihood of losing one of the headphones. In addition, some users find them simply inconvenient (taste is a delicate matter).
The average price of these headphones in Russian stores as of the date of this article is about 1,700 rubles, but on the Yandex.Market service you can also find points of sale with a lower price.
In addition, there is a modification of them, Xiaomi Redmi AirDots S, which probably differs only in software (i.e. firmware). The price is about the same; You can check it on Yandex.Market.
You can try to find it on Chinese sites, for example, from this seller on Aliexpress.
Another option is to use the search on Aliexpress; but there are nuances here.
Firstly, in Russian stores the prices for these headphones are quite competitive with Chinese ones; secondly, it is highly advisable to choose headphones with a global version (and not a Chinese one); and thirdly, we must beware of fakes.
For this, let me thank everyone for your attention!
Procedure for disassembling full-size headphones
Full-size headphones are distinguished by large dimensions of the cups, in which the speakers and some of the wires are hidden. For reliable fixation, manufacturers equip them with special latches or miniature bolts. Although they prevent the bowls from opening, the bolts can seriously complicate disassembly. After all, if you miss at least one fixing element, it will break during disassembly and the gadget will be damaged.
Reference. It is worth considering that manufacturers use different fastening methods. Therefore, the disassembly method will depend on the specific model.
For a clear example, let’s look at the repair of models from several popular companies.
Sennheiser
To disassemble a product from this manufacturer, you first need to remove the ear pads. Typically, the pads are secured with latches that can be easily removed using a plastic card.
- Next, you need to unscrew the four bolts that were hidden under the ear pad.
- The bowl halves are not glued together, so after you unscrew the bolts, they will easily fall apart into two parts.
- On the front half there is a speaker to which you will have to solder new wires.
Steelseries Siberia
This manufacturer glues the soft pad to the bowls. To disconnect the ear pad, you will have to use a knife or flat-head screwdriver.
Depending on the specific model, the bowls can be fastened together using small bolts or latches.
If you come across the second option, you cannot do without mechanical damage to the latches. In this case, in order to connect the bowls back together, you will have to glue them together.
Reference. It is worth keeping in mind that you will not be able to disassemble the earphone a second time.
For Philips, Razer, Audio-Technica headphones, the soft pads are not fixed in anything, but are simply put on the earcups. Therefore, repairing them is much easier.
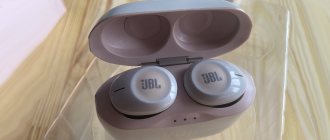
JBL Tune Disassembly Instructions
JBL has several types of headphones and headsets, and therefore the body structure is different. To disassemble the JBL Tune line of wireless headphones, you will need a little patience and a thin Phillips screwdriver. Over-ear headphones of this model often have soft ear pads that can be easily removed without any unnecessary movements.
But before you pull them, you need to make sure that they were not placed on tape. To do this, try rotating one of the ear pads.
Remove the ear pads on JBL headphones
If it spins, try pulling on one side of the soft material. On the inside, they are only clamped slightly by a plastic case, which in turn is held on by screws. Once the ear pads are removed, unscrew the few screws that hold the plastic housing cover in place.
This may be useful: Wireless headphones F9 instructions in Russian.
Is it worth doing the repairs yourself?
With so many instructions on the Internet, many people ask how to repair JBL headphones themselves. In practice, in 99% of cases this can be done on your own. In this case, the most common problems are related to damage to the wires/plug, damage to the speaker, failure of the regulator, or problems with the power supply (for wireless devices).
If you know how to disassemble JBL headphones, all problems can be diagnosed. At the same time, eliminating the breakdown will also not be difficult if we are talking about a broken wire or the need to replace the battery. This way you can save a lot of money, because the cost of repairs reaches 20-30 dollars. It depends on the type of fault and the need to replace any tools.
Please note that disassembling JBL headphones is easier than repairing them. If you do not have experience in soldering work and the necessary tools, it is better not to risk an expensive product and immediately turn to professionals. If you have confidence in your abilities, you can try to solve the problem yourself.
In the comments, share your experience on how to disassemble JBL headphones, what difficulties arose, and what tips you need to follow to achieve results.
Taking the earphone apart
Now we try to disconnect, if it doesn’t want to, then crunch it a little more and try to disconnect again)
It is better to do this with a scalpel or an all-metal knife; a paper knife will not work - it can fly apart, which is quite dangerous .
During the separation process, it is best to act as shown in the photo - hold on to the outlet of the bowl and use a knife, resting on your fingers, to push out the front wall. I strongly advise you not to pull the sound guide with your fingers (the white thing sticking out of the front wall on which the ear pad is placed) it is quite easy to break it off, and it can be broken off so that you can’t restore it later.
Well, then you can perform the mod for which these ears were disassembled
. A simple but interesting modification: vibration damping of in-ear headphones
Standard Chinese headphones are a pair of wires with two speakers on one end and a plug on the other. The headsets have a microphone with a control panel, where there are buttons for switching tracks, receiving calls and a volume rocker. To disassemble headphones for repair, upgrading or cleaning them, you need a couple of minutes, careful and precise hand movements, and simple tools.
Content
Microphone problems
As a rule, electret capsule microphones with amplifiers are installed in headsets. This means that during repairs you need to carefully monitor the polarity, you cannot clean their holes mechanically and do not allow a long-term increase in temperature. The latter means that you need to solder quickly, but at the same time very carefully.
To ensure the highest quality soldering process, use organic flux. And you can check whether the microphone is working without special equipment if you replace it with another one or connect it to another device that probably works.
Otherwise, you will need an oscilloscope, an active working speaker system, or a good knowledge of electrophysics to assemble an inverting amplifier circuit yourself.
Volume control problems
How to fix headphones if you have problems with the volume control in the form of loss of sound or crackling? In this case, you can use graphite lubricant to apply it to the resistive layer to restore contact. After this, the headset should function without problems.
If after lubrication the headset continues to work poorly, then the regulator needs to be replaced with a new one.
Is it possible to replace an earphone if I lose it?
The idea of replacing one earphone arises not only in case of loss, but also in case of breakdown. And this is logical, why buy new headphones, if we have a case and one earphone, we can buy one earphone and everything will be fine. But it is not so.
I spent several hours searching the Internet for information on this topic, and came to the conclusion that you can only buy and replace one earphone in the case of AirPods headphones. You can buy one headphone at a service center, store, or even some used option. After which we put this earphone in the case with the second one, reset the settings and they start working in pairs. This is all tested and really works.
But you need to understand that even one earphone is quite expensive. And if your headphones are no longer new, they have a tired battery, then perhaps it makes sense to buy new headphones right away, and not just change the right or left. In the case of buying a used headphone, these nuances are even greater, I hope you understand this.
I have not found information anywhere on replacing one headphone on the same Samsung Galaxy Buds, Redmi AirDots, some top models from Xiaomi, JBL, etc. If you have any useful information on this topic, please share it in the comments .
Main symptoms of a malfunction, identification of possible faulty elements
In order to determine the specific location of the fault, you must have experience with a multimeter. To repair headphones, a simple digital multimeter is enough.
Possible signs of malfunction:
1. There is no sound from one dynamic driver.
The first step is to ring the chain. To do this, you need to use a multimeter and a headphone circuit. Typical circuit for headphones without a microphone with a three-pin connector.
In the case of coaxial conductors, the circuit looks like:
Thus, in order to ring the left channel, you should connect the multimeter probes (in resistance measurement mode at a limit of 200 Ohms) to the outermost contacts of the connector. To control the right channel - to the first and second contacts from the connector body.
Depending on the type of dynamic emitters, the resistance can be from units to tens and hundreds of ohms. Zero resistance indicates a short circuit in the circuit, infinite resistance indicates an open circuit or a speaker malfunction. To obtain a more precise cause of the malfunction, you need to move the cord at the junction with the connector, emitters, splitter and regulator.
At the junctions of conductors to these headphone elements, conductor breakage (broken) most often occurs. If contact appears when the cord is touched, the speakers are most likely working. This way you can determine the exact location of the wiring break.
2. The emitters work, but the volume is lower and mono sound comes from the headphones.
The reason for this is a break in the common wire. In this case, the headphones will not ring in any of the options presented in Fig. 5. They will ring when the multimeter probes are connected between the outer and middle contacts of the connector.
3. Both dynamic drivers are not working.
In this case, there is usually a double fault: both emitters do not work, two conductors are broken, or a conductor plus a non-working emitter. This malfunction occurs when there is a strong mechanical impact on the headphone cord, or as a result of prolonged use with one inoperative channel.
4. Crackling sound when adjusting the volume control.
The malfunction is the result of wear on the variable resistor. It should be changed. You can remove the crackling noise for a while by rubbing the working area of the resistor with a pencil lead.
5. The microphone does not work.
The microphone is usually connected to pin 4 of the connector.
In this case, it is necessary to ring 1 and 4 (outer) contacts of the connector. If the headphones use a condenser type microphone, it may not ring. An oscilloscope is required to monitor its serviceability.
6. The sound in one of the speakers became quieter.
The sound channel of the emitter may be clogged. You can blow it out using a regular bicycle pump (in no case with your own breath).
General rules for opening the casing of different types of headphones (and caution)
Broken headphones, where one speaker has failed or the cable near it is damaged, can be repaired. To assess the situation and possible repairs, you need to open the headphones. On the one hand, they can be repaired. But without the appropriate experience, knowledge, manual dexterity and due to carelessness, the latch mechanism on plugs or inserts easily breaks, cables break, and solder joints are damaged. Working with a metal tool leaves scratches and dents on the plastic case.
We will look at the basic rules and give general recommendations for disassembling headphones: on-ear, in-ear, vacuum, in-ear.
You don't need any special tools to open the headphones. For most models, a Phillips screwdriver of the appropriate size and profile, a thin sharp object like a spatula for disassembling a phone (on Aliexpress costs a couple of tens of rubles), a blade from a stationery knife, or a scalpel is enough.