Quite often, a break in the wire leading to the plug occurs on the headset - according to experts, this is the most common defect that occurs due to frequent kinks and various mechanical damage.
Inside the cable there are several very thin and delicate wires that can easily break from strong tension or jerking. Is it possible to repair a headphone plug on your own, and what is needed for this?
Step-by-step assembly of headphones
To assemble headphones for your computer or mobile gadget yourself, you first need to disassemble the old devices and select the required parts
You must act with caution so as not to damage the elements of interest. After disassembly, you need to check the parts for functionality and only then begin assembling new devices
Dismantling an old gadget
When disassembling large headphones, you need to carefully inspect them for hidden latches or screws, most of which are hidden under the soft lining. The ear pads are attached with glue, snaps, or simply placed on the rim of the cup.
Subsequently, the necessary parts are extracted as follows.
- If the user needs speakers, the cable is unsoldered from them.
- If a wire is needed, then it is better to cut it, stepping back a few centimeters from the entrance to the housing and from the plug. This is necessary because in such places the cable most often becomes bent, which means its integrity is compromised.
- The required plug is disassembled and the wire is unsoldered. If it is non-separable, then the casing is cut with a knife, and a new one is assembled from a cap from a ballpoint pen (or a cover from a syringe needle).
Checking the functionality of parts
Before assembling the headphones, all selected parts are tested, for which you need to use a multimeter set to sound test mode. First, the cable is checked to ensure its integrity. The contacts on the plug are tested to make sure they are closed. If the dielectric ring is deformed, the future device will not work. The speakers are checked by placing the black and red probes of the multimeter against the contacts. If the device makes a beep, the parts are working properly.
Assembling new headphones
New parts are assembled in the following order. First you need to solder the wires to the plug. A ground wire is attached to the long contact on its back, and the speaker wires are soldered to the left and right contacts. If a microphone will be used, the cable must be four-wire. In this case, the last wire is attached to one more contact (the plug in this case should have four contact rings).
Next, you need to ring the wires and make sure that they are intact. All that remains is to protect the cable from permanent bending at the junction with the plug. To do this, remove the cap from the syringe needle and make a hole in it along the diameter of the cable. After this, the cap is put on the back of the plug with the wires and filled with glue, while making sure that the bare wires do not touch.
Next, the conductors on the other side of the cable need to be inserted into the holes of the headphones, a safety knot must be made to avoid careless tearing out of the wire, the insulation must be removed, tinned and soldered to the speaker contacts. Then you need to check the functionality of the design
To do this, the headphone plug is connected to a mobile device or PC on which a song or video with sound is played. If the speakers reproduce an audio signal, you need to disconnect the plug from the sound source and reassemble the headphones. If everything is done correctly and efficient components are selected, a self-assembled device will be as reliable as high-quality factory headphones.
How to solder a wire without a soldering iron?
There are several ways to connect wires without soldering:
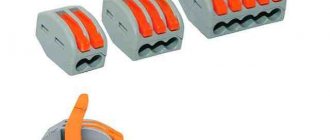
- Thoroughly clean and degrease the ends of the connected wires and twist them. Apply a few drops of Kontaktol glue to it and let it dry. Insulate the connection point.
- Perform twisting, having previously prepared the connection points, connect the wires to a powerful power supply (5-6 volts, 4-5 amperes). Connect a massive conductor, for example a nail, to the second contact. Touch the nail to the twist. An arc is formed that reliably welds the wires. Insulate the connection point.
As a result of constant bending of the wire near the 3.5″ Jack plug, noise may appear in the headphones when the connection of the plug to the wire is moved, or even the sound on one of the headphones will disappear completely. Sometimes the common wire breaks, then the sound is distorted: high and mid frequencies disappear almost completely. This happens due to the fact that the right and left amplifiers of the phone are turned on in antiphase and their output signals almost completely cancel each other out. It also happens that the stereo effect simply disappears. Or there is no sound in the ears, but the microphone works, or vice versa. And sometimes, due to a break in the microphone wire, the control buttons on the headset cord stop working along with the microphone.
If you have such symptoms, we advise you to find a diagram of your plug and re-solder the connector, especially since using these instructions you can do this yourself even without much soldering experience.
So, a TRS type connector is intended for connecting devices, for example, headphones and a player, with each other. The device consists of a plug (plug) and a socket (jack). Often this connector simply breaks at the point where the wires enter the connector itself. Because of this, either the right or left earphone or both at once may not work for you. Moreover, sometimes extraneous noise appears due to wire breaks in the jack 3.5 connector itself.
In general, it is worth noting that the abbreviation TRS itself comes from the English words: tip (tip), ring (ring) and sleeve (sleeve). Among the Russian-speaking population, the concept has been established that “jacks” are the plug itself, so if you use the original name of the TRS connector in everyday life, many will not understand what we are talking about.
Looking for damage
The main reason why wireless headphones malfunction is still damage to the connecting cable.
Therefore, if there are no visible traces of impacts (chips, scratches) on the housing of the headset, control unit or battery, then the first thing that needs to be done is to carry out a careful, detailed inspection of the cord.
It is possible that there are fractures, bends or breaks in the places where it connects to the headphones, control unit or battery case.
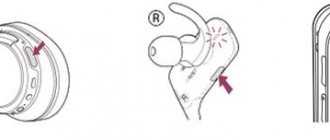
To do this, turn on the charged headphones to play a music track, carefully probe and bend the cable along its entire length.
If the cord is deformed at the site of the supposed break, the sound in one or two headphones will be interrupted or, conversely, appear.
We use pliers =”en-us”>
Tricks with a knife will not be enough, and to disassemble the earphone you will have to turn to pliers for help:
If you use standard pliers, then there will be nicks on the earphone, so it is advisable to use pliers with flat noses without teeth. But even with these, you can damage the earphone, for example, in my case, the coating came off a little from the earcups - some kind of varnish, the existence of which I didn’t even suspect? so for greater accuracy it is better to press through a cloth.
Why put so much pressure at all?=”en-us”>
We’ve figured out how to push, now let’s look at the question of why to push. The front wall is glued to the thicket with something like Chinese super glue. This glue is very strong, but also fragile. When squeezing with pliers, a slight cracking sound will be heard. If you can hear it, then you shouldn’t press harder, otherwise the earphone itself will crunch. In this manner, gently squeeze in a circle along the joint.
How to do without a soldering iron when repairing headphones
It often happens that a person does not have a soldering iron or socket at hand, and the headphone plug does not work. In this case, we can carry out resoldering in several non-standard, but acceptable ways.
The first method is to use it to glue wires to the mini-jack contacts. Everything is done simply and neatly. The reliability of such fastening is of course poor, and the electrical resistance of the glue can be tenths of an ohm. If the headphone impedance is 4 -16 ohms, the glue may affect the sound volume. The good thing is that the drying time for conductive glue is usually 10-15 minutes.
The second method is to heat a nail or piece of copper wire in a candle flame. This is a way for romantics: twilight, plug, headphones and you. In this case, it is better to use scented candles. But seriously, you can solder a plug using a fire and coals. The main thing is to be good and not to forget.
The third way is to make a gas soldering iron from a lighter with your own hands. You need to take a piece of single-core copper wire and attach it to the lighter so that part of the wire is in the flame. Heat is transferred over a certain distance through a copper wire, as can be seen from the photo.
If you use this method, pay special attention to the place where the wire adheres to the lighter body. A hole may form there due to heating. Be careful! For more details on how to make such a mini soldering iron from a lighter, watch the video
Be careful! For more details on how to make such a mini soldering iron from a lighter, watch the video.
Master Pike.
How to eliminate rustling noise in speakers when adjusting the volume
Budget models of speakers for computers and laptops use adjustable potentiometers. Essentially, these are resistors in which the resistance is adjusted. A special slider, moving along the conductive part of such a potentiometer, physically changes the value of its electrical resistance. In new speakers, of course, this change occurs very smoothly and quietly, but over time the lubricant dries out, resulting in rustling and microscopic sparking, which is transmitted in an amplified form through the UMZCH to the speakers. The problem can be solved either by lubricating the potentiometer or by replacing it.
Additionally about the colors of wires in headphones
How to properly solder wires to a headphone plug is out of the question if you are not familiar with the colors of wires in headphones and their meaning (for example, do you know what the green wire is responsible for?)
A different number of wires may come to the headphone plug:
- 2 wires (for mono headphones);
- 3 wires (for mono or stereo headphones depending on the connection diagram);
- 4 wires (for stereo headphones);
- 5 or 6 wires (for stereo headset with microphone).
2 wires
I don’t think anyone needs to explain how to repair a headphone plug if they only have two wires. It is basically impossible to confuse anything here.
3 wires
There are always two wires coming from each ear - plus and minus, but sometimes the manufacturer combines the minuses of both speakers together and it turns out that only three wires come to the plug. To make it clearer, here is a soldering diagram for a headphone plug:
This picture explains even more clearly where to solder the wires to the headphone plug:
Most often, the wires are coated with varnish of different colors:
- red
– right channel; - green, blue or white
wire – left channel; - colorless varnish
– common wire (ground).
Of course, there are no strict standards and colors may vary. Here's what it looks like in real life:
Let's see how to properly solder a wire to the headphones (3 wires):
4 wires
If your plug has 4 wires, then there may be options.
Option one:
you have ordinary headphones without a microphone and without buttons (the plug has only 3 contacts). Then these four wires are simply two pairs of wires from each of the speakers. Their disadvantages are the same color (copper), and their advantages are different (usually blue and red or green and red):
In this case, common wires (those of the same color) are connected together and soldered to the common contact of the plug. You should immediately understand how to solder 4 wires from the headphones to the plug from the figure:
Here's how to solder headphones to such a jack:
Option two:
you have a full-fledged headset (i.e. headphones with a microphone) and the plug has 4 contacts. Then, most likely, these four wires are one wire from each speaker, one signal wire from the microphone, and one common wire for all.
Schematically, this can be indicated as follows:
And here's how to make a plug on the headphones (correct soldering of headphones when there are 4 wires):
Most often, a microphone wire only looks like one wire, but in reality it is two wires: a thin wire in white PVC insulation completely wrapped in enameled copper wire (in colorless enamel). Something like this: And in this case it would be more correct to say that the headphones have not 4 wires, but all 5.
5, 6 or more wires
Depending on the implementation option, there may be 5 or more wires inside the cable from the headset. Up to 10! Be that as it may, they always try to make the signal wire from the microphone in its own “ground” braid.
In short, if you gutted your cable and it looks something like this:
or even like this:
then no one will immediately tell you how to properly solder the plug to such headphones. There can only be one piece of advice here: take a tester and test all the wires until you determine where the right ear is and where the left is. The remaining wires are to the microphone.
Determine by color which wires may be common and connect them all together. Solder all signal signals according to the connector pinout (see pictures above).
Then test the headphones and microphone. If something is wrong, look for the reason. No one will really tell you anything here; proceed using the scientific dildo method.
Various headphone breakdowns are a very common problem, especially if this device is used actively and not for listening to music at home. Most often, in-ear headphones break - earbuds and vacuum plugs, since they are usually used outside the home - for example, during active sports.
Typically, the likelihood of failure is influenced by the following factors:
- factory defects are the most common problem with cheap headphones;
- improper use - connecting the headphones to the wrong sound source can cause the speaker to break, and if you carry the sound source in your jeans or trousers pocket, the plug will be subject to constant pressure and sooner or later it will break.
If the headphones stop working, they may need to be taken apart. Of course, this is not always possible - for example, the most difficult thing to disassemble are earbuds and plugs that have a monolithic body. In addition, after disassembling these headphones, you may need new replacement parts.
In addition to the headphone body itself, you can disassemble the plug that connects to the sound source. But before you begin any operation, you should make sure that it is even necessary by diagnosing the breakdown.
Electrical methods for determining headset wiring
Unfortunately, it’s not always possible to easily open the control panel and earphone just like that. In such cases, you should use a multimeter.
We set the mode as in the picture and poke one probe into the yellow wire, the second probe into the rest. The vast majority of headphones have an impedance of either 16 or 32 ohms. These are standards. In practice, exactly 16 or 32 is rare, usually within +- 3 Ohms, but there are also 10, 24, and 54 Ohms.
The main thing is that the speakers have the same resistance among themselves. So let's say the speakers have a resistance of 32 ohms each. If we grab the ground and one of the channels with the probes of the multimeter, it will show us 32 Ohms. But if one probe is for one channel, and the second for another channel, then it will show the total resistance (in our case 64 ohms), i.e. The speakers in this case are connected in series. If you could not find both speakers, then the wire is broken somewhere further.
Don't have a multimeter? No problem