Before we tell you about the largest subwoofer in the world, I would like to tell you a little about the speaker system as a whole. It is difficult to imagine the current generation without music - and we do not need an even, calm flow of melody, we need a powerful, rich bass - only it can satisfy the needs of the most demanding music lover.
So what is a subwoofer? This is a low-frequency speaker whose sound diverges many meters from the sound source. It's hard to imagine a decent speaker system without a subwoofer. By adding loud and clear bass, it not only improves the sound quality of musical compositions, but also makes the melody more voluminous and realistic. Moreover, without a subwoofer, any film, even the most special-effects-rich one, will be bland and boring.
By the way, did you know that the eardrum can withstand a maximum sound of 140 dB? In any case, this is exactly the value that experts call, let's take their word for it and get acquainted with an installation that is fraught with a certain danger to human health - the largest subwoofer in the world.
How to check the authenticity of a Samsung phone?
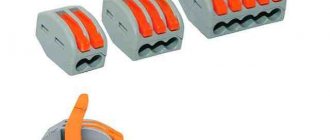
Each company device has a proprietary menu that is launched using a secret code.
- Open the dialer app
- Enter code *#7353#
- A menu like this should appear on the screen, with various options for testing phone components.
- If you have it, then the device is original.
Interesting materials:
How to set up a digital tuner for 20 channels? How to set up a digital tuner? How to set up a digital antenna on an lg tv? How to set up a digital antenna? How to set up a digital set-top box without a remote control? How to set up a DEXP HD 2991p digital set-top box? How to set up a digital set-top box for an old TV? How to set up a digital set-top box for your TV? How to set up a lumax digital set-top box? How to tune digital channels through a regular antenna?
Headband repair for Samsung Level On Pro headphones
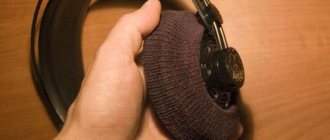
By chance, I received Samsung Level On Pro EO PN920 headphones with Bluetooth.
The headphones pleased me for exactly 5 months, after which it seemed to me that they somehow began to not stay on my head very well. A quick inspection showed that there were cracks along the headband, a lot of cracks, I would even say catastrophically many. The operation was exclusively at home and very careful, I did not carry the headphones around the city, and one might say I blew the dust off them, since I treat any equipment carefully. Disclamer: I will not touch on the issue of sound quality, whether they are worth repairing or not, or whether you had to go and buy new ones from the right vendor who understands a lot about headphones. I decided to fix it, and to do it in such a way that the end result looked acceptable and, if possible, retained the folding functionality. I’ll also note that at the beginning of the renovation I didn’t plan an article, so I didn’t take many photographs of the renovation process itself, but just believe me, I’m sure everyone can handle it. We disassemble the headphones, unscrew 2 small screws from the inside of the headband with a Torx T5 screwdriver on each side, remove the pads, then carefully pry them off with a thin screwdriver and separate the soft inner pad with “eco leather”. The photo below shows the quality of young leatherette leather (by the way, this is how I got them):
We move the remaining U-shaped pad in the direction from the ear pad; it is advisable to use your hands or the rubberized part of a screwdriver for this, because You can damage this delicate plastic. We also remove the stoppers of each earphone; they simply pull out towards you.
After this, we use a thin screwdriver to press out the hinge pin of the earphone itself and here is the headband in our hands:
Actually the problem itself:
At this point I went Googling, it became clear that I definitely shouldn't be alone in this problem. Indeed, the problem with cracking of the headband is quite widespread, many people encounter this, even breaking it into pieces, and well-known ad sites even offer repairs for this particular model. I found this repair option on the Internet. I definitely won’t do that. Finally, I went to AliExpress, hoping to find a new headband, but unfortunately they only offer ear pads, and most people are in complete order with them. So we will fix it on our own.
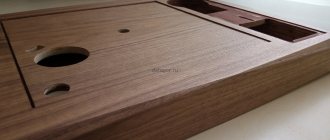
It became clear that the headband needed to be strengthened somehow. I went to the local market to a women's jewelry store, bought two women's iron headbands cheaply, one turned out to be 5mm wide, the other 7mm, laid out all the spare parts on the table:
They fit well in shape, and after 20 minutes of editing by hand, they fit almost perfectly. Trying on:
Here it must be said that there are two repair options: either strengthen the headband from the outside, which seemed more correct to me, but will require covering it with leather, or glue an iron rim inside, which will save you from working with leather, but will not save you from breaking off the very ends of the headband where the hinges are. , on which the headphones themselves are held. Here you can see that the cracks have already started behind the hinges, and the iron rim can no longer be glued there, since the headphone stopper will get in the way.
We measure the headband, cut off the excess, apply it to the headband
We wrap it with tape and partially assemble the headphones to check the clamping force of the resulting structure. If everything is satisfactory (and I was satisfied with the 7mm bezel), then we disassemble it back, press the bezel and use an awl to draw lines along the contour of the bezel in order to accurately fit it to its seat and subsequently accurately align the two parts. The headband, either one or the other, was not of the ideal shape, so it stood on the headband with some slant, but only in this position was it pressed along the entire plane to the headband
I decided to glue the rim with 88 glue, since firstly it does not tan after hardening, and secondly it is very durable and easy to buy. In order for the glue to have better adhesion, the gluing areas need to be sanded and made rough (yes, the first time I didn’t sand it and had to clean all the glue). I used regular sandpaper for the rim and needle files for the headband. We glue the rim in accordance with the instructions for the glue, with obligatory degreasing and curing. Next, you need to press the bezel along the entire length of the headband, here I spent a long time racking my brains on how to do this without damaging the already rather fragile headband. A pliers clamp like this turned out to be a good option
You need to adjust the pliers so that they press well without breaking the plastic. After connecting the headband and the headband, you need to use this clamp along the entire length of the headband, the headband is pressed, squeezing out the glue, we wait 30-60 seconds and move to the next section, and after that it will no longer be torn off. After pressing along the entire length, I attached the pliers to both ends of the resulting structure and left it like that until the glue dried completely. Instead of pliers, I think you can pick up small clamps.
At this point, I finally decided to glue the old cracks, I thought for a long time about what, but I couldn’t come up with an idea; we glue one crack and a new one immediately forms in another place. I read a series of articles about adhesives and plastics from the respected steanlab and realized that choosing the right glue, for me, who is infinitely far from chemistry, would not be easy anyway, but it’s better not to come close to dichloroethane at all. Therefore, without further ado, I went over all the cracks with ordinary cyanoacrylate and that’s it. But how to protect yourself from future cracks? I looked at the glue gun and thought that this was quite an option as a binding material. To prevent newly formed cracks from starting to spread along their entire length, you need to fill the remaining space on both sides of the rim with regular hot-melt adhesive from a hot-melt gun.
After applying a 1.5 cm spot of glue, I press it and smooth it with glossy paper - a backing for various kinds of stickers, it does not stick to the hot melt glue.
Next, I needed leather, I ordered a piece of leather from Aliexpress as soon as I decided to repair the headband, and after 2 weeks I already had a piece of leather about 30x30 cm. I took the thinnest leather I could find - 0.3-0.5 mm, since it stretches better and is easier to mold. I must say that I had not worked with leather before and this was my first experience. In fact, I bought the leather at random. After the headphones were ready, I learned that in Moscow you can buy leather of much better quality and at a lower price. Therefore, I don’t see much point in ordering blindly on Aliexpress; it’s easier to come to the store and touch all the options with your hands and choose the most suitable one. Life hack - a small piece of glove leather can be bought at all kinds of “shoe repair”, “clothing repair”, etc. My leather is more suitable for the definition of salon leather - for upholstering car interiors.
I started covering with leather from the soft lower part. We remove dermatin using improvised means.
It is glued on with some not very good rubber glue and comes off easily. We straighten the peeled piece of leatherette, smooth it out and glue it with transparent tape to the skin on the back side and cut it out according to the resulting template with a small margin of 1-2mm, I did not follow all the cutouts of the template exactly, this is useless, the edges will be hidden behind the overlays. To prevent the skin from leaving folds, you need to start gluing on one side in parallel, stretching the skin along the edge, then move to the other side and also glue under tension. Glue only the same bead that was glued to the original leatherette. Leather does not stick to foam rubber. This is the glue I used:
Why this glue? It has several very important parameters for this particular work. It does not leave whitish streaks, hardens quite quickly, has a time reserve of 5-10 seconds before joining the surfaces, and after hardening it is completely transparent and not fragile like ordinary cyanoacrylate. Another advantage is that, unlike the latter, it does not have superfluidity and can be quite accurately applied to a thin edge of 2 mm. I coated 2 cm sections and glued the skin by pressing it with my fingers, kept it pressed for a minute and glued the next section. The biggest danger here is to stain an open area of skin with glue, so if glue comes out somewhere and you want to grab it more comfortably, it’s better not to, or keep in mind that you can stain the skin.
After gluing this is what I got:
It can be seen that there are small folds - it was necessary to better and more evenly stretch the leather during gluing, and also take into account that the leather stretches differently in the longitudinal and transverse directions and the template should be positioned correctly, and not in order to save leather, as happened in my case. But in principle, for the first time and I think it turned out quite well, the folds look natural.
Let's move on to the headband. After covering the headband, it will increase in size by the thickness of the leather and the soft inner part may not fasten into its latches. Therefore, you need to take a sharp utility knife and remove the collar along the edges of the headband flush with the main one, as well as from the ends, where there will be an overlap of 2-3 mm of leather. You can accurately measure the height of the material to be removed from the ends with a caliper, the thickness of the leather was 0.5 mm, I added another 0.1 mm for glue, in total I removed 0.6 mm from each side, it turned out perfect. At this point I had to use the Dremel to remove some material from the iron rim while rounding off the edge. Therefore, you can immediately measure the bezel to be 0.5mm shorter on each side. The plastic can be removed with a stationery knife without any problems, the main thing is to take your time and act carefully, not forgetting about the safety of your own hands.
Next I took the skin, by this point I realized that it stretches differently in each direction. I applied the headband to the skin in the direction where it stretches better and drew a template, leaving a margin of about 5mm on each side, this is more than enough. From experience, you can leave a margin of 1-2 mm at the ends; my skin stretched very easily and strongly, so the margin of 1 cm for the sum of the sides turned out to be too much, then I simply cut off the excess.
First we glue one end, after a couple of minutes the glue will already set and you can stretch the skin along the entire length. Having smeared glue on the second end of the headband, I stretched the skin as much as possible and glued it. I cut it to size after gluing it, which was not very convenient. I think it’s better to measure right away, take a margin of 3-5 mm from the maximum stretch and trim the edge evenly and glue along the even edge, or have thin nail scissors available. Well, then we tighten the sides and glue them 2-3 cm.
The end result of covering the headband with leather.
Well, then all that remains is to collect everything. There were no problems with the assembly. Everything clearly fell into place.
I was completely satisfied with the result, the headphones look quite neat, fit perfectly on my head without falling off, and I hope they will last for a long time. The repair budget was about 700 rubles, and the remainder of the leather will definitely be used. The main rule that helped me is to take your time, do everything slowly, for your own pleasure.
PS: This is my pilot article on Habré, please don’t push me too hard.
Matterhorn
This subwoofer was created for military needs - it is difficult to imagine for what purposes the army needed such a large structure - this speaker system can only fit in a sea container. Is it possible that the military views it as a weapon of mass destruction?
In any case, this unit consists of forty subwoofers and forty thousand-watt amplifiers. Perhaps, with such acoustics, any most ordinary action movie will make an impression not only on you, but also on your neighbors - explosions will really be explosions, and shootouts will be shootouts, powerful and terrifying.
Why do iPhone headphones get dirty?
Any objects that a person uses in everyday life, over time, lose their true color and become covered with dust and dirt. This occurs due to contact with the environment. Earwax is secreted continuously and this process is considered normal. Even if the user constantly cleans the passages, this will not protect the device from contamination. While listening to music, earwax is deposited on the speaker mesh. In addition, the headset is in daily contact with other surrounding objects. When the headphones are in your pocket, particles of lint, dust and food can get inside.
The headset is cleaned 1-2 times a month
How to properly clean iPhone headphones from earwax
Wireless headphones for iPhone and iPod
How to clean earwax from iPhone headphones is of interest to many users, since this is the type of contamination that people encounter most often. The most popular method to remove wax at home is to use cotton swabs. They are soft and fit well. They are used to clean all parts of any type of headphones. You can use the sticks as usual or soak them in the solution.
Cotton pads are easy to clean the outer surface, especially if the headset has lost its color. They are also used after cleaning, when it is necessary to remove residual liquid products. The discs clean the wires well. This part of the device can be washed with plain water after squeezing the cotton pad well.
How to clean iPhone headphones with hydrogen peroxide
Hydrogen peroxide does a good job of removing both fresh plaque and stains that have become ingrained into the body. The product is not recommended for internal cleaning, but is well suited for external cleaning. It is enough to moisten a cotton pad with peroxide and walk over the contaminated parts.
After cleaning, be sure to wipe the device dry
How to clean iPhone headphones with alcohol
Alcohol is used much more often than peroxide, since it evaporates faster from the surface. This significantly speeds up the cleaning process and reduces the risk of speaker flooding. First, you need to carefully remove large particles of dirt from the mesh with a toothpick.
Note! EarPods have side mesh that should also be cleaned.
After significant contamination has been removed, you need to take ear sticks and treat them with alcohol. Before cleaning the headphones, remove excess liquid from the sticks with a napkin. The surface of the headset is wiped for several minutes until all dirt disappears.
In addition to regular alcohol, formic alcohol is often used. However, it should be used with extreme caution, as it is more caustic and can damage the coating. It can be used to clean the internal parts if it is not possible to remove dirt with a regular cotton swab.
What not to do when cleaning iPhone headphones
How to turn off headphones on an iPhone - all ways to turn it off
The main condition for quality headphone care is accuracy and attentiveness. It is advisable to carry out the work in a well-lit place to see all inconspicuous dirt. While working with the headset, do not put pressure on the mesh. Do not use water to clean the internal parts as there is a risk of the headphones flooding. If liquid does get inside, you need to leave the headset for a while to dry. Experts also do not recommend using aggressive detergents and abrasives.
Every owner of Apple and other brands of equipment should know how to clean iPhone headphones. There are several basic methods that can help restore a product’s cleanliness and attractive appearance in a short time.
MTX
The American company MTX, an undisputed authority in the field of acoustic developments, has taken the liberty of declaring that they have manufactured a subwoofer one and a half meters long. It's certainly not every day you see a speaker system of this size. The power of this unit is such that it can reproduce a sound of one hundred and eighty decibels. This volume will drown out the roar of jet engines. Such technical characteristics allow the largest subwoofer in the world to become a real record holder.
Comic
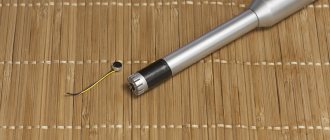
As you can see from the comic, by moving a soldering iron along a piece of pipe, you can bend it where and how we need. Then, by running a soldering iron over the surface, you can level it and give it the final look. When the desired shape is achieved, cut off the excess from the contact side.
In my opinion, such a connector is practically indestructible. It is much more likely that the wire will come out of position as it approaches the connector. And to reduce this probability, it was decided to use a spring. We will borrow it from a clicky ballpoint pen.
The spring should wind with difficulty, expanding at the connector. Then later, if you apply a soldering iron to it, it will shrink to its original diameter and melt into the connector.
Carefully!
The spring conducts heat very well and you can accidentally melt the wire sheath with it.
After everything that had been done, the thought came to me that it would be better if, before wrapping it in a plastic pipe, we put a 2-3 centimeter long thermal casing on the outgoing wire. In this case, you don’t have to worry about melting the wire braid when molding the connector and putting on the spring. Yes, and this would give it even more strength.
Royal Device
This time we are surprised by the sound quality of Italian designers. They built a dedicated audio room for their largest subwoofer. The entire construction was brought to reality thanks to the idea of an audio designer named Roberto. For his unique acoustic system, the man prioritized the quality of the speakers.
To bring their idea to life, the Italians built a special room, in which the entire underground space was reserved for the largest subwoofer in the world - one meter high, almost seven meters wide, and almost nine meters long. It consists of 9.5-meter waveguides, each of which is equipped with eight speakers operating in the low-frequency range - each with a diameter of forty-seven centimeters. There are also two pairs of tube amplifiers, each operating with a power of 50 watts per channel.
The sides of the subwoofer are made of brick, the space on top is covered with wood and anti-resonance material - its thickness is over five centimeters. The sensitivity of this structure exceeds 110 decibels/Watt/meter, the range of reproduced sounds starts at 10 Hz.