Who doesn’t remember the famous S-90 speakers from the 70s? (In fact, there was a Latin letter S, and therefore this Riga product was called the Radiotehnika S-90 speaker system, but the habit of not trusting anything foreign also came from this time, and then not everyone knew that the Balts use the Latin alphabet.) Dance regulars in the club (called discos in the 80s) they didn’t go into such details, and therefore they still call these speakers S-90. This article will be devoted to the literally legendary acoustics of Soviet times.
Nostalgia
“Radio Engineering S-90” was considered one of the best systems of that time and was in demand everywhere. Concerts in cultural centers in the most remote corners of our country, amateur performances, school evenings with songs and dances - everywhere this equipment was indispensable. Some irresponsible comrades risked conducting rehearsals at home, and the S-90 speakers created an unforgettable sound effect in absolutely all apartments of the five-story panel building. The “gratitude” of the neighbors was also indescribable. They can be understood. Even if the owner turned up the medium volume, extraneous sounds simply evaporated: the howling of dogs, the knocking of neighbors on the radiators, as well as the sound of sluggish bass from ordinary speakers two floors above disappeared.
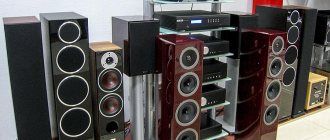
The “Radio Engineering” column heralded either an approaching earthquake or a military fighter jet touching the roof in a low-level flight. The chandeliers bounced, the crystal in the sideboards tinkled subtly, and everything in the room that was not secured was clearly vibrating. Although it must be said that the S-90 speakers were not and were not considered the most powerful in their class, an amplifier was installed to them. By the way, working versions of this equipment are in great demand today. Even heavily used retro equipment is quite expensive. A “Radio Engineering” column of any modification in working condition will cost from four thousand rubles. One!
We study and dare
While drinking beer, we reach three truths. There are three ways:
- Lightweight and effective.
- Medium difficulty. More shamanism and snobbery. Some sound improvements compared to point 1.
- Super complex, time consuming and super efficient. In reality, you are trying to make new speakers. It all depends on the quality of workmanship and musical flair. If nothing works out, then no one promised you anything.
I'll describe everything. I recommend the 1st way to start. Its value is that it does not take much time, you leave all the components of the speakers. Minimum of scarce parts and costs.
Description
The Radiotekhnika acoustic system of the highest (zero) class 35 AC-1 went on sale in 1977 and was immediately named S-90. The speakers had the best characteristics for those times, especially considering that only Soviet equipment was used. They were developed purely for domestic use, and this was done by the Orbita design bureau at the Riga production association Radiotekhnika. Subsequently, the entire series of these acoustic systems received the S-90 brand.
The speakers fully justified their characteristics; they were in no way inferior to imported ones, significantly surpassing all domestic ones. In order for the sound of the acoustic system to be complete, an amplifier of the “Electronics” or “Amphiton” type must be connected to it. In the frequency range from 31.5 to almost 20 kHz, the speakers operated with a nominal power of 35 Watts. Moreover, the power in the passport was ninety. The sound pressure, the results of which are described above, was 1.2 Pa.
Attention! Attention! Attention!
- When carrying out all work, ensure that the phasing of the speakers is correct. If you have not encountered this yourself, invite a specialist - electronics!
- Remaking the speaker 15 GD - 11A is an irreversible process. If you are not careful, the speaker has one path - to the trash can, and you have another - to the market.
The first way. Lightweight and effective.
- Mid frequencies are the main focus. By reworking the speaker, we will make it work in piston mode, increase the upper limit frequency, remove overtones, increase sensitivity, improve directivity, and dampen it.
- Let's move the speaker to the range of 31.5 Hz, instead of 20 Hz. There will be less muttering.
- Let's suppress the resonance of the high-frequency head.
- Let's quiet the sounds of the building
We buy a Soviet tennis ball from a store. Chinese and others are not suitable. They have different material. The ball should be exactly the same as in distant childhood for 8 kopecks. As a last resort, you can take it from friends or in the tennis sports section. We buy epoxy resin (a little, maybe 1 cm cube), glue (Super Cement, Mars, Argo, etc. - hard after hardening), a couple of simple pencils, any medical bandage and cotton wool.
Let's get creative. We saw the ball in half along the seam. The seam is visible to light. It is overlapped and 1–2 mm wide. You need to cut in the middle of the seam. I sawed with a Nev blade, having previously made notches on it with a sharpening stone. After sawing, align the cut line on sandpaper and sand the outer surface of the ball with fine sandpaper. If there are large deposits inside the seam area, then they also need to be removed.
When working, the ball must be secured with plasticine on a Mars battery (a film case, a jar of fish food, etc., according to your imagination) at three points. It's enough. The plasticine is then removed with a dry cloth or rubbing with gasoline. Once the surface of the ball has been treated, do not touch it with your hands. Grind the pencil leads on sandpaper.
Dilute epoxy resin with double the amount of hardener. Cover the surface of the ball with the thinnest layer. If necessary, excess glue can be removed with newsprint. Sprinkle with graphite and shake off excess. It is necessary to ensure that the white plastic of the ball does not show through the graphite. If it shows through, it means the layer of epoxy resin was small. Need to add. Once everything is done, let it harden.
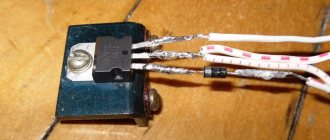
Assembling a 3 KHz filter. To do this, we take a 4.7 Mf capacitor and a 0.6 mH inductor. You can take a capacitor from 4 to 7 mF and adjust the inductor to it. In order not to bother your head with unnecessary formulas, the simplest thing is that the product of the capacitor capacitance in microfarads and the inductance of the inductor in mH should be equal to 2.82.
Let's say the capacitance of the filter capacitor is 6.6 μF (MBGO and MBM with a permissible deviation from the nominal value of ±10%), then the inductance of the coil is 2.82: 6.6 = 0.43 mH, (the winding contains 150 turns of PEV-1 0.8 wire , wound on a frame with a diameter of 22 and a length of 22 mm with a cheek diameter of 44 mm).
Using these data, it is possible to assemble a circuit without an LC meter, since it is not the exact value that is important, but the “capture” of the resonant frequency, which has a certain spread. We attach the capacitor and inductor to a piece of fiberboard and solder one terminal of the coil to the terminal of the capacitor. We solder wires 40-50 cm long to the free terminals.
Let's disassemble the column. We remove the low-frequency speaker, the mid-frequency speaker, take out the glass from it, remove the high-frequency speaker, remove the decorative trim, remove the phase reflex (on some speakers you will have to unscrew the filter).
We take half of the dried ball, polish it on the outside with suede or newsprint and glue it over the dust cap of the mid-range speaker head with hard glue. You must ensure that there are no un-glued gaps between the edge of the ball and the cap and that the ball is glued exactly in the center. We do the same with the second midrange driver. Leave to dry.
We screw a homemade filter onto the back wall of the speaker (inside) opposite the tweeter. Solder the wires from the filter to the output of the high-frequency speaker. Which one goes where doesn’t matter. We remove the connectors from the back wall of the speakers and solder the wire going from the amplifier directly to the filter. We saw off 10 cm from the bass reflex pipe with a hacksaw along the center line. We wrap the bass reflex pipe and the mid-frequency speaker glass with a layer of gauze and bandage it.
It is necessary to check whether they will enter their nests after this procedure. If they do not fit, then reduce the layer of cotton wool and gauze. We check if there is cotton wool and gauze in the glass. Add if it’s not enough until it’s full. We dampen the mid-frequency speakers. To do this, we additionally cover their diffuser holders with foam rings made from 10x27x355 mm blanks. the ends of which are glued end-to-end with Moment glue. We cover the bottom and ceiling of the column from the inside with felt (batting, padding polyester, etc.). We wrap the wires with a bandage.
We place the bandage along the wire and twist it, wrapping it around the wire. It is convenient to secure the bandage with threads. Assembling the column. We coat all the perimeters of all speakers with plasticine. There is no need to wear protective nets, but only on the condition that there are no small children, your wife will not come in with a mop or vacuum cleaner, and that the speakers will not be transported. Turn on the speakers. We don't know right. We call our friends. Please bring your favorite recordings. Let's listen. We calm our friends down with beer. We note with mockery how useful the bucks spent on purchasing foreign rubbish would be to them.
About the disadvantages
The weight of one column sometimes exceeded thirty kilograms. They cost three hundred rubles per pair (an engineer earned from ninety to one hundred and twenty rubles a month). However, few have seen them on sale for free. Many people bought S-90 music speakers one at a time, despite the fact that there was no guarantee that buying a second one would make them a well-tuned pair. However, even if a pair was purchased, no one guaranteed its balance: for example, the right speaker of the S-90 collected all its power together and persistently sounded louder than the left. This is despite the fact that the equipment was positioned as having the highest category of quality.
This drawback is not the only one that the S-90 column could have. Tweeters often failed because the thin and weak wires themselves were not very practical. At mid frequencies the sound was downright bad and often spoiled the whole impression. Other electronics could not withstand the sound system next to these huge structures, and the magnetic field created by the speakers had a negative effect on humans. And yet, it was the S-90 that could ideally create surround sound in an ordinary apartment of a standard panel house. In general, there were no special complaints about the sound.
Installation
The shortcomings that the Soviet S-90 speakers had did not stop music lovers throughout Rus'. For several decades they remained one of the most popular acoustic systems. Many thousands of pages on forums are dedicated to them today. This is one of the most striking symbols of a bygone era, which also had reliability and durability, which modern gadgets do not have at all. The S-90 speakers had impressive dimensions (36 x 71 x 28.5 cm), so they required proper installation, which was not always combined with the capabilities.
The apartments were quite cramped (and the conditions are the same now), and therefore you could see the speakers half a meter from the listener. While the ideal way for better sound is to place them on a pedestal just half a meter high and maintain a distance of at least two meters from the listener’s ear. Rarely does a room have such advantages; most often the required space is not enough, and therefore only the neighbors listened to the real sound that this equipment was capable of.
Appearance
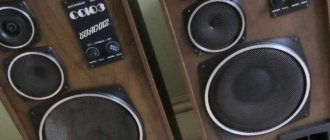
The body of the S-90 speaker is made simply and well - a non-separable rectangular box made of chipboard, trimmed with high-quality veneer from valuable wood. The wall thickness is sixteen millimeters, and the front panel is made of twenty-two millimeter aircraft multilayer plywood. The joints of the walls and internal sides are reinforced with special elements that increase the rigidity and strength of the body.
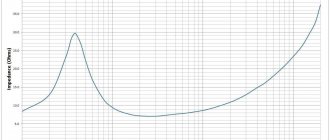
The heads have decorative black frames stamped from aluminum sheet. They are also protected by a metal mesh. On the front panel, the mid-frequency head is insulated inside with a cone-shaped plastic casing, the low-frequency head is located along the vertical axis. At the bottom of the column there is an overhead plastic panel with a nameplate. There is also a hole 100 x 80 millimeters - this is the bass reflex output. The amplitude-frequency response (AFC) is displayed on the nameplate, all curves correspond to the positions of the regulators. There is also the name of the speaker system and the brand name. The above-described frame with fabric is attached to the front panel with bushings. On the bottom rear wall there is a block with terminals.
The third way. Super complex, time consuming and super efficient.
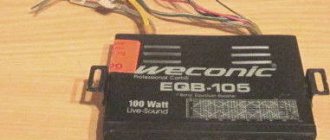
It’s a good idea to have the following instruments: an oscilloscope, an audio frequency generator, a digital multimeter, an LC meter. A person who does not do repairs and assembly at home, of course, doesn’t have all this, but there is a way out - go to the workshop and ask to try on what you need, taking filters, heads, etc. with you. If they ask for payment for this, it will be purely symbolic. You can even order a filter.
It will, of course, be more expensive. Begin. We take as a basis 35AC-212 with dimensions 710x360x285. It is desirable that the case be made of plywood, a woofer with a rubber surround, and a high-frequency speaker with a fiberglass dome. Let's sort everything out. We no longer need the midrange speaker. The housing needs to be increased for a woofer with a rubber surround to 100 liters. If the suspension is polyurethane foam, then up to 120–130 liters. Our body is 70 liters.
There are two options:
- Remove the front wall from the case in order to later use it for a matrix for holes for speakers in a newly manufactured 100 liter case. The remains of the buildings make good boxes for potatoes and marking in the cellar.
- You can try to build up the old body.
In the first case, you need to focus on the dimensions - 1100x360x350 and production in a furniture workshop according to your drawings, with abuse and quibbles about quality. We will consider the second way. So, you can try to get by with little blood. We make it ourselves, or we order two boxes with tightly fitting walls and lids made of double 10-layer plywood with external dimensions - 380x360x285. We cut out identical holes approximately 270x210 in the bottom of the column and in the lid of the box. We cover the inside of the box with felt.
After assembly it will be impossible to do this. We drill holes in the lid of the box and in the bottom of the column through which we fasten them together with bolts. The bolt heads should sink into the countersunk area. Add a little bit of shot - 10 kilograms of shot won't hurt, throw a gauze bag with cotton wool on top. We pre-fill the joint with epoxy with a normal content of hardener. We cover the joint with felt. The rest of the body movements are the same as in paths 1 and 2.
Let's take the mid-frequency head 30 GDS-1. You just need to check them - there are a lot of defects. Purely mechanical properties. Further. We measure f resonance of all speakers. You can use a felt-tip pen to sign directly on the magnets so you don’t get confused and try everything on again.
It would be good if the resonance frequency of paired speakers did not differ greatly. If the speaker produces extraneous sounds at any of the sound frequencies, then it must either be cleaned or replaced if cleaning did not achieve normal operation. We calculate and make filters for our case. The fewer inductances, the better. We continue to work with the body. Remove excess resin at the joint. Let's polish it.
We make two wooden boxes for filters. We will mount them on the back wall from the outside. We solder the wires from the amplifier directly to the filters. And we will drag the wires to the speakers through the fastenings of the speaker connectors. All wires are branded audiophile ones. Choose your own price category. There’s just no point in taking very expensive ones. It is better to convert the bass reflex to a frequency of 31.5–40 Hz. If the dome of the high-frequency head is made of lavsan, then, after removing the crosspiece, you need to coat the suspension and the outer third of the dome with perchlorovinyl. We cover the entire body with self-adhesive film. For the rest, see path 1 and path 2. With mandatory step-by-step verification - better - worse. The best method, if there is no obvious result, is blind listening.
Inside
The internal volume is filled with a sound absorber made of technical cotton wool, covered with gauze. In this way, the influence of sound pressure on the frequency response is reduced and a better sound quality of the speaker is achieved by eliminating resonances in the internal volume. Inside the case there are electrical filters on the board that separate the strips of the speaker system. The kit also included four plastic feet designed to be attached to the base of the cabinet, as well as a decorative removable frame with knitted fabric that adds acoustic transparency.
A rare acoustic system of those times has such qualities as the S-90 speakers - the sound power is simply off the charts! But at close to the maximum volume, low frequencies become inaudible and booming, and the highs begin to clatter - this is a characteristic feature of the 6GDV-1-16 high-frequency drivers. A little later, when similar products began to go on sale - “Amfiton 35AS-018”, “Orbita 35AS-016” and others, a different head was used. Sometimes analogues of this speaker system provided a deeper and more balanced sound than the original S-90 speakers.
Literature
- Zhagirnovsky M., Shorov 8. Improving the sound of 35AC-1 and its modifications. Radio, 1987, No. 8, p. 29–30.
- Shorov V. Improvement of loudspeaker heads. Radio. 1986, no. 4, p. 39–41.
- Aldoshina I., Voishvillo A. High-quality acoustic systems and emitters. M., Radio and communications. 1985.
- Zhbanov V. Mechanical damping of diffusers. Radio, 1988, No. 5, p. 41–43.
- Maslov A. Once again about the modification of the loudspeaker 35AC-212 (S-90). Radio, 1985. No. 1, p. 59.
- Zhbanov V. About damping of dynamic heads. Radio, 1987, No. 8, p. 31–34.
- Gennady and Karen Arzumanov. On the issue of modernizing acoustic systems. Bulletin of A.R.F. №6, 2000
S-90 line
All modifications of the S-90 and even all its analogues were certainly aimed at using cassettes. The high-frequency head reproduces sound quite well in the upper frequency range thanks to the cassette deck and Soviet amplifier. But if the lower and middle parts of the high frequency range are reproduced just fine, then the very top is different from them, and therefore receives criticism for allegedly blocking the frequency response and unevenness.
And the “Orbita” column of the S-90 line from the Moscow plant turned out to be a truly worthy alternative to the Riga “Radiotekhnika”. This modification with a similar set of acoustic heads differed only in the presence of a two-tube bass reflex at the very bottom of the body. As a result, the bass became lower and thicker. However, at high power, problems with hum and inaudibility persisted, and the upper frequencies clattered in the same way as with the Radiotekhnika S-90.
Manual upgrade
Many music lovers nevertheless realized their own dream: they bought the legendary S-90 speakers and began to modify them with a “file”. The solution is budget-friendly, exciting, and then the sound is the envy of everyone. Over the past thirty years, the outside of the speakers, of course, has lost its former chic in almost a hundred percent of cases, but the main thing here is that no one messes with the inside. You need to start working by enriching your arsenal with tools. You will need a basic set of screwdrivers, pliers, and a soldering iron. The first step is to remove the front panel, for which you need to unscrew a dozen or two different screws.
When disassembling, it is necessary to check whether the filling corresponds to the passport. So that at high frequencies it would be 10GD-35, at medium frequencies - 15GD-11A, and at low frequencies, for example, 35GD (well, or whatever is stated in the passport). Speakers are most often damaged, since it is possible to destroy equipment within one day, and even more so in thirty years. For example, a lot of furniture rearrangements and moves could happen. Most likely something is damaged. For example, a woofer. Resuscitating him will require additional work. You need to rewind the reel. In principle, this is not so difficult if you know some of the subtleties and have encountered the rewinding process at least several times before. After winding, centering and drying, the sound of the speaker will be perfect - all extraneous sounds will disappear.
The second way. Medium difficulty.
We do everything indicated in path 1, but do not collect the columns.
- Let's improve the properties of the body and kill overtones and the “barrel”
- Let's achieve better signal transmission
- Housing sealing. Removing the influence of the body
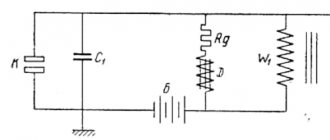
Rice.
1. S-90 speaker crossover diagram So, let's go. Strengthen the rear wall of the case by placing two slats with a cross-section of 3x2cm. vertically along the entire length at a distance of 15-20 cm from each other symmetrically, and attaching them with screws to the back wall. Pre-treat the mounting area with epoxy. It is necessary to take into account the possibility of installing a bass reflex later. Between the rear and front walls we install a spacer rail at the level of the midrange head, taking into account the possibility of installing a glass.
We coat all wall joints and corners from the inside with “Bison” type silicone glue or plumbing silicone putty. We cover the entire body inside with felt (batting, padding polyester, etc.). It should not be thicker than 1.5 cm, so as not to greatly reduce the internal volume of the case.
We reject all proposals to replace 15GD-11A with 6 GDSH-5. Ours is already “cool”, and such a replacement will lead to a loss of power, a decrease in the dynamic range (very dangerous) and you will have to greatly change the filter. So, when replacing 15GD-11A with 6 GDSh-5 for 35AS-212, you will have to replace the following parts: L1 - 0.22mH, C2 - 1.0mF, C8 - 0.5mF, L4 - 0.1mH. New parameters have been specified. When using 6 GDSh-5-4, you will also have to install an additional resistance in the circuit of this head at 4 Ohms. The appearance of the column also changes. Well, if you really want to, then you can. Further. Removing tone switches. Remove unnecessary resistors R (1, 2, 4, 5, 7, 8, 9, 11, 12).
We replace the wires on the filter mounting with a copper wire with a diameter of 1.2 mm. We replace the wires going from the speakers to the filter with more traveling ones. For the low-frequency speaker - multi-core - with a cross-section of 2.5-3 mm square, for the mid-frequency - 2.5 mm square. For high frequency - 2 mm square. single-core All wires are soldered to the filter directly, rather than passing through previous speakers. The filter is installed at the bottom of the column. All wires are laid under a layer of felt. On the side walls.
The filter regulators are removed. In their place, we make wooden (chipboard, plywood) plugs according to the thickness of the body. We pour them onto the epoxy and sand them down. We cover the front panel with self-adhesive wood-look film to match the veneer of the speakers.
Installing speakers. Low-frequency and mid-frequency through rubber gaskets. Suitable rubber from window insulation, thin rubber medical hoses, silicone hoses (worse). We treat the installed speakers around the perimeter with plasticine or non-hardening window putty (it resembles a bar of laundry soap and is cheap). Checking the sound. We're just fooling around. We push aside all sorts of “Pioner”, “Technics”, JAMO and ...
Domes
S-90 speakers, as everyone knows, most often disappoint with the sound of high frequencies - with overtones. And at mid frequencies there is often no ringing. Craftsmen recommend basically the same thing: replace the midrange, treble and dampen the body. But it’s better not to look for easy ways. The speakers are simply covered with plastic domes. This material is completely unsuitable.
Silk domes will remove overtones and make the sound more transparent. Therefore, the speakers can be safely replaced. While one speaker is being upgraded, it is necessary to test the sound and compare it with the one that is just waiting for the upgrade, that is, with the original one. Then it becomes absolutely clear whether to leave the rework or return everything as it was. The main thing is that the owner of the speakers and golden hands also has good hearing.
Wiring and housing
To improve the sound of low frequencies, the housing needs to be modified. Down with cotton gauze mattresses! Stores sell inexpensive batting that makes an excellent filling pad. And for just over a hundred rubles! All this can be done quickly and without any effort: the width of the batting is two meters, enough for two columns, but you will need a furniture stapler or a friend who has one. Before installation, just in case, it is better to change all the wiring and remove the switches. Cut out the batting in two layers and boldly sheathe the body.
The bass reflex pipe is placed on the sealant, and after that it is also covered with batting. There is also not much work to do directly with the filter. The switches will never be needed, so they can be removed, like all unnecessary elements from the board. Replace all these thirty-year-old thin wires with normal copper ones at all connections. Next, the filter, freed from everything unnecessary, must be carefully installed in the housing and covered with batting. The entire midrange box on the outside should also go under the material mentioned above.