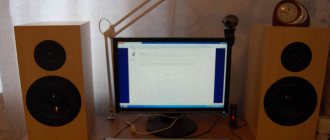
Music lovers constantly start debates about which speaker system to choose for comfortable listening to music at home. And this is no accident: the entire contingent was divided into two camps. The first believe that it is worth shelling out a tidy sum to buy a cool Hi-Fi (or better yet, Hi-End) system in order to be happy and forget about headaches about this topic for the rest of your life. But there are also those who are not ready to give up their entire life’s savings for expensive acoustics (instead of the required car or apartment), and therefore consider the best option to purchase simpler equipment or improve the good old classics to good sound.
In this article we will talk about one of the most popular audio systems produced during the USSR, which could not leave any of its owners indifferent. The S90 speakers, the technical characteristics of which can excite consciousness to this day, have become one of the highest achievements of the Soviet era.
Speaker models
The very first thing worth mentioning is the real and full name of the speaker model – 35AC-012. An important factor is that this acoustics was produced in several variations. The most popular of them are S90 and S90B. There were also S90i, S90D and S90f models, but they were not widely used and are now almost unheard of.
The model with the postfix “B” differed from the usual “nineties” in a wider range of reproduced frequencies. Another significant difference was the introduction of an electrical overload indicator for the speakers. The recommended power of a high-quality amplifier for these speakers is in the range from 20 to 90 watts. It’s also worth mentioning the S90, the S90B (and other modifications) were the first models of speaker systems that met international requirements for Hi-Fi equipment.
Review of the Lenovo S90-A smartphone. Dust in the eyes
Well, the main purpose of such devices is to show off the eyes of others, who will look at you with respect, admiration or hatred in a store or trolleybus. The main solutions are a quad-core processor with a frequency of 1.2 GHz, an Adeno 306 video core and 2 GB of RAM (which is mainly “eaten up” by applications) - this is a very, very mid-budget level. For reference, this is the level of the Samsung Galaxy S3. The built-in memory, by the way, is 32 GB (about 25 are actually available), there is no expandability.
Functional Features
So, the S-90A model managed to look like an iPhone. What other features will we remember about this device?
Android 4.4.4 OS is installed on board the smartphone. In combination with the above-mentioned processor, RAM and video core, its performance is not satisfactory. You can navigate through the interface without any problems, third-party “more serious” applications cause slight heating, let’s say right away that we didn’t upload powerful games there. HD video as a whole is also processed and played back, although there were, of course, freezes, but they were most likely caused by unstable evening Internet.
In this case, the smartphone does not claim to be long-lasting. The battery capacity of 2,300 mAh is an average low figure, which, however, fully corresponds to the price category of the device. Frankly speaking, it doesn’t last long, especially with Wi-Fi and when the screen is on in general. After a couple of charges, we gave up and used the device connected to the network.
Attentive readers are probably already waiting for the answer to the almost detective story associated with the screen (which is declared as Super AMOLED HD). Some analysts point out that our old friend Samsung holds the patent for this technology. At the same time, he is the only company producing such screens. As we like to say, someone is lying.
Let us remember that Super AMOLED is the brand name for OLED displays from Samsung (LG, for example, calls them OLED). However, back in 2013, the Explay Infinity II device was released with the same screen technology (or rather, it was also announced). Fly announced this even earlier, introducing its IQ444 Diamond. Samsung, of course, even if it sells technology to direct competitors, is already significantly outdated and unclaimed by the South Koreans themselves. Therefore, there are two options: either Lenovo somehow received the original matrices and the right to use the brand name, or simply “by inertia” or for marketing purposes it called its OLED screen Super AMOLED. Just imagine - a smartphone copy of Apple, and even with a super-display from Samsung. What else is needed?
The answer is probably somewhere in the middle. Lenovo apparently uses HD Amoled Screen. In general, this indicator is not so important to us. Outwardly, everything looks just fine, but we’ll leave the subtleties of color rendering, brightness and saturation for those who especially want to programmatically obtain some revealing numbers and information. Let's forgive the manufacturer for the echo of Samsung's marketing aggression, which fooled everyone with its SAMOLED.
We did not test the protective glass for strength - it does not look very convincing, especially against the backdrop of the aluminum body. And in general, I don’t want to try, change, or update a lot of things in a smartphone. It remains a beautiful decoration, a frozen picture in the hand, the main purpose of which is to appear spectacularly from your pocket and demonstrate to everyone around you (the main thing is to reliably cover the Lenovo logo). Although an unbiased user will be pleased with the simple and convenient hardware and good performance indicators.
Design
The housing that houses the S90 speakers is essentially a non-demountable rectangular box made of particleboard. The cladding is veneered veneer made of valuable wood. The thickness of the speaker walls reaches 16 mm, the front panel is made of plywood 22 mm thick. The internal joints of the cabinet walls are connected by special elements that increase the rigidity and strength of the structure, but do not interfere with high-quality sound.
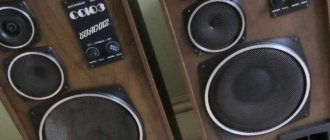
If you look at the device from the front, the speakers are arranged in the following order (from top to bottom): tweeter, midrange speaker and woofer. Also on the front panel of the S90 speaker you can see the frequency response (amplitude-frequency response) graph and the bass reflex hole. While the frequency response is located at the top or bottom (depending on the acoustic model), the bass reflex is always located at the bottom. This was done for reasons of proper design for better sound and giving the speakers good bass.
Interesting facts about Soviet acoustics No. 1
Due to its popularity, this cult product has acquired many myths. Now this is already an expensive retro technology that cannot be perceived as ordinary speakers with many shortcomings.
Weight of speakers and speakers
Speaker system No. 1 weighed as much as a 5-year-old child, despite the relative lightness of the body, made of chipboard. The thickness of the three walls was 16 mm, while the front part was made of multi-layer plywood, 22 mm thick. The entire structure weighed more than 30 kg, and the largest speaker weighed 6 kg.
The two remaining speakers were somewhat smaller and did not sound as loud.
The size of one column corresponded to 36x71x28.5 cm. To obtain the purest, balanced sound, music lovers tried to purchase two such devices at once. However, correct synchronization of speakers was not possible for everyone, especially if they were purchased at a certain interval.
Speakers S90: characteristics
If we take the regular S90 as an example, they have dynamic direct radiation heads installed. More precisely, a high-frequency head 10GD-35, a mid-frequency head 15GD-11A and a low-frequency head 30GD-2 (in later models - 75GDN-1-4).
The speaker system is equipped with two step playback level controls to adjust the midrange and treble in the ranges from 500 to 5000 Hz and from 5 to 20 kHz. Each regulator moves in three fixed positions. In position “0” there is no obstacle for the signal from the crossover filter, and it is fed directly to the corresponding head. When using the “-3 dB” and “-6 dB” positions, the signal is attenuated by 1.4 and 2 times, respectively, relative to the “0” position. By switching the selected control, you can change the timbre of the sound.
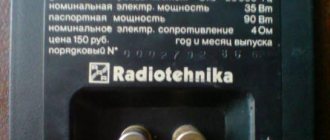
The rated power of the S90 speakers is 90 Watts, while the nominal power is 35 Watts. The nominal electrical resistance of this speaker system is 4 ohms, and the range of frequencies available for playback ranges from 31.5 Hz to 20 kHz. The nominal sound pressure of the S90 is 1.2 Pa. I would like to note the rather impressive dimensions of one column - 71.0 x 36.0 x 28.5 cm, and the total weight of the entire system reaches 30 kg.
Refinement of the S90 or how to make them “sing” at minimal cost
I have long had a dream - to buy the legendary S90 and modify them with a file, in order to make a budget solution that will be the envy of everyone. After monitoring various flea markets for a long time, I finally bought a 35AC-212 “Radio Engineering” S90 from 1981 on one speaker (my peers ;) ). The condition on the outside is a solid 4, no one has tampered with the inside with crooked paws. There was only one minus - the bass driver from one speaker was killed, which was honestly reported to me, and I really didn’t like the fact that both woofers were painted silver (it’s good that the paint is not deep paint, i.e. the mass of the diffuser has not increased much). For 1000 rub. I bought a set for creativity. We will improve it. Oh, I feel strong polemics between supporters of improvements to Soviet acoustics and supporters of burying it completely and without turning. I immediately apologize for the quality of the photos, because at the time of revision, and even now I do not have a digital camera other than a phone. After listening, I decided to disassemble each speaker to see if the insides matched the speakers' passports. As it turned out, the HF quality is 10GD-35, MF 15GD-11A, and LF 35GD (something) I don’t remember, but with a rubber suspension that hasn’t dried out. The first thing I did was rewind the woofer. Restoring the speaker was no problem for me, since I did this very often in my youth for little money. Unfortunately, I didn’t have a mandrel of a suitable diameter, but I have a need for invention and I went to the nearest construction store with a caliper in my pocket. As a mandrel, I bought some kind of plumbing pipe for what seemed like 20 rubles. I sawed it lengthwise (this is necessary since after winding it would be practically impossible to remove the coil from the mandrel). Let's add another 20 minutes for winding and centering and a day to dry the speaker. That's it, the speaker started playing without any extraneous sounds and as if untouched. After listening to the result and reading the great Internet, I began to think further about how to make the sound even better. Basically, all types of modifications come down to replacing the HF, replacing the midrange and damping the body. The highs really don't sound very good. There are unpleasant overtones in the high frequencies and a lack of ringing in the midrange. The HF section uses speakers with domes made of some kind of plastic/polyethylene. For comparison, I installed 10 W speakers with silk domes, the high-frequency sound became much more transparent and the overtones that simply grated the ear disappeared. As a result, these rootless speakers for about 500 rubles per pair remained in them. I bought them a long time ago and the markings on them are unreadable, and I don’t remember what was written on the price tag. You can also use 10GDV speakers with silk domes. I note that I first made one speaker and compared the sound from the test discs with the sound of the original speaker. After listening, I decide to leave the rework or return everything back. Everything was done according to my favorite ear, which never seemed to let me down.
Next I decided to work on the low frequencies, i.e. modification of the body. Batting was bought for ridiculous money - 38 rubles per meter of length and 2-something meters wide. Having also looked at the manufactured filters, I heeded the advice to change all the wiring in the speakers. I removed all the speakers from the speakers. I took out the filter and switches. The wires can be safely cut since they will need to be replaced anyway. Next, I cut out the required piece of batting, borrowed a furniture stapler from a friend, and began sheathing them inside in 2 layers.
We put the bass reflex pipe on the sealant and also cover it with batting.
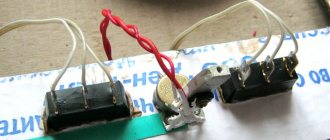
The next thing you need to do is modify the filter.
The filter circuit is simple. I turned off the switches completely, since they are completely unnecessary. We remove unnecessary elements from the filter board. We replace all the thin conductors in the filter with normal copper wire. Here is the filter before modification. And this is a copper wire about 4 squares used for almost all connections. As a result, redone with removed dividers and regulators
Next we install it in the body and cover it with batting. We also cover the entire midrange box from the outside with batting.
In principle, after such modifications, the sound changed for the better, the bass became clearer, the upper frequencies became “more transparent” and “lighter”, but I still didn’t like the mids, the upper mids were not enough. There was not enough ringing in the vocals. After rummaging through my supplies I found two 4GD-8Es in excellent condition. I installed one speaker and spent a long time comparing the results. I liked the result. In one blues recording I heard brushes hitting the main drum. Before that I didn't distinguish them. But these speakers did not last long in acoustics. After listening to the modified speakers for a week, I came to the conclusion that the sound began to tire me. Probably all this is caused by the fact that the 4GD-8E dynamic heads have a very high quality factor and, in a closed box, have a very jagged frequency response. Unfortunately, there is no normal microphone to take measurements. Yes, the midrange speakers were equipped with a foam pad covering the rear holes in the speakers. The midrange box itself is filled with fluffy “eye” cotton.
On the Internet they often wrote about 5GDSH-5-4 and 6-GDSH-5, about the fact that after installing the PAS they produce excellent midrange frequencies. Walking through neighboring radio stores, I bought a pair of 6-GDSH-5 4 Ohms for 110 rubles. As far as I understand, they are installed in household electronic equipment. I sealed the windows in the diffuser holder basket with thin batting and installed them instead of 15GD-11A, fortunately their installation dimensions are completely the same. There is another way to refine the midrange speakers - impregnating the suspension with mystical guerlain mixed with the blood of the orchestra conductor with acetone and applying a thin layer to the back side of the diffuser. But as far as I understand, this is quite rare and in construction stores they just shrug their shoulders. It would be worth taking for an experiment, because 110 rubles for a pair of new speakers is not a pity.
After all operations, we completely assemble the acoustics and enjoy the new sound. I tested the sound on Sukhoi’s homemade high-fidelity amplifier (I’m afraid that true Hi-Fi connoisseurs will spew rays of diarrhea in my direction). By the way, I also assembled the amplifier myself, with minor modifications to the power supply, and it has been playing for exactly more than a decade, but that’s how it works in the same form as an engineering sample. I connected it all to Sb Live! Playing flac of special discs such as audio doctor. And just wav and flac discs that are specifically recommended for testing the audio path.
Costs 1000 rub. the acoustics themselves 500 RUR HF speakers 110 RUR MF speakers rubles 150 batting, glue staples for a stapler screws and other small items Total 1760 RUR. What did we get?
Such nice acoustics
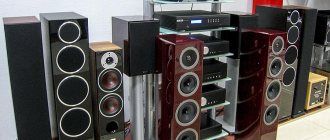
What follows is only my opinion and the opinion of my friends who have experienced it. A friend who owns jbl floorstanding speakers, I don’t remember the model, but they cost about 20,000 for one and a Yamaha receiver, he definitely agreed that after the S90 modifications, his set is being replayed. I'm completely satisfied with the sound. Walking around different salons with acoustics and listening to them, I understand that such sound is cheaper than 15,000 rubles. You can't buy one speaker.
PS Now they are playing together with Gumel's Simple amplifier and Sukhoi's BB pre-amplifier. Everything is connected to the same sound system SB Live! and works as a front to 4.0 sound for watching movies on a 37″ LCD panel. There is more than enough realism in disaster films. I don't even think about adding a sub.
Speaker circuit and connection to the sound source
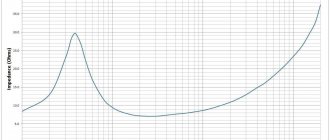
In order to understand whether it is worthwhile to modify any speaker system, you need to study all the data and aspects of the equipment. Below is the electrical diagram of the S90 speakers. Anyone, even a novice radio amateur, can understand it; you just need to have at least basic knowledge.
Another important point is the correct connection of the speaker system. After all, if something goes wrong, even during connection you can, without meaning to, damage the equipment. You don't need to be a professional to figure out how to connect S90 speakers. The main thing is to have a sound source with an amplifier of at least 20 Watts (in this case, most likely, the sound will not be loud enough for large rooms), but not more than 90 Watts. If the amplifier's permissible power value is exceeded, the user risks being left without acoustics due to its breakdown. To connect, you will need regular speaker wires, which must be connected to the terminals on each speaker and amplifier. The main condition for connection is compliance with polarity.
Radiotehnika S90 - a little about
The official name of the first Soviet speaker system was 35AC-1, but it was known to the public as Radiotehnika S90. The speakers became the coveted trophy that every Soviet music lover dreamed of.
And even today you can find passably working copies that delight the older generation with their signature slightly hissing sound.
Any mass events of the 70-90s could not take place without the legendary speakers, capable of providing the most surround sound, deafening all those present. And today, for most who still remember Radiotehnika S90, these speakers evoke only two associations - deafening volume and vibration.
This miracle of Soviet technology appeared in 1977 thanks to the efforts of the Latvian engineer Roland Kerno, who worked for the Telefunken company for a long time.
Parsing
In the event that the acoustics were purchased in used condition and are currently well-worn by life, it is worth paying attention to the appearance. To do this, you need to disassemble the S90 speakers, first placing them on their “back”.
When removing the speakers, you need to take into account that the tweeter and midrange heads are attached to the housing using the same screws as the decorative grilles and trims. The woofer is attached separately, and you need to be as careful as possible not to damage it when unscrewing it.
Next, you should pull out the bass reflex, having first removed the cover from it. Since the part is plastic, you should be extremely careful so as not to accidentally break off the fasteners.
The HF/MF controls are much easier to dismantle than they seem. All you need to do is carefully remove the decorative plugs that are located in the center of each regulator. After this, using a screwdriver, you need to unscrew the screw that is revealed to the eye and remove the regulator handle itself. The plastic lining must be carefully lifted on both sides using flat objects and removed, and the four screws remaining under it must be unscrewed. After this, the attenuator can be pushed inside the S90 column, not forgetting to unsolder it from the filter.
The cotton wool bags located inside the case must be removed. Again, if the previous owner of the speakers did not forget to return them to their place in case of disassembly.
You should first unsolder the panel with filters from the output on the rear side of the speaker, and then you need to dismantle it by unscrewing the screws. Now you can remove the panel with the terminals attached to it.
Appearance and body
If the grilles and decorative covers of the speakers are “tired,” then it is worth straightening them and painting them, having previously sanded and degreased them. This will give the speakers a fresh look. The body of the S90 speaker becomes loose over time and can be strengthened if desired. This will result in a better sounding woofer.
This can be done in various ways, including installing spacers and additional corners inside. It is also necessary to pay attention to sealing all joints and seams using conventional plumbing sealant. In addition, you can glue the inner walls of the case with foam rubber (except for the front), which will increase the volume of the latter.
Terminals and filter
Knowledgeable radio amateurs advise replacing the standard speaker terminals with universal type terminals with gold-plated connectors. The installation location must be lubricated with sealant and the panel with terminals must be put in place.
Considerable attention should be paid to the sound filter. If it was attached to the body with metal screws, then the filter settings will be lost. There are cases where the filter was assembled on a metal plate. This can be corrected by transferring all nodes to a plywood panel. The circuit of the filter itself may have been changed at the manufacturer due to different parameters of the speakers, so you should make sure that everything is assembled in accordance with GOST. If there are jumpers in the filter, then they must be removed and replaced, for example, with an oxygen-free copper cable with a cross-sectional area of 4 mm2. It is worth removing the attenuator from the circuit, as it simply distorts the sound, and replacing the wires used to connect the speakers to the filter.
For low-frequency speakers, a wire with a cross-section of 4 mm2 is suitable, for mid-range speakers - with an area of 2.5 mm2, for high-frequency speakers - with an area of 2 mm2. After these simple steps, the filter must be returned to its place and covered with foam rubber.
Speakers and other “trifles”
New seals should be cut for the speakers. This can be done using cheap or simply outdated computer mouse pads. This is the simplest option. After this, it is worth returning them to their seats and installing decorative overlays and nets.
Before installing the regulators in place, you will have to remove all resistance from them. When installing them in place, it is imperative to use sealant, as when installing a bass reflex.
Through such simple manipulations, the S90 speakers acquire new life. The sound quality becomes an order of magnitude higher, despite the low costs. As a result, we can say that if you don’t have the money for expensive 2.0 format acoustics, you can use a similar option and become the happy owner of the time-tested Radiotekhnika S90 speaker. If it happens that only half of the speakers are available, do not be upset. After all, it is remarkable that the S90 speaker, a photo of which can be found on almost any site for acoustics lovers from the times of the USSR, can work alone and give good results.