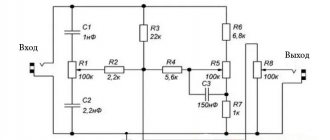
Sometimes it happens that you assembled an amplifier with your own hands, started it up, started singing... joy knows no bounds, but then the euphoria passes and the understanding comes that somehow something is wrong. Or, for example, friends brought it to check, or I just wanted to evaluate my amplifier through which I have been listening to music for several years. If you need to check a sound amplifier, then the meander can tell a lot about the amplifier, or rather not even the meander itself, but what its shape will become after passing through the amplifier under test.
A square wave is a periodic square wave signal. The difference between a meander and a simple rectangular signal is that its duty cycle is 0.5.
It is true that square wave signals cannot reveal much, nor can they accurately quantify the parameters of the audio amplifier under test. What they express can only be assessed as 'little', 'a lot' or 'not at all'. But this assessment is very useful, especially since everything is very clear and simple. In this way, you can not only check the amplifier for operability, but also evaluate the degree of linearity of the frequency response and the quality of the amplifier by the type of signal at the amplifier output.
To evaluate an amplifier, it is enough to have one square wave generator operating at a fixed frequency of 1 kHz. The Internet is full of circuits of similar generators. You will also need an oscilloscope to visually display the signal.
This technique allows you to test any amplifiers, both for speaker systems and headphone amplifiers, implemented on any element base, be it lamps, transistors or microcircuits.
Typical faults
Before you repair, install and configure the ULF in your car, you need to understand the breakdown. It is simply impossible to consider all the faults that can be encountered in practice, since there are so many of them. The main task of repairing a sound amplification device is to restore a broken component, the failure of which led to the inoperability of the entire board.
In any electrical equipment, including amplifiers, there can be two types of faults:
- contact is present where it should not be;
- There is no contact in the place where there should be contact.
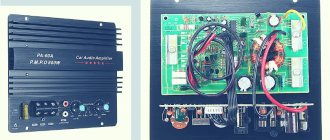
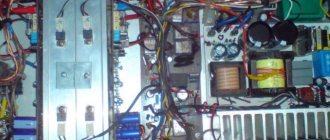
Automotive ULF microboard
Where can I get parts for repairs?
Basically, to repair amplifiers, transistors are required, such as complementary pairs TIP35C/TIP36C, 2SA1694/2SC4467, 2SA1943/2SC5200, 2SA1567/2SC4064, 2SB688/2SD718 (KTB688/KTD718), 2SB778/2SD998, which are installed in the final amplification stage, as well as MOSFET- transistors STP50N06 (FQP50N06, RFP50N06, KF50N06, HFP50N06, SFP50N06), STP75NF75 (75NF75), STP60NF06 (IRF60NF06), IRF3205, IRFZ44N, IRFZ48N used in the voltage converter.
It happens that you cannot find such ones. Where can I buy? You can buy radio components online. For example, I often buy on AliExpress. In our online stores it is not always possible to find what you need, and delivery prices are higher, and this directly affects the total cost of repairs.
Purchasing components on Aliexpress helps reduce financial costs, but, unfortunately, there are a lot of outright defects and fakes. Few people will be surprised by batteries with river sand, matryoshka capacitors, and now also matryoshka transistors.
But don’t be upset, since this online site also has trusted stores that sell quality products.
For example, the “Aoweziic Raw material spot Store” has a large assortment of transistors necessary for successful repair. The store is proven and has positive customer reviews; many craftsmen shop there not for the first time.
It is worth noting that the prices for components there are almost on par with the prices, for example, in the same Chip and Dip, but do not forget that in local stores you will also have to fork out for delivery by mail, which usually costs 300 - 400 rubles.
Be careful and read customer reviews. Well, if you were sent a fake or the wrong product, then be sure to open a dispute with a video attached as proof. Sometimes it helps a lot.
Home » Workshop » Current page
You might also be interested to know:
Functionality check
Repair of car amplifiers first begins with ULF diagnostics:
- First you need to open the case and carefully inspect the circuit, use a magnifying glass if necessary. During diagnostics, you may notice damaged components of the circuit: resistors, capacitors, broken conductors or burnt out board tracks. But if you find a burnt-out component, you need to take into account that its failure may be a consequence of the burnout of another element, which in appearance may seem intact.
- Next, diagnose the power supply, in particular, check the output voltage. If burnt out resistors are identified, these elements will need to be replaced.
- Apply power to the ULF and the Remout output, then you need to short-circuit the system to positive and look at the PROTECTION diode indicator. If the light comes on, this indicates that the device has been protected. The reason may be poor power or its absence on the board, a broken transistor, or problems with the operation of the voltage converter. In some cases, the reason lies in the breakdown of the transistor power amplifier for one of several channels.
- If, after power has been applied, the fuse element does not burn out, you need to check the voltage level at the output. It should be approximately 2x20 in or more.
- Carefully inspect the transformer device of the voltage converter; it may have burnt out turns or broken circuits. Smell this element, it may smell burnt. In some ULF models, a diode assembly is installed between the PN output and the amplifier - if it fails, the assembly can also include protection.
Soldering iron on an amplifier chip
How to check a car amplifier at home
In order to check the performance of a car amplifier at home, you can use any unit with a constant output voltage of 12 to 14 volts, or a computer unit that has the voltage necessary to start the amplifier. The source power must be at least 200 volts and before turning it on, be sure to set the power volume control to minimum. The repair process should always begin with a visual inspection of all radio components on the amplifier circuit board. A standard car amplifier model consists of three main components:
- an input voltage converter unit, which changes the unipolar input voltage of the vehicle's on-board circuit into two polar ones with an increase in voltage up to 20 Volts;
- power amplifier unit, often it is made of bipolar transistors, which are installed on radiators necessary to increase the heat dissipation area. Powerful output stages at maximum power get very hot, so a poor, leaky connection between the transistor plane and the heat sink will certainly lead to its overheating, and, accordingly, to breakdown;
- a frequency control block used to change the sound timbre. A common malfunction of this unit is associated with a deterioration in the smoothness of changes in resistance by variable resistors.
After opening the case, you should carefully inspect every detail of the amplifier, paying special attention to:
- blown fuses. An unbroken fuse-link thread should be visible through the glass flask;
- resistors should not have visible carbon deposits indicating their burnout;
One of the most common malfunctions of failed car amplifiers is related to the breakdown of the inverter power supply. This node consists of:
- input filter capacitors with large capacity;
- pulse transformer;
- transistor converter and microcircuit for acting as an inverting device;
- rectifier diodes working in pairs;
- a smoothing chain consisting of a choke and several electrolytic capacitors.
In any case, any burnt parts found must be replaced with new ones. In this case, neither the fuse nor the resistor installed in the sound-reproducing equipment fails without associated reasons. The condenser may dry out and swell over time. More accurate research and testing of amplifiers is carried out using a millimeter and an oscilloscope.
Troubleshooting
Do-it-yourself repair of a car amplifier is carried out in accordance with what problem was identified during its operation:
- If a transistor in a car amplifier breaks down, then before directly replacing it, it is recommended to diagnose the power supply safety element. You also need to make sure that the diodes on the buses are working. If everything is in order with these parts, the installed transistors need to be changed.
- For more specialized repairs, you will need an oscilloscope. By installing the device probes on pins 9 and 10 of the generator board, you need to make sure that there are signals. If there are no signals, then the driver is changed; if there are signals, then the field-effect transistor elements are replaced.
- Capacitors are changed much less frequently during the repair process - as practice shows, this happens infrequently (the author of the video is the HamRadio Tag channel).
How to check a car amplifier at home
In order to check the performance of a car amplifier at home, you can use any unit with a constant output voltage of 12 to 14 volts, or a computer unit that has the voltage necessary to start the amplifier. The source power must be at least 200 volts and before turning it on, be sure to set the power volume control to minimum. The repair process should always begin with a visual inspection of all radio components on the amplifier circuit board. A standard car amplifier model consists of three main components:
- an input voltage converter unit, which changes the unipolar input voltage of the vehicle's on-board circuit into two polar ones with an increase in voltage up to 20 Volts;
- power amplifier unit, often it is made of bipolar transistors, which are installed on radiators necessary to increase the heat dissipation area. Powerful output stages at maximum power get very hot, so a poor, leaky connection between the transistor plane and the heat sink will certainly lead to its overheating, and, accordingly, to breakdown;
- a frequency control block used to change the sound timbre. A common malfunction of this unit is associated with a deterioration in the smoothness of changes in resistance by variable resistors.
After opening the case, you should carefully inspect every detail of the amplifier, paying special attention to:
- blown fuses. An unbroken fuse-link thread should be visible through the glass flask;
- resistors should not have visible carbon deposits indicating their burnout;
One of the most common malfunctions of failed car amplifiers is related to the breakdown of the inverter power supply. This node consists of:
- input filter capacitors with large capacity;
- pulse transformer;
- transistor converter and microcircuit for acting as an inverting device;
- rectifier diodes working in pairs;
- a smoothing chain consisting of a choke and several electrolytic capacitors.
In any case, any burnt parts found must be replaced with new ones. In this case, neither the fuse nor the resistor installed in the sound-reproducing equipment fails without associated reasons. The condenser may dry out and swell over time. More accurate research and testing of amplifiers is carried out using a millimeter and an oscilloscope.
Basic Amplifier Settings
Now let's move on to the question - how to set up a car amplifier? There are several configuration options - for use with or without a sub.
How to properly configure the ULF without a subwoofer - first you need to set the following parameters:
- bass boost - 0 decibels;
- level - 0 (8V);
- The crossover must be set to FLAT.
After this, adjusting the audio system settings with an equalizer, the system is configured to suit your preferences. The volume must be set to maximum and turn on some track. How to set up an amplifier in a car for use with a subwoofer is also not a particularly complicated procedure.
For proper configuration, it is advisable to use the following parameters:
- Bass Boost should also be set to 0 decibels;
- the level is set to 0;
- the front crossover is set to the HP position, and the FI PASS control element must be set in the range from 50 to 80 Hertz;
- As for the rear crossover, it is set to the LP position, and the Low control must be set in the range from 60 to 100 Hertz.
It is very important to observe these parameters, since they determine the quality of the adjustment and, accordingly, the sound of the audio system. In general, the setup procedure is similar, using a level control to ensure a more harmonious sound. The sensitivity of the rear and front speakers should be adjusted to each other.
If you don’t understand anything about this, it’s better not to go there, because repairs will cost more after you burn or break.
Other little things.
All active elements - transistors, both field-effect and high-power complementary pairs of transistors are installed on the radiator through an insulating mica gasket. To improve heat transfer, thermal conductive paste is used.
In some cases, it is necessary to remove the printed circuit board from the amplifier housing, which is also a radiator. Naturally, the heat-conducting paste smears, stains everything around, and dust and dirt stick to it. Therefore, you have to remove it from the radiator and transistor housings, and clean the insulating mica gaskets from it. It's not a pleasant job.
After repairs, everything needs to be restored as it was. You should have heat-conducting paste KPT-8 or KPT-19 on hand. It is better to apply the paste on both sides, both on the metal substrate of the transistor and on the radiator. In this case, the mica will be in the middle and covered on both sides with a layer of thermal paste. I don’t recommend applying a lot of paste; the main thing is that an even, thin layer of paste forms on the surface.
I advise you to also buy mica for the occasion. For example, I bought a mica plate measuring 10 * 5 cm and about 1 mm thick. Mica can be easily “flaked” using a sharp knife blade. Get several insulating pads made of mica. They can be used to replace broken, damaged or lost insulating gaskets. Mica can be easily cut with a knife into plates of suitable size.
Checks before purchase
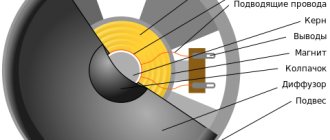
Visual inspection
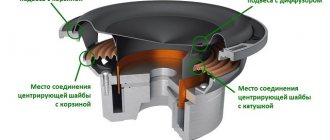
Pay attention to the integrity of the diffuser, whether there are any cracks or damage on it. Inspect the line of its attachment to the basket; it should be smooth and have no signs of removal or installation. Also inspect the dust cap, it should be intact and there should be no traces of plywood on it. Pay attention to the fastening of the centering washer to the basket and reel; there should be no tears there. The magnet should not have chips or cracks. In other words, make sure that the subwoofer is not damaged or has not been repaired. We do not recommend buying refurbished speakers secondhand, even if the repair was of adequate quality.
Features of online purchasing
Online there is an additional risk of running into a scammer, in order to protect yourself as much as possible and buy a used subwoofer without wasting your nerves, follow the following recommendations:
- purchase goods through advertisements on large, specialized forums. They generally care about the quality of transactions and set trading rules with an emphasis on combating fraud;
- try to purchase equipment from a seller with a good rating, or try to find a guarantor or people who have already made purchases from this person. But it’s not difficult to do this on forums;
- check other threads and messages from the seller;
- ask for additional photographs of the product with the number and name written by hand, if for some reason these were not included in the ad;
- ask for additional photographs from the required angles to visually assess the condition of the case, magnet, suspension, coil, etc.;
- when purchasing for a large amount, there is a practice of a guarantor, when the money is transferred to a third party (a well-known and authoritative person), who gives it to the seller after the buyer confirms receipt of the goods;
- do not hesitate to ask for a photo of the seller’s passport;
- choose a method of money transfers with identification of the recipient (for example, transfers where you need to indicate the recipient’s passport details).
cxema21.ru
Of course, it is not possible to cover all cases encountered in repair practice, however, if you follow a certain algorithm, then in the vast majority of cases it is possible to restore the functionality of the device in a very reasonable time. The main task of repairing any UMZCH is to localize the failed element, which entails the inoperability of both the entire circuit and the failure of other cascades. Since in electrical engineering there are only 2 types of defects:
1) The presence of contact where it should not be. 2) Lack of contact where it should be.
List of equipment and tools necessary (or at least highly desirable) for repairs:
1) Screwdrivers, side cutters, pliers, scalpel (knife), tweezers, magnifying glass - i.e., the minimum required set of ordinary installation tools. 2) Tester (multimeter). 3) Bipolar regulated power supply 15...25(35) V with output current limitation (highly desirable). 4) And finally, the most important tool is a head on your shoulders (required!).
The first point of any repair is an external inspection of the subject and sniffing it (!). This alone sometimes allows us to at least guess the essence of the defect. If it smells burnt, it means something was clearly burning.
Checking the presence of voltage at the input: the fuse has blown, the fastening of the wires has become loose, etc. The stage is the most banal in its essence, but at which the repair ends in approximately 10% of cases.
We are looking for a circuit for the amplifier. In the instructions, on the Internet, from acquaintances, friends, etc. Unfortunately, more and more often lately it has been unsuccessful. If we didn’t find it, we sighed heavily, sprinkled ashes on our heads and started drawing a diagram on the board. You can skip this step.
We open the subject and carry out an external inspection of its “gibles”. Use a magnifying glass if necessary. You can see destroyed housings of semi-automatic devices, darkened, charred or destroyed resistors, swollen electrolytic capacitors or electrolyte leaks from them, broken conductors, printed circuit board tracks, etc. If one is found, this is not yet a reason for joy: destroyed parts may be the result of the failure of some “flea” that is visually intact.
We check the power supply, the output voltage, as a rule, in automobile ULF power supply is two-polar, starting from 2x20 volts and above. If we find burnt out parts (resistors, transistors), then we change them.
In general, the verification algorithm is as follows:
We supply power to the amplifier and close the Remout input to the positive power supply (or to the negative, depending on where), and look at the PROTECTION LED protection indicator, if the LED is on, then the amplifier has gone into protection. This may be for several reasons: Something is wrong in the converter voltage, the transistors of one of the arms may have been knocked out, or there may be no power to the microcircuit that drives the transistors of the converter (usually TL494 or SG3xxx, there may be others).
In addition, the amplifier may go into protection for the reason that one or more transistors of the power amplifier may have failed, no matter which channel. When a PA transistor fails, it usually shorts out, and due to the high load, the PN goes into protection.
Therefore, if after supplying power to the PA the fuse does not blow, we check the voltage at the output of the PN, as I already said, it should be about 2x20V and higher (double-pole). Most likely, when the PROTECTION LED is on, there will be no voltage at the PN output, so it is recommended to disconnect the amplifiers from the converter. The easiest option is to unsolder one transistor from each channel (you can do all of them). If, after soldering the field terminals, the amplifier turns on and PROTECTION does not light up, replace the dead shorted transistor with a working one.
If the LED does not go out, then we dig into the voltage converter, check whether voltage is supplied to the PN microcircuit, there may be transistors in the power circuit of the microcircuit through which power is supplied. Also pay attention to the converter transformer, whether there are any burnt turns, breaks, or snot. And don’t be lazy, smell it to see if it smells burnt. It happens that in car amplifiers diode assemblies are placed in series between the PN and the amplifier; due to their malfunction, the amplifier can also go into protection, usually this happens when the volume of the amplifier is higher than average - either the protection LED blinks or the amplifier immediately goes into protection.
This article is intended for non-professional radio amateurs, for those who do not know how to hold a soldering iron in their hands but for one reason or another do not have the skills or knowledge base to repair such equipment.
If you have questions about amplifier repair or need help with repairs, post a topic on the forum, they will try to help you!
Low bass output.
- If two subwoofers are used, they can have reverse polarity. Then frequency compensation occurs and the low-frequency signal level becomes lower. Look at the "Reverse" button on the back of the subwoofer. Press the button once to switch the polarity. Both speakers are now the same polarity and the low frequency signal level will increase.
- The subwoofer may not reproduce bass because... a signal with an insufficient level of low-frequency component comes from the signal source. Turn the "Bass" knob on the source to its maximum position.
- If increasing the low-frequency signal level at the source does not bring results, you need to increase the signal level at the subwoofer itself. Turn the “Level” control on the rear panel of the subwoofer. Continue turning the knob until the bass level is satisfactory. Next, slowly turn the “Crossover frequency” knob in any direction and listen to select an acceptable tone level.
No sound output.
- Check the input level on the rear panel of the subwoofer. The LED will blink if there is an audio signal coming into the subwoofer. If the LED does not blink, the problem is with the signal source. Turn the volume knobs on the source. The source may be a mixer, stereo receiver or amplifier.
- Check the cable connecting to the subwoofer for wear or breakage. If there are signs of mechanical defect, replace the cable.
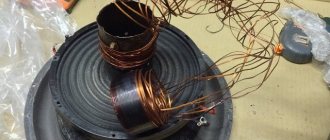
- Remove the back panel of the subwoofer and inspect the speaker cone winding for damage or breakage. If there is mechanical damage to the winding, the speaker must be replaced.
In case of serious electrical breakdowns or any breakdowns that you cannot fix yourself, we recommend contacting qualified specialists.
Where to begin?
Before checking any element with a multimeter for serviceability, be it a transistor, thyristor, capacitor or resistor, it is necessary to determine its type and characteristics. This can be done by marking. Once you know it, it won’t be difficult to find a technical description (datasheet) on thematic sites. With its help, we will find out the type, pinout, main characteristics and other useful information, including replacement analogues.
For example, the scanning on the TV stopped working. Suspicion is raised by the line transistor marked D2499 (by the way, a fairly common case). Having found a specification on the Internet (a fragment of it is shown in Figure 2), we receive all the information necessary for testing.
Figure 2. Specification fragment for 2SD2499
There is a high probability that the datasheet found will be in English, no problem, the technical text is easy to understand even without knowledge of the language.
Having determined the type and pinout, we solder the part and begin testing. Below are the instructions with which we will test the most common semiconductor elements.