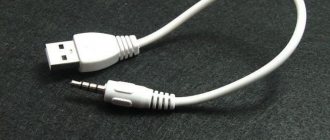
Devices capable of playing media files, streaming music, making calls, etc. are equipped with a 3.5 mm jack for connecting a headset or headphones.
Smartphones or tablets are no exception. Rare models of modern devices do not have a jack 3.5 connection. Over time, you may experience difficulties using headphones on your device.
Make sure your headphones are not broken
The most obvious reason. It is quite possible that nothing happened to the headphones, and the problem is not with them. This can be easily checked. simply by connecting the headphones to another device. Not necessarily to a smartphone, it can be a laptop, TV or any other device with a 3.5 mm jack on board.
If you can't hear sound when you use your headphones with another device, then you've identified a problem.
Just replace your headphones. In case they work with another device, the reason is something else. This means you need to try one of the other solutions listed below.
It is also recommended to connect another pair of headphones to your smartphone to make sure they work. While this is rare, there is still a possibility that they may not be compatible with your smartphone for some reason but work with various other devices.
For example, 5-pin headphones may not work in smartphones that have a 3-pin mini-jack connector.
Electrical methods for determining headset wiring
Unfortunately, it’s not always possible to easily open the control panel and earphone just like that. In such cases, you should use a multimeter.
We set the mode as in the picture and poke one probe into the yellow wire, the second probe into the rest. The vast majority of headphones have an impedance of either 16 or 32 ohms. These are standards. In practice, exactly 16 or 32 is rare, usually within +- 3 Ohms, but there are also 10, 24, and 54 Ohms.
The main thing is that the speakers have the same resistance among themselves. So let's say the speakers have a resistance of 32 ohms each. If we grab the ground and one of the channels with the probes of the multimeter, it will show us 32 Ohms. But if one probe is for one channel, and the second for another channel, then it will show the total resistance (in our case 64 ohms), i.e. The speakers in this case are connected in series. If you could not find both speakers, then the wire is broken somewhere further.
Don't have a multimeter? No problem, we'll use a battery. We will need a 1.5 volt tablet. It is better not to use other types of batteries, because... You may burn the speaker coil or damage the cone. I do not recommend keeping the headphones in your ear while identifying channels. It farts very loudly) it’s better to just hang it on your ears, but you can also put it on the table.
The cheeks in the earphone will sound not at the moment when you hold the battery, but when you touch and release it. And you shouldn't hold it for more than a second. It should be light touches.
With these simple methods you can quickly determine which of the wirings is responsible for what. Now I’ll show you a few common options.
Check if your smartphone is connected to another device via Bluetooth
If your smartphone is paired with wireless headphones, speaker or any other device via Bluetooth, the headphone mini jack may be disabled. Typically, when you connect your headphones, your smartphone should recognize them and everything should work as intended, regardless of your Bluetooth settings. However, this is not always the case.
This is a quick and easy solution as all you have to do is open the settings menu on your device, find the Bluetooth option and check if it is turned on and the smartphone is not paired with one of the other devices you have in your home .
If so, simply turn it off, plug in some headphones, and see if that solves the problem. If they still don't work, just move on to the next solution on this list.
How to determine the purpose of headset wires
So, the easiest option, especially when you have nothing at hand except a knife and a soldering iron, is to open the headphone remote control
On this side of the board, at the bottom you can see a soldered red-yellow wire, and next to it is the letter G, which as we know is Ground. Turning the board over:
And we see that the blue wire is R, i.e. Right is right, but red is M or microphone. Is this M+ or M- you ask. If it is just M, then M+ is implied, because M- always goes to the ground. And if there is both + and -, then know the minus is still on the ground)
Cool! But among these wires there are no two that go together. Okay, you can also disassemble the earphone ( read how to do it here )
Yeah, here they are))) But here it’s worth warning you. Often there is a discrepancy between the colors of the wires in the wire before and after the fork. Those. It reaches the remote control the same way as on the connector, but further on, other colors can go to the second earphone.
In general, in this case it was possible to do without opening the earphone, because It is logical that among the colors that have already been decided on there is no left channel. Well, the yellow (golden) leash is always earth. So we solder (from the word solder, and not what you thought) together the yellow and yellow-red wires and voila we have four wires of classic colors
Clean the headphone jack
As you can imagine, a lot of dust and also lint can find its way into the headphone jack over time. This may be the cause of the problem, as dirt may actually block the connection between the headphones and the jack.
The first thing you need to do is just look into the 3.5mm mini-jack to see how dirty it is. A flashlight won't hurt.
The next step is to try to clean it and hope that solves the problem. There are many different ways to do this, some of which work better than others. One of them is to simply clean the headphone jack with something (a needle, for example), this will at least solve the problem regarding the dust that is inside. You can also use a can of compressed air if you have one.
A great option is to use a cotton swab. Press it into the slot and twist it a little to remove dust. Be very careful, as the last thing you want to do is damage the device. You can also soak a cotton swab in rubbing alcohol, but make sure you don't use too much.
Once you're done, look into the headphone jack again to see how much dust and dirt you were able to remove. Plug in your headphones to check if everything works as it should.
How to repair a headphone plug yourself
To repair a headphone or headset plug with your own hands, you need to carefully remove it from the case if it has not yet fallen out. Usually the plug is filled with rubber. When disassembling, we cut this body along the seam with a sharp knife. The neater the cut, the easier it is to restore the body after repair.
Finding out the cause of the headphones malfunction
The malfunction of headphones most often consists of a break in one of the wires in the plug. Less often, a break occurs near the speaker contacts or the wire breaks due to a violation of the integrity of the insulation.
To determine the malfunction, you need to use a multimeter and ring the plug contacts. From the diagrams above we already know where the common wire and the left and right audio channels are. If the resistance between the contact of one channel and the common wire is more than 20 - 120 Ohms, then most likely there is a break or break in the wire. Remember that the typical winding resistance of modern in-ear headphones is 32 ohms.
The breaking of the wire is determined by the jumping readings of the multimeter when the wire is bent.
The easiest place to find a break is near the headphone speakers. It is often easier to open the speaker housing than to cut the rubber-filled plug. If the wires to the speakers are soldered well, then you should remember about faults in the plug.
Do-it-yourself troubleshooting
Once you have determined the location of the malfunction, you need to get to it and see with your eyes. Then it will become clear how exactly to solder the plug or headphones.
Let's say that a wire break occurs inside the headphone plug. To disassemble the packaged minijack shown above. Ideally, you should record or photograph the wiring and update the connector soldering. Remember that flexible stranded wires are coated with a good varnish and it is difficult to tin them just like that. First you need to burn the varnish, for example with a soldering iron, lighter or mini-burner. After this, you can tin the wires with rosin or other flux.
It is better to leave 2 - 3 mm of bare wire without braiding to increase the strength of the structure. When we return the plug housing to its place or fill a new housing with sealant, it is necessary to create as large a contact area as possible between the braid and the outer sleeve of the plug. Thus, during jerks, the load will be transferred to the most massive part of the plug, and not to the weak contacts of the left and right channels.
After soldering the headphone plug, its internal contacts can be filled with hot melt glue, epoxy glue or sealant. After drying, file to the desired shape.
Check your audio settings and restart your device
There's also a chance that the problem isn't with the jack or headphones you're using, but with the device's audio settings. Simply open the sound settings on your device and check the volume level, as well as any other settings that may be muting it.
Usually there are not many settings on a smartphone, so you should immediately find the reason. If there is, then there is.
If everything seems to be fine, there is another simple solution you can try—simply reboot your device. Sometimes this can solve many problems related to smartphone software and takes less than a minute. Simply press and hold the Power button, select the restart option.
We also recommend installing the Sound About program, it usually solves the problem immediately.
How to repair a headphone plug yourself
To repair a headphone or headset plug with your own hands, you need to carefully remove it from the case if it has not yet fallen out. Usually the plug is filled with rubber. When disassembling, we cut this body along the seam with a sharp knife. The neater the cut, the easier it is to restore the body after repair.
Finding out the cause of the headphones malfunction
The malfunction of headphones most often consists of a break in one of the wires in the plug. Less often, a break occurs near the speaker contacts or the wire breaks due to a violation of the integrity of the insulation.
To determine the malfunction, you need to use a multimeter and ring the plug contacts. From the diagrams above we already know where the common wire and the left and right audio channels are. If the resistance between the contact of one channel and the common wire is more than 20 - 120 Ohms, then most likely there is a break or break in the wire. Remember that the typical winding resistance of modern in-ear headphones is 32 ohms.
The breaking of the wire is determined by the jumping readings of the multimeter when the wire is bent.
The easiest place to find a break is near the headphone speakers. It is often easier to open the speaker housing than to cut the rubber-filled plug. If the wires to the speakers are soldered well, then you should remember about faults in the plug.
Do-it-yourself troubleshooting
Once you have determined the location of the malfunction, you need to get to it and see with your eyes. Then it will become clear how exactly to solder the plug or headphones.
Let's say that a wire break occurs inside the headphone plug. To disassemble the packaged minijack shown above. Ideally, you should record or photograph the wiring and update the connector soldering. Remember that flexible stranded wires are coated with a good varnish and it is difficult to tin them just like that. First you need to burn the varnish, for example with a soldering iron, lighter or mini-burner. After this, you can tin the wires with rosin or other flux.
It is better to leave 2 - 3 mm of bare wire without braiding to increase the strength of the structure. When we return the plug housing to its place or fill a new housing with sealant, it is necessary to create as large a contact area as possible between the braid and the outer sleeve of the plug. Thus, during jerks, the load will be transferred to the most massive part of the plug, and not to the weak contacts of the left and right channels.
After soldering the headphone plug, its internal contacts can be filled with hot melt glue, epoxy glue or sealant. After drying, file to the desired shape.
It's time to go to the service
If none of the solutions listed above work, this means that the problem is larger than expected.
If your phone is still under warranty, your best bet is to simply contact the seller or manufacturer, explain the problem, and send it in for repair or replacement. In some cases it may take a long time, but at least it's free.
The second solution, by far the worst, is to return the device to the manufacturer or someone else who knows what they are doing.
You'll need to pay to have the problem fixed, but at least you'll be able to use the headphone jack again.
Otherwise, you can simply choose wireless Bluetooth headphones, which will also solve the problem. Well, sort of.
Causes of connector failure in a laptop
One of the main factors in the failure of the headphone jack on a laptop is its looseness. The problem may arise due to improper use of such an important device.
The first of these examples is pulling the headphone plug out of the socket by the wire.
As a result, the connector becomes loose. Breakage of the socket can also be caused by frequent use and wear. As you can see, the second reason does not depend on users.
Another reason for connector failure is the possibility of shorting. In this case, it will interfere with the normal operation of the speakers.
About the colors of wires in headphones
Headphone wire colors are usually standardized. The wire colors for standard headphones with 3 wire types are shown in the photo below.
However, there are still manufacturers who use non-standard wires for soldering headphones and marking channels. For example, Apple uses two-color wire markings in its AirPods headphones.
In such cases, the Internet or the method of checking with a 3-volt battery or multimeter comes to the rescue.
When voltage is applied (with a battery or a multimeter in ohmmeter mode) between the contacts of the speaker, a rustling sound will be heard in it. It's simple. It’s more difficult with headsets, especially if they have buttons. This is where circuitry comes into play. Because manufacturers often use a minimum of pairs of wires to transmit a large number of signals.