Hello dear readers of the site. I haven’t updated my website for a long time - I don’t have enough time and energy, since I’m renovating my apartment. But sooner or later, everything comes to an end, and I hope my repairs too. Now about the main thing.
Having analyzed the questions that arose after the articles on headphone repair, I came to the conclusion that I need to talk in more detail about the design and repair of headphones for phones, players and computers. If you still have questions during the course of the article, pay attention to the previous two articles, these are repairing headphones for a computer and repairing headphones with a microphone. Perhaps in them you will find answers to questions that are not addressed here.
Structurally, the earphone consists of a housing
and
electromagnetic mechanism
.
In turn, the electromagnetic mechanism is made of a coil
,
a membrane
and
a magnet
.
Coil
It is
a frame
attached to
a membrane
, on which
a winding
with a resistance of 20–120 Ohms is wound with a thin copper wire. Voltage is supplied to the terminals of the coil winding from an audio signal source, for example, a player.
magnet inside the coil
, attached to the base of the body. There is a gap between the coil frame and the magnet, and it turns out that the coil easily moves up and down along the magnet.
Now, if an audio signal voltage is applied to the headphone terminals, a magnetic field will appear around the coil, which, interacting with the magnet field, will change depending on the polarity and power of the audio signal. In this case, the magnetic field will move the coil up and down relative to the magnet, and, consequently, the membrane, which, oscillating, will create sound waves, and we, in turn, already hear them as music or speech.
Causes of headphone malfunction: what is it connected with
Suddenly broken headphones will, of course, ruin the mood of any music lover. The reason may lie both in the device on which the sound is listened to, and in the parts of the playback device. Let's look at common reasons:
- Broken wire at the plug or speaker . In this case, the sound through the headphones is not reproduced at all, or appears partially, or is distorted. In some cases, you may hear a crackling sound in the membrane.
- Plug contacts sticking . This occurs due to frequent use of the device. For example, if moisture or dust accidentally gets on the plug and is not cleaned, it may cause problems with hearing the speakers. Clogged contacts do not allow sound to pass through themselves, so there may be a complete absence of sound from the headphones.
- The connector of the device being reproduced is clogged . If the headphone output of a player or phone is dusty or oxidized, there can be no talk of transmitting sound to the membrane.
- Cable bend . This can happen anywhere in the headphones: both in the middle of the wire and at the sockets. Often this problem occurs due to improper use of electronics. So think about how you treated him before.
- The volume control is broken . If there is such a lever directly on your headphones, switching it frequently can lead to problems with sound reproduction. The fact is that if this unit malfunctions, the contact between the headphones and the sound playback device is broken.
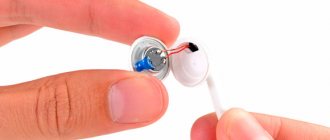
- Malfunction of the membrane (speaker element). This happens rarely and often due to dust, moisture, corrosion or mechanical damage. Therefore, keep the device clean regularly.
HELPFUL INFORMATION! Earwax can get into the headphone speaker, causing it to malfunction, resulting in intermittent or no sound. In most cases, repairing headsets and headphones without a soldering iron is impossible
Looking for the cause of the damage
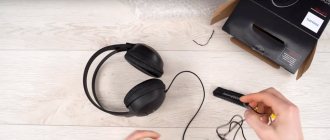
Admit it, how often have you seen a headphone cable break right in the middle? The cause of the breakdown is almost always the plug, which, with regular use, is subjected to mechanical stress much more often than other elements of the headphones. Simply squeeze and tug the wire around the plug.
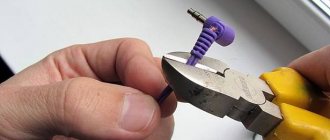
If the sound appears after this, it means that there really is a problem. We simply cut off the old plug - we won’t need it anymore. Although, if the distance between the break and the flexible part of the plug is about cm, there is a chance to use it if it is not possible to buy a spare plug.
In addition, to more accurately determine the location of the break, you can use the tester in resistance measurement mode (Ohm). Touch one end of the plug to any of the plug contacts (the left or right headphone output is the two outermost contacts), and attach a simple needle to the other probe with electrical tape and carefully insert it into the wire a little further from the intended break point. If the tester shows a value of 0 or slightly more than zero instead of 1 (a value with hundredths or tenths), then there is a break in this wire.
The wire on the headphones is broken: how to find the break and fix it at home
First you need to determine exactly whether the wire has broken or whether the failure of the electronic device is due to something else. To find a breakdown, you can use a multimeter or try to find a break mechanically. If everyone is familiar with the second method: just rub the wiring of both outputs and you can hear intermittent sound. The first method of determination requires skill in working with a multimeter.
Testing with a multimeter: basic procedure
Using a multimeter makes the process easier and faster. To search, you must:
- make small cuts in the top layer of insulation near the speaker and plug, then carefully remove the protective white or transparent layer;
- connect the black probe of the device to one cut, and the red one to the other, setting the desired voltage with the lever;
- If this section of the copper core is operational, then we continue searching until the device stops beeping.
You need to remove the braid from the cables using a special tool, because with a knife you can damage the conductor itself. It happens that the multimeter constantly makes a sound, so there is a possibility of suspecting a problem in the speaker or plug itself.
How to solder headphones so they work as before
A broken cable can be repaired, so don't rush to the store for new electronics. The only thing you may need (if you don’t have it at home) is rosin and tin (these are raw materials for soldering):
- Remove the insulating layer along with the protective layer using special nippers. In this case, you need to completely remove the entire braid.
- Next, cut the wires in the damaged area so as not to split them. The cut should be perfectly smooth.
- We heat up the soldering iron, meanwhile we reliably twist the cut wires so that the contacts correspond to each other.
- We apply solder to the soldering iron rod and process the pre-stripped conductors.
- Next, we heat up the thermal tubes (insulation for wires) and put them on the copper conductors, pay special attention to the soldering points. It is important to further isolate these areas.
The headset conductors have three interconnected cables inside: two audio outputs and one grounding. You need to be more careful with this arrangement.
Replacing the conductor in headphones: the basics of the process
If multiple damages are noticed on the conductor, then soldering alone is probably not enough. Most likely, this method will not solve the problem. Therefore, we will tell you how to replace a damaged cable with a new one:
- Choose unnecessary headphones, but with a working cable. To remove it, remove the insulating layer and carefully unsolder all connections.
- In order to remove the contacts on the audio outputs, you need to carefully open the case so as not to break the wiring; we repeat similar actions with the second contact.
- We unsolder the old wires from the desired headphones, then carefully place the new conductor into the housings for the “ears” and solder the contacts on the plug and near the speakers.
- Then we heat the insulating layer and put it on the conductors; we reinforce it with silicone tubes near the plug and auditory outputs.
- Let's connect the halves of the headphones using Moment glue.
HELPFUL INFORMATION! To ensure that the wiring is securely fastened and your headphones last longer, tie a knot in each headphone housing, without putting too much tension on the conductors. Clogs in the socket contacts can accumulate for years, so the device may require preventative cleaning after prolonged use.
One earphone does not work: various reasons and how to fix the device
In addition to broken contacts on the headphones, other problems may arise, for example, the lack of the necessary drivers, a problem in the socket itself, or clogged contacts.
| Cause | Explanation |
| The plug does not fit tightly into the connector | The contacts on the plug and the audio output for headphones and on the plug are arranged in a circle; accordingly, loose pressing or falling of the connector does not create close contact, so the sound in one of the headphones may not be heard. |
| Lack of drivers | If utilities are not installed correctly on the device or are missing altogether, the headphones will conflict with the operating system of the player or phone. In this case, they need to be installed. |
| Contamination and moisture ingress | Over the course of months of continuous use (meaning at work, during sports, or other activities), the speakers may become contaminated with earwax, dust, or beads of sweat. And these factors will definitely affect the performance of the gadget. |
The malfunction of one earphone may also lie in a damaged membrane. You, of course, can try to bend it into place, however, you must understand that this phenomenon is temporary, and soon the device will completely fail without the possibility of repairing it. Fact! Poor hearing is more common with earbuds with silicone tips.
The nuances of repairing the microphone on portable headphones
The microphone on the headphones is a rather fragile element that is more susceptible to contamination than other components of the device. Often, it is because of a blockage in the microphone hole that the sound in both headphones begins to “stutter”. To get rid of the problem, you need to clean the mini-device:
- Prepare a cotton swab (preferably wooden, it holds cotton more securely) and fresh alcohol.
- We remove the housing from the microphone on the headset and carefully treat all particles with a cotton swab soaked in alcohol. Proceed very slowly to avoid damaging the mechanism.
- Wait until the antiseptic moisture has completely dissolved, after which you can assemble the case and continue using the headphones with a microphone.
If the microphone has not completely failed, sound reproduction will be restored.
The speaker on the headphones is broken, how to fix the gadget yourself
If, when trying to determine the cause of a non-working headphone, it was possible to find out that it was the speaker that was to blame, fixing it is very labor-intensive. Even in service centers they will immediately offer you a replacement for a new one. This device is quite microscopic, so soldering it is a delicate job that not every master can do, and most devices cannot be repaired.
GOOD TO KNOW!
If you are having your headphone speakers replaced at a workshop, make sure you get the exact part that matches your device model. Beware of fakes, because Chinese speakers have the worst sound quality. If your headphones are not branded and are inexpensive, then you probably shouldn’t spend money on repairs; it’s better to buy a completely new accessory
Replacing the cord in large headphones
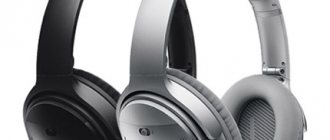
Large gadgets, such as, for example, Philips headphones or Sven headphones for a computer, differ from in-ear ones only in the size of the speaker (diaphragms in small gadgets). Difficulties may arise when trying to get to the speaker in order to solder the wire contacts.
Different headset manufacturers have different methods for opening them. These may be latches that are difficult to detect or hidden screws hidden under soft “pads” - ear pads. For example, the question often arises: how to disassemble Sennheiser HD203 headphones?
This is done simply.
- Using a credit card or other flat object, press down the latches that hold the ear pad in place.
- Once the pads are removed you will see 4 screws that need to be removed.
- On the disassembled device, you will see contacts with wires soldered to them, which need to be unsoldered and replaced with new ones.
When repairing Steelseries Siberia headphones, the ear pads are held on with an adhesive base. You can remove them by carefully prying them up with a screwdriver, after which you can find the fasteners. Some models use latches instead of screws, which can be broken if pressed hard. If they break, you will have to glue the cups of the gadget together, after which they will become inseparable.
In the Razer Kraken headphones, the ear pads are not glued and can be easily removed.
After disconnecting them, the fasteners can be found under the glued paper.
In the Audio-Technica M30 or ES7 headset, they are also placed on the rim of the gadget’s cup. Philips headphones are no exception.
By the way, the Audio-Technica ES7 headphones have hinges for rotating the cups. Therefore, if you disassemble it while repairing a gadget, you must be careful.
The Philips SHD 8600 headset does not have all the disadvantages associated with replacing the plug and cable, since it is a representative of wireless devices.
Volume control malfunction: can it be fixed?
Theoretically, you can try to repair the volume control on your headphones, but only if you have experience working with radio devices. If you hear a crackling sound and sound disturbance when rotating the volume wheel, then it's time to change this mechanism.
Often the problem of this effect is associated with a violation of the integrity of the conductors directly in the Volume mechanism itself. In this case, you need to completely replace the device with a new one, since it is very difficult to get to the internal wiring, but re-soldering will be much cheaper and faster. You can purchase a headphone volume control with a different housing. Here it is now important to solder all the contacts correctly
Repairing a headphone plug with your own hands: a step-by-step guide
The plug on the headphones is a rather vulnerable element, and failure occurs on it in most cases, and in order to fix it, appropriate experience is required. The editors of Tenho.guru will tell you in detail how to fix a part without being a master, the first time.
| Illustration | Description of action |
| Having made sure that the damage to the contacts is in the audio jack 3.5, we proceed to dismantle it. To do this, cut off the plug from the main wire at a distance of 1.5-2 cm, remove the insulating layer from the wire (1.5 cm), and three contacts appear in front of you: yellow, green and red (green - left earphone, red - right, and yellow is mass). | |
| Now we narrow the contacts using rosin and a soldering iron, after which we treat the ends with tin for fastening. | |
| We cut the plug, measuring a length equal to the length of the jack itself. Then we disassemble it until the plastic appears, which separates the contacts. | |
| We determine which contacts are responsible for what: the first longest is the base (mass), the second is the right channel, the third is the left channel. Similarly, the inside of the plug is determined in a mirror order. | |
| We fix the plug in a vice and solder our headphones: to the last contact there is a green wire, to the middle one there is a red wire, and to the first (yellow) there is a yellow wire. At this stage, we check the functionality of the headphones on the phone or with a multimeter. | |
| We install heat-shrinkable tubes, first a thin one so that it covers the wires, and then a wide one, which we pull onto the plug and reduce their size using a lighter. First, we wrap the contacts with a thin nylon thread and secure them with “Moment” glue. | |
| Our headphones are ready. Try to hide all the elements carefully so that no bumps are visible through the heat-shrink tubes; this is aesthetically unattractive. |
We check for quality
Upon completion of the operation, we need to check the functionality of the repaired headphones. We connect them to any player, smartphone or stereo system and turn on the music. Now, accidental touches to the cable should not cause any audible consequences, so we can only rejoice at the result.
How does a contact plug work?
Before you start soldering, it is useful to study the design of the stereo headphone plug. Below we offer a schematic representation of it. A headphone cable contains three wires: the right channel (usually red), the left channel (green, white or yellow) and ground (in our case copper-colored).
There is no separation between right and left channels on the mono headphone plugs. Depending on the plug, the contacts for soldering will be of different sizes. During soldering, try not to create electrical connections between the contacts, especially to ground, otherwise when you connect the headphones to the device, a short circuit will occur and they may fail. Therefore, in no case should you expose the ends of the cables (see point 2) more than is necessary for soldering.
Home repair of wireless headset and headphones
There can be many reasons why a Bluetooth headset may not work: inability to charge, fewer working hours than expected, or lack of audibility in one of the audio outputs. To eliminate any of these problems, you will need to disassemble and detect the malfunction.
The good quality of the headphones can be determined during the disassembly process by the density of the insulation and soldering of the contacts. The problem is mainly associated with the failure of the batteries.
To disassemble the wireless headphone housing, you need to remove both housings from the speakers, then remove the screws to get to the circuit board and battery. First select the desired model of the battery to be charged and solder the old one to the new one. See an example of dismantling Bluetooth headphones in this video.
If you have your own opinion about repairing headsets and portable headphones, share them in the comments below the article. We'd love to hear about your personal experiences and would be happy to discuss the process.
How to repair a broken wire?
So where should you start? Step back about 10 cm from the plug and cut the cable with a knife (a stationery knife is best).
Cutting the wire
It turned out to be two halves
Next, cut the insulation and prepare the ends on the good section of the cable for soldering.