In the daily life of a modern person, headphones are an indispensable attribute that allows you to enjoy listening to your favorite music and audiobooks anywhere and at any time. Unfortunately, this gadget does not last forever and is prone to breakdowns. In such a situation, you have to think whether you can repair the headphones yourself, or whether it is better to buy new ones. It is recommended not to rush to throw away old ones, since broken ones, in most cases, can be repaired at home. This article will discuss how to repair headphones yourself.
Plug failure
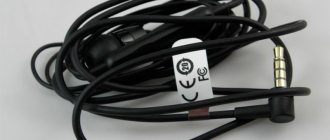
If your headphones break, the first thing you should pay attention to is the connection between the plug and the cable. Often the cause of the breakdown lies precisely in this place. Due to frequent bending, the cable cores break, so the signal does not pass into one “ear” of the gadget or into both at once . The microphone may also not work.
The breakdown is quite easy to detect. When the gadget is turned on, you need to try bending the cable at the site of the supposed breakdown in different directions. If a sound appears or a crackling noise is heard, this means that one of the wire strands is broken. What to do if a problem spot is found on the cable?
To repair headphones, do the following.
- Cut the plug from the cable.
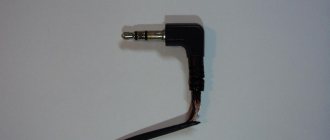
- To repair the plug, the inside of the old one will be used with a slight modification. To remove this part, you need to cut the plastic shell using a utility knife, as shown in the picture below.
- After cutting the plastic, remove the insides of the plug. You will see contacts to which several thin wires of different colors are soldered. In the same way, you can disassemble iPhone headphones.
- Remember or sketch on paper which contact and color the wire was connected to. The figures below show standard cable wiring diagrams. The color of the conductors may differ in different models, in this case, green is the left channel, red is the right, and copper (without insulation) is common.
- If you need to repair headphones with a microphone, which are connected with one plug (usually there are 2 plugs on the cable), then the wiring diagram will be as in the figure below.
- Next, you need to free the internal cable cores from the external (general) insulation.
- Headphones cannot be repaired without a soldering iron. This is explained by the fact that it is necessary to connect common wires and tin the tips of all conductors using flux and solder. Since the conductors are covered with insulation (varnish), the tinning process will be a little difficult. To make it easier, it is recommended to lightly heat the ends of the wires using a lighter. You can also clean the ends from the varnish layer using a regular knife.
- To continue repairing headphones with your own hands, for example, Defender headphones, you need to find a ballpoint pen, from which you only need one part, namely the bottom. It will serve as a housing for the plug.
- Prepare a small piece of heat shrink tubing to protect the wire from sharp bends.
- At the next stage, you will need to put the tip of the handle and heat shrink on the cable, and then solder the tinned ends of the wires to the plug part.
- We solder the contacts, strictly following the wiring diagram (using our sketch).
- After you have soldered all the conductors, you need to check whether the headphones are working or not. To do this, you can use a multimeter and call all contacts. If there is no device, then simply plug the plug into the phone socket and turn on music playback on it. Make sure that both channels of the headset work separately by turning the balance control in the equalizer.
- If the test result is positive, place the heat-shrink tube over the soldering area and use a lighter or hair dryer to ensure a tight fit to the plug.
- To proceed, prepare a small amount of epoxy resin.
- Add a few drops of resin to the tip of the pen and slide it onto the soldered plug. At this point, the headset repair is considered complete.
The procedure for replacing the plug is the same for all types of headsets, for example, such as: Beats By Dr headphones, Sennheiser HD 215, Razer Kraken Pro, as well as for Steelseries Siberia v2 headphones, Audio-technica ATH-ES7 and headphones Defender.
Identification of the rupture zone
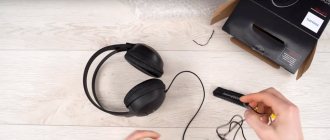
To repair damaged headphones, you first need to find a break, and this can be done by probing or using a multimeter . Probing the cable to detect a breakdown is the easiest way. You need to connect the headphones to the sound source, start the music and begin to carefully bend the wire in the direction from the plug to the speakers, without missing a single centimeter. If in some place the music begins to be interrupted, a crackling sound or other noise appears - this is the place where the wire breaks.
Using a multimeter is a professional and more accurate way to detect cable damage. It is necessary to turn on the measuring device, set the sound diagnostic mode, and then connect the probes correctly: black to the COM connector, red to mA. Now you need to carefully make notches near the plug and the earphone itself, and then install the probes in them. If the device beeps, this means that the wire is intact, and the problem needs to be looked for elsewhere. If the multimeter is silent, you need to make a cut in the middle, and then check both halves of the cable one by one. Where the wire is intact, the device will beep. The tester is silent on the damaged part of the cable. In this area you also need to find the middle and make a cut again. In this way, you should check the cable until there remains a faulty section a couple of centimeters in size.
Important! The best way to reconnect damaged wires is to use a soldering iron. If the user does not have such a device or experience working with it, it is allowed to twist or connect the torn wires with solder or solder paste.
Headphone cord is faulty
How to repair headphones if the headset cord is faulty? You can try to find the place where the internal wires of the cable are broken by probing and bending all its sections while the gadget is running. If you hear a cracking sound or a sound during the test, mark this place with a marker. Next, at the break point, the cable is cut and stripped. After which the ends of the thin conductors must be soldered, observing color, and insulated.
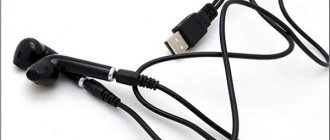
If the break point is not found, then the entire cord will need to be replaced . The following example will show the repair of vacuum headphones.
- Before disassembling broken vacuum headphones, you need to purchase a new cable - you can order it on the Internet.
- Using a utility knife, carefully disassemble (separate) the glued phone gadget into 2 parts.
- After opening, you will see the soldering points to which you need to solder a new cable. This way you can repair Beats headsets by Dr. Dre, Sony, Audio Technica Ath-CKR10.
- Iphone headphones are repaired in the same way. But when disassembling apple headphones, you should be careful and write down or sketch the location of the wires. They can be multi-colored.
How to fix a connector
How to fix a connector
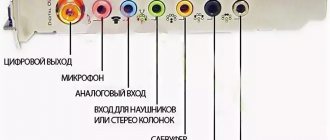
Repairing a headphone jack, or jack, or input is not easy . Problems specifically with the connector, and not with the headphones, can be indicated by either the lack of sound in the headphones or incorrect connection/disconnection of the headset to the device. For example, when you connect a headset, the device may not see it, or, conversely, after disconnecting the headset, the device may continue to consider it connected, thereby continuing to transmit sound to headphones that are no longer in the jack.
reasons for an input failure :
- The connector is clogged. To solve this problem, just take a needle, soak it in alcohol, drop a couple of drops of alcohol from the needle into the connector, then clean the connector - first carefully with the needle, then with the headphone plug, plugging it into the connector and pulling it out several times.
- The socket itself inside the device broke. In this case, only replacing the input itself will help. To do this, you can take the device to a service center, or watch a detailed video on replacing the connector below.
- The reasons are in the OS on the phone itself.
Replacing the cord in large headphones
Large gadgets, such as, for example, Philips headphones or Sven headphones for a computer, differ from in-ear ones only in the size of the speaker (diaphragms in small gadgets). Difficulties may arise when trying to get to the speaker in order to solder the wire contacts.
Different headset manufacturers have different methods for opening them. These may be latches that are difficult to detect or hidden screws hidden under soft “pads” - ear pads. For example, the question often arises: how to disassemble Sennheiser HD203 headphones?
This is done simply.
- Using a credit card or other flat object, press down the latches that hold the ear pad in place.
- Once the pads are removed you will see 4 screws that need to be removed.
- On the disassembled device, you will see contacts with wires soldered to them, which need to be unsoldered and replaced with new ones.
When repairing Steelseries Siberia headphones, the ear pads are held on with an adhesive base. You can remove them by carefully prying them up with a screwdriver, after which you can find the fasteners. Some models use latches instead of screws, which can be broken if pressed hard. If they break, you will have to glue the cups of the gadget together, after which they will become inseparable.
In the Razer Kraken headphones, the ear pads are not glued and can be easily removed.
After disconnecting them, the fasteners can be found under the glued paper.
In the Audio-Technica M30 or ES7 headset, they are also placed on the rim of the gadget’s cup. Philips headphones are no exception.
By the way, the Audio-Technica ES7 headphones have hinges for rotating the cups. Therefore, if you disassemble it while repairing a gadget, you must be careful.
The Philips SHD 8600 headset does not have all the disadvantages associated with replacing the plug and cable, since it is a representative of wireless devices.
Connecting wires without a soldering iron
If the user wants to do without a soldering iron to repair torn headphones, he can use solder paste, solder, or make a reliable twist.
Solder
You can fasten wires with solder without the help of a soldering iron. For this you need a small metal container. You need to put a small amount of solder in it and also add rosin. Now you should light the stove, place the dishes on it and melt its contents.
Next, you need to lower wires of the same color one by one into the solder and run them along a wooden block so that the substance is distributed evenly . You can perform the same steps and remove excess solder using a simple rag. Next, the wires are connected together, after which you need to wait until the material hardens. After this, the exposed sections of the wire must be insulated using heat shrink tubing or electrical tape.
In the same way, you can solder a wire if it breaks at the plug or near the earphone. In this case, you need to pour crushed solder and a little rosin onto a flat surface (contacts), and then heat it so that the substance melts. After this, the material is evenly distributed with any convenient object and the prepared wire with applied solder is applied to it.
Another convenient way to solder two wires together without a soldering iron is to use foil. The action diagram is as follows. It is necessary to remove the top braid from the cable, and then remove the insulation from the contacts (usually varnish with thread). Next, you need to cut strips from the foil along the width of the exposed wires. They are used to make grooves into which contacts twisted in pairs are placed separately. Solder and rosin are poured on top of them and distributed evenly along the surface. Now you need to wrap the foil tightly around the wire so that there are no gaps, and heat it until the solder melts. Next, the foil is removed, and the wires are tightly compressed with pliers, but this must be done carefully so as not to damage them. Excess solder can be easily removed with fine sandpaper.
Solder paste
Solder paste is more often used than regular solder to repair broken wires without a soldering iron. This process is faster and easier than working with solder and rosin.
On a note! It is inconvenient to work with a solid substance, but the paste is much easier to apply to the surface being treated. You can buy it at the store or make it yourself.
To repair headphone wires, you need to coat the exposed contacts with paste, connect them together and heat them over an open fire or in any other way. With this connection, soldering occurs deep between the wires, so its strength is significantly higher than when using solid solder.
Twist
Twisting the cable is the simplest solution. You need to take two identical wires from 2 to 4 cm long, connect them together and braid them, after which you need to put a heat-shrink tube on top or wrap electrical tape . The connection should be very strong, but do not tug the cable too much during operation. If everything is done correctly, the headphones will last for a long time.
Volume control problems
How to fix headphones if you have problems with the volume control in the form of loss of sound or crackling? In this case, you can use graphite lubricant to apply it to the resistive layer to restore contact. After this, the headset should function without problems.
If after lubrication the headset continues to work poorly, then the regulator needs to be replaced with a new one.
Thus, in most cases, before you run out and buy a new headset, you can repair it yourself. To do this, you will need a soldering iron with a thin tip and skills in handling it.
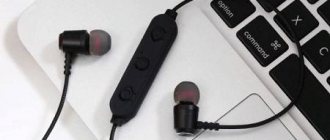
Features of headset restoration
Repairing a headset from a Samsung phone or another brand is a little more complicated than repairing regular headphones, because it is equipped with a microphone and a control button. There are usually four or five wires in a headset - one or two for microphone, two for headphones and ground. A control unit with a microphone is often installed where the cable branches to the left and right headphones. If a wire breakdown occurs above the area with the control unit, you will need to repair only one contact with or without a soldering iron. If the cable below the branching area is deformed, it is important not to make a mistake and connect the wires correctly.
Important! Usually the yellow (in some cases without insulation) cable is the grounding cable. Sometimes it can be wrapped over the microphone wire to reduce interference during a call. In any case, the cut wires are connected according to color.
Common questions and answers
Below is a table with common questions regarding headphone repair and their answers.
Vyacheslav
For several years he worked in mobile phone stores of two large operators. I understand tariffs well and see all the pitfalls. I love gadgets, especially Android ones.
Ask a Question
Question to the expert
How long will a hand-joined wire last?
It all depends on the operating conditions of the headphones. If they are regularly subjected to heavy loads, makeshift repairs will only last 1.5 – 2 months.
Is it possible to re-glue the speaker membrane if it is torn or deformed?
In theory, yes. But you need to take into account that it is very small, so it will be very difficult to carry out the work. In addition, you need to glue the structural element so that its center is exactly above the magnet. This is also not easy. Finally, in headphone speakers, the membrane, coil, and surround are all a single unit, making it very difficult to replace this structural element.
I want to replace the plug. How to understand where the new “ground” is and where the channels are?
Usually on replacement plugs this is very easy to track visually. The contacts there are located one after another, interspersed with layers of insulation. In this case, “ground” has the largest soldering area, and the channels are just small pins.
I want to replace my faulty speakers. Can I borrow them from old headphones?
Yes. But two points need to be taken into account. The first is size. The speakers must have the same diameter as the cabinets. The second is amplitude-frequency characteristics. If one speaker is changed, the frequency response should be the same as that of the second. Otherwise, in one ear the sound will have a different color and it will be uncomfortable to use the device.
The membrane is fine, the wires are intact, but the headphones wheeze. What's the matter?
There are two possible options. The first is that the speaker has become demagnetized. In this case, the device should be replaced. The second is that the input signal is too strong. Try headphones with another gadget. If the sound is normal, then the problem is not with them.
4.8/5 — (31 votes)