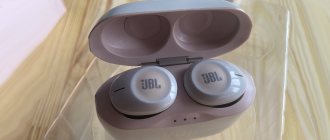
The connecting wire in the headphones is considered the weakest point in the design. If the sound emitters and plug rarely fail, then the wire, subject to deformation and mechanical stress, breaks constantly. Pets love to chew cables from audio devices. Repairing headphone wires is easy to do at home.
How to connect headphone wires to each other
Do-it-yourself headphone wire repair involves restoring contact. Before proceeding with the repair and connecting the headphone wires, the location of the break must be localized. It is easy to locate the defect if the line insulation has been damaged, but often the internal conductor breaks on the cable near the plug or sound emitters. In this case, the insulation is intact. To find the location of the damage, you need to insert the plug of the sound emitters into the corresponding socket of your smartphone or music center, turn on the music file and carefully “wash” the entire connecting cable. At the break point, the sound will periodically disappear.
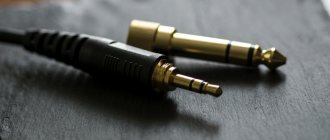
Most often, a cord break occurs at the point where the line connects to the plug. If the headset is not equipped with a microphone, then four conductors fit to the plug:
- Left channel signal
- Right channel signal
- Left channel ground
- Right channel ground
In most models, the ground conductors from the emitters are combined at a branch point, and three wires go to the plug. The audio lines are soldered to separate contacts, and the ground conductors are combined at one point. Both the audio line and the ground can break. If the signal conductor breaks, there will be no sound in one of the channels (headphones). If the ground wire is torn away from the headphones, the sound will be distorted, with a low-frequency background. A broken wire can only be repaired by completely re-soldering the connection. Rare models of sound emitters are equipped with a plug, the body of which is unscrewed along a thread, so the plastic shell will need to be cut with a sharp tool.
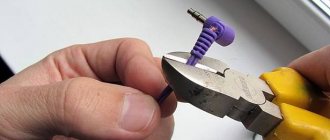
First, the connecting cord is cut at a distance of 2-3 cm from the plug. You should remember what color line comes to the corresponding petal. Next, the connector is completely cleaned from the body, and the remnants of the old core are unsoldered from the petals. The plastic insulation is removed from the connecting cable and copper conductors. To properly connect headphones and repair a broken wire, a bundle of thin copper wires must be stripped and tinned. The conductors are very thin, so the most reliable way to remove varnish is to burn them in the flame of a lighter or match. This must be done quickly so as not to burn the wires themselves. Burnt varnish and soot are removed from the conductors with a cotton swab with alcohol or solvent. This procedure also degreases the ends, which makes soldering easier.
Cleaned conductors are treated with a rosin solution or flux and coated with a thin layer of tin using a well-heated soldering iron. Before soldering the wires to the connector, a piece of heat-shrink tubing is placed on the cable. Next, the wires are carefully soldered to the petals of the plug. A heat-shrinkable tube is moved onto the connector from the wire and heated with a household hairdryer or lighter. This way, you can repair headphones from a computer or smartphone.
Finding the break point
To repair a headset with a broken wire, the owner needs to stock up on suitable tools and the determination to see the job through. Having discovered a breakdown, the first thing you need to do is find out in which of the wires the gap has formed . In this case, specialists resort to a multimeter, tester or voltmeter.
Checking for wire breaks is carried out as follows.
- Make two small cuts in the insulating material: one near the plug and the other near the speaker.
- If you carefully examine the core of the cable, you will notice a transparent protective layer. It must be carefully removed, being careful not to damage the wire itself.
- To establish a wire break or continuity, select one of the devices described above. When working with a multimeter, you need to place the black and red sensors in the slits. The squeak you hear will signal the integrity of the copper core.
- Make another cut a short distance from the original one and use the sensors again. Repeat the procedure until the device stops beeping. Remember that you need to cut the insulation very carefully.
- Once you have located the break, gradually narrow your search until you reach an area two centimeters long.
There are times when the device does not stop sending signals - this means that the problem lies not in the cable, but in the speakers themselves.
How to repair a headphone wire
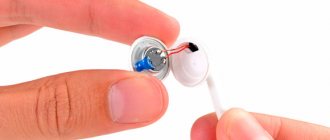
How to fix a headphone wire if it comes off. The wire can break not only at the connector, but also directly at the sound emitter. In this case, the capsule will need to be disassembled.
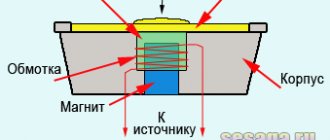
It is not difficult to open large emitters when the two parts of the housing are fixed together with a threaded connection or latches. The wire inside the sound capsule rarely breaks because it is not exposed to any stress. The exception is a manufacturing defect due to poor soldering. In this case, repairing the headphone wire is easy. After opening the casing of the sound emitter, it is immediately noticeable that the conductor is poorly soldered. If necessary, the copper line must be re-cleaned and soldered securely. Repairing torn headphones is more difficult in a miniature design.
The capsule and body are joined with a tight fit, sometimes with a small addition of adhesive. Using a sharp and thin object, you need to very carefully separate one part of the body from the other. If the wire on the headphones is torn or broken, the connection is restored by soldering. If the cable to the sound emitter breaks, it must be cut off. Then disassemble the capsule and remove the broken part of the wire. Strip and tin the ends of the conductors. Thread the wire into the base of the housing, tying a knot at the end. This is necessary to avoid cable tension and possible breakage. After checking the functionality, the case is restored.
How to connect the headphone wire if it breaks in the middle. This defect is most often caused by pets with their teeth. In this case, the external insulation of the cable is broken and the break point is clearly visible. To repair a headphone wire, simply cut out the damaged section of the wire with scissors.
Then all conductors are cleared of insulation and, using flux and a soldering iron, coated with a thin layer of tin. A polyvinyl chloride tube or “cambric” is placed on each conductor, which will insulate the connection. If such material is not available, insulating tape is used. You need to put a piece of heat shrink on the wire. Tinned wires, in accordance with color markings, are twisted and soldered. The site of each soldering joint is protected by an insulating tube.
Heat shrink tubing is placed on the wire connection and heated by a heat source. This is how a wire from any type of headphone is repaired. If there are many defects on the wire, then making a wire and repairing the headset can only be done by completely replacing the connecting cable.
This procedure makes sense only if the sound devices are of a very high class. Budget designs, with serious violations, are usually thrown away and replaced with new products.
Forgetting that they are on your head
This happened to me many times during my playing days. I spent hours playing Counter-Strike or Dota 2, and as soon as the match ended, I rushed to the toilet - forgetting to take off my headphones first. Snap, knock, front face.
This shorting of the cord causes sudden tension on the internal wires and their connection points. The headphones may not break the first, second, or even third time this happens, but the damage does add up. Each cord connection is one step closer to failure.
How to connect headphone wires without a soldering iron
There are situations when you need to make headphones if they are torn and you don’t have a soldering iron at hand. In such a situation, the method of twisting wires is used. This allows you to temporarily restore the functionality of the audio device. To twist the headphone wires, they need to be cleared of insulation, and the copper conductors must be cleared of varnish. The conductor insulation is thin and fragile. If you don’t have a tool, you can even remove it with your fingernails. The flame of a lighter or match burns the varnish coating of the copper conductors. Then the soot is removed from the thin veins with any cloth. It is good to use perfume or nail polish remover for cleaning. The cleaned and degreased strands are tightly twisted together. The twist should not be too long. The normal length of conductors for twisting is 0.5-0.8 cm.
You need to twist the headphone wires in accordance with the color marking. Places of twists need to be insulated. If a vinyl chloride tube is not available, insulating tape and even regular tape are used. You can wrap each twist separately with electrical tape. Since the tape is very sticky, winding will not be possible. In this case, two strips of adhesive tape are placed at the junction of each pair of conductors and pressed against each other. The conductors are not grouped at one point, but are routed in different directions to avoid possible short circuits between them. After this, the entire group of twists is insulated with a common layer of electrical tape or adhesive tape.
Flipping over the cord
The length of the headphone cord can be quite long. The Audio-Technica ATH-M50x and Sony MDRV6 have cord lengths of 10 feet, and even cheaper but high-quality headphones may come with 5-8 foot cords.
You may be tempted to let such a long cord hang on the ground. If so, make sure it can't be stepped on - or worse, the casters on your computer chair can't be knocked over. It only takes one severed point to render the whole thing useless.
How to fix headphones if one comes off
You can repair headphones if the wire comes off at home. The technique is no different from restoring a broken wire. The end of the cable is stripped of insulation, and the copper conductors are fired, cleaned of carbon deposits and coated with a thin layer of tin.
This is done with a well-heated soldering iron using flux. The capsule body is opened depending on its design. The remains of the soldered wire are removed from the contact. The sound line is introduced into the capsule body through a hole. A knot is tied at its end, then the prepared cord is soldered onto the contact pads of the capsule. Before assembling the case, you need to check the functionality of the sound system by listening to a piece of music.
Exposure to sweat and moisture
Electronics and water don't go together. Just like it can fry your smartphone or tablet, water can fry the audio drivers in your headphones.
Sweating can be a huge problem, especially if you listen to music while exercising. Wearing a headband can reduce the risk of sweating, but you're better off purchasing headphones for sports or exercise, headphones for sports and workouts, headphones for sports and workouts that are designed with sweat in mind. The sound quality may not be top notch, but at least it will last.
Avoid using headphones when you are in the rain or straight out of the shower . Water can drain from wet hair into cracks. High humidity can also accelerate wear on internal components in the long run.
⇡#JVC HA-SR85S Esnsy: continue to glamorize
Despite the fact that we did our best to protect these headphones from scratches, abrasions strangely still appeared on the surface of the glossy plastic. The design of the cups does not in any way encourage wearing them outside - these headphones are designed for a quiet home environment. Perhaps it is precisely because of the careful handling that the JVC HA-SR85S Esnsy looks like it just came out of the box.
There is no damage, and abrasions on the gloss are visible only in the light, and even then from a certain angle. The most painful place after scratches on the case is the Android/iPhone headset mode switch: to get to it, you need to press the plastic latch and remove the ear pad. This design does not leave the impression of being reliable: plastic is plastic - it can burst. But the choice of headset operation option is made once or twice at best, and the JVC HA-SR85S Esnsy will definitely survive this procedure.
Save on the price tag
Paying more does not guarantee a better product (eg Apple and Beats), and cheaper products may be well made and durable (eg Panasonic ErgoFit headphones). But generally speaking, you get what you pay for.
I've been able to make cheap headphones for years, but don't be surprised when your $20 foreign drum headphones take off after three months. Reliable materials, thoughtful design and quality control all come at a price. To pay less, you need to sacrifice something.
For that, check out the best Beats headphones for iPhone users if you're in the market for a premium product.
Increase volume
All devices that make noise do so by creating sound waves. Sound waves are created by vibrations, and the louder the sound, the more vibration. Because headphone components are delicate, excessive volume can distort the parts that produce sound.
At first you will stop hearing certain frequencies. The sound will shift and deteriorate, losing its rich qualities. As it worsens, sounds may begin to feel more violent than usual. Over time, you will hear buzzing and other annoying artifacts.
⇡#Pioneer SE-MJ751 Bass Head: unconfused bass
The ear pads of this model could become a quality standard for other manufacturers.
But the white color of the wire has lost its attractiveness and acquired some kind of uneven and slightly “rusty” tint. This can be easily fixed by changing the cable.
Let us remind you that a distinctive feature of this model is the use of four speakers for powerful transmission of the lower range. In addition, the Pioneer SE-MJ751 Bass Head has a bass control, which scared us when we first listened to the headphones with a slight crackle. This crackling went away almost immediately and then almost never showed up. An interesting detail: the headphones were often used in mild frosts (down to minus ten degrees) and in humid climates with frequent precipitation, but this did not affect the quality of the controller and speakers. The plastic headband has not lost its clamping force and still looks stylish and attractive.
Repair
Headphones are designed for long-term use, however, they are not immune to breakdowns. At the same time, defects typical for headphones arise most often due to careless attitude towards them on the part of users . So, the reasons why the headphones stopped working are:
- damage to connecting wires;
- connector failure;
- failure of the sound emitter, etc.
The owner of the headphones can repair many of these breakdowns with his own hands. This does not require any special knowledge; it is enough to have certain skills in performing electrical installation work and to be careful and careful.
Advice! The algorithm for repairing typical faults is the same for all types of headphones, however, in each case a certain disassembly sequence must be followed.
Tool
To repair headphones, you will need:
- soldering iron;
- tin solder and rosin;
- Screwdriver Set;
- wire cutters;
- stationery knife;
- tester;
- glue;
- heat shrink tube.
⇡#Creative Sound Blaster Tactic 3D Sigma: almost lossless
The build quality of this gaming headset was excellent. Everything about the design of the headphones is perfect, with the exception of scratches on the gloss of the earcups.
Creative Sound Blaster Tactic 3D Sigma is one of the few models in which, over time, there is absolutely no slightest play in the headband and cups. The protective foam cap on the microphone is not even frayed. The volume control works perfectly, there is no rattle. We handled the wire very carefully - and our concerns about its fragility, expressed in the review, turned out to be unfounded.
Still, there are complaints about this headset, in particular about the quality of the plastic on the external audio card. For three years, no one threw it on the floor, it was not hit with a hammer and was used exclusively for its intended purpose from the very beginning of operation. But here’s what we see over time: the audio card case is covered with scratches and even cracks. Either the system unit of the overclocker was too hot and dried out the plastic, or the manufacturer did not pay enough attention to the quality of this material.