A subwoofer is an acoustic system for reproducing frequencies of 20-120 gigahertz in sound and it is connected to the car radio in the car.
This connection can be made at the RealZvuk service station or “garage” specialists. And if you have basic knowledge, which you can find in this article, connecting the subwoofer to the radio can be done by the car owner himself. To do this, you only need to prepare some tools and consumables.
Necessary tools and materials.
- Fuse.
- Capacitor.
- Wiring.
- Wire cutters.
- Pliers.
- Insulating tape.
- Spanners.
- Adjustable wrench and tie.
- Directly subwoofer.
Connection diagram of the subwoofer to the radio.
The connection diagram for a passive subwoofer is simple: it, together with the speakers, is connected to the amplifier, and the amplifier is connected to the radio. The task of the amplifier in this chain is to transmit the signal received from the radio to the high-frequency and low-frequency speakers, where the last one is the subwoofer, and the high-frequency ones are the satellites (I advise you to read the article - DIY subwoofer amplifier).
Let me note: a subwoofer along with an amplifier requires a lot of space, so many people place them in the trunk of a car. As you probably guessed, to connect a subwoofer in this case, the wires have to be routed through the entire cabin - to the battery.
Attention! Before you start connecting the car's speaker system, you must disconnect its battery (to prevent a short circuit from occurring). Let's start connecting the passive subwoofer.
All power wires must be protected, especially the “plus”. Corrugation or other material is suitable for protection. We install a fuse on the “plus” (you can also purchase a ready-made wire with a fuse) and do this closer to the battery.
Install a Subwoofer on a car?
Sign up for installation
See How to connect a subwoofer
First stage of connection.
For wiring, you will need to find a technological hole (in foreign cars it will most likely be closed with a rubber plug, but in domestic cars it may be without a plug). If there is no such hole in the car, you will have to drill it.
We pull the wires into the drilled hole and fill it with sealant. By the way, for a more durable use of the cable, it is better to use a rubber bushing instead.
Second phase.
We stretch the wires in the engine compartment and bring the harness out into the cabin.
In the cabin, it is better to prepare places for wiring in advance, since it is better to hide it. And to do this you will have to remove the door sill trims and other interior trim elements here and there. After laying the wiring in the cabin, all dismantled trim elements can (and even need) be returned to their places.
Third stage.
From the passenger compartment, the wiring goes to the trunk, also through a technological hole; if there is none, then it will have to be drilled again. After pulling the wires into the trunk, we connect them to the amplifier: plus to plus, minus to minus.
Now the amplifier is connected to the battery and all that remains is to connect it to the radio. To do this, you will need “tulips” and a thin single-core wire that controls the power supply to the amplifier (most likely, it will be blue).
To remove the radio, use special flat keys; they are easier and faster to work with. but if there are none, you can use a simple screwdriver or knife.
The fourth stage of connecting the subwoofer to the radio.
“Tulips” are connected according to the colors of the connectors. However, it happens that the wire plugs can be red and black, while the car radio can be red and white. In such a situation, you need to connect white to black, and red to red.
After this connection, we conduct wiring through the interior with a power wire and connect the “tulips” to the amplifier ports.
All that remains is to connect the subwoofer to the amplifier. By the way, if you have a two-channel amplification device, then the subwoofer must be connected to both channels (needed for optimal signal distribution by the amplifier). Find out how to set up a subwoofer in your car here.
How to make a do-it-yourself subwoofer box for a car
A stealth subwoofer is perfect for a car. It is compact and invisible, which makes this model ideal for a car. A good speaker will require at least eighteen liters of volume. The placement problem can be solved by moving the front panel into the trunk or using a niche for a spare wheel.
We recommend:
Car radar detectors - 10 best models
During installation, the front panel extends and connects to the trunk trim. The latter is cut along the junction line of the amplifiers and subwoofer. Then the surface is masked where it comes into contact with the polyester resin. The form can be made from corrugated cardboard. You can glue the parts together with tape. The metal frame is assembled with orientation towards the edge of the fiberglass. The latter is used to make the amplifier cladding panel. Between the parts there should be a thickness equal to the rest. Fiberglass and putty will help give the device a more presentable appearance.
Column installation
Connecting an active subwoofer to the radio.
When connecting an active subwoofer to the radio, we perform similar manipulations, only we connect this directly to the radio - without an amplifier. With this connection scheme, a capacitor is connected to the subwoofer. Just remember to observe polarity here.
Many citizens install subwoofers at home, but not everyone knows how to install this device in a car and which subwoofer is better to choose. Currently, there are a large number of models on the market.
How to make a drive for a car
The most common storage device is one that uses a capacitor. The fact is that a modern amplifier consumes a large amount of current, which increases during music production. A car battery cannot provide this amount of current. And because of this, gaps appear in the sub’s work. The main mission of the capacitor is to accumulate charge, which is given to the subwoofer as needed. After the current is transferred, it again accumulates voltage.
The capacitor is connected in parallel to the subwoofer and battery. The capacity must exceed sixty thousand microfarads. When choosing a capacitor, you need to remember about a voltmeter; it will allow you to directly observe the operation of the element.
As a rule, the subwoofer is placed under the seat, the capacitor in the trunk, next to the amplifier. There should not be more than half a meter between the latter. Capacitors from different manufacturers differ in materials, capacity and design. It is better to opt for narrowly focused manufacturers.
Installing a subwoofer in a car
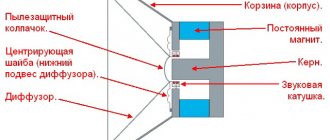
A subwoofer is an ordinary audio speaker, but it is quite large in size, and its primary task is to reproduce bass.
One speaker cannot reproduce all the necessary sounds. There is high-frequency sound, low-frequency sound and mid-frequency sound. Midrange and bass audio speakers are characterized by dense and clear bass. It is quite difficult to install such a system. It takes up quite a lot of space in the cabin, so it is very difficult to install a subwoofer, for example, in a sedan. There are active and passive car subwoofers. The passive model has only one audio speaker, which is built into a wooden body. This material improves sound quality. The passive subwoofer is devoid of any additional details. This is a regular speaker. It cannot be connected to a common multimedia system, because this can cause a short circuit.
Making a subwoofer enclosure
First of all, we calculated the housing for the loudspeaker using the WinISD program, doing it in 3D through Sketchup.
The case will be set to 35 Hz. The dimensions of the base (width and depth) are 600x400, respectively, because the subwoofer will need to fit well under the cabinet (photo at the end of the article). Here are screenshots from WinISD: according to calculations and the WinISD program, the capacity should be 60.9 liters, not counting the speaker and Bass reflector.
The minimum cross-section of the tunnel is 150 cm2, so we take 15 cm by 10 cm. The program showed a length of exactly 50 cm, but they couldn’t hold it for that long, so they tilted it. It's hard to immediately understand how bending affects the length of the tunnel, so we measured it logically so that the bent version had the same amount of air as the straight version. An OSB board of 18 mm is predicted. When bending a tunnel, there is a triangular element that is calculated so that at the narrowest point the area is the same as in straight lines, that is, 150 cm2.
Next you need to buy several MDF boards - one with a thickness of 25 mm and five - 18 mm. Then cut all the slabs with an extra 1mm edge to fit the rest of the pieces exactly. Dimensions of plates in the table (thickness, quantity, dimensions):
First, we will glue the part of the tunnel with the bass reflector and screw it together using drywall screws. Then we will glue the bottom wall. Using the available space, we put the element on the bend of the tunnel, then add an element that was also the wall of the tunnel and the chamber with the electronics.
Then we will glue and screw the side wall on the side of the radiators and the wall on the other side. Let's glue the front plate. Now there are holes for the socket and radiators.
To strengthen it, we will tighten the speaker chamber with a T-shaped element. Here, no rigidity was given to the bottom wall, because the tunnel wall stiffens it enough. At the end we will glue the top wall.
The wood work is almost finished. Now let's start covering with matter. Glue everything to the wood with the same glue that was used to glue the box.
Cut the felt with a hot blade. At the edges where two pieces of felt were connected, we glued them to the overlap (one part overlapped the other side by a couple of cm, and the other to the edge).
Useful: Portable headphone amplifier
Choosing a speaker for a subwoofer in a car
10-inch woofer Often, car subwoofers use speakers ranging in size from 6 to 15 inches. We will focus on the most optimal and popular options - these are 10 and 12 inch speakers.
Why this particular size? Speakers under 10 inches are most often used for extra bass and front bass, and are unlikely to make a good subwoofer. Speakers as small as 15 inches are used in car audio competitions. A subwoofer with such a speaker has a volume of up to 90 liters and will not fit in every car. In addition, it greatly distorts the sound.
There is no consensus on what power speaker to choose. But one thing is for sure - the maximum power of the speakers must exceed the maximum power of the amplifier. If the speaker is operated at maximum volume for a long time, this will lead to sound distortion and noise. It's better to keep a balance.
If you do not plan to take part in competitions, we recommend choosing 10-12 inch speakers. A homemade box for a 12-inch speaker has a volume of 40-50 liters and will fit in any trunk.
This type of subwoofer requires a special amplifier. Such a device receives the corresponding signals from the system, and then sends them to the subwoofer, which produces low frequencies. An active subwoofer already has its own amplifier. It can be directly connected to a multimedia system and enjoy excellent sound. You will not need to additionally buy and connect an amplifier. But active subwoofers have one drawback - they are much more expensive than their passive counterparts.
Before connecting the subwoofer, you must remove the terminal from the battery. Then you need to connect the most important wiring, the connector for which is located between the engine and the car dealership. The wire must be passed through as carefully as possible, and then clamped directly under the hood.
An active subwoofer, as a rule, has a pair of outputs, which provide the ability to connect directly to the system. For this purpose you need to use a special cord. In general, installing a car subwoofer will not cause any particular difficulties.
Listening to the subwoofer
- The big red switch is the power supply to the transformer.
- Below it there is a network indicator.
- The green switch turns on the bass reflex tunnel lighting.
- Next to it is an input switch.
- The black switch in the upper right corner is used to switch the speaker between the internal power amplifier and the Speak-on jack on the rear panel.
- The red LED below indicates problems and turns off the speaker. It is controlled by uPC1237.
- The green LED at the bottom shows the voltage status of the USB next to it.
- To the right of the USB connector there are 2 jacks as one of the input signals.
- The switch at the bottom right is used to rotate the signal phase 180 degrees.
- The left potentiometer controls the volume level.
- The right one is for adjusting the phase shift in the range -180-0.
The sound became deeper. Much. In any case, it was better than without a sub. You can feel the air resonating in your lungs and objects bouncing on the shelves. It is difficult to say how much was spent on the manufacture of this design, but the cost of the purchased parts, offhand, is about 5,000 rubles. And at the end we post printed circuit board layouts and files in the application.
- As a useful addition, here is another design for a homemade active floor-standing subwoofer
Preparation
To make a subwoofer enclosure yourself you will need:
- Drawing;
- Materials: plywood or MDF, glue, screws, terminal block, wire for connection;
- Tools - jigsaw, screwdriver, pencil, template for mounting hole or compass.
Drawing
Having the housing parameters for the subwoofer in hand (volume, area and length of the port), you can make a drawing yourself using special programs (in my opinion, SketchUp from Google is the most convenient for this). But if you make the box for yourself, then there is no point in wasting time learning the software and doing everything the old fashioned way - by hand.
If you do not know how to calculate the enclosure, then read the material “How to calculate the enclosure for a subwoofer.” You can also order a paid estimate on the Internet; as a rule, it is accompanied by a clear drawing for manufacturing.
An example of a drawing of a housing with a bass reflex (FI)
Materials and fasteners
Housing material
In order to make a box for a subwoofer, you need a material that should vibrate as little as possible. From experience, it is best to use MDF (not painted, not laminated, etc.)
MDF (MDF - Medium Density Fiberboard). In Russian - medium density fiberboard.
MDF is easy to process, has good density, due to its structure it has no resonances and does not delaminate - the bass in such a box is soft and dense. MDF is more expensive than plywood and is “afraid” of moisture.
Plywood is the most common option and costs less than MDF.
Do not use chipboard or old furniture to make subwoofer boxes. A plywood or MDF body will always sound better.
If the walls are thick enough, there is no need to cover the inside of the body with vibration insulation, etc.!
Do not use material thinner than 18 mm. and the larger the volume of your case, the thicker the walls should be.
Subwoofer concept
How to convert a passive subwoofer into an active one
It will be useful for a beginner to know what this speaker is generally intended for. Isn't it possible to just use a pair of multi-voice speakers and quietly enjoy the full sound? It turns out not.
Note. As you know, a subwoofer is designed to reproduce low frequencies that have low localization. If there were not one speaker enclosed in a separate housing, it would be difficult to determine from which point the sound is coming. It will seem unreal, too voluminous and enveloping.
In addition, if earlier, when the subwoofer was not invented (see How to make a subwoofer: practical tips), speakers for reproducing various frequencies, including low ones, had to be huge and expensive, then with the advent of a separate subwoofer everything has become much simpler, both in terms of volume and cost.
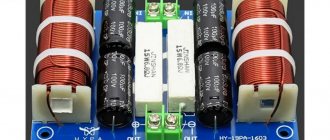
Speaker circuit
Box for 12 subwoofers with bass reflex
To build the box we will need:
- Dense multi-layer plywood or chipboard
- Self-tapping screws
- Screwdriver or screwdriver
- PVA glue
- Carpet
- Sound insulation materials
- Wires and terminal block
Cover the inside of the box with sound insulation. Before screwing in the screws, use a thin drill to mark holes so that the plywood does not burst. Assemble the structure, cut out the carpet with a margin to bend along the edges. Apply glue, let dry, and staple.
How to make a subwoofer box correctly
Purpose, design and principle of operation of the CV box
The design of the HF box is aimed at modulating the sound flow. The effect of sound transmission and reflection is used. Thanks to the special housing design, sound harmonization is achieved. This is especially noticeable at low frequencies and when installing a subwoofer. With the appropriate dimensions, the HF box will make the bass sound quite loud, bright, but unusually deep.
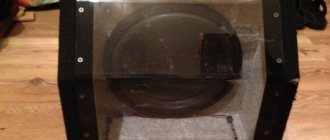
Subwoofer box