Car audio amplifiers
Purpose and principle of operation
The sound of your car radio can be improved by installing high-performance speakers. Unfortunately, the parameters of the standard equipment do not allow the use of high-power sound emitters, which limits the possibilities of modernization with little cost.
In such a situation, installing an autonomous sound amplifier will help out. It is an electronic device powered from the vehicle's on-board network that increases the amplitude (span) and power of low-frequency electrical oscillations.
Four-channel car power amplifier with adjustable parameters
The input of the device is supplied with a signal taken, usually from the linear output of the radio. An acoustic system is connected to the output. In other words, in the electrical circuit the amplifier is located between the audio source and the speakers.
Classification
A car's interior sound system consists of several channels—separate “lines” for generating, amplifying, and processing the low-frequency electrical signals needed for speakers.
For this reason, one of the criteria for classifying car amplifiers is the number of channels, each of which has its own input and output.
Photo gallery: examples of car amplifiers for 1–6 channels
Low frequency amplifier for subwoofer
Car stereo audio amplifier
Six channel car amplifier
Typically the device has from 1 to 6 channels. The stereo system requires two (left and right speakers). The "front plus rear" scheme - four.
When a subwoofer is needed, choose amplifiers with an odd number of channels (3 or 5) or those that allow connection in bridge mode. The latter allows you to use a more powerful speaker, as it uses two amplification channels simultaneously. In addition, the low-frequency speaker can be connected using a separate single-channel amplifier - a monoblock.
Based on a combination of energy efficiency and output signal distortion indicators, automotive audio amplifiers are divided into classes A, B, AB, C and D.
Class A devices have the lowest efficiency and the least signal distortion. In contrast, Class C is characterized by high energy efficiency and high distortion.
Class AB is an economical compromise solution that combines acceptable sound quality and good energy efficiency.
Class D includes equipment with digital signal processing, which provides excellent sound. Its disadvantage is its high cost.
Specifications
From a consumer point of view, the most important parameter of car audio amplifiers is output power. Its value is indicated in the passport or certificate. You should not rely on the numbers printed on the case or front panel. As a rule, they are not true.
There are several techniques for measuring output power. The following are most often cited in documentation.
PMPO (Peak Music Power Output) - maximum peak output value. In practice, it does not characterize either the sound quality or the capabilities of the device and, as a rule, is given for advertising purposes.
RMS (Root Mean Squared) - root mean square (square) value of power at a given signal quality. This parameter characterizes the state at which even an inexperienced listener notices sound distortion.
DIN POWER is the most adequate parameter measured at the rated load with a normalized harmonic distortion coefficient. Its varieties are also referred to in the documentation as IEJA and IHF.
Among the main technical characteristics (except power output):
- frequency range,
- nonlinear (harmonic) distortion coefficient,
- signal/noise ratio,
- dumping factor.
In practice, the same characteristics of equipment from different manufacturers differ slightly and provide high sound quality.
Choice
Based on the number of channels, the amplifier is selected based on the number of speakers that need to be connected and their connection diagram.
An additional advantage may be the presence of crossovers - built-in audio frequency filters (HPF highlights the upper ones, LPF - the lower ones) with adjustable parameters (cutoff frequency, gain, slope).
When choosing the power of a car amplifier, take into account the capabilities of the speakers. To operate for a long time, they do not need to be overloaded, so the power should be less than what the speakers are designed for.
If there is no linear output (tulips) in the radio, which happens very rarely, you will need a high-level input.
Choosing a place
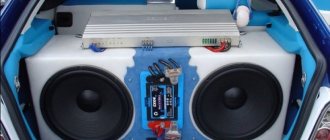
Amplifier in the trunk
The first thing you must do before installing the amplifier is to decide on its location. It doesn't matter whether you bought a two-channel or four-channel amplifier. Even if it is a candy bar, you need to correctly determine its location. The length of the wires from the radio to the amplifier, and from the amplifier to the speakers, will depend on this.
For example, if you plan to install an amplifier in the trunk behind the seats, you will have to pull the interconnect wires from the radio back - about 4-5 meters. In this case, immediately buy wires of the required length. Next, you'll need speaker wires. If the amplifier is located in the back, calculate the length from the amplifier to the front speakers - from 3 to 5 meters for each speaker. It is important to consider that the length can be significantly longer than the calculated one, since you will be laying the wires directly. It is also important to determine the length of the wires from the amplifier to the rear speakers or subwoofer.
When determining where to install your subwoofer, keep in mind that the amplifier generates heat. To install the device, it is better to choose a place around which air can easily circulate. Do not cover the amplifier with a rug or place it upside down or on its side.
If you want to install the amplifier in the front of the car, under the seat or dashboard, you will save on wires. In addition, it is generally accepted that the shorter the length of the wires, the lower the losses. Therefore, the better the sound in the car.
There is also an option that involves installing two amplifiers. One is placed in front for the front speakers, and the other in the back for the rear speakers or subwoofer. There are many options for installing amplifiers, and before you get started, think about where you will place it and calculate the length of the wires.
Install the amplifier under the seat
If you correctly calculate the installation under the front seat so that the amplifier does not interfere with its movement and has access to its adjustments, then this will be a good solution. The installation is hidden, does not take up useful space and requires a short distance to the power source (if the battery is under the hood), which is more important than proximity to the sound source. But there is a difficulty in self-installation (removing the seat, supplying speaker wires, etc.), it is necessary to think about protection from the feet of rear passengers; not every amplifier is suitable in size and form factor. Usually used for acoustic amplifiers, rarely for a front subwoofer.
Placing the amplifier under the rear seat can be an ideal option for hidden installation, as long as it provides cooling and protection from passengers sitting on top. But this solution is not used often, since not every car has the required interior geometry in this location.
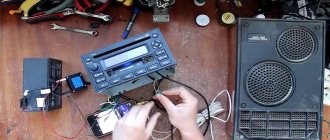
Connecting the amplifier to the radio
Connecting the amplifier to the radio is quite simple. It connects with two types of cables: RCA interconnect and Remote.
Make all connections on a de-energized system (positive wire folded away from the battery)!
Interconnect cable
To avoid interference, lay acoustic and signal cables on the opposite side of the power cables; if intersection cannot be avoided, do it at a right angle.
Interblocks or RCA connect to the linear outputs of the radio and transmit the audio signal to the amplifier. Line outputs have a left and right channel (can be mono for a subwoofer), do not confuse them when connecting to an amplifier, so as not to disrupt the balance adjustment on the radio (left/right).
Remote
The minimum cross-section wiring that transmits the signal to turn on the amplifier when the radio is turned on is the same when it is turned off. Usually the radio has a separate wire for this; if it doesn’t exist, you can connect to the active antenna control or connect it to a permanent plus by installing a toggle switch to independently control the amplifier. It is highly not recommended to power it from a constant +12 directly - this way your amplifiers will be constantly on, which will be an unnecessary load.
Wires
Speaker wires
On sale you can find ready-made sets of wires for amplifiers. They are usually made in China and are of low quality. If you are installing an amplifier for the first time, purchasing such a kit will be the best option for you. To achieve better sound quality, purchase wires separately.
You can connect the amplifier using ordinary stranded copper wires. Please note that single-core household wires will not suit you - only multi-core is needed. A wire marked PVA, sold in hardware stores, is suitable for connecting acoustic devices.
For rear and front speakers, buy a 2x2.5 PVS cable, and for tweeters, 2x1.5 is enough. The subwoofer requires thicker wires - 2x4 cross-section. The thickness depends on the length of the wires and the power of your speakers. The longer the wire, the thicker it should be.
https://www.youtube.com/watch?v=vBpwXG5wHvA
Everything is similar with the power wires for connecting the amplifier. If your music is simple, a simple wire will do, which you can connect to the one that powers the radio, and the minus to the body of the car. This is not very correct, since losses in the form of deterioration in sound are possible.
The best option is to connect the power wires from the amplifier to the car battery. The wire should be chosen thick enough. For example, KG with a thickness of 25-35 is suitable. The longer the wire and the more powerful the acoustics, the thicker the wire you will need.
The positive wire must be connected through a bulb with a fuse, the rating of which will correspond to the fuse on the amplifier. Place the flask itself at a distance of no further than 30 cm from the battery.
To connect the power wire to the radio, you can use any single-core wire, as it will not have any effect on the sound of the acoustics.
PVS
In order not to buy KG and PVS wires for the amplifier, you can buy wires for cutting at an auto store. They are not of the best quality, but they are suitable for not very powerful audio systems.
If you find mounting kits with different wires on sale, choose the option with the thickest wires - this way you will achieve high sound quality and be able to connect several amplifiers to the power wires. Use power wires with a cross-section of 21 square meters or more. mm with a length of no more than five meters. The negative and positive wires must have equal cross-section.
Step-by-step instructions for serial connection
In this embodiment, the resistance is summed up and calculated using the formula:
R1 - first speaker,
R2 - second speaker.
In this case, R1 must be equal to R2, otherwise the speaker system will quickly wear out and the expected sound effects will not live up to expectations. Using this scheme, you can connect as many speakers as you like, but their R value should not exceed the maximum permissible R of the amplifier. It is also worth considering that the more speakers are connected in series, the less sound power will be output.
- Negative 1 is connected to the positive channel of column 2.
- Positive 1 is connected to the negative terminal of the device.
- Negative 2 is connected to the positive output.
The serial connection of three or more speakers is carried out according to the same scheme, where each subsequent one is polarly connected to the previous one, and their outermost contacts are polarly connected to the terminal of the device.
Connection
After studying the types and types, we move on to the question of how to connect a subwoofer to a car radio without an amplifier:
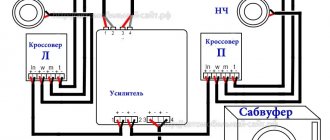
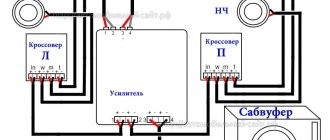
To start connecting an active subwoofer, first we find two inputs on the back panel of the car radio, then using a linear wire we connect the input of the head unit to the subwoofer input. Then we connect the power - to do this we stretch the power wire from the “plus” terminal of the battery to the subwoofer A “negative” » we connect the subwoofer and the battery with a wire. When connecting an active subwoofer to a car radio, it is necessary to install an additional (very important) component - a fuse. It should be installed near the battery itself. The installation diagram of a subwoofer without an amplifier is shown in the first picture of the article. When low-frequency sounds are played, the subwoofer's electrical power consumption increases significantly , as a result of this, the load on the elements supplying the on-board network of the machine increases. Therefore, for the safety of the power circuit, an additional capacitor is installed in the subwoofer power circuit
- After connecting the subwoofer to the car radio, we proceed to setting up our speaker system
- As a rule, the whole setup comes down to creating a limit for the upper limit of operation for the woofer, then choosing the correct oscillation phase for the speaker
Now, how to connect a subwoofer in a car without an amplifier, you usually have to completely redo the audio power system, so here is an approximate list of necessary purchases:
- 5 meters 8AWG power cable(red)
- 1 meter of cable 8 AWG black
- 5 meters of control cable (thin) with a cross section of 0.75 mm
- Fuse holder FH58
- 40 Amp fuse
- Interconnect cables
- 2 meters of tubing
- Terminals and ties
The circuit of the sound system is simple, so there is no point in describing it in full, see the first photo of this article:
- The fuse is placed 10-15 centimeters from the battery, throw the power cable into the tube
- All cables inside the cabin are laid under the carpet
Subwoofer terminals
How to connect a subwoofer in a car without an amplifier - see the designation of the outputs on the subwoofer:
- +12V output is power (supplied only to the battery through a fuse)
- REM is the control wire, it comes from the radio, and connects to a blue/white wire (for Pioneer car radios, if you have a different one, then see the radio connection instructions), which usually sticks out of the bundle of wires coming from the radio
- The GND terminal is ground (negative wire)
- LOW INPUT contact (under tulips) - RCA wires are connected (to the subwoofer from the radio, if any)
- HI-INPUT contact - connect here if there are no RCA outputs on the radio
Now it’s clear how to connect a subwoofer to a car without an amplifier, all that remains is to wish you success in this matter; to better understand the topic, we recommend watching our training video.
Attach the amplifier to the subwoofer housing
At first glance, this is a very convenient option - easy installation, no need to run long wires to the subwoofer, and easy dismantling of the entire structure. It is worth understanding that even imperceptible vibrations of the subwoofer body (they are always there) greatly affect the amplifier elements and can damage them, as well as loosen the fastenings. But if there is no other way out, then it is recommended to mount it through a separate spacer using rubber gaskets in order to somehow reduce the transmitted vibrations.
Installing an amplifier in a raised floor
Advanced method. It has the advantages of the previous one, preserving the spare tire, but requires the correct manufacture of a separate canister (raised floor), in which several amplifiers and components can be easily located, additionally distributing all the wiring.
✆ +38 ✆+38
Protect cables from damage with additional insulation.
The wires must be well insulated with electrical tape.
This connector is used if the car radio does not have linear outputs; in principle, the same circuit is implemented that I presented earlier with resistors. Well, you can buy any fuse holder flask based on your personal preferences. To avoid the device body knocking against other structural elements, the adapter is wrapped in foam rubber and secured with electrical tape.
The signal wire from the signal source is supplied to the Remote sockets, i.e. Another important point. How to properly connect an amplifier in a car There are three main problems related to the layout of car audio equipment. The need for such voltage arises as a result of insufficient power from the on-board network to drive the speakers.
Why is an amplifier needed for a car radio?
You should not install the device in the first place you like: most likely this will not be the best option. Often the sound quality is affected by the poor quality of the amplifier and speakers when technical equipment is purchased secondhand, but it happens that branded equipment sounds very bad. Since audio equipment is often placed in the trunk of a car, a wire length of about 5 meters is considered.
Such connection of the amplifier in the car will provide the most reliable contact, which will not depend on vibration and shaking. To supply power, the wire is selected according to the power of the amplifier.
How to properly connect an amplifier in a car
Specifically for the body, the standard wiring is unlikely to be designed for the additional current consumed by the amplifier. But in order for the ear to normally perceive low-frequency sounds along with other mid-range and high-frequency sounds, the sound power must be 2 times greater than the right R and left L channels separately. Since the device is powered by a car battery, the total power of the channels must be divided by 12 volts. The most popular operating scheme and very often in bridge mode they use an inappropriate load and, as a result, the amplifier fails. If you don’t want to rape your amplifier, don’t bridge it with a sub with a resistance of less than 4 ohms, I recommend using a load of 8 ohms.
Based on this value, the wire cross-section is selected. You should not install the device in the first place you like: most likely this will not be the best option. You will also need a 3.5 mm adapter. How to install the AMPLIFIER?
Parallel connection diagram
When connected in parallel, the load resistance drops and the output power increases in proportion to the number of speakers
Here you should pay attention to the maximum permissible load on the amplifier and the number of channels
Most models are designed for a load of 2 ohms, less often 1 ohm, but for high-quality sound and longevity of the equipment, it is advisable to create an optimal load for the device. So, for example, when connecting two speakers with R = 4 Ohms and two speakers with R = 8 Ohms to an amplifier with R = 8 Ohms, we get the permissible resistance of all speakers (4+4+8+8=24 - total; 24: 4=6 - total resistance per device).
- The negative channel of speaker 1 and speaker 2 is connected to the positive terminal of the device.
- Positive - to the negative contact of the same channel.
- All others are connected according to the same principle.
Install the amplifier on the back of the seat
Another popular place to install the amplifier is the back of the rear seats. There is enough space, there is quick access to adjustments, the useful volume of the trunk is practically not used, and installation is relatively simple. But there is a possibility of contact with the objects being transported, and problems with folding the seats may arise, so you need to correctly position the wiring to prevent wear.
Install the amplifier in the rear shelf
One of the most common installation locations. The installation is partially hidden, the amplifier does not take up space in the trunk. But it is not uncommon for difficulties to arise during the mounting process due to the topography of the shelf, trunk opening system or the presence of rear speakers; access to adjustments may also be difficult if they are located at the front. When installing, make sure that the body does not touch the body; for this, a spacer made of wood or plastic is usually used.
