The Windows Audio Session API (WASAPI) allows client devices to control the flow of audio data between an application and the target audio device. Makes it comfortable to listen to music and mix without unwanted delays and without loss of quality. It is convenient to download wasapi on our website and install it.
What is WASAPI
Each audio stream played on a device is a member of an audio session. Using session abstraction, a WASAPI client can identify an audio stream as a member of a group of related audio streams. The system can manage all threads in a session as a single unit.
The audio engine is the user-mode audio component through which applications share access to the final audio device. The sound machine transfers audio data between the endpoint buffer and the end device. To play an audio stream through the render endpoint device, the application periodically writes audio data to the render endpoint buffer. The audio engine mixes streams from various applications. To record an audio stream from a capture endpoint device, the application periodically reads audio data from the capture endpoint buffer.
audio output chain
WASAPI consists of several interfaces. The first one is the IAudioClient interface. To access WASAPI interfaces, the client first obtains a reference to the target audio device's IAudioClient interface by calling the IMMDevice::Activate method with the iid parameter set to the REFIID IID_IAudioClient. The client calls the IAudioClient::Initialize method to initialize the stream on the endpoint device. After the stream is initialized, the client can obtain references to other WASAPI interfaces by calling the IAudioClient::GetService method.
Many methods in WASAPI return the error code AUDCLNT_E_DEVICE_INVALIDATED if the target audio device used by the client application becomes invalid. Often an application can correct this error.
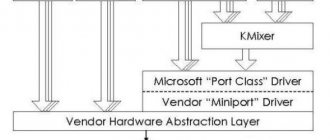
WASAPI implements the following interfaces in foobar.
- AudioCaptureClient . Allows the client to read input from the capture endpoint buffer and pass it to the browser.
- AudioClient. Create, configure, and initialize an audio stream between an audio application and the audio system or hardware buffer of the audio target device.
- AudioClock. Monitor the stream's data rate and current position in the stream.
- AudioRenderClient. Write output to render endpoint buffer.
- AudioSessionControl. Configure control parameters for an audio session and monitor events in the session, including default.
- AudioSessionManager. Enable access to session controls and volume controls for both cross-process and specific audio sessions.
- AudioStreamVolume. Control and monitor volume levels for all channels in an audio stream.
- ChannelAudioVolume. Control volume levels for all channels in the audio session to which the stream belongs.
- SimpleAudioVolume. Control the overall volume level of the audio session.
- AudioSessionEvents. Provides notifications about session-related events, such as changes in volume level, display name, and session state. Gives access to the user of this program in mode and support.
How to install plugins in foobar2000
Before installing plugins for the player, you must place all the necessary plugins in one directory. Almost all popular extensions are available on the player’s official website. Use foobar version 1.4.6 - it is the most stable at the moment.
Important! Plugins are downloaded as archives in zip (most often) or fb2k-component format. There is no need to unzip them into the program directory (unless otherwise indicated in the plugin description), the program will do this itself during installation.
There are 2 installation methods.
First way:
- If the downloaded archive is in zip or fb2k-component format, then open foobar2000, then click on the File item at the top and go to Preferences.
- Click on the first item in the menu on the left - Components.
- Click on the Install button below to install the third-party plugin. In this case, the program itself will extract the necessary files from the archive and place them in the correct directory. The plugin will appear in the list.
Second way:
- If the downloaded archive is in a different format, you must first unpack it (for example, using WinRar).
- Find the file with the dll extension and transfer it to the Components folder in the directory where the program is installed.
- Restart the player. The plugin should appear in the list of components.
As you can see, foobar2000 is easy to customize, since there are a huge number of plugins with which you can select the required sound quality. The installation process is also extremely simple and can be done in 2 clicks.
What is the difference between Wasapi Exclusive (Event) and Wasapi Exclusive (Push)
If you decide to download wasapi exclusive, then there are two options for 32 and 64 bite. There are two main ways to communicate using:
- Wasapi Exclusive (Event).
- Wasapi Exclusive (Push).
Both carry the same audio data and sound the same. The difference lies solely in the ability to work with one or another equipment.
Please note: starting with version "MC 18.0.183", WASAPI is now used as the default program. If your audio device does not support this mode, you can disable it in the device settings dialog.
Versions up to 18.0.183. WASAPI output mode sends data from Media Center to the audio device. It works with almost all equipment.
WASAPI Event Style allows the audio device to retrieve data from Media Center. This method is not supported by all hardware, but is recommended if it is supported. This offers several benefits:
This allows the audio subsystem to retrieve data instead of sending data to the system.
The hardware (or WASAPI interface) never sees pause or reset calls. Instead, when pausing or resetting, silence is delivered in a pull loop. This eliminates the need for hacking cards that surround their buffers when paused, reset, etc. (ATI HDMI, etc.). This provides a more direct data path to the driver/hardware. The main "fetch loop" uses a non-locking circular buffer (a system that J. River built for ASIO) so that the fetch request is completed as quickly as possible.
Advanced settings
By clicking the Detailed settings
we find ourselves in the advanced settings of the program.
The first group of settings relates to exclusive mode. Here you can select the data format in which the audio will be output. Here you should either set the parameter to auto-selection mode, or select the supported mode with the highest bit depth (see table). You can also enable dithering here (apparently with noise shaping), which will be performed when the bit depth is reduced (for example, if the source is 24-bit and the output is 16-bit). By the way, let's look at the quality of dithering.
NS on
NS off
It’s very strange - no dithering, much less noise shaping is visible here.
The program just adds some strange additional noise. This is probably a bug - I have already reported this oddity to the developer. Added: According to the developer, processing is still performed and is called first order noise shaping. Those. additional noise is not introduced into the recording, and the existing quantization noise is displaced into the high-frequency region using a special algorithm that includes feedback. The developer also claims that natural microphone noise, present in most recordings, can easily act as a dither. Those. This algorithm gives predominantly better results on live, non-synthetic recordings. Added:
in version 4.0.63 the ability to use combinations of dither and noise shaping was added. Next we have the settings for the general WASAPI mode. Here we can control the quality of the resampler (resampler MFT or Audio resampler DSP) included in the Windows Audio Service. As written in the Microsoft documentation, if the program does not control the resampler quality, the default value is set to 30. Let's compare the resampling quality of 44.1->96 kHz with the quality of 1, 30 and 60 (maximum).
Q=1
Q=30
Q=60
By ear, the minimum quality has significant distortion; quality modes 30 and 60 are almost equally acceptable by ear. By the way, it’s interesting that resampling quality control was introduced only in Windows 7.
There is also a setting for automatic signal amplitude scaling up to 98% of the maximum, which prevents the Windows limiter from interfering (otherwise it will compress the signal).
As for the Shared mode, you can familiarize yourself with the features of its operation in the review of Windows Media Player.
And the last group of settings that interests us is Playback thread settings, i.e. playback stream settings. Here we come across an innovation called MMCSS (Multimedia Class Scheduler Service). This service distributes processor resources between processes responsible for performing real-time tasks - recording, playback (rendering). By enabling this function (DwmEnableMMCSS(True) and setting the task type to Pro Audio, we will set the maximum CPU access priority for playback, which will further reduce latency (buffer size). Thus, setting the Pro Audio mode reduces the likelihood of buffer underruns (which is what causes the clicking noise), but this mode is less efficient in terms of power efficiency.
In general, this is all settings regarding playback quality. It should also be added that before playing the playlist, the program performs decoding and the necessary processing (for example, dithering or amplitude scaling), placing the result in the computer’s RAM in the selected format (for the exclusive mode, the mode selected in the settings is used, for the general mode, the original format is used). Here is an example of the log after starting and turning on the track:
PlayPcmWin 4.0.62.0 64bit wasapi.Init() 00000000 wasapi.DoDeviceEnumeration(Play) 00000000 wasapi.ChooseDevice(Speakers (Creative SB X-Fi)) 00000000 wasapi.Setup(PCM 44.1kHz Sint32V24 2ch ProAudio Ex inclusive EventDriven latency=3ms zeroFlush=500ms timePeriod=0.5ms) 00000000 Endpoint buffer size = 132 frames. Read playgroup 0 completed. Elapsed time: 1632ms wasapi.StartPlayback(0) 00000000
The duration of the track is about 6 minutes. After launch, the program consumed 70 MB of RAM, after turning on the track - 212 MB.
As you can see in the screenshot. I was able to output audio in i32V24 format with a latency of only 3 ms. No sound artifacts were observed
What’s most interesting is that in Shared mode, the program performs resampling using the resampler MFT algorithm, and then receives the stream back, placing the already resampled audio in RAM (i.e., resampling is not performed on the fly). Here's the log:
PlayPcmWin 4.0.62.0 64bit wasapi.Init() 00000000 wasapi.DoDeviceEnumeration(Play) 00000000 wasapi.ChooseDevice(Speakers (Creative SB X-Fi)) 00000000 wasapi.Setup(PCM 44.1kHz Sint16 2ch ProAudio Shared EventDrive n latency=3ms zeroFlush=500ms timePeriod=0.5ms) 00000000 Endpoint buffer size = 2880 frames. Resampling… Read playgroup 0 completed. Elapsed time: 6677ms wasapi.StartPlayback(0) 00000000
After the work started, the program consumed about 340 MB of RAM.
PlayPcmWin supports WAV, AIFF, FLAC formats, and also has CUEsheet support.
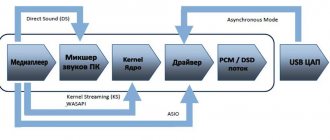
What is the difference between Directsound and Wasapi Shared
Windows is the most widely used operating system in the world. people use it to solve everyday problems, and listening to sound is one of them. Microsoft Windows 7 and above can play sound in two ways. using direct Directx audio support and WASAPI support. Most Windows applications use the Direct Sound approach. Windows can play multiple streams from different applications when using direct audio. Directsound works as an intermediate layer between software and sound drivers. It takes audio from other software, then resamples the entire audio stream into one stream, and then sends it to the audio drivers. The downside to this approach is that we never get what we actually play. for example, if someone is playing a 192 kHz, 24 bit audio file. then windows will probably convert it to 44kHz, 16bit with a different audio. Direct Audio automatically resamples the audio stream to the appropriate sampling rate that can be supported by the audio hardware.
WASAPI provides two modes of operation. general mode and exclusive mode. General mode works the same as direct audio, with the Win mixer doing the resampling and mixing. In exclusive mode, WASAPI bypasses the Windows audio mixer and the application can send data directly to the sound card. In this mode, the application can decode formats such as DTS, DTS master audio, DOLBY True HD, Dolby digital, Flac, etc. and send the unmodified stream to the sound card.
Besides the different modes, how WASAPI manages data between buffers is also important. WASAPI uses a push and PULL approach to request data to be processed. When using the push method, the application places data in buffers and constantly monitors them, and as soon as it sees that they are empty, it fills them again. In the PULL approach, which is a modern development, the application uses two buffers. Audio drivers call the application as soon as it sees an empty buffer and begin using data from another buffer. meanwhile, applications fill the empty buffer.
Basic
An audio signal, in general, is encoded by a sequence of signal amplitude values measured at regular intervals. A single amplitude value is called a sample, and the time between two adjacent measurements is called the sampling frequency or quantization frequency. In the vast majority of cases, a sample when transferred to an audio device is described as a signed integer - 16, 24 or 32 bits. The 32-bit width can be used to align the device buffer on a double-word boundary, in which case the sample is encoded with only the first 24 bits, or for full-bit encoding. The first option is available in ASIO and WASAPI, the second only in WASAPI.
The maximum achievable signal-to-noise ratio is determined by the sample bit depth and is calculated as 20log(2^q) where q is the sample bit depth.
16 bits - sample range [−32768, 32767], SNR 96.33 dB 24 bits - sample range [−8388608, 8388607], SNR 144.49 dB 32 bits - sample range [−2147483648, 2147483647], SNR 192.66 dB
Due to the mutual multiplicity, sampling rates (the number of samples per second for one channel) should be written in two sets: {44100, 88200, 192000} and {48000, 96000}. The two sets of frequencies mean that an audio device needs two oscillators for good synchronization. Of course, you can use one with a multiple of the frequency, for example, both 88200 and 96000 Hz, but this significantly increases the complexity of executing an accurate clock circuit.
Conclusion : a high-quality audio device must have two oscillators, one for working with frequencies {44100, 88200}, the second for {48000, 96000, 192000}.
Which is better ASIO or WASAPI
ASIO was designed to work around the original broken Windows audio subsystem, which forced everything to run at a fixed speed, mixed system sounds and audio streams, and had serious latency problems. ASIO was designed to provide a low latency interface for professional audio computing. Wasapi is a Microsoft development that addresses shortcomings at an earlier stage and is stable. But it has less support for non-standard playback speeds and may not support dop dsd or higher dsd speeds.
ASIO natively supports all sample rates that the connected DAC can handle and has no problems with DSD. The length of the buffer mainly depends on the overall system load, as the computer has to interrupt other operations to load the next chunk of samples into the output buffer, so on low-power or busier systems, a very short or very long buffer can increase CPU load. This may cause unwanted delay in music playback.
ASIO is the Steinberg audio interface model used in virtually all professional audio applications, and is generally the best way to operate with very low latency. Manufacturers of professional sound cards provide ASIO drivers. Its only weakness is that you can only use one ASIO driver at a time, which could cause problems in the future as more and more studio equipment such as microphones, sound modules and monitors (that's what speakers are called in the professional training world) ). audio) come with USB interfaces rather than the older model that combines all your inputs and outputs into a single audio interface.
Many consumer audio companies these days make asio drivers for their DACs as they take any Windows calculations out of the equation and provide a higher chance of getting good results from their product.