Despite the perfection of technical solutions, car radios when receiving radio or television far from cities may disappoint their owner. The sound begins to fade, become saturated with interference, and disappear completely. An antenna amplifier for a car radio allows, to some extent, to eliminate this problem. It needs to be connected correctly. You can choose from numerous models on the market or make your own.
"Lada Priora"
The standard radio in Lada Priora and Lada Vesta cars has good sound and a fairly wide range of functionality. For the most part, car owners are happy with it. However, a number of simple improvements can improve the sound and noise filtering.
Modification of the standard radio consists of replacing the microcircuit in the amplifier (you must install the “ULF TDA7560”) and the amplifier power capacitor. Instead of a standard capacitor, install two: 10,000 µF and a film capacitor “K 73-17” 0.47 µF 250V, which creates a power reserve. The sound then rises to a higher volume level with clearer reproduction.
Attention: on the radio components market, the TDA7560 microcircuit has interchangeable analogues: TDA7851; PAL007; TDA7850.
Why does a goat need an accordion in the kingdom of Nesmeyan?
Why do you need Wi-Fi in a car radio? Let's answer briefly - we need it. Today, almost any smartphone is capable of distributing the Internet via Wi-Fi. Although in this case it is more convenient to install a USB modem and establish a full connection with the navigator. A Wi-Fi module with an antenna turns the radio into a router with a convenient tariff plan.
The radio can be powered from a car battery for quite a long time. Longer than it takes to charge a smartphone. It makes sense to consider the device as a backup.
Who needs and in what cases is NFC used in a car radio? NFC is a communication technology with a fundamentally short range. That is why this protocol is used in payment systems, for locks, tickets and access systems.
The advantage of the system is that the NFC antenna can be very miniature and does not require power. The active module is able to read tags and perform pre-defined actions. For example, when the system reads the chip of your smartphone, the radio can connect via a wireless interface automatically. Programming NFC tags for a radio is a rather tedious task due to the limited capabilities of the device’s processor. Purely technically, you can cut NFC chips from used travel cards and write an action script for each. But it’s much more convenient to set up voice control via a smartphone.
"Mazda 3"
In radios installed by the manufacturer in Mazda 3 cars, the amount of distortion increases with increasing sound strength - constant wheezing at a power level of more than 20 divisions.
Mazda 3 car interior
The problem is not in the speakers, but in the power amplifier, distorting the sound signal. The output is to increase the voltage to 16-18V. However, it is not in the car. You can achieve your goal, increase the voltage from 12V to 18V, using the universal converter URZ1122.
This power supply is manufactured by different companies under different names and different markings. Therefore, the specific choice of the DC-DS converter model is up to the car owner. The only thing to keep in mind is that different models have different sizes. Compact converters are easily built into the radio, larger ones are installed on the outside of the case.
Hyundai Solaris
In Hyundai Solaris, many owners are not satisfied with the sound of the radio. They solve this problem in two ways:
- install additional amplifiers, subwoofers, and pull wires with a large cross-section throughout the cabin;
- The radio itself is being modified.
Hyundai Solaris
Both methods achieve the same result. But in the first case, it is expensive and the car interior becomes cluttered. The second method costs little money and does not spoil the internal design. All you need is time and desire. The process is standard. Replace the chip in the standard TOSHIBA TB 2926 AHQ amplifier with a TDA 7560 and increase the capacitor power to at least 3900-4000 uF. The ideal option is a 10,000 µF capacitor.
The process of replacing radio components itself is not complicated. Difficulties arise when removing the radio from the locks holding it and disassembling it. Patience and attentiveness will help here. Ultimately, the work will pay off with spacious, clear sound on standard speakers.
"Kia Rio"
In the Kia Rio, the manufacturer installs a standard MOBIS PA710 QBR radio made in China. It has the same problems as the Hyundai Solaris, although the radios are from different manufacturers.
Car radio MOBIS PA710 QBR
They have one thing in common - the standard TOSHIBA TB 2926 AHQ amplifier. Therefore, the solution to the problem is the same as that of Solaris. In addition, the audio system does not have a USB connector. This drawback is also easily eliminated.
"Kia Sorento"
Car enthusiasts connect a rear view camera to the standard Kia X7BB radio on a Kia Sorento. To obtain Hi-Fi sound, change it to the X8BB model.
Head unit Kia X7BB
A number of radios from well-known manufacturers with high sound quality, installed on various brands of cars, also require improvement.
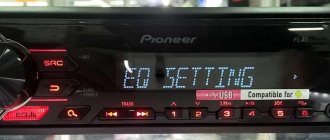
Pioneer radio
Many models of both cars and trucks are equipped with Japanese Pioneer radios. This is one of the best options for a car radio, with good sound and a wide range of functions. However, it has a significant problem. It does not turn off, but goes into sleep mode with backlit keys and a working clock. This distracts the driver while driving and drains the battery when parked.
Pioneer radio
The problem is resolved by reconfiguring the audio system.
- By pressing number 2 we enter the menu.
- Find the System section;
- Activate PW Save;
- Turn off the radio with the OFF button, after which it will go into sleep mode again;
- We remove the problem with button 1. Only the clock remains. If you want to remove them too, click on number 4.
Problem solved. There will be no return to sleep mode.
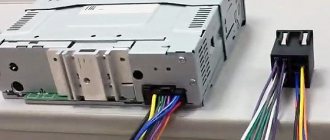
What is iso
ISO is an international organization that develops standards and regulations for various industries. The abbreviation sounds the same in all languages. A Russian manufacturer working in accordance with standards labels its products with the abbreviation “ISO” or “ISO”. All well-known developers of car radios equip their products with two types of standard plugs. Each looks like an eight-pin rectangular connector.
Chinese radios with tuner QSD-RT-L93
Modification of a Chinese radio with the QSD-RT-L93 tuner is very difficult and only professionals can do it. But even a novice car enthusiast can improve the quality of radio signal reception.
The radio manufacturer ignored the operation of the display controller. As a result, interference is emitted outward through the radio panel and reaches the antenna input. This is most clearly manifested when installing the antenna inside the cabin, on the glass. The solution is to shield the audio system housing, which will lock the interference inside it. This can be achieved by simply grounding the aluminum base of the display.
Chinese radio
Additionally, you can strengthen the LED power converter by adding a 1 µF ceramic capacitor to the circuit.
Using simple and affordable methods, you can significantly improve the sound of standard audio systems and eliminate some design flaws.
Car radio power amplifier chip
The car radio power amplifier chip was developed in 1998 by the world famous company Philips. The car radio power amplifier chip was intended to amplify the head unit.
Pinout of a standard Euro connector
A Euro connector is a standard plug used in most countries around the world. When connecting equipment, you may encounter non-standard wires tangled in a bundle. This problem is solved by purchasing adapters and pinouting the radio chips.
Standards 1din and 2din
Speaker system connectors come in two types: non-standard ones from the manufacturer, mostly pin-type, and standardized European ones, which are located at the back. Installation of equipment with a special audio connector from the manufacturer will require the use of a special proprietary connector. If the plug is ISO, then you can connect to it directly. There are two types of Euro connectors: 1din and 2din, the difference is in the height of the car radios. The two-block one is twice as tall; it is not connected to all cars, because there is no space on the panel for the required dimensions.
Radios with European 1din are the most common.
When installing car radios, wires with a small diameter of 1.5-2 mm are used, for power lines - with a large cross-section. Failure to follow these simple rules will distort the sound and damage the equipment.
Manufacturers in Japan, the USA and some Chinese use the 2din standard.
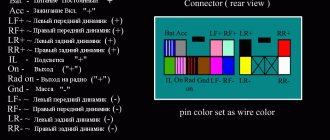
Upper power connector A
The plug is used to supply electricity to the receiver, antenna and amplifier, as well as when it is necessary to control the backlight or turn off the sound signal. Standard color markings are used. Outputs 1-3 and 6 are not used in low- and mid-price segment speakers; they are intended for additional options for high-end products.
Connection types
- The first is the connection in the socket of wires of two colors, yellow and red, turning the receiver on/off does not depend on the ignition. The method is inconvenient because it predisposes the battery to discharge if the acoustics are not turned off;
- The second wire is connected through the ignition switch, the yellow wire is connected to the on-board computer.
Functional purpose of the receiver outputs
| ANT | The connector is used if the car has a retractable antenna |
| Remote | Multiple speakers can be connected |
| Illumination | Allows you to change the intensity of the device's glow |
| Mute | Adjusting the sound |
| A4 | Turn on/off |
Pinout of radio ISO connector
| A 4 | Color yellow | Battery + Power |
| A 5 | Color blue | Antenna. |
| A 6 | Color orange | Backlight |
| A 7 | Color red | Ignition, 12V. When disconnected, reset settings to factory settings. |
| A 8 | Color black | Acoustics |
Bottom speaker connector B
Used to connect amplifiers (2 cables each). The sound of the equipment depends on whether all connectors are connected correctly. The main thing is not to confuse them, otherwise the acoustics will be of poor quality.
Rules for connecting speakers by color marking of wires
| Color white | Left front |
| Color grey | Right front |
| Color green | Left rear |
| Color violet | Right rear |
Brief performance characteristics of the microcircuit
The data is given below:
- equipped with a built-in supply voltage converter;
- the voltage converter at a relatively low voltage allows you to create an output power of 70 W at a load of 4 ohms;
Circuit diagram of power amplifiers for car radios
- the chip has a class B output power of about 18 W at a voltage of 14.4 V;
- The power supply of the internal circuit can be increased by increasing the switching on of the converter, which increases the output voltage.
Note. It is necessary to objectively understand that the voltage booster does not always function, but only when the output power crosses a certain limit. And this mode of operation was called N.
TDA chip circuit
The microcircuit also contains a MODE output, which is capable of operating in three modes, namely:
- active mode ON;
- standby mode STD-BY;
- in silent MUTE state.
Amplifiers for car radios
In its functional assets, the microcircuit also contains specialized integrated units for protection against:
- possible short circuit of conductors located at the output;
- short circuit caused by the intersection of a power wire with a positive charge and a common wire;
- temperature overheating in case of operating overload.
Dynamic distortion detector formula
The TDA chip contains a dynamic distortion detection detector, which turns on automatically if distortion doses occur in the output signal. This does not occur with the saturation effect:
- The input signal voltage increases, however, the output signal does not increase, continuing to be within the voltage limits created by the power amplifier.
Distinctive features of the TDA chip for a car radio amplifier
- Since the flange of the amplifier chip is connected directly to the common wire, there is no need for an insulating radiator gasket if the attachment point is a radiator.
Microcircuits and working with them
Note. It is imperative to lubricate the fastenings with a specialized heat-conducting paste, otherwise this design will last a short period of time.
- Additionally, it will be necessary to tin all power paths.
Points that motorists pay little attention to. As a rule, they are:
- You must always remember that over time, the internal wiring of the car radio (see Diagrams of car radios and connector pinouts) and its additional components become unusable, which can cause interruptions in the operation of the amplifier;
- it is extremely important to effectively correlate the voltage created at the input with the one that should be obtained at the output;
Car radio to amplifier
- It is imperative that you carefully read the detailed illustrated diagram, which can easily be found on the Internet;
- An equally important point is the proper operation of the radiator, which must not only function, but function effectively; otherwise, the amplifier of the microcircuit will overheat and it will simply go out of its working state.
Dual ISO connector
The standard audio systems of some cars are connected with a double plug. The pinout of connectors for them is standard. The contact halves are connected to each other by a durable plastic jumper and secured with a special clamp. For correct installation, a guide groove is used, which prevents the plug from being installed in the wrong position.
The black one connects a current source to the radio, the brown one for acoustics.
Distinctive advantages and disadvantages of choosing a TDA chip from Philips
| low market value | slight technological obsolescence |
| speed and ease of operation | lack of modern functionality |
| proper reliability and performance and the required degree of functionality | Difficulty combining with luxury car radios |
| wide range of compatibility with car radios | the need for annual inspection of all components |
| Availability of operating instructions on the Internet | |
| simplicity of structure | |
| possibility of continuous operation in uninterrupted mode |
If we talk about objective realities today, it should be noted that the TDA1562Q chip for a car radio amplifier (see How to make an amplifier from a car radio: detailed instructions) is best used for nationally produced cars, since in this case, there are no compatibility problems a priori, which This cannot be said about modern foreign cars.
Note. Sometimes a microcircuit is delivered with a manufacturing defect, so before purchasing it directly, you need to carefully inspect everything visually.
As a rule, you need to pay attention to:
- absence of any obvious physical defects;
- the presence of all components that are indicated in the attached operational diagram;
- make sure that replacement is possible, if necessary, and that the seller has a warranty for the product.
Video review and photo materials will help you get more detailed information. Testing the amplifier can be done with your own hands, since instructions can be found almost everywhere today. The price of the TDA amplifier is not very high.
The number of Russians at MediaTek Labs has increased 14 times? project to create “Internet of Things” devices and “wearable gadgets”
Having compared the site visit statistics for two months (November and December 2014), MediaTek found that the number of resource visitors from Russia increased 10 times, and from Ukraine? in 12. Thus, the share of Russian-speaking developers with accounts on labs.mediatek.com exceeded one tenth of the total number of users registered on MediaTek Labs.
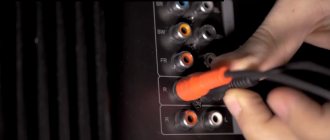
Design of aux port and connecting cable plug
Through the linear aux input (the name of the port is an abbreviation for the English radio engineering term Auxilary, translated as “secondary”), you can connect any electronic music or communication devices equipped with a headphone output to the car radio. These include laptops, mobile phones, mp3 players, phones, iPads, smartphones, tablets.
Once connected, you will be able to listen to music, audio books, voice recordings from a voice recorder, radio channels from the Internet, and any audio information through your car speakers. It is more convenient to listen to music and audio books through car speakers, since the signal from a mobile gadget, after passing through the car radio amplifier, sounds much louder.
Externally, the aux input jack looks like a shaped metal rod mounted in a rubber or plastic base.
There are mono and stereo inputs, which are easily recognized by the number of circular stripes (contact separators). On the metal of the stereo input jack you will see two separate contacts, otherwise the plugs are identical. Two pins are needed to transmit the signal to the left and right speaker or earphone, creating a stereo effect.
In a car audio system, the input jack looks like a round hole surrounded by a metal frame. It can be located on the body of the car radio or in a special niche for connectors (usually next to the cigarette lighter).
In expensive imported cars, the aux input socket can be covered with a cover that protects the contacts from dust and moisture.
For radios without an aux input, you can make and connect the connection to mobile gadgets yourself.
You should undertake independent work if you have the skills of soldering, reading radio circuits, or disassembling a car radio. Beginners who love sound tuning, in order not to spoil the car radio, are better off turning to specialists.
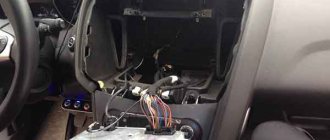
Before you get to work, you need to find a diagram of your car radio model in the library or the Internet. There is no point in starting work without a detailed radio circuit. For comfortable work, you need to remove the car radio from the car and bring it home.
For disassembly and installation you will need:
- screwdrivers, pliers;
- soldering iron and soldering supplies (solder, acid, soldering loupe);
- pieces of acoustic wire, electrical tape;
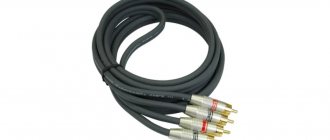
- output universal tulip-type connector.
Before starting installation, you need to completely disassemble the car radio, remove the cables, cassette recorder or CD player, and find the radio circuit.
For practical installation of an additional connection you need:
- On the radio circuit, find the channel input and ground pins. By default, the left channel is designated by the letter “L”, the right channel by the letter “R”, and the ground is marked as “GND”.
- Calculate the location of the contacts on the radio module diagram. The contact points on the board can be marked with printed inscriptions RCH, LCH. Along the way, you can inspect the entire printed circuit, clean it, identify charred tracks, and check the fuses.
- Check the connected cable. The internal integrity of the wires is tested with a multimeter. The wires going to the soldering points can be taken from a standard jack, a coaxial cable with three shielded cores. Colored wires that can be easily identified by channel are preferred. For connection, a length of 30–40 centimeters will be sufficient.
- Solder the wires to the contact points. For soldering, it is better to use a low-power soldering iron with a sharp tip. Soldering accuracy will be ensured by a soldering loupe and dark electrical tape.
- The ground wire is soldered to the GND point or to the radio module body.
- The soldered wires are additionally insulated with heat shrink and are routed outside the car radio casing. If there are no suitable holes, they can be drilled.
- Solder the marked wires to the contacts of the tulip-type output socket, find a place for it on the dashboard or center console, and secure the output.
Some cassette car radios have special three-pin connectors behind the volume control for connecting an CD changer, to which you can connect a line input. Connecting to such circuits is even more convenient, since when you turn on the aux input, the cassette recorder is automatically turned off.
To test a new device, you need to turn on the car radio in listening mode to the radio, cassette or CD. When the aux jack is plugged into the input jack, the sound fades out and the head unit switches to playing a recording from an external source.
The last stage of the work is a mounting device for external audio storage media, since holding a smartphone, tablet, mp3 player on the passenger seat (in a niche in the center console) is not always convenient. For most mobile devices, plastic or metal brackets are sold that can be glued or screwed to the dashboard next to the car radio.
You can see in detail how to make an aux input on a car radio in the video: