Particular attention should be paid to the place where the wire passes through the wall of the engine compartment.
In this case, the amplifier must process signals with different levels. Then it will have to be drilled.
If you have a system focused on SPL results, then each additional draw will reduce the drawdown. What is the easiest way to connect a passive subwoofer? You will also need a 3.5 mm adapter. The connection to the amplification device is made with short wires. Why do you need an amplifier? The sound quality will depend on how well the connection is made.
Besides, it will save your money.
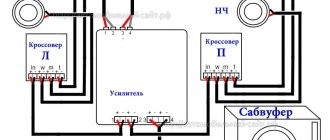
Connection diagram for a 4-channel amplifier Details Views: Greetings: We continue to study the simplest basics of car audio, and in this article I will tell you how to connect a 4-channel car amplifier in a car yourself, together with a radio, powered by a battery, as a load we will have speakers or subwoofers or both. The resistor connection diagram will look like this: If there are linear outputs, then everything is much simpler.
Review of the installation kit Ural (Ural) 4Ga-BV4KIT. How to connect an amplifier. Subwoofer connections
Why is an amplifier needed for a car radio?
Installing an amplifier in addition to the radio will not only increase the overall power of the sound signal, but also improve the sound quality. Plus, you can connect a subwoofer to the amplifier. Using an amplification device allows you to optimally tune the sound of your car audio system. By connecting the amplifier through a crossover, the sound is perceived better over the entire frequency range. It is important to understand that the voltage of the car's on-board network does not always correspond to 14.4V, which is necessary to provide maximum power to the amplifier. This situation is especially evident when using a subwoofer: the output voltage of the amplifier at a lower supply voltage cannot drive a powerful load in the form of LF (low-frequency) dynamic heads.
This problem is solved by installing high-capacity electrolytic capacitors (1F). This element accumulates the necessary discharge and does not allow the bass to “sag” during peak load, i.e. the signal is juicy, clear, without any distortion. In order to be able to connect a subwoofer to an amplifier, the devices have a special output for the subwoofer. To improve sound quality, it is not necessary to replace the head unit and speakers. In this case, you just need to install a four-channel amplifier, which is compact in size and has fairly high output power. If you seriously approach the re-equipment of the sound part of the car, then connecting an amplifier will not be difficult.
It is worth noting that many cars are equipped with standard audio systems with speakers of mediocre quality. In order to achieve truly high sound quality, you need to think not only about purchasing an amplifier, but also about replacing the standard dynamic heads. Each car owner has the opportunity to choose the location of the speakers, as well as additional components. Many people are quite happy with the installation of speakers with tweeters and tweeters in the front part of the cabin. To install such a system you will need a four-channel power amplifier.
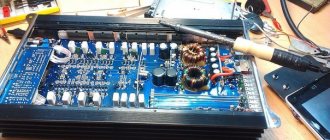
How an amplifier works
To understand this, it is not necessary to delve into its electrical circuit and find out from which elements it is assembled. It will be enough to consider what happens to the signal when it enters the amplifier from the radio. It is generally accepted that a signal is supplied to an amplifying device of low amplitude, after which it increases to a certain value. This reasoning is correct, but only partially, since the amplifier creates a new signal that is a copy of the input one.
Any car amplifier consists of three components: input, power supply and output. The main purpose of the device is to amplify the signal without distortion
The signal is supplied to the amplification device from the standard radio and increases to a level that ensures normal operation of the speakers. As a result, the input and output signals differ only in power characteristics. Regardless of the amplifier, the design will have three main components:
- Input circuit.
- Power supply unit (PSU).
- Output stage.
Each sound source has a certain output voltage level. For example, one radio produces a signal at the linear output with a voltage of 1V, the other at 3V. In this case, the amplifier must process signals with different levels. One signal, as a rule, is processed by standard devices and some amplifier models. However, most devices are capable of processing two input signals. If they are at a high level, they are supplied directly to the load; if they are low, they first pass through an amplifying device.
It is important to know that the sensitivity of the input node must correspond to the level of the signal supplied from the radio. The amplification device adjusts the input sensitivity, which determines the gain. If the input sensitivity is too high, the output signal may be distorted. In this case, it is controlled by the volume control on the radio. For a better understanding, we can say this: sensitivity is adjusted in order to eliminate mismatches in output signal levels in a car audio system. Correct sensitivity adjustment can be judged by the absence of distortion in the dynamic heads.
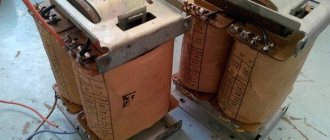
A unit such as a power supply is designed to convert the voltage from the battery to a higher one. The need for such voltage arises as a result of insufficient power from the on-board network to drive the speakers. One of the functions of a car amplifier is to increase and control the supply voltage. For this purpose, a transformer is used in the power supply. Since the audio signal is variable, two voltages are required to operate the load (speakers): positive and negative. To implement them, two voltages with opposite polarity are removed from the transformer. By combining these oscillations you can obtain an alternating signal.
If the power supply outputs +25V, then it must also output -25V, which is necessary to power the amplifying device. In the example given, the voltage difference is 50V. Calculating the power using the formula P=U²/R, where P is the power of the amplifier, U is the voltage, R is the load resistance, with a supply voltage of 50V and 4 Ohm speakers, we get a power of 625 W. The greater the difference in the power supply voltage, the more power can be removed from the amplifier.
The output stage provides direct amplification of the input signal, which is then fed to the dynamic heads. The main element of the output unit is high-power transistors, which operate in switch mode, providing increased voltage from the power supply to the output of the amplification device. This is realized by converting the voltage from the power supply into the required signal form. The transistors are controlled by an input signal: the voltage from the power supply takes the form of an audio signal, i.e., the transistors are turned on or off depending on the input signal.
Problems and their solutions
If the installed unit does not turn on, the cause of the defect is a violation of the integrity of the power supply circuit or the built-in adapter, which can be checked outside the car by connecting the product at home through a power supply that produces direct current, 12 V. If the equipment turns on correctly at home, you need to check the condition of the cables on the car using a test device. A coating of oxides and rust on the contacts impairs the transmission of electricity; as the current increases, circuit breaks occur.
From the radio there is a cable through which a signal is passed to activate the amplification circuit. Under normal conditions, the voltage in the cable is 5 V; when the parameter decreases, you need to check the reliability of the contact and make sure that there are no breaks in the cord. Additionally, the condition of the fuses and the reliability of grounding of the power circuit and interconnect cables are checked.
The amplifiers are designed with a protective unit that generates an error (blinking control indicator) when a faulty speaker is detected or when the audio cables are shorted. To restore functionality, turn off the speakers one by one to find the damaged circuit. To determine a grounding fault, an ohmmeter is used, which the user connects one by one to the loudspeaker circuits.
Types of amplifiers
Before you get ready to buy an amplifier, you need to find out what these devices are. Today, a large selection of equipment is offered, but their main difference is the number of channels. There are amplifiers from one to six channels. In addition, devices are classified according to the method of signal amplification: analog (AB) and digital (D). Digital devices are capable of delivering high power with relatively low signal quality. Analog, on the contrary, are characterized by low power and high quality.
Characteristics of amplifiers depending on the number of channels:
- Single channel. Mainly used for subwoofers. This type of amplifier is designed for a nominal load of up to 2 ohms. For larger loads, it is recommended to use a two-channel amplifier. A positive feature of such devices is ease of use. Since car radios do not have a low-frequency volume level, single-channel amplifiers are equipped with a special volume control, with which you can customize the audio system to suit you.
- Two-channel. Designed to connect two dynamic heads with a higher power value than for a single-channel amplifier. One high-power speaker can also be used as a load.
- Three-channel ones, although rare, can be found. They were replaced by four-channel devices.
- Four channel amplifiers are the most popular. They can be used for four speakers or used in two-channel mode and also connect a subwoofer. It is possible to connect two speakers and two subwoofers.
- Five-channel allows you to connect four speakers and one subwoofer.
- Six-channel for a car audio system is rarely used, since it mainly uses four speakers and one subwoofer. In addition, such an amplifier can quickly discharge the battery.
One of the most common car amplifiers is a four-channel
How to choose an amplifier
After familiarizing yourself with the types of amplifiers, you can decide which device is best suited for your audio system. It remains to give preference to one manufacturer or another. If you really want to get high-quality sound, then it is better to pay attention to the following brands: Infinity, Alpine, DLS, JL Audio, Audison. In addition, it is desirable that the amplifier be equipped with a fan and various signal level regulators. It is worth remembering that a significant indicator is sound quality, but not power. A very useful feature is the presence of an equalizer, which will allow you to customize the sound to your liking. At the same time, you need to understand that a larger number of functions leads to an increase in the cost of the device.
The perfect combination
As mentioned above, car speakers have the right to be called that if they involve a trio (sub, amplifier and capacitor). Let's try to figure out which combination can be called ideal.
Woofer Mystery MJB 12, amplifier Sony XM-504Z and capacitor Stinger SPC111
A powerful trio that delivers perfect sound. At the same time, everything is in a budget option and you don’t have to pay extra.
Selection of amplifier, subwoofer and capacitor
Woofer Specifications
| Mystery Corps MJB 12 | High quality MDF |
| Diffuser | High quality chrome plated injection molding |
| Suspension | Butyl rubber |
| Magnet/magnetic system - weight | 40 oz/80 oz |
| Voice coil | 2" aluminum, covered with cardboard |
| Case dimensions, mm | 450/418/367 |
| Peak power, W | 250-500 |
| approximate cost | 4-5 thousand rubles |
Specifications of the Sony XM 504Z amplifier
| Dimensions, mm | 350/233/55 |
| Peak power, Ohm/W | 4/100 – 2/125 – 1/250 |
| Channels, number | 4/3 |
| Power supply | MOSFET transistors |
| approximate price | 3-4 thousand rubles |
How to install
After the amplifier has been purchased, you need to choose a place for its installation and perform the correct installation, taking into account possible nuances. You should not install the device in the first place you like: most likely this will not be the best option.
Choosing the right place
Depending on the location of the amplifier, the length of the connecting wires will depend. Please note that when installing in the luggage compartment, you will need wires to connect the radio to the amplifier and subwoofer. On average, you will need about 5 m of wire for the multimedia system and 3 m for each speaker, which depends on the specific machine. Calculations are made in advance, since the wires will be laid under the casing.
When choosing a location, it is important to consider that the amplifier generates a lot of heat, so normal air circulation is welcome. Avoid installing the device in a side position or upside down; it is also necessary to avoid air obstruction, which is possible when covering it with a rug or things. One of the options for installation space could be the space under the driver's seat. In this case, it will be possible not only to save on the length of the wires, but also to improve the sound quality, since with a longer length part of the signal is lost.
In most cases, the amplifier is installed in the trunk, but it can also be located in the passenger compartment.
In fact, there are many options for mounting an amplifier, so it’s worth dwelling on each of them, at least briefly:
- The front of the cabin or the center. This option is optimal (depending on the vehicle) because it can achieve good coupling to the load, which will provide an extended level of transient frequency.
- In the trunk. If it is planned to install two amplifiers, then one is installed in the front, the second in the luggage compartment. The connection will require longer wires, but the location of the device will not take up free space.
- Installation on the rear shelf. This option is relevant for a car in a sedan or coupe, and the shelf must be durable.
- Under the passenger or driver seat. There will always be free access to the device, which will ensure quick dismantling if necessary.
Wires for installation
One of the important elements in connecting a device is the wires. They are necessary for power supply and interconnection. Additional wires may also be needed. To supply power, the wire is selected according to the power of the amplifier. To this figure should be added another 30% for losses due to low efficiency. If we consider as an example two two-channel amplifiers with a total power of 200 watts, then at maximum volume they will consume 260 watts. Based on the data obtained, you can determine the cross-section of the wire, which depends on the current passing through it. To do this, let's turn to Ohm's law: I=P/U, where I is current, P is power, U is voltage. Since the car battery voltage is 12V, after performing the calculation, we get a current of 21.6A. It is recommended to buy wires with a reserve, paying attention to the quality of the insulation.
Fuse
Since the power cable runs in close proximity to the body, a mandatory element in the amplifier connection circuit is a fuse, which will prevent a fire in the event of a short circuit. The amplifier itself has protective elements, so it is recommended to install the power cable protection fuse near the battery. The element is chosen in most cases with a nominal value of 50A. It is prohibited to install a part with a large value.
There are different types of fuses, but the most common are AGU and ANL. The first ones are used by amateurs because they have a low cost. The design is a glass cylinder with a metal tip on it, and a fusible insert located inside. The design features of such fuses are their disadvantage. The problem is that the part consists of several parts that are connected by a fusible metal element. With use, the fuse oxidizes and simply fails due to constant vibrations. In addition, contact in such a protective element is very unreliable. As for ANL fuses, they are free from the listed disadvantages. The part is made of an all-metal plate and is securely fastened in the clamp using bolts. The likelihood of failure is minimal.
To prevent a short circuit in the amplifier's power supply circuit, install a fuse
Interconnect cable
The sound from the radio is supplied to the amplifier using an interconnect cable. The quality of the signal that arrives from the source directly depends on this element. You should not rely on inexpensive options or those included with the amplifier: first of all, they are thin, the shielding is poor, and the insulation itself is weak. A high-quality wire must have strong insulation, continuous shielding, and a good central core. The RGA connector itself must also be of high quality. When choosing wires, you can pay attention to manufacturers such as Tchernov Cable and Daxx. To install the amplifier, you will need a set of screwdrivers and a wire stripper.
The radio is connected to the amplifier using an interconnect cable, the quality of which must be given close attention when purchasing.
Let's sum it up
A high-quality sound system in a car is impossible without a special amplifier. To use it, you need to purchase a lot of additional equipment, including the amplifier itself, a fuse, a capacitor and a lot of wires to connect the system. The connection process itself will require partial disassembly of the car interior in order to lay the wires without significant visibility. This often discourages those who want to install acoustics in a car.
If you want to install the amplifier yourself, you will have to do all the work mentioned above. If such a process seems too complicated to you, and you have never connected acoustic equipment, then it is better to turn to specialists and get the most from the purchased equipment. If you have experience installing an amplifier and other acoustics, tell us about it in the comments.
Is it possible to connect an ordinary capacitor to a subwoofer?
Of course, you can connect a regular capacitor to a subwoofer, but it will not give any effect. An electrolytic device with a capacity of 5,000-10,000 uF can act as a filter and reduce some electrical noise. For example, clicks will not be heard when you turn on any electrical equipment in the car. Even a large-capacity electrolyte battery will not be able to prevent voltage sags when playing powerful bass.
Only installing a storage capacitor for a subwoofer can provide the amplifier with energy when needed. If the amplifier is connected through the energy storage unit for the first time, the device needs to be charged. The same procedure must be performed when the battery has been removed from the car for a long time and the product is discharged.
To do this, the minus of the battery is connected to the minus of the device, and the plus is connected to the positive terminal of the device through a resistor with a nominal value of 10-20 Ohms and a power of 20 watts. Instead of a resistor, you can use a car light bulb. It will light up brightly at first, and as it charges, the glow will fade.
Power connectors (power supply).
Three contacts marked - +12V.
Power is supplied from the positive terminal of the battery. The supply wire should not be thin. It is advisable to install a fuse at a distance of 40 cm (or less) from the battery (pictured). It is designed to protect the vehicle's electrical wiring.
The control wire from the head unit (radio tape recorder) is connected. The interconnect wire usually has a third thin wire, which is used as a control wire. It is needed so that the amplifier turns on and off together with the head unit.
GND (ground), connected to vehicle ground.
The wire must have a cross-section no smaller than the supply one and be as short as possible.
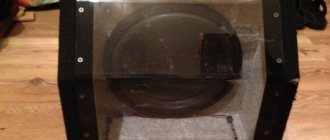
Subwoofer backlight
It is better to make the backlight for the subwoofer speaker at the stage of manufacturing the box. For this purpose, LEDs are used - semiconductor devices that emit light when exposed to electric current. They can be purchased at an electrical supply store. LEDs have two contacts - cathode and anode
They are marked accordingly in the photo. It is important to connect the diodes correctly: the cathode contact is connected to the minus, the anode to the plus. Resistors are soldered to the anodes of each LED. The LEDs are connected to each other by cathode contacts, and resistors are connected to the power supply
To ensure that the diodes stay well in the subwoofer housing, it is better to fasten them together as follows. It is much easier to use LED strip. The diodes in it are already connected and securely fastened, and therefore it only needs to be connected to the amplifier's power supply. You can attach the tape to the subwoofer using double-sided tape or glue. LED strips have a wide range of colors, are easy to connect and perfectly decorate your subwoofer. Subwoofer and amplifier lighting
Connectors for speaker systems (speakers or subwoofer).
The wires from the speakers are connected. It is important to connect the “+” and “-” contacts on the amplifier to the corresponding “+„, “-” contacts on the speakers. How to connect a subwoofer with a two-channel bridge? We connect one wire from the subwoofer to the positive terminal of one channel on the amplifier, and the second wire from the subwoofer to the negative terminal of another channel of the amplifier. We connect the free positive and negative terminals on the amplifiers with a short wire to each other (not required for all amplifiers, see the instructions).
Antenna connection
Having a radio in the car, some car enthusiasts prefer to listen to music or watch videos. But many drivers like to listen to their favorite radio stations while on the road, which is why every car audio system has an FM tuner. An external antenna is required for its normal operation. Experts recommend installing an active module that ensures stable reception of radio stations. The antenna is powered from the car network via the radio.
Chinese audio devices are equipped with a special output labeled ANT. Depending on the settings, power may be supplied to the antenna when the radio is turned on or only to the radio. The antenna cable is connected to a special socket located on the back wall of the device. The receiving part is located on the windshield. The active antenna is connected with 3 wires:
- Weight. It is connected to the car body or to the standard terminal on the GU body.
- Power wire. Connects to the red wire of the device control.
- Antenna wire. Connects to the corresponding socket on the radio.
In the case of installing a simple receiving device, an antenna adapter containing an amplifier is additionally used to improve the quality of the received signal. In radios with a GPS module, an active GPS receiver is used, which ensures stable operation of both the navigator and the radio. Connects similarly to an active antenna for a car radio.