In order to do something with your own hands, it is necessary: that these hands are present and that they are not sharpened, you know what.
We will assume that both of these conditions are met in you.
Well, so much the better, then I’ll continue. What prompted me to do this. From what kind of oak tree did I decide to make this very subwoofer? So, question and question. Difficult. You can attribute everything to the fact that, as one lady said about my behavior, it seems to be unmotivated. As if I have nothing better to do, I have a good Yamaha V496RDS receiver, good acoustics, JAMO floor-standing fronts and a set of a center and two rears, called JBL HMX. The fronts produce good bass, like, what else do you need? I agree here that there is no limit to perfection, a normal sub costs from 6 thousand rubles. and higher, and in order to decide to buy it with your own money, you need at least these 6 thousand rubles. have on hand.
And this, in general, is already a luxury unaffordable for me in light of my recent purchases. However, everywhere in magazines they blatantly write, not 5, but specifically 5.1, hinting that the right guys must have this “Stradivarius drum”, aka 0.1, aka a subwoofer. And like, if they don’t have such a device at home, then they are not good boys at all, but big-eared suckers.
Thus, each owner of a set of five normal columns gradually comes to the idea of his own inferiority, without the presence of a sixth column. Trips to the store begin, conversations with sellers, who come in different types.
Some of them, looking at your worn jeans, say that an inexpensive active Yamaha is the most optimal solution for you, others say that the right subs, which will take your breath away, start at $300 and above, and anything cheaper is a complete bullshit for those who have cheap shelf Soviet acoustics. In general, we can agree with each of them.
Two thoughts appear. The first is why buy something that isn’t the best for quite a lot of money. Secondly, the toad is choking me to shell out $300 for some kind of low-frequency speaker, when for this money I can reduce the list of my planned priority purchases by a third.
From two thoughts, a third arises - why is everything so expensive?
If we develop the last thought, it will turn out something like this: why does some plywood box with one speaker and an amplifier, which is destined not to amplify frequencies above 200 Hz and can be a crossover filter, cost such crazy money? I can understand why regular speakers are expensive. There is a housing that is cleverly designed to make all the speakers sound good, which also cost a lot of money because of their characteristics.
And all this garbage should play frequencies from 30 to 20000Hz. Then various smart people test it and write in their magazines, they say, this column for $600 is missing some accent, the one for $550 doesn’t emphasize anything, but this one for $900 has and emphasizes everything , everything you need.
You read such articles and think what smart guys they must be, they hear everything, understand everything, well done, in a word. Considering that there are probably no obvious sound defects in acoustics for $500, we can assume that they must have ears like an elephant to hear it all.
I’m finishing the preface... :-)
Description
The 25GDN-4 basket was made of 10KP-P steel, 2 mm thick and cast from an aluminum alloy. Cast paper diffuser with a curved generatrix. Corrugated, two-link paper hanger. The centering washer with a diameter of 136 mm is made of bakelized fabric and has a corrugated structure.
Magnetic system
Cast ring magnet UNDK-24. Weight 2.7 kg. Diameter 126 mm, height 60 mm. Gaps between frame-core: 0.3 mm; coil-flange: 0.34 mm. Core diameter 51.2 mm. The diameter of the hole in the upper flange is 55.08 mm. Air gap with a diameter of 1.94 mm and a height of 12 mm.
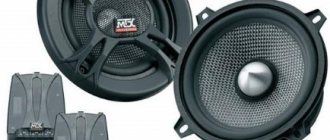
the 25GDN-4 speakers were produced by the Samarkand plant “Kinap” on stamped baskets, then on cast aluminum alloys, which are completely similar to the 2A-9 . The only difference is the groove for mounting the magnet; it had a smaller diameter corresponding to the diameter of the magnet of the 25GDN-4 speaker, and also on the side of the flexible leads on the petal of the basket there were two large holes for screw clamps of the “wing” type, which were absent on the 2A-9 speakers.
In the photo below, on the left is a stamped frame, on the right is a cast one:
First testing and fine-tuning
After waiting for all the adhesive joints to dry, I decided to try my handiwork. To do this, I connected the left front channel of my Yamaha 496RDS AV receiver to the new speaker.
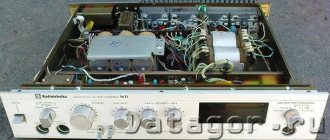
Yamaha 496RDS stereo amplifier
I turned the volume balance to the left, the HF tone to minimum, the volume to 25%, inserted a disc with some club music and turned it on.
The sound that spread throughout the apartment shocked me. It was soft bass, the type I had trouble getting on my floorstanding fronts, but much louder. It literally chilled me to the bone. However, extraneous high-frequency sounds were also mixed into the sound.
Some of them were boxed, which did not disappear after pasting the inside of the case, the rest were caused by the flow of air from various cracks in the box that had not yet been coated.
During the day I eliminated the cracks in the case and as a result glued the back cover. Along the way, I installed a couple of metal connectors - banana sockets for connecting wires to the rear wall. It turned out quite well.
Assembly of the housing of the future subwoofer for 75 GDN
The next switch-on showed that the seams were all sealed, the air noise remained when passing through the upper bass reflex and box overtones became clearly audible. It took me a long time to figure out where to start, and as a result I started making parallel phasic and cotton-gauze pillows, which I nailed to the inner walls of the sub. As a result, all the walls were completely covered with these pillows.
I did it even simpler with the bass reflex. The upper volume of the subwoofer was significantly smaller than the lower one, so air noise appeared only in the upper bass reflex. I read on the Internet that it is quite possible to use not only cylindrical tubes, but conical ones, as long as they expand outwards.
And then a plastic glass, purchased at one time from a set of car dishes, came to the rescue. It had the required diameter and length, a little more. This is what I installed as a bass inverter. Before the heap, I rounded the back wall where the air escaped, so it turned out the same as my Jamo fronts.
I puttyed the place where the phasic joins and the entire rounding, and after drying, I sanded it to a smooth surface.
Assembly of the housing of the future subwoofer for 75 GDN
All that remained was to level and paint the body, and also cover it with black film with a wood pattern so that the box would fit into the overall look of the room acoustics. All this time, while I was leveling the case, I periodically connected it to the receiver to check.
I managed to change the design of the bass reflex to remove all air sounds at the nominal volume. They appeared only at maximum volume and at certain frequencies. Due to the fact that I supplied a full-frequency sound signal to the sub, and not a filtered one, the sound of air passing through the phasic slightly spoiled the picture.
When a sinusoidal signal generated by the CoolEditPro program was supplied from the computer, the sound disappeared, but you could hear the glass shaking. There were two frequency peaks in the region of 10-50Hz. This is the first, about 25-27Hz and the second 35-37Hz. At these frequencies, the volume of the signal increased greatly when playing the test signal.
Along the way, I suddenly discovered a crack in my 150 liter aquarium, which was located in the same room where I tested the sub. I still don’t understand why this happened. Either from a slight distortion of the cabinet, which I later discovered, or from my experiments, or from everything in the place.
In view of the fact that I had long been planning to buy myself a larger aquarium, the crack did not upset me much, rather it added pleasant troubles to choosing a new aquarium and leveling the cabinet, which is a topic for another article in another section.
Voice coil:
The voice coil is wound with PEL wire with a diameter of 0.27 mm. 4-layer winding, 240 turns. The outer diameter of the voice coil is 54.4 mm, the inner diameter is 51.8 mm. The coil frame is made of aluminum foil 0.2 mm thick.
Regarding the 25GDN-4, there is a clear improvement in quality in the form of a transition from a ringing stamped basket to a cast one. Presumably, after the 2A-9 speakers were discontinued, the contractor producing cast baskets for Lomo (after all, most likely the casting was not done at the Kinap factories themselves) began supplying baskets to the assembly line of the Samarkand Kinap plant. The fact that the later 25GDN-4 speakers were subsequently equipped with baskets that were previously cast for the 2A-9 speakers is also evidenced by the fact that these baskets retained the tidal pads for the holes for mounting the magnet from the 2A-9 speaker.
Parameters of Thiel-Small 25 GDN-4 (found on the Internet):
Fs: 50 Hz Re: 13 Ohm Qms: 3.62 Qes: 0.663 Qts: 0.56 Mms: 31 g
Rough work, box construction
As for subs, they have such a narrow frequency range that the requirements for the frequency response of the speaker are not so high, and the design should not be so complex that it cannot be repeated. What difficulties might there be? Well, first you need to find a woofer. This is the least of the problems.
There is a 75GDN, which is very popular because of its good characteristics and low price. Maniacs can buy some imported copy for 100 bucks, but is there any point in overpaying if you most likely won’t feel the difference.
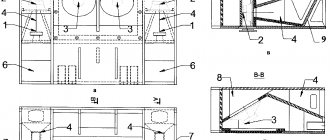
The main problems may arise when choosing and calculating the design of the box for this speaker. But here the wonderful JBL SpeakerShop program comes to the rescue. It contains many ready-made examples of different types of acoustic design of subwoofers. Download the program and select the box type. I chose Bandpass 6A. This is such a box.
Diagram of the future subwoofer
The picture was taken from the Internet from an article about a subwoofer on 75GDN. I just have slightly different sizes.
I came across a thread in the forum on www.ixbt.com, just about building a sub, almost exactly what I need. I recalculated the dimensions again, it seems similar to what I was going to do, only a little larger.
When I sawed off the first blank of the left wall, I realized that the box would not be small at all, but there was nothing left to do, everything was marked out. The final dimensions were:
- Height 640mm
- Length 410mm
- Width 280mm
- Top volume height 160mm
- Upper bass reflex length 70mm (diameter 70mm)
- Length of the lower bass reflex 240mm (diameter 70mm)
The pieces of chipboard were 20 mm thick, I thought that the thickness was the most suitable. I sawed everything with an ordinary hacksaw, and by the time all the walls were ready, I was really sick of it. At the same time, I acquired calluses on my hands from the hacksaw.
Due to the fact that I initially gave myself 2 days to make the sub, I spent the whole weekend screwing screws into the walls, assembling the box. By the end of Sunday, the box was ready and secured around the perimeter with screws.
Assembling the housing of the future subwoofer
Then, all week, I thought about the order of assembly. It turned out that the top wall will be closed last, and the back wall will be the second to last. Without installing these walls, it was possible to work normally with the body inside, which is what I did the next weekend.
I coated all the joints with Olga Savalova’s favorite glue, Moment, and installed the inner wall in the slot for the 75GDN speaker, which I bought on the market for 1000 rubles. I secured the wall properly by tightening a bunch of screws from the outside.
Having tried on the remaining walls again, I began to glue the inner surface of the box with polypropylene foam 6 mm thick. For this I used the same “Moment”. I let each layer dry under weight.
To cut round holes in the back wall, I had to use a special drill attachment, which did the job well and soon I had a back wall with two perfectly round holes with smooth edges.
The initial idea was to find pipes 70mm in diameter from sewer pipes. To my surprise, there weren’t any of these. There were either 50 mm or 100 mm, so I had to take the first. It was from them that I made the first bass reflexes. (The sewer pipes were leaking like crap.)
I filled the difference in the mounting diameter with layers of polypropylene foam and in this form installed both pipes in the rear cover of the subwoofer.
