The article is devoted to the modification and restoration of the much-loved amplifier “Radiotekhnika-U-101”, which even now captivates with its attractive appearance.
My old dream came true and this “beautiful girl” appeared in my house. We must pay tribute to the previous owner - her appearance is wonderful! The device was not shoveled, with non-wheezing variable resistors and without any interventions or improvements.
↑ 1. Power supply
Replace the power supply filter capacitors. For the ±26V power supply, I set 10,000 and 4700 uF and for the ±31V power supply, 4700 uF per arm. We also replace the diodes with KD 213. (These and further in the article, the ratings of the parts are not recommendations, since they were used those that were at hand, i.e. at home). At the same time, we change the wires coming from the transformer to the power supply board to wires with a larger cross-section. Considering the power of the amplifier, I limited myself to a cross-section of 0.75 mm2. We bridge it with film. We remove the thin jumper on the power transformer (pin 6-6*) onto two separate wires from each coil to the common point of the power supply board.
Next, we hang the capacitor parallel to the primary winding of the mains power supply 0.047 µF x 630 V. Thus, we get rid of interference from the mains a little.
Now we have a normal power supply. And this is almost half the road to success.
About the manufacturer
It was once a subsidiary of the well-known company. The latter was abolished in 1997. But Radiotekhnika remained and is still operating today. Now it is the largest manufacturer of musical equipment in Eastern Europe. The history of the company began in 1927. Then Abram Leibovitz founded a small enterprise producing radios. Over time, the company grew and began to produce a huge amount of consumer electronics: from radios and televisions to amplifiers and speaker systems. The legendary S90 speakers were designed and released in 1989. The development of such a thing as the Radiotekhnika U-101 amplifier dates back to approximately the same time period.
It’s worth noting right away that sophisticated “audiophiles” do not value the equipment of this manufacturer. They consider it mass “slag” and “trash.” The only thing these comrades recognize from Soviet audio systems is the top amplifiers from Amphiton and the legendary Brig. But in any case, the Radiotekhnika U-101 stereo amplifier is ten times better than the Chinese rubbish that is now on the shelves of electronics stores. Therefore, for scoring small rooms (such as a standard apartment), it can and should be purchased. Moreover, on the secondary market this device costs a penny. However, let's move on to the design features of the amplifier and its technical characteristics. Because this is the most important thing.
↑ 5. Fighting the background
Got it! No forces! We replace the capacitors in the phono stage with fresh ones.
This didn’t give us much, but it won’t hurt for prevention. During the work being carried out, it was noticed that the background increases when you bring your hand to the cable connecting the input board to the pre-amplifier. Yeah! Got a handsome guy! We unsolder the wires from the preliminary input and... silence!!! Exactly him! Only mass screening will help! It would have been possible to run it with separate shielded wires, but I did it differently. We remove the chip from the cable.
We find a piece of shielded cable, remove the braid from it, shape it, solder the end so that it does not come apart.
Now we carefully insert our train into it. Again we form along the train. We put the chip back. The result is a snake like this. We insulate the screen braid. It’s better to put a heat-shrink tube on top and shrink it. The connection to the common wire is made only on one side - from the signal receiver side. We put the train in place. Turn it on. Fon committed suicide! There is a bit of a sting, barely audible when you turn the volume knob to maximum, but it’s nothing compared to the noise that was there!
Appearance and Design
So, let's look at the Radiotekhnika U-101 stereo amplifier. Its design is, in principle, standard for devices from this manufacturer of the 80s of the last century. However, the massive front panel made of brushed aluminum inspires a certain confidence. The clean wood that decorates the rest of the body also evokes some positive emotions. But most of all I was pleased with the buttons for switching operating modes and the volume, balance, bass and treble controls. They are made well (from the same aluminum), and the size is such that you definitely won’t miss them. All these are distinctive features of Soviet audio equipment of those times. And “Radio Engineering” also looks the part. However, the designers did not forget about cooling the internal elements of the device. High-quality metal grilles are located both in the upper part of the body and in the lower part. The rear panel has a massive power supply refrigerator and a large number of necessary connectors (mostly five-pin). The back panel is also made of metal.
↑ 6. Final amplifier
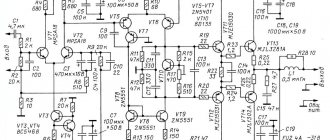
During the work, the performance of the amplifier was checked after each change. But it's not the same. I wasn't happy with the sound. Somewhat lethargic. And there is no bass. Just some kind of fart. We measure quiescent currents per channel: 26 mA and 30 mA. Then it dawned on me. That's who won't let me in! In the end of the Balts, current equalizing current sensors R32, R33, R38, R39 = 1 Ohm 0.5 W were soldered in!!!
For my speakers, which have a resistance of 4 ohms, an additional two ohms is clearly excessive! White bricks from our yellow-faced brothers will help us here! Change to 0.22 Ohm 5 W.
Turn it on. Here it is - dynamics! Here they are - low! The device was kept in place by protection using transistors VT11, VT12. Finally the “girl” started singing!!!
She started singing! Along the way, I replaced the P308 wooden transistors (VT7, VT10), which were clearly not thriving in their characteristics (especially the current - 30 mA), with what I had at home - 2N5551, selected in pairs for each channel. The conclusions, however, had to be bent - the base and the collector had to be swapped.
Next, I set “zero” at the output of the terminals. Before the replacement of P308 it was 77 mV and 110 mV, after the replacement it became 60 mV and 60 mV, respectively. After the replacement, I adjusted R5 (3k9). I installed a resistor with a nominal value of 4k52 (there were such ones) and the outputs became slightly less than 30 mV. On this I calmed down. I could have tinkered with it some more, but I didn’t. I decided that enough was enough.
Now the quiescent current!
It was not possible to set the quiescent current normally due to dust-covered, aged trimming resistors.
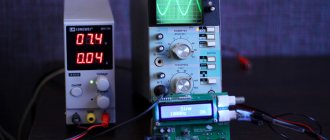
Here my favorite multi-spinners SP5-2 helped me. They had to lengthen the legs from MLT-1 resistors of a rarely used value that had served their time. Solder it in. We shorten the input to ground. Turn it on. We measure. Let's correct it. After a half-hour run and adjustment, I set the quiescent current to 50 mA. (Here we must not forget about precautions. One wrong movement and a “draft”. In this case, to limit the current and protect against troubles, I used 24V car lamps installed in the gap of the ±26V supply wires). The photo shows the check after disconnecting the lamps and the final adjustment.
Weight and dimensions
Soviet technology was not compact. The Radiotekhnika stereo amplifier is no exception. Its dimensions are quite impressive. Its width is 330 mm. Length - 430 mm. And the height is 80 mm. Quite a voluminous device. To install it you will have to find a suitable place. The ideal option would be a rack for equipment. They were produced (and were very popular) in the 90s of the last century. But even now there is such furniture. It’s just that now the dimensions of such shelves are tailored to Chinese “receivers”. But this amplifier has to fit there. As for weight, this amplifier weighs an impressive 10 kg. This weight is due to the heaviness of the power supply, individual components and metal design elements. But it is immediately clear that we have a solid, high-quality Soviet system. Now let's move on to the technical characteristics of the amplifier. They determine the quality of the reproduced sound.
Dealing with extraneous noise
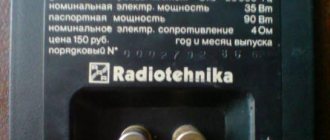
Active noise cancellation is a very good thing in any amplifier. Unfortunately, the Radiotekhnika amplifier is deprived of this useful option. There are noises. But they are not so noticeable to the naked ear. The signal to weighted noise ratio is 83 decibels. And the signal-to-background ratio is 60 decibels. These are pretty good characteristics. The harmonic coefficient at low frequencies is no more than 0.2%. For the untrained reader, these numbers mean nothing. But they can be explained more simply. This amplifier is capable of providing high-quality sound of any composition, even at its maximum volume, with minimal distortion. And this is the most important thing in any amplifier. At least for this reason, Radiotekhnika U-101 is much better than the Chinese consumer goods that are now flooding store shelves. Therefore, if you have the opportunity to purchase Radiotekhnika, you should not lose the chance to become the owner of high-quality equipment.
Amplifier Specifications
So, let's move on to the technical characteristics of the amplifier. It is worth noting that it is not suitable for lovers of loud music. Its rated output power is only 20 watts per channel. For scoring a standard room it is quite enough. But nothing more. The resistance is 4 ohms for each channel. This means that huge 8-ohm floor-standing speakers (like Amphiton) cannot be connected to it. He simply won't be able to swing them. The best option is bookshelf speakers. They are the ones most suitable for such a thing as the Radiotekhnika amplifier. The characteristics are quite modest. Even by Soviet standards. But it ensures high sound quality. The range of frequencies reproduced by the amplifier ranges from 20 to 20,000 Hertz. This is quite enough to ensure high-quality sound. If you connect this amplifier to a computer, you must use an external DAC. Only he can unleash the full potential of this amplifier.
Adding Bluetooth to the Radiotekhnika U-101-stereo Amplifier
Below the cut is a short story about modifying the amplifier, in the form of adding a Bluetooth module. The story began a long time ago, after purchasing a T101 radio tuner, I was inspired by the idea of assembling not a complete set, but at least a minimum set of a tuner, amplifier and vinyl player. The latter, of course, cost a lot of money, hucksters on Avito ask from 5 thousand for a copy that shows no signs of life, as well as a voice. With an amplifier everything turned out to be simpler; the unit, which is still alive to some extent, starts at 2 thousand rubles. In general, 2 thousand is not a lot, but not for a Soviet amplifier for the general consumer, in which someone dug in the same way as in the tuner that I got (the capacitors in it were carefully replaced with Japanese ones and thank God it seems, but the soldering seems to be the same Soviet soldering iron, so half of the tracks were torn off and carefully kept on the terminals of those same capacitors.)
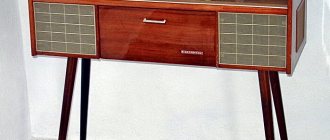
The search was carried out every day for about 5 minutes at the request of the electronics, and as it turned out, it was not in vain! In hot August, a lot of radio and amplifier was spotted, without any notes that it was radio equipment. The main photo is an old radio in a wooden case and with a broken handle, but something attracted me to open the ad. Inside was an amplifier, bit, painted, not working, but the very desired radio equipment, priced at 300 rubles. Having quickly agreed with the seller, I began to wait for the evening in order to pick up the treasure =) Time flew by quickly. Having met the seller, I went towards the house, who knew that the amplifier was large and heavy, and within 20 minutes the weather turned from slightly cloudy to full-fledged rain . I ran like this to get to the bus.
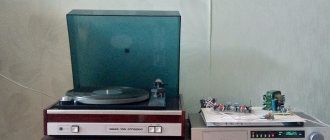
At home, the amplifier stood on a shelf, where it was instantly occupied by a cat; warm, but already semiconductor technology warms the souls of any living creature.
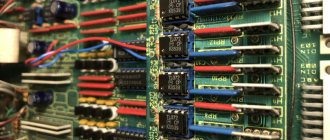
At that time, I sat down to make diagrams and form an order with a bunch of capacitors, almost all - Jamicon, in total there are 53 capacitors, taking into account a reserve of 1-2 pieces for each type, just for reinsurance, as well as for the possibility of choice, if any then from the air conditioners with problems.
I didn’t take pictures of the re-soldering process; it took about 2 hours, as well as a significant number of nerve cells. I came across a fairly old unit, whose tracks looked more like snot, but TS100, low temperature and careful soldering did their job, 0 tracks were torn off, all the condensers fell into place neatly and like family. An interesting thing to note is the capacitors in the rectifier, they are simply huge; compared to them, the modern replacement was 3 times more compact and looked quite lonely on the board.
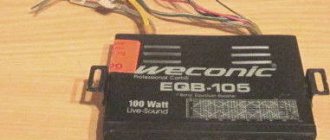
It seems I ran away from the title a little, so here it is, bluetooth! Everything was quite simple here, I had a 3.5mm cable to a Soviet 5pin, but I was just too lazy to run around and connect the phone to the amplifier, the external BT module required a second outlet, and also liked to make noise from the 5V power supply, a mess!
The BT module itself aliexpress.com/item/32945255089.html In short, the impressions are positive, it works without problems with iPhone and Android, the sound is acceptable for 110 rubles, when powered by a battery, no hiss or extraneous noise, the Chinese lady only talks about low battery batteries (if the supply voltage is approximately below 2.7-2.8V), other sounds of connection, disconnection, etc., all the sounds. Now there is an updated version with Bluetooth 5 and also with buttons, I haven’t tried it myself so I can’t say anything about the new version.
I started inlaying the new board by disassembling it. To be honest, the process is not simple, the amplifier is large and heavy, and the tables are now made small, give a Soviet amp a Soviet varnished table!
Bottom view after removing the fiberboard cover, on the left you can see a foreign wire that worked as a temporary solution earlier.
From above, everything is almost feng shui, except that the fuse on the red wires stands out. The stock fuse installation location was carefully broken by the previous owner and cannot be repaired. Completely defenseless, I didn’t want to leave the device, so light collective farming was carried out.
The previous owner also successfully cut the wires to the speaker connectors, bringing out what looked like a Soviet network cable. Fortunately, everything was returned to its rightful place. You can also notice the updated capacitors in the power system; they are really tiny compared to the original. I couldn’t measure the original capacitors with a multimeter, except in resistance mode.
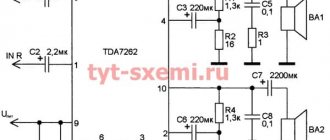
The basic set of parts is as follows. I talked about the Bluetooth receiver above. The main power supply is 12v 200mA, there is a review on it from Kirich - Since the receiver module is powered by 5V and our power supply produces 12V, an AMS1117 5.0 linear converter is added to the circuit, as well as a pair of capacitors.
The first step was to assemble the power line. The AMS117 was soldered onto a copper strip for a slightly larger heat dissipation area, and capacitors were soldered to the chip itself. 35v 220uF at the input, and 50v 22uF at the output.
The output is 5V and has minimal ripple. The current circuit passed an hour-long test at a current of 100 mA.
Testing with a Bluetooth receiver also did not raise any questions, there was no noise, so the converter and capacitors were shrink-wrapped, and I moved on to fitting.
There is generally enough space in the amplifier. Enough so that you can fit another powerful 200-watt pulse power supply, as well as a pack of TDA amplifiers, which can be wound in an even layer onto the frame for better cooling. In our case, everything fit in just as well without any problems. The power supply will be located near the transformer; a pair of wires will send its voltage to the receiver, which is located close to the input connector board.
It’s not interesting to just leave bare boards like that. I decided to print the cases. I took the box for mt3608 www.thingiverse.com/thing:3643057 as a basis, the box is simple, universal and can be easily modified in 3dx max to the desired size.
The first thing I do is load all parts of the model into max.
Next, I measure the object for which the body is needed, and from it I create a body of the same dimensions, or a simple box.
Next, I place the lid exactly above the main box, select the points on one of the sides, and pull it out so that the inside of the case is slightly larger than the power supply, I repeat this for all sides.
The result is a case that perfectly fits the device I need. I prefer to make such cases a little larger than necessary in order to conveniently route the wires.
Next, I load it into the kura, set the settings for fast and not the highest quality printing, save it to a flash drive, and print it.
Gray PLA from Greeg, 40 minutes, and voila, most of the body is ready. Did you know that the EU has passed a law banning single-use plastic products made from non-degradable plastic? Probably many 3D printing enthusiasts know, because this has greatly affected manufacturers of plastic for printing. PLA is biodegradable and now disposable spoons and plates are made from it. The European raw material for the production of plastic has suddenly become more needed in Europe, and its sales to other countries have sharply decreased. And fans of plastic plastic are now sucking their paws and looking for workarounds, in the form of more expensive PetG, or ABS, which require thermal chambers, and cheap printers in the air.
The power supply fit fine, so the cover was printed.
I didn’t notice that in the cruise settings there was a body print with a size of 101%, it’s not scary, but there is still a slight discrepancy in the sizes of the lid and the main body. Luckily everything closed without any problems.
It was in the evening, the neighbors were sleeping, and I had no desire to drill into the amplifier case in order to attach a new power supply to it, and being able to remove everything at the right time is also nice. Therefore, the bp was secured to 2 strips of terrible tape from Galamart. I don’t know what this tape is made of, but the stench from it is so bad that it hurts your eyes, and the wallpaper peels off like in that joke.
Thanks to this tape, I was able to check my Xiaomi extension cord for originality. It was glued to the table with 2 strips, when it needed to be moved to a new table, the extension cord came off without a cover. The board was original; after a year, the extension cord did not even show signs of constant use. I'll probably take more.
Wires 220 were soldered to the input of the main transformer. The top was insulated with heat shrink. Soldering these wires with a regular soldering iron would probably be scary, ts100 with a tip like a stump at a temperature of 340, soldered it in seconds.
Oh, yes, at the same time with modeling the case for the power supply, I made a case for the BT receiver, the same technology + a little extra space for convenient wiring.
The wires are soldered and everything is ready to be installed in place.
There was enough space, special thanks to the Soviet developer for the technological hole, I don’t know why it was conceived, but it was useful to me.
As soon as you get up to get the next part that the printer has printed, the cat comes.
The lid this time was printed to size and closed no worse than the previous one.
We solder the BT output of the receiver to the UNIV Input, you can also connect it to a tuner if you don’t have one, logically everything is in order, and the UNIV Input will be free for new devices.
The wires are a little un-audiophile, but no interference or interference was noticed on the other inputs, so I left it as is, just added a pad so that the sharp legs of the microcircuits would not press anything into the wire when closing the lid.
Then I tested it. Recently I snatched up a ugreen adapter on sale, for 250 rubles it’s a must-have against the backdrop of nonnames and names. Aptx is there, EDR is there. The Dualshock 4 controller works, wireless TWS headphones work, even pauses the sound if there are buttons on the headphones. The point of this paragraph is that there are no drivers for it on the Internet. The disk with the adapter comes, but I don’t know where to insert it in 2022. As a result, the manager gave me drivers that weigh almost half a gig. Drivers for Ugreen USB bluetooth
Everything, of course, works without a driver, but with it there are much more settings.
That's probably all for this. The amplifier was successfully prepared, the task was completed 100%, everything plays perfectly over the air and also over the wire if you select the tuner input on the selector and the tuner itself is turned on. Overall, it’s nice to delve into this technique over the weekend, a very meditative experience. Thank you for your attention, I hope you enjoyed this little journey into the depths of Electronics u101
Comparison with other amplifiers
This is a very important step. You need to take into account all the nuances and understand whether the Radiotekhnika amplifier is better or worse than the rest. The first competitor is Amfiton-001. Under the same playing conditions, our hero showed a much more complete sound scene than Amphiton. Further more. The Amphiton bass could not become as correct and fast as the low frequencies created by Radiotekhnika. A clear failure. The next test subject was the legendary Brig U-001. This monster of sound easily made a simple 101. The Brig produced a much better sound. And nothing could be done about it. Although "Brig" is years older, it is much better than "Radio Engineering". The only trouble is that it is very difficult to find an adequate Brig on the secondary market. Therefore, Radiotekhnika remains the best option. And an inexperienced listener will not notice much difference between these two amplifiers.
Positive reviews about Radiotekhnika
What do those who have already purchased the Radiotekhnika U-101 pre-amplifier say? The vast majority of owners are satisfied with the sound this amplifier provides. Others note that after a little modification the device began to sound even better. But all music lovers agree on one thing: this amplifier is easy to use. It is great for everyday use. Another advantage people consider is the ease of repairing the amplifier if it fails. In general, the owners are satisfied with the device.