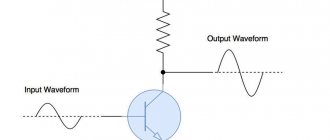
Principle of operation
To understand the operation of the device, you do not need to have the appropriate education and delve into the circuit diagram of the amplifier. It’s just necessary to take a closer look at how the signal appears that goes from the car radio directly to the amplifier itself. It is known that the signal that arrives at this device has a low amplitude. After it passes through the amplifier, it produces the appropriate level that is necessary to reproduce sound. However, this is only one side of this issue. More precisely, the amplifier generates a new sample signal. Moreover, this signal is a copy of the one that arrives at its input from the car radio.
Installation features
When choosing a place to install the Pioneer GM-A3602 amplifier, you should consider its size. It is quite large, and its walls are 180x238x60 mm. When installing it as a subwoofer amplifier, the best option would be to use space in the trunk or under the seat. But when using an additional pair of sound emitters to connect, choosing a mounting location can be a problem. In addition, it is worth considering that the amplifier does not have a classic power supply connector, so you will have to interfere with the car's electrical network. If it is still under warranty, then it is still recommended to choose another model that can receive power via the built-in bus.
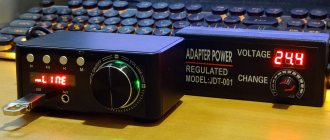
You should also provide a wire to provide a signal to turn the device on/off. Since the Pioneer GM-A3602 car amplifier has a fairly low cost, it is not equipped with a sensor that would allow it to turn on and off automatically when there is a sound signal.
Amplifier types
There is a huge selection of this type of device on sale. Basically, they differ in the number of channels. Amplifiers are now known that have from 1 to 6 channels.
There is another classification of such systems, which is determined based on the method used to carry out the signal amplification procedure.
- Some devices use an analog type of signal amplification.
- The most commonly used elements are those that produce amplification first according to the digital class.
Every car enthusiast who values high-quality sound has at least once thought about the need to connect a good speaker system. Of course, no normal acoustic system can do without installing such an important element as an amplifier. In this article we will talk about how to connect an amplifier to a radio with your own hands, what is needed for this and how to choose the right place for the subwoofer.
Sufficient minimum
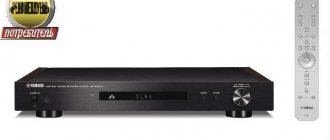
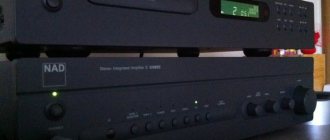
Integrated amplifier Pioneer A-50DA Price — 68,990 rub.
Whatever trends emerge and dominate the AV industry, Pioneer, always responding to the challenges of the times, remains faithful to Hi-Fi. Here Pioneer, as they say... is always ready. At the same time, calling the “pioneer” Hi-Fi classic can only be done with reservations. The company's corresponding products are significantly influenced by the permanent technological and digital revolution. Such is the Pioneer A-50DA integrated amplifier.
There are currently several models in the Pioneer stereo amplifier line. All - including the Pioneer A-50DA - feature Class D amplification. The proprietary Direct Energy concept is implemented here, the essence of which is the optimized architecture of the output stage and power supply to obtain low nonlinear distortion, high signal-to-noise ratio and, accordingly, , better sound results. The power supply transformer provides separate isolated windings for the preamplifier, power amplifier and control circuit sections. The functionality of the model is also very wide.
First of all, it is worth mentioning the possibility of working with digital musical material, which can be received not only via coaxial and optical inputs, but also via an asynchronous USB port from a computer. High quality digital signal processing is supported by a precision 32-bit ESS SABRE32 Ultra DAC ES9016 DAC chip with eight-channel PCM and DSD data processing with a sampling frequency range limited at the top to 384 kHz and 11.2 MHz, respectively. The numbers themselves are impressive.
It is possible for the Pioneer A-50DA to function as a power amplifier - for this purpose, the designers have provided a Power Amp Direct input and a button to activate the corresponding mode on the front panel. Of course, analog switching has not been forgotten: there are four unbalanced line inputs on RCA connectors, as well as an input for a signal from an MM pickup (the older model with the index A-70DA has a balanced analog input and the ability to work with a signal from MC heads). The ground terminal will help cope with background noise when playing records. The control signal input and output make it possible to integrate the amplifier into a single system for centralized power management. It is possible for the Pioneer A-50DA-K to function as a power amplifier - for this purpose, the designers have provided a special Power Amp Direct input and a button to activate the corresponding mode on the front panel. For purists, the Direct function is addressed, directing the signal bypassing the balance and tone controls (high and low frequency controls are available). There is still a very rare, but certainly useful function of loudness (Loudness), which increases the output at the edges of the frequency range when listening at low volumes. Among the bonuses are automatic switching to standby mode if there is no signal for half an hour (turned on and off with the APD button on the remote control) and the ability to adjust the brightness of the indicators (Dimmer button). Pioneer A-50DA is capable of working with two pairs of speaker systems, for which two pairs of high-quality screw output connectors A and B are provided; possible combinations: A, B, A + B. This function will help organize a two-wire speaker connection using a bi-wiring scheme. The output terminals are located at a considerable distance from each other, which simplifies the connection of cables with special physical parameters.
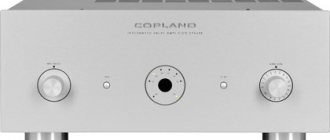
The solid appearance of the Pioneer A-50DA is added by a thick (3.5 mm) aluminum front panel and controls made of the same metal. The component looks “pioneer style” strictly, without frills or sentimentality. The workmanship of the model does not give rise to criticism, which is not surprising considering that the component belongs to such a highly reputable brand as Pioneer. The included remote control is very convenient, with a classic look, which can be used to control not only the amplifier, but also content sources - a network player and a SACD player. Of course, provided that these components are also manufactured by Pioneer.
Overall, the sound of the Pioneer A-50DA can be described as very pleasant and comfortable. The lower register is outlined quite clearly, and the energy of the bass is sufficient to present even such demanding musical forms in this regard as hard rock, symphony orchestra and organ in a medium-sized room. Reproduction of classical, jazz and other acoustic music gives grounds to certify the sound of the amplifier as accurate in tonal, timbre and spatial terms.
So, above was a portrait of a modern technologically advanced stereo integrated amplifier. Its sound is quite consistent with the design level. In other words, the Pioneer A-50DA did not lose face during the musical examination.
Operating with both analog and digital signals and playing a variety of genres of music, the amplifier demonstrated an energetic, clear, accurate, expressive and spacious sound pattern. In general, the sound can be defined as very pleasant and comfortable. The lower register is outlined quite clearly, and the energy of the bass is sufficient to present even such demanding musical forms in this regard as hard rock, symphony orchestra and organ in a medium-sized room. Reproduction of classical, jazz and other acoustic music gives grounds to certify the sound of the amplifier as accurate in tonal, timbre and spatial terms.
All these words refer to the operation of the Pioneer A-50DA in Direct mode. Turning to the tone block allows you to diversify the sound and bring it into line with individual tastes in relation to a particular music. It turned out that the tone controls work quite effectively. The same can be said about loudness compensation, which makes it possible to avoid a deficiency of low and high frequencies during night listening.
Of course, there is no point in talking about the sound resolution of the Pioneer A-50DA in the grandest sense, because we are dealing with a relatively inexpensive electronic component that belongs to the lower Hi-Fi category. At the same time, the compliance of the low cost of the device with its technological, functional and sound level is beyond doubt.
Preparing for installation
If you don’t know how to install and connect an amplifier in a car, then you need to familiarize yourself with some of the nuances of this issue. Simply installing a subwoofer where it is convenient for you is not the best option. In order for the sound to be of the highest quality, you should take into account several points, which we will discuss below.
Choosing a place for the amplifier
Before connecting the amplifier to the radio, you need to decide on the location. The location determines the length of wires that will be used to connect the device to the speakers. If you decide to install a subwoofer in the trunk, then keep in mind that to connect to the radio, you will need to buy wires to connect to it and to the speakers. This is about 5 meters for a multimedia system and about 3-5 meters for each speaker. This parameter must be accurately calculated, since the cables will be laid in the casing, and therefore not in a straight section.
When choosing a location for the device, keep in mind that the sub generates a lot of heat. To correctly install the element according to the diagram, select a place where there will be normal air circulation. Never place the sub on its side or upside down, or cover the device with things or rugs. If the amplifier is installed under the driver's seat, you can save on wiring, especially since the shorter the cable length, the better the sound. Since part of the signal may be lost on a long wire.
If you decide to install two amplifiers with linear outputs, then one of them can be placed in front and connected to the speakers, and the second one can be placed in the back and connected to the subwoofer.
There are many options for correctly installing a device with a linear output and connecting it to the car’s standard radio; we will consider each of them briefly:
- In the front of the car, in the center. This option of installing the amplifier with two or one linear output is optimal. You will be able to achieve excellent communication with the speakers, and accordingly, the level of the transition frequency will be expanded. If you are the owner of a small car, i.e. there is little free space in front, this option for connecting the device will not be possible. It is relevant for minibuses or SUVs, but in any case, the subwoofer must be of its own size.
- In the luggage compartment, the speaker is facing forward. If there are two amplifiers with linear outputs, then one can be installed in front, and the second in this way. You will need more wires for this project, but the device will be located in the rear and will not affect the available space in the cabin.
- The option of installing an amplifier with a linear output on the rear parcel shelf will be relevant for vehicles in a coupe or sedan. The rear shelf must be strong and withstand heavy loads.
- Under the driver's or passenger's seat is another option for installing the component in a car and connecting it to the standard radio. This way you can always dismantle the device if necessary and check its functionality. If the device is installed in front, it can be connected to the standard radio and two speakers. This will require fewer wires and this will be correct, because the shorter the wire length, the better the sound will be.
Use as a subwoofer amplifier
However, in bridge mode, this model provides the connection of one speaker with a power of up to 180 watts. This mode is more interesting because it allows you to install a not too powerful subwoofer without unnecessary hassle and the purchase of expensive equipment such as an additional capacitor. It is the work in this configuration that can be called the main one for the presented device.
Especially for this purpose, the manufacturer Pioneer GM-A3602 provides a built-in filter that can cut off high and mid frequencies, leaving only a range from 10 to 80 Hz at the output. Thus, even if the radio does not have a special subwoofer output, this will not be a problem when connecting. The signal is supplied using classic RCA connectors, which facilitates the installation of the required wires and allows the amplifier to be used with any device that has a linear output.
DIY connection
If you decide to connect the amplifier to the car radio yourself according to the diagram, familiarize yourself with the installation process. It makes no difference where the device will be installed - under the car seat, next to it or on the rear parcel shelf. The main thing is to adhere to a certain scheme of actions.
Tools and materials
Algorithm of actions
- It is necessary to connect the interconnect cables from the car radio to the device. If the device is four-channel, then two pairs of wires will be needed, if the device is two-channel, then one pair is enough.
- The next step is the installation of power cables to the device, we are talking about positive and negative wires. The best option is to install directly to the positive and negative terminals of the battery. To simplify the task, you can connect the negative cable directly to the car body, because its body is the mass, so you don’t have to pull the wire to the battery. As for the control cable, it connects directly to the car radio without problems.
- If the amplifier is mounted in the luggage compartment, then the cables should be laid where other wiring is located. Today, many cars are equipped with special channels for electrical wiring, which will isolate the cables from external influences.
- Pay attention to cable connections. In order to do everything correctly and the music is of high quality, and the signal passes through without loss, acoustic terminals are used. One of the important conditions is that the contact of the cables must be reliable, but if it is not possible to purchase such terminals, then the connection can be made without them. Regarding the capacitor, its installation is optional. You need to connect a capacitor if the wires you are using leave much to be desired and their connection is not strong.
- The final stage will be the installation of acoustic wiring from the device to the car's music speakers or subwoofer. If you confuse the polarity of the wires, nothing bad will happen. After installing the device, you need to listen to how well the speakers play; if you hear that the sound is repeating and playing with noise, then the polarity must be changed. What is important in this case is reliable contact of all elements of the speaker system so that the wires do not become disconnected arbitrarily as a result of vibrations.
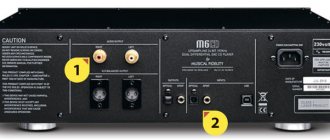
Basic characteristics
This amplifier has a rather beautiful outer casing, made in a red and black color scheme. This suggests that the manufacturer thought through both hidden and open installation of the device. To connect the Pioneer GM-A3602, a classic set of blocks is used. One of them is designed to supply power voltage, and next to it there is a 25 ampere fuse. The second is a pair of pins for connecting the speaker system.
There are only two outputs, since this amplifier does not support quadraphonic connections. It can provide a clean amplified signal to a pair of speakers with a power of 60 watts, raising it to a peak of 120 watts. Thus, its main purpose in this mode of operation is to amplify the sound signal for an additional pair of acoustic elements installed together with the standard quadraphonic system. Considering that head unit amplifiers are typically capable of delivering 50 watts of power per channel, using this as a replacement for them is at least impractical.
Positive reviews about the model
In order to finally make your choice, you should read the reviews of the Pioneer GM-A3602 left by drivers who have already equipped their car with this device. Among the main positive aspects they note the following:
- Easy to connect. If we omit the need to intervene in the car's electrical system, connecting the amplifier is quite simple. All contacts on the buses are labeled; specific connectors and separate circuits are not required.
- Low cost. Compared to other devices in this class, the amplifier has a reasonable price along with quite high power.
- Loud noise. Users note that the amplifier is capable of producing truly loud sound, which can be useful during outdoor recreation.
- Ease of installation. The case is equipped with all the necessary fastenings that allow you to securely fix the amplifier in the designated place.
- Possibility of universal use. It is an excellent option for those who have not yet decided on the final layout of the sound elements in the car.
- Sophisticated cooling system. The amplifier works even in the hot season without overheating and sound distortion associated with it. There is thermal protection.
- Nice appearance. The gadget is perfect for placement in a prominent place in the car, as it has a thoughtful, eye-catching design.