Computers are devices that have confidently entered human everyday life. The multifunctionality of the devices guarantees the possibility of their use both for work purposes and at home, for games, communication, professional activities and hobbies. One of the important functions of a computer device is sound playback, which makes it possible to watch movies, listen to tracks, music, and communicate through various programs with friends and family. For some users, sound quality is not a primary indicator, focusing only on simple playback, but some PC owners give special attention to the capabilities of audio devices, which forces them to look for options to improve the sound. A device such as an external sound card can help with this. We will tell you in which cases purchasing an external sound card is a justified decision, how to select, connect and configure this equipment.
Connecting an external sound card to a computer.
How to connect an external sound card to a computer
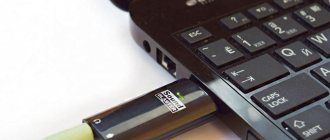
First, let's connect your audio interface to your computer. Most often, you just need to connect a sound card via USB or find a thunderbolt/type-C connector. Sometimes you need to download drivers, which we recommend that you do anyway. Modern audio cards are automatically detected by the system and do not require complex settings. Just connect your sound card to your computer, go to the official website of its manufacturer, download and install drivers for your audio interface model. The location of the drivers is indicated in the instructions for the audio interface and differs from manufacturer to manufacturer.
After downloading and installing the driver, go to the “sound” section of the control panel and make sure that the sound card appears as a working device in the playback and recording of sound. If this is what happened, you can start using your new device.
Open your digital sequencer, such as Cubase, Ableton or Fruity Loops, and set your sound card as the recording and listening device in the audio settings. Depending on the program you are using, these settings may vary, details about them are widely available on the Internet.
Possible connection difficulties
Provided you connect a new device and follow the connection process consistently, according to the instructions, there will be no problems with synchronizing devices. If, however, when testing the device’s performance, a failure occurs, the card does not function, then it is worth checking some points that are often the source of the problem:
- If the computer device “does not find” the external card, it is necessary to eliminate the possibility of a malfunction of the USB port one by one. This can be done by connecting to a known working connector, for example, where your mouse is inserted. You can use another port on your PC or laptop, or check the functionality of the sound card on another computer device.
- If the card is recognized by the computer, but no sound is played, the problem may be caused by incorrectly installed drivers. To fix the problem, you will need to reinstall them again, after which the device should work.
- Another reason why the sound may not play is user inattention. Multifunctional cards of an expensive class are equipped with many options and toggle switches that must be activated to start playing sound; a careful study of the instruction manual included with the product will help you figure this out.
The described manipulations, performed carefully and correctly, will help eliminate problems and activate the card, if the problem is not a malfunction of the device itself due to a manufacturing defect, which only a service center specialist can determine.
How to connect a microphone to a sound card
To connect a microphone to a sound card, you need to take into account several conditions.
First, pay attention to the available sound card connectors. Most often, modern audio interfaces are equipped with XLR/Jack combo jacks that support both plugs. Depending on the jack available, purchase the appropriate cable for your microphone.
Secondly, the type of microphone being connected is important - condenser or dynamic.
A dynamic microphone does not require additional power, and you can simply plug it into the jack, adjust the gain, and start recording. A condenser microphone requires additional voltage to operate, called phantom power.
Most audio cards have phantom power - find the switch on the device case labeled +48V and turn it on after connecting the microphone. Adjust the gain and start recording.
Of course, today there are more and more microphones that use a USB connection. It is used to enable relatively high-quality recording without using a sound card. Please note that the USB microphone is not directly connected to the sound card, and for better recording quality we would recommend using the traditional connection of microphones to the audio interface, which we discussed earlier.
Why doesn't the computer see the microphone?
The main reasons for the lack of communication may be the following:
- The power button on the device is not activated,
- connection errors,
- incorrect settings,
- outdated or malfunctioning software,
- breakdown of headset elements (faulty cord or plug),
- failures in the operating system.
It matters how the microphone is connected to the PC:
- headphone input,
- common connector
- two sockets are used (in devices with two plugs),
- USB,
- Bluetooth.
Depending on the connection options, the following faults may occur:
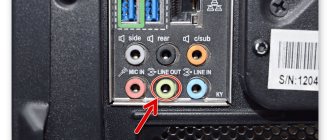
The PC audio connector is incorrectly selected. The microphone port is pink, the headphone port is green. Laptops may have uncolored inputs, but they are marked accordingly.
ON A NOTE. Some computer models provide a single input for headphones and microphones, which eliminates error.
- The device plug does not match the diameter of the audio input, it dangles in it, so there is no contact.
- The connector is dirty or its individual elements are damaged.
- The Bluetooth option is not turned on or the batteries have run out.
How to connect speakers to a sound card
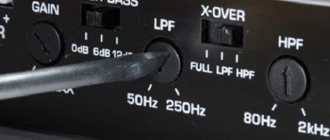
An important point in all the necessary switching of the studio is connecting the monitoring speakers to the sound card. Headphones alone are not enough, and you will soon realize this yourself, because the sound can sound different on different devices. In addition, in any case, one day you will want to listen to the finished work, or the recorded audio track in full scale. Monitor speakers, like monitor headphones, do not embellish the sound, but display it “as is”, without artificially altered frequencies.
Summarizing
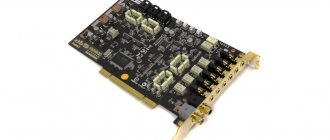
An external sound card is a device designed to improve the playback of audio content. This equipment, unlike analogues integrated into the motherboard, is purchased by music lovers, professional gamers and musicians to improve the sound quality of audio content. The equipment, although not a budget purchase solution, is in demand among connoisseurs of high-quality audio sound and is popular among a certain category of consumers. This article will help you figure out how to decide on the choice of an external connection type sound card, the features of connecting the equipment and its settings.
Connecting monitors to a sound card
To connect monitors to the audio interface, RCA jacks, also called “tulips,” balanced XLR connectors, or large balanced TRS Jack 6.3 connectors are used. Depending on the model of your monitors and sound card, select an available connection and simply connect the devices together.
Balanced cables and connectors are so named because they are designed to be noise-cancelling, and hearing audio without noise is important in a studio environment.
To connect a subwoofer to a sound card, use the same means as for connecting monitor speakers.
What color is the audio port?
Color coding scheme for connectors and ports
| Color | Function | Connector on PC |
| User input | ||
| Pink | Analog microphone audio input (mono or stereo) | 3.5mm TRS |
| Light blue | Line level analog audio input | 3.5mm TRS |
| Lime green | Analog audio line-out, front stereo (speakers or headphones) | 3.5mm TRS |
How to connect headphones to a sound card
During recording and mixing, it is important to hear and control the entire process, so you can’t do without headphones.
Most sound cards have a separate headphone jack. Advanced models may even have several connectors so that what is happening with the sound can be heard simultaneously, for example, by a vocalist and a sound engineer. There is nothing complicated about connecting headphones to the audio interface - there is a special dedicated connector for this. However, most often it will be a Jack 6.3 format socket, that is, a large jack. If your headphones do not have such a plug, you will have to get an adapter.
We would recommend using professional monitor headphones that reproduce sound accurately and come with the correct plug out of the box.
Solving common problems
Unfortunately, not all users have successful installation of the equipment in question on their computer. Some people encounter problems when the sound is interrupted or completely absent. There are different reasons for such situations, and each of them will have to be checked manually in order to find a solution as quickly as possible by correcting the existing problems. To make it easier for you to detect the error, follow the link below and start familiarizing yourself with all the methods in order.
Read more: Reasons for no sound on PC
We are glad that we were able to help you solve the problem. In addition to this article, there are 12,721 more instructions on the site. Add the Lumpics.ru website to your bookmarks (CTRL+D) and we will definitely be useful to you. Thank the author and share the article on social networks.
Describe what didn't work for you. Our specialists will try to answer as quickly as possible.
How to connect a MIDI keyboard to a sound card
One of the possible options for connecting a MIDI keyboard to a computer is to use switching through the built-in midi interface of the sound card. Despite the fact that many modern midi keyboards only have a USB connector, there are many models of such controllers on the market that use classic midi connectors.
To connect such a keyboard, use a midi cable, connecting the midi out connectors on the controller and the midi in connectors on the sound card.
Sound recording
Let's return to the general settings window of Windows 7. How to configure the recording sound? This is also easy. The Recording tab provides similar settings, but now for audio recording devices. If you select a microphone and click the “Configure” button, the speech recognition window will open. Unfortunately, Windows will tell us that speech recognition is not supported for the Russian language. The Properties button can bring us more benefit, clicking on it opens a window with tabs. Setting up sound in Windows 7 is not the most difficult task, is it? The General tab in the microphone properties displays brief information about the device. The “Listen” tab allows you to connect a player or other devices to listen to music; on the “Levels” tab we can change the microphone volume and gain, and on the “Levels” page there are bit depth and bitrate settings. The Enhancements tab gives us the opportunity to enable various sound effects.
The other general sound settings tabs in Windows 7 are also useful. On the “Sounds” tab we can change the sound scheme used, and the “Communication” tab allows us to reduce the volume of sounds during conversations - convenient and clear! We hope this article helped you get acquainted with Windows 7. How to adjust sound? It's simple, because now you can share your experience yourself!
The multimedia capabilities of a PC are used not only by fans of computer games and connoisseurs of high-quality cinema, but even by those users who, for example, keep accounting records, print documentation or retouch photographs. Many people don’t mind being distracted and listening to good quality music or watching videos on the Internet during their lunch break. One way or another, playing multimedia content first of all requires the sound equipment to be in good working order and properly configured.
Sound settings in Windows 7 have undergone some changes compared to previous versions of the OS. Usually, during installation, the system selects the most suitable drivers for each device, including the sound card, but there are times when audio playback becomes impossible. The problem in this case can be either software or hardware in nature. Hardware problems are associated with the breakdown of speakers or a sound card and can only be solved by repairing or replacing damaged components; software failures are much easier to eliminate.
In order to figure out what type of problem you are dealing with in each specific case, it would be nice to have a basic understanding of how sound is actually generated in your computer or laptop:
- Initially, information recorded on a digital medium, such as a flash drive or DVD, goes directly to the computer’s motherboard.
- Next, using a built-in chip or a separate card, the received information is processed and decoded into an analog format, which is fed to speakers or headphones.
Method 1: mechanical
Many users who are accustomed to working on a laptop, but “forced” to master navigation on a desktop computer in the office or at home, experience some confusion associated with the abundance of connected wired devices such as a keyboard, mouse, webcam and speakers. Therefore, if the sound disappears (especially suddenly), first of all you need to make sure that the connection has not been broken and the wires do not have strong kinks. Next, you need to make sure that the speakers are connected to the appropriate connector (“Output”) located on the motherboard or audio board. If the sound card is multi-channel and you are connecting a system of six speakers with a subwoofer, then you should carefully (according to the instructions or the colors of the connectors) connect all the plugs in pairs. After all the connections have been made, you need to go to the “Control Panel” through the “Start” quick access menu and enable the “Surround Sound” function in the settings.
What else is worth knowing?
- Typically, the connector into which the speakers are connected is green and has the inscription Out directly above the socket.
- If you are using a special HDMI cable, then it is worth remembering that not all devices support this type of switching. In the Windows Control Panel, you can configure the synchronization of the hardware with the cable by clicking on “Set as default.”
- If you are using USB devices that reproduce sound, you can try plugging them into another slot, after which you must restart the computer.
The volume of the speakers is controlled by a knob called Volume. If you have connected the speakers correctly, turned the volume control to maximum, but no sound appears on the computer, then you can move on to further search for the cause of the problem.
Method 2: Sound card drivers
Method 3: Checking Settings
The problem of sound disappearing in Windows 7 may also be due to incorrect operation of the system, which, of course, can be properly configured.
Method 4: neutralize Win audio failures
Absolutely all versions of the Windows 7 operating system can be subject to glitches, as a result of which the correct operation of sound on a computer or laptop is disrupted. Sometimes the sound disappears directly during operation, and in order to “get it back” you need to restart the OS. Of course, this is by no means a solution, so it is best to configure Windows Audio and restore normal sound functioning on your own computer.
Method 5: Fixing an Incorrectly Configured BIOS
Method 6: Installing Codecs
If there is sound when loading the Windows operating system, but immediately disappears while playing games or watching multimedia content, then the problem most likely lies in hopelessly outdated codecs, or in their complete absence.
Method 7: Look at the "Taskbar"
If the sound on the device has disappeared completely, or has a very low volume level, then you can adjust it by clicking on the image of the speaker near the clock icon in the “Taskbar”. Once pressed, you will have access to an adjustment menu called “Mixer”. If the speaker image is crossed out in red, it means it needs to be removed manually. If the volume slider is at the bottom, then it needs to be raised to maximum. Here, in the “Mixer,” you can also adjust the frequency and bit depth of the audio, as well as all sorts of “tricks” like surround sound.
Method 8: Using Additional Software
When you can’t adjust the sound on your computer yourself, you can use special programs that can diagnose the problems that have arisen and, accordingly, eliminate the cause of the failure. Some manufacturers of audio components accompany their devices with similar utilities, or they can be downloaded from the official website of the developer.
The initial sound setup on a personal computer or laptop begins with installing drivers for the sound card. Of course, the latest modern operating systems, such as Windows 7, are themselves able to determine the model of the sound device, regardless of whether it is built-in or separate, and install the necessary supporting software. Of course, this option is not suitable for owners of sound cards that were released recently.
If the OS does not install the drivers automatically, then do not despair. We need to start from the very beginning, namely, to understand exactly what sound card is installed on your personal computer. They exist in three types: 2.1, 5.1, 7.1. At the very beginning, when installing special drivers, you can easily determine this using pop-up tips. And depending on the type of sound card, you can start setting up the sound on your computer, knowing what sound you should get as a result.
How to connect a guitar via an external sound card
In addition to recording to a microphone, most sound cards have the ability to record instruments. For guitars, a special Hi-Z connector is used, which has increased resistance to more accurately match the output signal of the pickups. This connector allows you to record an instrument in high quality without losing important sound nuances.
On some audio interfaces, one of the input connectors can be made instrumental by turning on the nearby toggle switch labeled Hi-Z. Connect to this jack, adjust the signal gain and start recording.
Which motherboard has the best sound?
Comparison of the best motherboards for audio production
| Product | Chipset | Sound |
| Asus AM4 TUF X570 | X570 | 5 audio ports with optical output Realtek S1200A, SNR 108 dB |
| Gigabyte B550M AORUS PRO-P | B550 | 5 audio ports with optical output Realtek ALC1200 |
| GIGABYTE GA-A320M-S2H | B365 | 3 audio ports, Realtek ALC887 codec |
| GIGABYTE GA-A320M-S2H | A320 | 3 audio ports |
How to connect a sound card to a mixer
For the convenience of switching and recording several instruments at once into a common mix, use a mixing console, connecting it to the sound card. Thus, depending on the number of inputs and outputs of the console and sound card, you can expand the recording capabilities.
- To connect multiple instruments to a mixing console and record a common signal, connect the output jack of the mixing console to the input jack of the sound card. Please note that this way you will only be able to record all the instruments connected to the mixer at the same time onto one track. You can also connect the audio outputs of your sound card to the mixer channels for monitoring. We connect headphones and monitors to the corresponding connectors on the mixing console.
- To record several separate tracks, the sound card must have a large number of inputs and outputs, and the mixer must have Channel Inserts. Each Channel Inserts connector is stereo, and to connect to a sound card you will need a Stereo Jack 6.3 cable to two Mono Jack 6.3 connectors. Thus, a sound card channel is connected to the mixer channel, and recording can be carried out in several tracks, using all the functions of the mixing console. All other connections can be repeated from the previous paragraph.
Where can I find drivers for an external video card?
Naturally, each model of external sound card (from each individual manufacturer) requires its own drivers. As a rule, they come included on a small disk.
However, modern laptops often lack DVD-ROM. In this case, there are several options for getting out of the situation:
- loading the driver from a removable storage device (often from a flash drive);
- downloading the driver from the Internet.
The second method seems to be the most attractive. You just need to go to the website of the official manufacturer, select your own operating system and download the package of necessary drivers.
In addition, let's not forget about the utility, which will allow you to configure the equipment more accurately in a musical sense. In the vast majority of cases it is provided free of charge.
See also:
- Do you know how the AVR operates?
- Description of various types of energy audit - https://postroyka.org/vidyi-energoaudita/
The video will demonstrate how to connect and configure an external sound card:
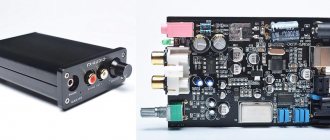
A sound card is an electronic device designed to process sound, output it to speakers or headphones, and organize the recording of audio files. These components, used in personal computers, may be integrated into the motherboard or supplied as a separate unit. External audio cards can be installed in the motherboard connector, for stationary models, or connected to the device via a USB port. Sometimes the computer does not see the device or it does not work correctly. To do this, you need to know how to properly configure an external sound card .
How to connect an amplifier to a sound card
To listen to a good signal, many speakers and headphones require an amplifier.
Connecting a sound card to an amplifier is very simple - you need to connect the output connectors of the sound card (not to be confused with the headphone jack) to the input connectors of the amplifier. Depending on the device model, the connector format may differ - balanced XLR connectors or balanced TRS jacks. Carefully study the available equipment and plan the connections, only then purchase the necessary cords. Tags: sound, training Number of impressions: 16152
Setting up the map
After installing the drivers, the computer device should automatically recognize the external modulator. At this stage, the work on the settings does not end: in order for the sound to be played through the specified device in the PC settings, the equipment must be given priority status. To complete this task, the user will need to perform the following simple manipulations:
- Find the volume “mixer” on the taskbar, double-click on it with the right mouse button to open the adjustment menu window.
- In the window that opens, select the “Playback devices” item, where you will need to find the installed equipment and select it with the right button of the manipulator.
- Confirm in the settings the laptop’s choice of device for playing sound by confirming the “Default” directive.
- Perform a similar procedure with the “Sound recording devices” position, if the card is intended to be used not only for playback, but also for recording audio content.
At this point, the settings of the external card can be considered complete: all that remains is to check its functionality and set the audio playback parameters that meet the user’s requirements, if the device is equipped with regulators.