In an electromechanical dynamic loudspeaker system, the weakest point is the cone. It is usually made of special paper, so it can become deformed and damaged at high volume levels. It can be easily torn, in addition, it absorbs moisture well. This affects its strength. Do-it-yourself speaker cone repair is possible at home. The paper pulp used to make this part is dense and rigid. The speaker works like a piston, so no deformation of the material is allowed.
Read Me.
The navigation for this FAQ is as follows. All material is divided into parts, but at the same time, through the “Navigation” located at the top of any page, you can get to any point in this FAQ or return back.
This was done so that the overloaded page does not become overwhelming for people with a weak Internet connection or those who access the network via iPhone, iPod, etc.
As certain pages are published, the links in the navigation menu will become active.
This is my first time doing this, so there may be overlaps with addressing. Please report any errors you notice in the comments!
A few words about terminology.
A dynamic head, or loudspeaker head, or speaker for short, is an electromechanical device that converts changes in the strength and direction of electric current into sound waves. https://oldoctober.com/
A loudspeaker, or column, or Acoustic System (AS) is the acoustic design of the speakers or, more simply put, the box in which the speaker or speakers, if there are several, are mounted.
If there is more than one speaker and they are different, then the speaker is called multi-way. Speakers are conventionally divided into low-frequency (LF), mid-frequency (MF) and high-frequency (HF).
In this series of articles we will mainly talk about speaker repair. AS will be mentioned only in this connection.
There are several questions missing from Navigation, the answers to which I know.
- How to glue a magnet to flanges and at the same time center the core?
- How to make a dust cap?
- How to make a speaker hanger?
- How to make a diffuser?
- How to make a centering washer?
I doubt that these repair technologies are still relevant today, since most spare parts can be purchased separately. However, if the answers to any of these questions are of interest to DIYers, then I will try to answer them in detail, too, after I finish writing the main topics.
Return to top to "Navigation".
Now a little about the electronic filling
The device is almost the same, except that the dimensions are larger, the microcircuits or capacitors may be in a different order:
- Let's take a closer look at the voltage converter, power supply and amplifier
- The ceratec subwoofer amplifier is usually two-channel, but two channels are connected to one single dynamic head
- Moreover, each channel in the amplifier amplifies a different sound frequency, low and medium, as a rule
- In addition, almost all modern amplifiers operate on a single chip from the TDA series
- To get more power at the output of the amplifier, twelve volts from the on-board network of the car is not enough; for powerful microcircuits, the supply voltage is from 40 volts
- Therefore, the bw subwoofer circuit has a built-in high-frequency converter that converts the 12 volt voltage into the voltage necessary for normal operation of the amplifier
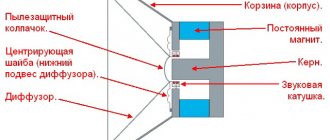
How does the dynamic head work?
The schematic drawing shows a cross-section of the speaker. This is roughly how low-frequency and mid-frequency loudspeaker heads are designed.
The loudspeaker head (hereinafter referred to as the Speaker) consists of the following parts.
- Suspension (corrugated).
- Flexible output (pigtail).
- Bracket (secures the braid to the diffuser).
- Damper (protects the pigtail from breaking near the terminal).
- Hole in the housing for flexible output.
- Insulating strip (holds the terminal).
- Terminal.
- Solders connecting the flexible lead to the terminal and the coil lead.
- Coil output.
- Coil.
- Speaker housing (basket, frame).
- Diffuser (membrane, diaphragm).
- Dust cap (plug).
- Centering washer.
- Sleeve.
- Pole piece.
- Kern.
- Top flange.
- Magnet.
- Bottom flange.
The letters N and S indicate the North and South poles of the magnet. This is the usual arrangement of the poles, although the opposite occurs occasionally.
The following picture shows a schematic cross-sectional drawing of the tweeter.
- Coil output.
- Insulating gasket.
- Suspension (elastic extension of the dome).
- Diffuser of dome design (membrane, diaphragm).
The main difference between tweeters and midrange and bass drivers is the absence of a centering washer.
In addition, many HF heads use a dome-shaped diffuser, often called a membrane. The dome and surround of such speakers are a single unit, and the sleeve is attached to the dome.
Since the stroke of the tweeter cone is small, the coil leads often play the role of flexible leads.
Return to top to "Navigation".
Rewinding the subwoofer coil - what you need
Repairing a dynamic head (speaker) is a labor-intensive process, especially if it involves the need to rewind the coil of the electromagnetic system, since this operation requires almost complete disassembly of the speaker and removal of its cone.
It is advisable to carry out such complex repairs if the price for a new dynamic head is sufficiently high, the necessary tools and materials are available, as well as initial knowledge in the field of electronics. The article discusses a relatively simple case of restoring a speaker coil: without the need to make a new base for the coil (the aluminum base is well preserved); Due to the considerable power of the speaker, an enamel wire of an impressive cross-section is used, which is easy to install.
To rewind the speaker coil we will need the following basic tools and tools:
- A cylindrical, all-metal mandrel (blank) for installation inside the reel frame during the winding process.
- Glue "BF-2". Glue "Moment". Acetone. Ethanol.
- Enameled wire (enamel wire) of a certain length and cross-section, for the manufacture of a new coil winding.
- Winding machine.
- Calipers.
- Electric soldering iron.
100 ml bottle with BF-2 glue. No more than 10 ml is consumed per coil rewind.
Aluminum (continuous) mandrel. The outer diameter is 49.5 +/-0.05 mm. The diameter of the internal hole is 8 mm. Length - about 60 mm. Coil IEK KU 09-18 (24V) as a source of winding wire. Before winding, the wire must be thoroughly straightened and rewound onto another storage reel, which has a round shape.
Disassembling the speaker.
Most dynamic heads are not intended for disassembly and are, as it were, disposable (non-separable, difficult to repair) components of speaker systems. In practice, it is often possible to successfully disassemble a speaker of a standard design and reassemble it again. The main task is to soften the glue that holds together the many components of the speaker, and separate them from each other without injury or deformation.
Speaker device. The speaker mounting screws have a hex slot (photo on the left). Subwoofer without speaker (photo on the right). Subwoofer speaker (before repair). The speaker is marked "10P32", probably indicating a diameter of 10 inches and an impedance of 3.2 ohms.
The sequence of operations is as follows.
First, we unsolder the flexible braided conductors (current leads) from the socket on the speaker basket.
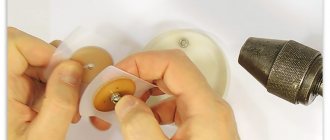
Secondly, remove the dust cap. To do this, saturate the adhesive seam with acetone (for example, a syringe with a needle), and use the tip of a knife to separate the cap from the diffuser. Based on the results of this operation, a conclusion should be drawn about the quality of softening the glue with acetone, and the need to use some other solvent.
Removing the dust cap.
Thirdly, we disconnect the upper suspension of the diffuser from the basket, soaking the adhesive seam with solvent. In the case of repairing a subwoofer speaker that has a durable rubber surround, the task is greatly simplified.
Disconnecting the upper diffuser suspension from the speaker basket.
Fourth, very carefully separate the centering washer of the lower diffuser suspension from the speaker basket. To do this, generously saturate the adhesive seam with solvent, wait a few minutes, and slowly, using a small flat-head screwdriver, separate the washer from the basket.
Disconnecting the centering washer (lower diffuser suspension) from the speaker basket.
The diffuser should now be free to remove from the basket. There is no need to peel off the centering washer from the diffuser.
What are the types of speaker malfunctions?
Speaker malfunctions occur due to improper use, improper assembly, or normal wear and tear.
Incorrect operation.
Most often, damage occurs due to excess power supplied to the speaker. One of the reasons for such errors may be confusion with the method for determining the power of the speaker and amplifier. This is due to the fact that the same numerical values of effective, root-mean-square (RMS), or as it is also called, sinusoidal power and amplitude or musical power create a current in the speaker coil that differs by a factor of two.
Another reason that causes speaker overload is the careless redistribution of power between the heads of multi-way speakers. Most often, tweeters - tweeters - suffer from this. The fact is that the power of tweeters in multi-band systems can be less than 10% of the total speaker power. And if the user, using an equalizer, supplies most of the amplifier's power to the tweeter, then the death of the latter can be instantaneous.
There are also mechanical damages to the dust cap, suspension and diffuser. Sometimes these damages lead to misalignment, which in turn leads to the destruction of the coil and sleeve.
Destruction of the sleeve and coil can also be caused by displacement of the core. In such cases, the sleeve along with the coil gets jammed in the magnetic gap. This usually occurs as a result of a loudspeaker or speaker being dropped.
Unskilled assembly.
Due to unskilled assembly, the sleeve, coil, suspension or centering washer may come off. Poor quality gluing can also cause extraneous sounds.
Improper fastening of flexible leads can significantly reduce their service life.
Normal wear and tear.
If the loudspeaker head is assembled well, the suspension and flexible leads suffer the most as a result of normal wear and tear. The diffuser can also collapse if its safety factor does not match the power of the speaker.
Return to top to "Navigation".
Let's move on to repairs
If you have firmly decided that rewinding the subwoofer speaker is not a problem for you, then prepare the following materials and tools:
- Shellac (or epoxy) for coating the subwoofer windings
- Solvent
- Rubber glue
- Screwdriver
- Soldering iron
- Micrometer
- Screwdriver
Disassembly
Not everything is as simple as it seems; repairing a car subwoofer yourself is a painstaking job:
- First we need to carefully disassemble and remove the subwoofer head, we should act slowly, sudden movements with hands are unacceptable, otherwise you can damage the coil sleeve
- In addition, you need to maintain cleanliness during the work process so that dust does not get into the magnetic system, and even more so metal shavings
- Otherwise, after spending a lot of time and effort, instead of a working subwoofer we will end up with a pile of ringing rubbish
- When you get to the sleeve itself, you should carefully unwind the old wire, while counting the number of turns in the layer and the total number in the coil
- Here, the more accurately you calculate, the better the quality of the repair in the end.
- Then you need to measure the diameter of the wire
- A micrometer is needed for this purpose.
- You can, of course, measure with a caliper, but the measurement accuracy is lower, if you don’t have such tools, you can cheat
- Wind the wire around a screwdriver or nail, very tightly, so that turn to turn, and so on for 10 - 30 turns, measure the length of the winding using a ruler
- Then you need to divide this length by the number of wound turns, and you will get the approximate diameter of the required wire (the ruler has a large error)
Getting ready to rewind
Now you need to prepare the subwoofer diffuser for rewinding:
- Using a mandrel suitable in diameter, secure its sleeve in the screwdriver
- It is necessary to very accurately adjust the mandrel and sleeve so as not to deform it during the rewinding process
- Apply epoxy or varnish to the surface of the sleeve
- Then you will need to clean the wire of the diameter we need
- Pass the wire through a cloth soaked in solvent
- After that, lubricate with epoxy or shellac
- Of course, after this, the instructions prescribe that the coating must dry
Rewind
We have the wire and sleeve ready, let's move on to rewinding:
- We immediately solder the beginning of the new winding to the second terminal, if we follow the direction of winding the wire (this way we eliminate unnecessary crossing of wires, this has a positive effect on the service life of the repaired speaker) and begin winding, photo below
- It is important to fix the tension and not forget to count the turns, because the more accurately we wind, the closer the speaker characteristics will be to the factory ones
- After each layer it is better to wrap it with varnish, after laying the winding, solder the second contact, cut off the wire
- Coat the entire coil with varnish again.
The first layer of our winding, put on a screwdriver
- After winding the coil, you will need to leave it for a day to dry completely.
- And if you used shellac, then the coil must be heated to 80-120 degrees (for example, in the oven)
- Shellac will not harden otherwise.
- This is the main inconvenience when using shellac
- But when it dries, a certain amount of elasticity remains, which completely eliminates damage to the winding from drying out of the impregnation or due to its thermal expansion
- After drying, all that remains is to attach the diffuser to the speaker, and
- repair of car subwoofers is considered successful if everything works
Putting it all together
To prevent the coil from rubbing against the magnetic system, we need to set a uniform circular gap:
- Paper cut into strips is suitable for this purpose.
- We insert it in a circle (where possible) between the body and the coil, thereby obtaining a uniform gap
- We check for any jams or snags by moving the diffuser gently down and up with your hand.
Insert pieces of paper between the reel and the body
- Then we glue the suspension of our speaker and carefully insert it into place
- Give the parts time to dry
- Then you can pull out the centering papers
- Once again you need to check for jamming
- When everything is in order, add a layer of glue
- Let's dry it and put the finished subwoofer in the car for testing.
- Don't forget to turn the volume down by half.
- Subwoofer coil rewind completed
How to identify a faulty speaker element without disassembling?
All speaker malfunctions can be divided into “mechanical” and “electrical”. However, some electrical defects are very difficult to distinguish from mechanical defects by ear.
If no external changes, such as destruction of the corrugation or diffuser, are detected, but extraneous sounds appear in the form of crackling or periodic loss of sound occurs, then you should first check the flexible leads.
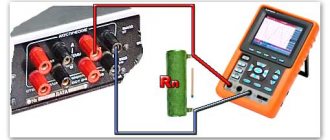
To do this, connect a dial ohmmeter to the speaker terminals and move the pigtails while the diffuser is stationary. If the ohmmeter needle moves, it means the flexible lead is damaged.
Other electrical defects include coil breakage and short-circuiting of part of the coil turns or the entire coil. These defects can also be detected using an ohmmeter.
If the flexible leads and the coil “ring” as if they are working, then you can try to identify the source of parasitic overtones using a low-frequency generator.
| Get the Flash Player to see this player. |
To do this, a master oscillator signal is supplied to the amplifier input.
A link to a portable low-frequency generator program is in the “Additional Materials”.
A partially peeled off coil or part of the turns can be identified by smoothly changing the frequency of the generator or turning on the generator in the GKCh (Swinging Frequency Generator) mode.
When testing this speaker, the frequency range 20Hz...2kHz with a period of 3 seconds was used. In this speaker, apparently, a significant part of the coil has come unstuck, as overtones are heard over a wide frequency range. If a small fragment of the coil peels off from the sleeve, overtones can appear only at a certain frequency, and only when the damaged structural element enters resonance.
In some cases, to identify a malfunction, it is useful to use an infra-low frequency generator. This can help identify, for example, defects in the gluing of the rubber corrugation to the diffuser. The arrow shows the place where the oversound is formed.
| Get the Flash Player to see this player. |
Rubbing the sleeve against the core or the coil against the inner surface of the upper flange can also be detected at a frequency of several hertz if you lightly press the corrugation waves with your fingers.
Of course, to troubleshoot speakers by ear, some experience is required, but it comes quickly, since the nature and timbre of parasitic overtones corresponds to the size and material of the speaker’s structural elements.
More serious damage to the speakers is even easier to detect.
So, for example, if something is heard when turning the speaker over, it means that part of the turns or the entire coil has fallen off the sleeve.
If the diffuser moves very poorly, then most likely the coil has fallen off and jammed the sleeve in the magnetic gap.
If the diffuser does not move at all, then the core may have moved and jammed the coil along with the sleeve.
Never attempt to disassemble such a speaker without first removing the sleeve, as this may also damage the cone.
Return to top to "Navigation".
Do-it-yourself rewinding of the Pioneer TS-W304R subwoofer coil.
In this article I want to talk about how to repair a burnt-out subwoofer speaker on your own. The Pioneer TS-W304R subwoofer at one point refused to play music.
Having examined it, I came to the conclusion that there was a short circuit in the coil.
Disassembly was carried out at home in domestic conditions. Anyone can repair a coil. The main thing is to have your hands and a little patience.
1) Nail polish remover
5)Rubber glue moment
Let's get started: First we need to peel off the suspension. Take a syringe and apply nail polish remover to the back of the speaker. Then we apply varnish on the back side under the plastic frame.
Next, we tear off the washer and suspension using a screwdriver. (We do the installation very carefully!)
Disconnect the centering washer. We also saturate the glue with liquid along the edges of the washer.
Use a screwdriver to remove it.
We try to remove the upper part of the subwoofer. In my case, the coil body was lifted.
And so about the malfunction: An interturn short circuit has occurred. The sub played and got very hot (played in a clip) and the varnish lost its strong properties due to high temperatures. The device shows unstable resistance when the diffuser position changes.
It seemed to me that the cooling of this subwoofer was inadequate. I decided to make several side holes for ventilation in the basket. But this must be done carefully. Better yet, without magnets. If the chips are not removed. Over time, it will destroy your coil while the subwoofer is running. If you're not sure, don't drill.
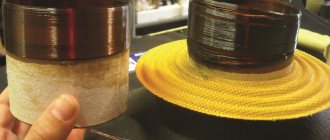
Let's move directly to the coil itself. To wind it, we need the body itself; I found a can of some kind of chemical for hair. The size is perfect.
It was decided to make the speaker with a resistance of 2 ohms.
We make calculations using the formula R=P*l/S
—-where R is the resistance, l is the length, P is the density of the wire material (in our case, copper, 0.017), S is the cross-section of the wire.
We look for the length using the following formula l=SR/P
Section formula S=3.14*D²/4
—-Here 3.14 is “Pi”, D² is the diameter squared.
Solder the beginning of the wire. Using bf glue we smear the whole thing, I wrap it without tools on a metal can of chemicals. The following procedure is to solder the end of the wire to the speaker terminal.
After we glue the centering washer, we set the coil gap so that the coil does not click against the magnetic system. We do this while the glue is more or less liquid.
Out of joy, I decided to paint the basket in Graffiti style.
You can read more interesting articles on the website 100-sovetov.rf
Subscribe to the channel, there will be many interesting articles. Thumbs up if you liked the article.
How to replace speaker flex leads?
Use extreme caution when replacing flexible leads on an unassembled speaker, as a steel tool attracted by the magnetic system may damage the cone and dust cap.
If access to the flexible terminals (pigtails) of the speaker is free, then you can try to replace them without disassembling the speaker. But, in some cases, the speaker will still have to be disassembled. The picture shows a broken flexible lead.
Old flexible leads should be removed with the utmost care so as not to damage the diffuser or break the coil leads.
First, unbend the brass bracket that holds the flexible terminal, if there is one, of course.
Then the soldering area is heated with a soldering iron to separate both the flexible lead and the coil lead from the diffuser. Usually, after warming up, the glue softens and the leads can be removed.
How can I replace damaged flexible leads?
Of course, the simplest solution is to borrow flexible leads from another speaker of similar power or order from suppliers that sell spare parts for speakers. But, if this is not possible, or you want to save on spare parts, then you can make surrogate braids yourself.
I can offer you two well-proven replacement options. Both of these technologies have undergone the most rigorous testing on speakers operating under high loads.
The first and simpler option is to replace the failed pigtail with a piece of MGTF wire of a suitable cross-section. I don’t know who first came up with this, but it was with these flexible terminals that the once popular 4A32 speakers went on sale.
Another option is to make braids from a Soviet-made flexible telephone cable. It can still be found among all the junk at flea markets.
I am familiar with two types of such cable. In one, each wire consists of seven cores, and in the other of fourteen. Each core is made by winding copper tape onto a Mylar thread. In cross-section, the tape has the shape of a rectangle with dimensions of 0.03 x 0.3 mm.
It is not difficult to calculate the total cross-section.
0,03 * 0,3 * 14 = 0,126(mm²)
As you can see, the cross-section is small, so for powerful speakers you can twist two or more stranded wires.
First, a section or sections of telephone cable are prepared using a soldering iron.
The insulation is removed in small sections to avoid damage to the cores.
Then the cores of each stranded wire are untwisted and twisted again into one wire.
To maintain the twist during tinning, the edges of the wire are clamped between two wooden clothespins. Then the future ends of the braid are tinned. The original flexible lead is used as a template.
And finally, the flexible lead is carefully glued twice with rubber or 88 glue with an interval of 20 minutes.
Before the first gluing, the twist must be free so that the glue penetrates between the cores. Immediately after the first gluing, the strands are twisted to the end. The second gluing finally fixes the cores relative to each other.
Thus, it is possible to make a flexible lead for a speaker of any power.
If there is neither a telephone nor an MGTF wire, then as a temporary measure you can use an MGShV wire or even a braid from a shielded wire, but such pigtails do not last long, and they put a greater load on the diffuser due to less flexibility.
When installing a flexible output, you need to take into account that the weakest points of this unit are the places where the pigtail is attached to the diffuser and terminal.
If the fastening brackets are damaged or lost, the braid is secured with two crossed stitches of thread. Then the attachment point is glued with glue with a large dry residue. Weathered BF-2/BF-4 will do.
To prevent premature fracture of the pigtail, the attachment points are covered with several layers of rubber or 88 glue with a transition to a flexible terminal.
Return to top to "Navigation".
Repairing a subwoofer at home
How to repair a car subwoofer, and subwoofers in general, is one of the frequently asked questions due to their widespread use in audio equipment. There are three options: buy a new one, take it to a service center for repairs, or repair it yourself. To repair subwoofers yourself, you need to understand at least a little about electronics, as well as be able to use a soldering iron and a tester.
Causes and their elimination
There may be several reasons why there is no sound on an Android phone or tablet:
- settings conflict
- incorrect phone firmware;
- hardware problems due to physical damage.
Each of the reasons has its own solutions.
Incorrect settings
First of all, if there is no sound on your phone, you should check whether a profile is activated on the device that turns off all sounds . Sometimes the user, unwittingly, activates the complete silence profile.
You should press the “ Volume + ” button and make sure that all sliders are set to the “ Maximum ” position. Or do the same manipulations through the settings.
If the settings are not saved
The sound may also disappear as a result of a failure when installing programs that were downloaded from unofficial sources or an application store.
Programs that provide superuser rights (root access) can also affect the sound. Such manipulations can cause conflict situations between installed software.
The solution to this problem: stop using root rights, remove recently installed software one by one, or do a Hard Reset.
Errors when flashing
This item is automatically divided into two:
- unofficial firmware version made by masters or self-taught people;
- Incorrectly installed version of the official firmware.
In such cases, you should flash the gadget according to the instructions, or take the smartphone to a service center.
Android glitches
You should go to settings, then “ Applications ” and “ Application Manager ”. Find a service called “ Sound ”, make sure it is not stopped, restart the gadget and clear the cache.
If the service does not restart, reset the settings to factory settings.
Hardware faults
There are other reasons why the speaker on the phone may not work, which the user cannot influence.
Speaker failure
- clogged speaker (low audibility at maximum volume);
- short circuit of the coil (characteristic crackling noise during playback);
- break (no sound at all).
Broken audio jack
In some cases, a broken connector affects the presence of sound in the smartphone. Procedure for restoring missing sound (there is no guarantee that it will help):
- Before removing the headset, you need to hold down the “ Volume + ” button;
- connect and disconnect headphones several times;
- blow out the connector with a sharp stream of air.
Damaged audio amplification board
The board fails as a result of moisture getting inside the smartphone , mechanical impact (fall, impact), due to defective factory parts or overloads during operation. It is for these reasons that the speaker on Android smartphones often does not work.
Be careful with wiring
Very often, manufacturers fill the wires running from the contacts to the coil with glue and it is not always possible to remove them undamaged. Even if the wiring has come off at the edge of the diffuser, you can do the following trick - unstick the wiring from the diffuser. Then unwind a little from the reel, and then glue them back, but at a different angle. If the coil unwinds reluctantly, then you should not be zealous - you can easily break the wires. It is better to glue them across the diffuser. This way you can lengthen the protruding ends of the wires by almost a centimeter, which is more than enough.
The photo shows the test diffuser with which the experiments were carried out
Glue selection
When choosing glue for speakers, pay attention to its composition and scope of application. Take the appropriate one, taking into account the nature of the damage
Diffusor SL is a universal adhesive consisting of one component. Its main constituent element is polychloroprene. Originally created to correct defects in dynamic loudspeakers. A good choice for assembling speakers. Thanks to special technology, this composition forms a colorless, neat, high-strength seam. It sets within two hours, complete drying is completed after a day, and then you can use the speaker for work. The choice of specialists involved in the repair of subwoofers.
DKD is a modern choice of adhesive material. Its composition is distinguished by a single-component structure with low viscosity. Used to restore the turns of the winding enameled wire necessary for gluing the voice coil. Complete drying takes about two to three hours, and can be accelerated with a hair dryer.
Akfi 705 is suitable for quick assembly. It is distinguished by its versatility. This two-component composition is suitable for quick speaker repairs. Well proven for rubber and plastic surfaces.
Interbond is a two-component viscous composition based on ethyl-2 cyanoacrylate. Used for repairing centering washer, coil gluing, flexible leads.
What to do if music on your phone does not play through the speaker, but only through a third-party device
It's no secret that on Andro phones >you need to carry out several checks. Which will help determine the reason for the lack of sound.
Check your volume settings.
Perhaps you yourself previously turned on the “Silent” mode so that your friend would not bother you with calls. And they forgot about it. Try adjusting the sound with a rocker.
This mode can also be activated/deactivated by pressing and holding the power button. Several sound modes will appear on the screen: “Normal”, “Vibrate” and “Silent”.
Steps
1Get to the speaker. Ideally, you should remove the speaker to gain access to both sides of the cone
Remove door panels and grilles or trim to remove mounting screws or fasteners.
2Hold the speaker. If the diffuser is old, it may be fragile, so work carefully. Hold the speaker so that it does not fall out after the last pair of screws are removed.
3Carefully pull the speaker out of the socket. If the speaker has been sitting in the socket for long enough, it may stick to the sealant or paint.
4Inspect the connectors on the speaker. The speakers receive the signal from the source or amplifier through two wires
Polarity (the order in which the wires are connected to the connectors) is important. Take a photo (on your phone), draw a picture, and write labels on the wires or connectors so as not to confuse the connection order when installing it back.
Fix the holes
1Get repair material. Most diffusers are made of paper or thin plastic. To seal a hole, you will need material of approximately the same density and type, but slightly larger than the hole itself
If you can't find thin plastic, like some speakers, you can use paper.
2Prepare the speaker. Carefully remove dust, dirt, etc. from the front of the diffuser. If the diffuser is old, it may be fragile, so be careful.
3Use scissors or a razor to remove any overhanging edges near the hole. The smaller the hole and the smoother its edges, the better the repair will be.
Find the sweet spot between the size of the hole and the evenness of its edges.
4Cut the patch from the material chosen for repair. The patch should be slightly larger than the hole and roughly follow its shape.
5Apply nail polish to the edges of the hole. Apply a generous coat of nail polish around the edge of the hole on the diffuser.
6Apply nail polish to the edges of the patch. Apply a generous coat of nail polish to the edges of the patch.
7Connect the patch and diffuser. Align the patch with the hole and stick it in place. Press on both sides at the same time. Don't press on just one side or the hole will break even bigger.
8Allow to dry completely.
9Tweak it. Check the areas that have not stuck and add just enough varnish to fill the void. Securely adhere the edges that are not glued with varnish.
10Install the speakers back into place in the reverse order of their removal, remembering to maintain the correct polarity of the wires.
Repair of Breaks
- 1 Remove and prepare the speaker.
Follow the steps above to prepare your speaker. Do not cut or tear anything from the diffuser. - 2
Apply a generous coat of nail polish to the tear.“Paint” the break itself and around it with nail polish. Apply polish to both sides of the diffuser.
- 3
Let dry completely. - 4
Apply a second coat of varnish. - 5
Let dry completely. - 6
Reinstall the speakers in the reverse order of removing them, remembering to maintain the polarity of the wires. - 7
Ready.
Impregnation
To protect, for example, a paper speaker from rupture of the diffuser, impregnations prepared on the basis of organic solvents are used. So, for the central part responsible for high frequencies, transparent plastic dissolved in dichloroethane is used.
For the intermediate, responsible for mid-frequencies, use rubber glue in white spirit (by weight of glue - a quarter of the total weight of the composition). The outermost part is impregnated with a composition based on automotive sealant. After mixing the components, saturate the diffuser so that no drip protrusions remain on its surface - the coating should be uniform and homogeneous.
The interval between layers of impregnation is from 4 to 15 minutes: it is necessary to allow the previous layer to be absorbed before applying the next one. The final drying time for the coating to “settle” is a month, with the diffuser facing upward. Previous poor-quality, uneven impregnation could irreversibly damage the sound of the speaker; in this case, there is a technological violation, as well as overuse or saving of materials for impregnation.
Do not apply mineral oils, bitumen, petroleum jelly or other impregnations. Even PVA glue wouldn't help here. At best, the result will be zero; at worst, the speaker can be irreversibly damaged by poor-quality or inappropriate impregnation. High-quality impregnation must have at least two layers.