Detailed description of diagnostics and repair of medium and high power speakers. The article was written for those who want to repair speakers and have winding and soldering skills. I have been repairing speakers for 15 years and want to pass on the acquired skills and techniques to the Datagorians. Sorry for the lack of detailed photos of the process, all the equipment and work are now a thing of the past.
How to disassemble a loudspeaker head?
Be careful not to bring steel tools close to the magnetic system, especially from the side of the diffuser or centering washer! This may damage the diffuser or dust cap!
If you still need to use tools near a magnetic gap, use tools made of non-magnetic materials.
If the centering washer is glued with epoxy resin, then repairing the loudspeaker in the absence of spare parts can be very problematic.
In other cases, the complexity of the repair depends only on the design of the speaker and the adhesives used during assembly. If the glue that glues the suspension and the centering washer can be dissolved with acetone, then you can safely begin disassembly.
Most adhesives dissolve better when the speaker is still young. It happened that such speakers could be disassembled in a matter of minutes. Adhesive joints made with BF-2, BF-4 glue or glue with similar properties are best able to be dismantled.
To disassemble the speaker you will need the following tools and materials.
- Acetone is a solvent.
- Alcohol is a solvent.
- Pipette* – for dosing the solvent.
- Scalpel – for cutting adhesive joints.
- Spatula – for cutting adhesive joints.
- Matches - as gaskets.
- Calico (cotton fabric) – to remove glue residues.
- Box wrench – for dismantling the magnetic system.
Other tools and materials may also be needed.
Chemically pure acetone** is preferable to other solvents due to its relatively low toxicity. Therefore, it is better to choose acetone even when it is inferior to other solvents. For example, adhesive joints made using “88N” glue are better dissolved by ethyl acetate, but it is much more toxic.
True, if the diffuser and centering washer are glued with “BF-2” or “BF-4” glue, then ethyl alcohol can be used as a solvent. However, the possibility that there may be water in the alcohol makes acetone preferable.
Depending on what exactly is being dismantled, the appropriate dismantling techniques are selected. So, for example, if a paper hanger comes off, then the glue should be dissolved with the utmost care. If the rubber suspension comes off from the speaker body, then the work can be done more aggressively.
————-
* A convenient pipette can be made from a glass drawer and an “artificial vein” from a dropper (an elastic band into which needles are inserted directly while the medicine is being delivered into the vein). An ordinary medical pipette quickly breaks down under the influence of acetone, and its length does not allow it to reach some adhesive joints.
** Pure acetone is easy to distinguish by its smell. You just need to know this smell. Unfortunately, nowadays they sell anything under the name “Acetone”. Often some arbitrary solvent or mixture of different solvents is poured into bottles. And this is not surprising, because we have 400 gr. acetone, costs the same as a bottle of vodka. This is a good reason to exchange a bottle of vodka for a bottle of pure acetone at some production facility.
Dismantling the suspension.
If you're having trouble persevering, consider playing your favorite movie in the background, as dismantling the moving system of a large speaker can take a long time.
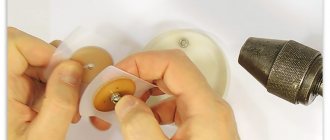
Dismantling of the rubber suspension begins from some edge where there is less glue flow. By adding acetone and lifting the edge of the suspension, a cavity is created into which acetone is again poured.
The work will go faster if you start dissolving the glue in several places at once.
Each time, adding a few drops of acetone to the formed cavities, gradually raise the edges. To prevent the suspension from sticking back, matches are placed under it. As the glue dissolves, the matches are moved to the edges of the cavity.
It is not recommended to use great force when separating rubber from metal. Rubber can become irreversibly deformed and even crack.
Dismantling a cardboard hanger from the body side differs from dismantling non-paper hangers only in that it requires more accuracy and patience.
Great efforts should not be made so as not to damage the suspension, which becomes especially vulnerable under the influence of the solvent.
If you use too much solvent, you can damage the mounting surface of the suspension, and even the corrugation itself. Therefore, if the adhesive joint is difficult to dissolve, then mechanical action must be used. A not very sharp scalpel will do here.
If you notice that the cardboard corrugation has begun to delaminate, then it is better to pause work and think about another technology.
After dismantling the paper hanger, the mounting plane may become deformed. You can return it to its original shape if you place the diffuser on a flat glass or other solvent-resistant surface, and again slightly soften the mounting plane with acetone. During this operation, you can also remove any remaining adhesive.
In some cases, for example, when the very edge of the paper corrugation on the side of the body is already damaged, you can cut off the suspension along the edge and build up the lost fastening edge using fabric or paper. It may seem that this is a very time-consuming repair option, but if the suspension is destroyed under the influence of a solvent, it will be completely impossible to restore the speaker without a spare cone.
In other cases, it is easier to peel off the suspension from the diffuser side rather than from the body side. This method gave good results when repairing 10GDSh-1 (10GD-36) speakers with foam suspensions, although they were still new.
Removing the centering washer.
In some cases, when rewinding the speaker, the centering washer is peeled off only from the side of the housing. This is usually done when the glue with which the washer is glued to the diffuser does not dissolve well and the diffuser may be damaged during dismantling.
But it also happens, on the contrary, that it is much easier to glue the joint between the centering washer and the diffuser than along its outer perimeter. Then it becomes possible not to center the speaker during assembly.
However, sometimes, after rewinding and assembling such a speaker, it may require additional alignment. This mainly applies to speakers in which the centering washer is glued not to the diffuser, but to the sleeve, and may be due to too large a gap between the sleeve and the centering washer.
When dismantling the centering washer from the body side, the adhesive joint is soaked with solvent along the entire perimeter. As the glue softens, the edge of the washer rises and matches are placed under it.
When dismantling the centering washer from the diffuser side, the adhesive joint is also impregnated with solvent along the entire perimeter.
To prevent damage to the diffuser due to prolonged exposure to solvent, the process can be accelerated using a small spatula.
At the end of dismantling the diffuser and centering washer, remove any remaining adhesive from all surfaces using a solvent and calico (cotton fabric).
To prevent debris from getting into the magnetic gap, the gap is sealed with electrical tape.
Return to top to "Navigation".
Lada Largus towbar: which one is better to choose, do-it-yourself installation
The driver can cause a breakdown himself. This is mainly possible if you listen to music for a long time, turning on the equipment at maximum power. During active loading, the coils overheat. Since they are attached with glue in many cases, due to heating the glue melts, and the coil simply peels off from its seat. Hence the wheezing. To solve the problem, you will have to change the coil, use fresh glue, and also avoid repeating similar situations.
Even with prolonged operation at maximum speed, the amplifier can be damaged. This is an even more expensive device, so replacing it will require more money.
How to remove metal filings from a magnetic gap?
If there are metal filings in the magnetic gap, then when the speaker is operating, parasitic overtones may appear, such as rustling, crackling, etc.
To remove sawdust, use two simple tools - a piece of copper or brass wire and a wooden spatula. A spatula for large speakers can be cut from the handle of a small brush, and for small ones - from a toothpick.
First, using a bent wire, the filings are moved into the visible area of the magnetic gap.
Then the wooden spatula is covered with a layer of “88H” glue, which is allowed to dry. When the glue has hardened a little, the spatula is placed in the magnetic gap and sawdust is collected. If it was not possible to remove all the sawdust in one step, then the blade is cleaned and a new layer of glue is applied to it.
Both of the above operations are repeated until sawdust is no longer visible in the magnetic gap.
Return to top to "Navigation".
Types of speaker malfunctions
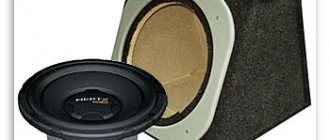
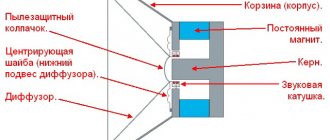
The main part of any speaker is a dynamic emitter, which converts the electrical signal into sound waves. It also breaks down most often. What are the most common speaker problems?
All emitter failures are usually associated with three main reasons:
- improper operation;
- factory defects - the use of low-quality parts or errors when assembling the device;
- natural wear and tear of acoustic equipment.
It is quite simple to attribute a breakdown to one of the reasons - in the event of a manufacturing defect, speakers, as a rule, break within a short time after purchase; natural wear, on the contrary, takes a very long time - with proper use, even cheap high-quality speakers can last at least ten years . Thus, a sudden breakdown most often refers to errors when working with speakers.
Incorrect operation
The main cause of breakdowns during the operation of speakers is failure to comply with the permissible power limit of the signal supplied to the emitter. Most often this is due to the fact that the user makes a mistake when determining the power of the speaker and amplifier. This is very easy to do, since power can be calculated using several methods. The values of effective, sinusoidal and amplitude powers can differ dramatically from each other - the excess when taking into account the wrong type of power can exceed 200%. Of course, the column burns out the first time it is plugged into the network.
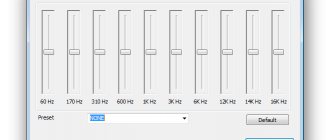
Overloading of dynamic drivers is quite common in speaker systems whose speakers are equipped with multiple speakers. In such a speaker, the power of the electrical signal may be incorrectly distributed between the tweeter, midrange speaker and subwoofer. As a rule, the victim of such a problem is the tweeter, which requires significantly less power than its counterparts. The power of the tweeter is usually no more than 1/10 of the total power of the speaker. If a user tries to apply more current to the tweeter by over-boosting the ultra-high frequencies using an equalizer, the fragile high-frequency driver may break instantly.
In addition to electrical problems, mechanical damage to any element of the speaker may also occur. It is usually protected by a fabric or metal decorative grille, but it is nevertheless quite easy to damage the emitter. The cap that protects the device from dust, the diffuser suspension and the membrane itself - a thin film, often paper, which is extremely easy to tear or pierce - can be damaged. The consequences of these damages can be very serious: the alignment is disrupted, which causes the coil or sleeve to break, making sound reproduction physically impossible. The same result is caused by the displacement of the core from the center of the speaker - in this case, the most important parts of the device get stuck in a magnetic trap.
Such breakdowns are usually caused by very careless handling of the speakers - most often by dropping the device. In this case, both fragile portable speakers made from not the most durable materials and massive floor-standing speakers with high power can be damaged. Although the latter, of course, are better protected from mechanical damage.
Manufacturing defects
All parts of the speaker are usually glued together, and improper gluing can cause the stationary parts to move out of their intended places. Even the diffuser may come off, making it impossible to vibrate and, accordingly, receive sound waves. Poor fastening of moving parts and wires significantly reduces the life of the speaker, and natural wear occurs too quickly.
Natural wear and tear
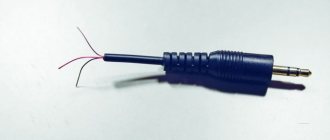
When properly assembled, the most fragile parts of the device suffer from wear and tear - the suspension and flexible leads - that is, the diffuser holder and the wire that supplies the signal to the coil.
Speaker systems do not sound. What to do?
First you need to read how speaker systems work. And still here. Often things are not as bad as might be expected. Let's try to figure out the problem ourselves.
To begin with, let us remember that computer speaker systems are active, i.e. contain not only speakers, but also at least a two-channel amplifier with a power supply.
If there is no sound, you must first check the speaker systems themselves.
To do this, you need to turn on their power and remove their plug from the sound card connector.
This can be done “on the go”, nothing bad will happen.
The volume control should be set to the maximum position.
Diagnostics
It seems that it is very simple to distinguish mechanical damage from electrical damage - just remove the protective panel and inspect the speaker for damage. If everything is in order with the integrity of the parts, then the failure is related to the electrical part. However, it is difficult to distinguish some types of breakdowns by ear and eye - for example, a malfunction of the flexible coil lead. In this case, most often the sound does not disappear completely - the speaker may make extraneous sounds and become silent from time to time.
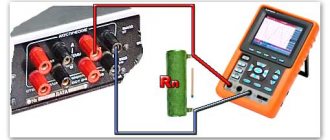
To determine the breakdown of the flexible terminal, as well as coil malfunctions, an ohmmeter is used, connected to the speaker terminals with a static membrane. If the needle starts to twitch, that’s where the problem lies. To fix the damage, you will have to disassemble the speaker, separate the broken parts and install new ones - they can be bought at any radio equipment store.