How to solder plugs to a shielded audio cable? Very often the amplifier and computer cannot be placed close enough to allow the use of a standard audio cable.
In such cases, you can make such a cable yourself. In any case, a self-made cable will cost less than a ready-made one. More details at https://oldoctober.com/
This article describes in detail how to make an audio cable to connect a computer to a Soviet amplifier equipped with five-pin audio connectors.
How to connect a computer to an amplifier is described here.
Cable cutting.
You can prepare a cable in different ways, but the least traumatic method for conductors is to remove the insulation using a soldering iron.
Holding the soldering iron with one hand, rotate the shielded wire around its axis with the other hand, while pressing the insulation against the sharp edge of the soldering iron tip. https://oldoctober.com/
If after this you cannot remove the insulation by hand, you can use side cutters.
It should look something like this.
We also remove insulation from individual wires in the same way.
Now you can give the cable a look suitable for tinning.
Return to top to table of contents.
Headset wires with screen
It also happens that the ground is used as a screen. Those. Either all the wires or just the microphone wire are wrapped in it. This is done to protect against external interference.
In the case of a shielded wire, the screen just needs to be unraveled (unscrewed), the contents removed and twisted into an independent wire. Such screens on headphones are quite rare today, because... create parasitic capacitance and make the sound more muddy.
Microphone shielding is much more common. It looks like this:
As you can see, the yellow wire is abnormally thick. Let's unwind it:
Hidden underneath is a blue microphone wire.
In general, the essence of shielding is to protect against interference so that external fields do not create interference on the microphone wire, which will be transmitted to your interlocutor. This is necessary because The signal level from the microphone is low and the level of interference may be equal to or greater than the useful signal.
Well, okay, the screen is back on the ground, and with it the yellow-striped-red wire. We twist and solder:
Tinning.
Tinning is a mandatory procedure if the electrical elements were not prepared for soldering at the production stage.
In order to tin the conductors and plug contacts, you can apply them one by one to a piece of rosin and heat them with a soldering iron. In this case, there should be a drop of solder on the working surface of the soldering iron.
When using liquid rosin-based flux, you need to moisten the conductors and plug contacts one by one with the flux, and then heat it with a soldering iron with a drop of solder on the tip.
The use of active flux is allowed only for tinning, but not for final soldering.
When using active fluxes, rinsing of the solder is required.
The tinned end of the cable should look something like this.
Return to top to table of contents.
Looking for the cause of the damage
Admit it, how often have you seen a headphone cable break right in the middle? The cause of the breakdown is almost always the plug, which, with regular use, is subjected to mechanical stress much more often than other elements of the headphones. Simply squeeze and tug the wire around the plug.
If the sound appears after this, it means that there really is a problem. We simply cut off the old plug - we won’t need it anymore.
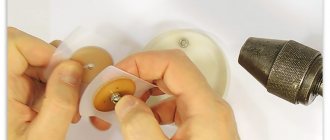
Five-pin plug (ONTs-VG).
To disassemble the ONTs-VG plug, you need to press the tab with a screwdriver and remove the protective cap.
Don’t forget to put a protective cap on the cable and pieces of insulating tube (cambric) on the wires.
It is more convenient to solder the wires to the plug if you secure the latter with a clothespin, which, in turn, is pressed down to the table with something heavy.
Solder three wires one by one to the connector contacts.
It should look something like this.
The protective tubes can now be put on.
The arrow shows the cable fastening element, which does not allow securely fastening a thick cable.
If the cable is thick enough, and such cables are preferable when the connection length is several meters, then to securely fasten the cable you need to tightly wind 10-12 turns of thread in the place indicated in the picture.
To prevent the fastening from loosening while tying a knot, you can secure the ends of the thread with a drop of melted rosin.
We assemble both halves of the connector and align the hole in the protective cap with the fixing tab.
We put the cap on so that the fixing tab fits into the hole and secures the cap. If fixation does not occur, remove the cap and bend the tab up. We put the cap on again.
Return to top to table of contents.
Types of microphones
Microphones can be divided into two groups.
The first group is the type of fastening.
In general, any parts can be attached to the board in different ways.
Using wires. These are usually round microphones.
DIP contact. Attached to the board using holes.
SMD (planar). They are soldered to the board with their housing, on which the contacts are located.
The second group is the type of microphone.
There are analog microphones and digital ones. This group most often includes SMD microphones.
Analog ones have two contacts: minus and plus. Typically the plus is the center contact and the minus is the circle near the surface.
Digital microphones are not inherently digital. They were called that by sellers of radio components. And the output of the microphone is a digital signal, which is changed due to a pair of resistors in the microphone.
Key on the case
SMD microphones may also have a key. That is, it must be installed on the side towards which the dot (or arrow) points to the board. Most often they have four contacts.
If this type of microphone is soldered on the wrong side, it will not work.
Installation of a 3.5mm Jack type plug.
A small digression.
On the market you can find inexpensive 3.5mm Jacks, whose pads intended for soldering are coated with nickel. Rosin and flux based on it are not suitable for soldering them. If you do not have active flux, you will have to use a sharp knife or scalpel to remove the coating from these areas and then tin them in the usual way.
When connecting a Jack plug to a thick shielded cable, you need to take into account that there is not much space under the Jack's protective cap.
The picture shows that the screen cores are twisted asymmetrically with respect to the cable wires.
As in the case of the previous connector, do not forget to first put the protective cap on the cable.
The wire formed by the twisted conductors of the screen should be shortened to avoid shorting it to the left channel.
We put protective tubes on the wires and solder them to the corresponding contacts of the Jack.
We slide the protective tubes onto the connector contacts.
Only now we solder the common wire to the connector.
Insert the cable into the fastening element. The arrow shows a fastening element whose dimensions are insufficient to securely fasten a thick cable.
As in the case described above, we will use sewing thread. To securely fasten the cable, you need to tightly wind 7-8 turns of thread No. 10.
Hold the cable and the ends of the thread with one hand, and with the other, using a soldering iron, apply a drop of melted rosin to the turns of the thread. Securing the ends of the thread with a knot can weaken the connection.
If you did everything correctly, then before final assembly, Jack should look something like this.
Now we bend the contacts of the left and right channels inward.
Pressing the Jack contacts, screw on the protective cap.
Return to top to table of contents.
How to strengthen the headphone wire
The easiest way is to make additional winding, especially in the place where the wires are connected to the plug. This is where wire chafing most often occurs. Soviet headphones were made from dense copper veins, which were difficult to cut. Modern cheap headphones have extremely thin wires that can be cut.
On expensive models, you can notice reinforced fiber at the bend of the wires or a thicker elastic layer. Such protection will ensure smooth deformation of the wires and prevent them from being torn off.
Historical reference
The first models of studio headphones had reinforced wires. Producers and sound engineers could not afford to miss any moment during the performance, so they wrapped the wires with an additional layer of insulation. They did the same with microphones. If you look at photos of pop music concerts (especially rock music) of the late 20th century, you will notice a solid layer of winding on the microphones. The modern music industry is moving to a wireless option and soon there will simply be no need to repair plugs.
You can also treat the wire with a layer of paint or varnish, which will save the headphones from hypothermia. You may notice that in the cold season, the headphones harden and the chance of damaging the wires is much greater than in the summer. Both too low and too high temperatures can cause damage to the accessory.
Shorten it. The longer the wire, the greater the chance that it will break or fray at some point. The short wire will not get tangled and will provide comfort and ease of use.
Another good and creative way to strengthen and reinforce the wire is to braid it with sewing threads. This method will not only protect the headphones, but also make them unique by painting them with unusual designs or patterns. In the cold season, they will be protected from frost and will definitely not crack.
Soldering iron.
A soldering iron with a power of 25 - 40 watts is suitable for soldering connecting audio cables.
The pictures show the process of preparing two tips with diameters of 4 and 6 millimeters for operation.
In some cases, you may need to use a file to correct the shape of the soldering iron tip.
A properly sharpened soldering iron tip is convenient not only for soldering, but also for removing insulation.
The tip of a 40-watt soldering iron with a diameter of 6 mm, for ease of use, can be slightly narrowed with a file.
After the tip has acquired the required shape, it must be burned so that the oxide prevents the solder from spreading beyond the working area. For firing, just turn on the soldering iron for 20 - 30 minutes.
Now you need, with the soldering iron still turned on, to pass the file along the working surface of the tip several times to remove the oxide. Immediately after this, you need to immerse the tip in rosin, rub the solder ball with the tip and immerse it in rosin again.
Your soldering iron is ready to go.
Return to top to table of contents.
Direct soldering process
Repairing headphones comes down to restoring contact in damaged wires.
For this you will need:
- soldering iron;
- solder;
- rosin;
- stationery or construction knife.
To ensure complete confidence in eliminating the problem area, a piece of cable approximately 1-3 cm long is cut from the earphone.
To remove the protective insulating casing, you need to scrape off one-half inch (1.25 cm) of the outer braid using wire cutters or a utility knife.
Using a construction knife, the outer insulation of the cable is stripped. Inside there are two wires, marked with different colors. Most often, the left channel is marked with red, the right channel with green, and the common channel is marked with either blue or yellow. Sometimes the common channel is bare copper wire.
In a section of about 0.5 cm from the end of the wire, it is necessary to remove the insulation.
Depending on the material, you can remove it in several ways:
- The polymer insulation is carefully removed using a knife so as not to damage the conductive material.
- Varnish and paint are removed by burning with a soldering iron or mechanically using a knife or fine sandpaper.
The stripped ends of the internal cores are tinned with solder. The soldering iron is plugged in and left for the time required to heat it up. Then take a small piece of solder with the tip of the soldering iron. The stripped end of the wire is installed on rosin. The soldering iron tip distributes the molten solder evenly over the entire cleaned surface. The wires are ready for soldering.
To do this, you must additionally take a tablet of acetylsalicylic acid (aspirin) or any aspirin-containing medicine. Even expired tablets will do. So, before you run outside, you need to look into your home first aid kit.
Neutral and active fluxes.
You can use any rosin as a flux, including: pine, violin, stage rosin, etc.
A solution of rosin in ethyl alcohol turns rosin into a liquid flux. Liquid flux not only allows you to get more beautiful soldering, but also removes heat from the elements in contact with the soldering area.
Rosin-based flux is neutral. It does not require subsequent flushing and cannot cause leaks in electrical circuits.
You can make liquid flux based on rosin yourself. To do this, you need to dissolve 2-3 grams of rosin in 20-30 grams of ethyl alcohol. It is better to use powdered rosin. A piece of rosin can be broken with a hammer, first wrapped in cloth.
Alcohol is extremely volatile, so liquid flux should be stored in a tightly closed container. You can use a bottle of nail polish, which also has a brush.
The use of so-called active fluxes is recommended only in extreme cases. Most often, this need arises when budget nickel-plated plugs are used. Moreover, this coating is also applied to the contacts intended for soldering.
After soldering using active flux, the soldering area should be thoroughly washed and then dried.
You can wash the soldering area with either an alcohol-gasoline mixture or ordinary water. If this is not done, then after some time problems may arise caused by oxidation of parts and leaks in electrical circuits.
Return to top to table of contents.
What are the types of headphone jacks?
The headphone soldering scheme depends on the plug used to connect the headset to a computer or mobile gadget. TRS connectors, also called jacks, are used as connectors. They are represented by a pointed end in the form of a cone (Tip), turning into a sleeve (Sleeve) with one or several rings in the form of cylinders (Ring) or without them. The rings are separated from each other and from the sleeve by a layer of polymer insulating material.
Depending on the dimensions of the connector, headphone connectors are divided into:
- 2.5 mm – micro-jack – with the corresponding diameter, used in mobile devices from Apple;
- 3.5 mm – mini-jack – common in computers, TVs, portable devices;
- 6.35 mm (1/4”) – jack – used in professional (studio) sound recording equipment (amplifiers, musical instruments);
- A USB interface is a rare phenomenon; such devices are preferred by eSports players due to a number of controls;
- XLR – connector for professional audio equipment;
- Lightning – equipped with Apple technology to output uncompressed audio.
In principle, thanks to the adapters, any headphones can be connected to a standard 3.5 mm jack.
3.5 mm connectors differ in the number of contacts or pins (pin - from English pin) in the form of rings:
- two-pin or TS - two-terminal with a transition to stereo, has become obsolete;
- three-pin or TRS - common in speakers and headphones for mobile phones, players, laptops, an additional contact serves for separate transmission of audio to each ear;
- four-pin or TRRS – used in headsets, the fourth pin is needed for the microphone;
- five-pin or TRRRS - less common, mainly in noise-canceling headsets.
Advice from professionals
- When buying cheap headphones, expect a year of service life. Almost no one has them for longer.
- If you are repairing an expensive pair, you will need a good soldering iron with a thin tip so as not to fill everything around with solder.
- Copper, silver, gold - all this is clearly better than tin. Good sound requires good materials.
- Reinforcement of headphones greatly extends their service life.
- You can tin your contacts not only with aspirin. There are many ways. If the reader is repairing expensive studio headphones, you can clean them with a knife, since the thickness of the copper will allow this to be done.