Articles
How to charge a capacitor for a subwoofer
How to charge a capacitor for a subwoofer is a relevant question today. The fact is that these drives are extremely valuable today and have recently been found not only in expensive acoustics, but also in standard sets of car audio systems. Knowing how to charge capacitors for subwoofers correctly, you don’t have to worry about the sound quality, which will always be at a high level inside the car.
Description of the device
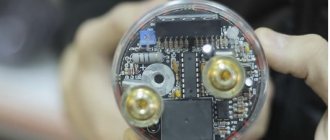
A capacitor is a two-terminal device having a constant or variable capacitance with low conductivity. This is a device that accumulates voltage and magnetic electricity. It consists of two conductive plates, between which there is a dielectric. It is a kind of battery.
Note! It is worth pointing out that there is a capacitor source of variable and constant capacitance. There is also an electrolytic capacitor type.
A complete concept from the field of physics
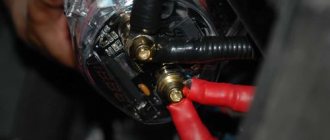
Discharge with a screwdriver
First we need a suitable screwdriver with an insulating handle. As a rule, the handles are made of rubber or plastic. Both materials are capable of creating a safe barrier between the hand and the metal part of the screwdriver.
If you are not sure that you have an insulating screwdriver, it is recommended to buy a new one that has a logo with the maximum permissible voltage.
Such tools are sold in the electrical goods department of any hardware department. Both a flathead and a Phillips screwdriver will do.
Now the discharge process itself.
- Grasp the element with one hand at the base, without squeezing too much;
- Place a screwdriver on both terminals;
- A discharge sound and slight sparking will be heard.
Hold the screwdriver so that it touches both legs at the same time, only then the discharge process will occur normally.
To check, you can close the terminals with a screwdriver again.
You can check the degree of discharge with the same multimeter.
Methods for charging and discharging a capacitor
When charging a capacitor, the energy of the power source is converted into the energy of the electric field that arises between the metal plates of the radio-electronic device. It is important to consider that at each section of the circuit there is explicit (resistor) or implicit resistance (wires, internal resistance). In this case, the charging rate of the capacitor will depend on its capacitance and resistance in the entire circuit. The process is considered complete when the applied voltage becomes equal in magnitude to the voltage on the metal plates.
The process of charging and discharging a capacitor is best determined with a multimeter or using a special measuring device - an indicator screwdriver.
You can charge a capacitor through a light bulb. To do this, you will need to connect the “plus” to the battery through a car light bulb, and connect the “minus” to ground (car body). The light will flash and go out. In the same way, you can charge a capacitor for a subwoofer if it does not have a charging current control system. This capacitor charging scheme is effective, simple and safe.
Discharging may be necessary when repairing household appliances and electronic devices. This can be done using a screwdriver with an insulated handle, closing the contacts one by one, while simultaneously touching the ground with the screwdriver shaft. If the capacitor is removed from the board, it is necessary, without touching the contacts with your hands, to apply the screwdriver rod to both terminals of the product (a spark should appear). You can also assemble a discharge device by soldering two wires with clamps to a resistor (several kOhms), and then connecting them to the terminals of the capacitor. It is important to check the voltage to make sure the device is sparse.
Additional benefits of installing capacitors in cars
In addition to solving problems with the operation of the subwoofer, a capacitor connected to the car network has a positive effect on the operating mode of electrical equipment as a whole. This manifests itself as follows:
It's better to check first
First, this element needs to be de-energized. It is clear that there is no need to deprive it of its power source. It is enough to turn off the electrical appliance and disconnect the plug from the socket. If you approach this issue radically, then for safety you can turn off all the circuit breakers at the switchboard that are responsible for supplying electricity to the room.
Now we need a special device - a multimeter - to find out whether the capacitor is charged.
- Select the mode for measuring DC voltage (direct current).
- We set the device knob to the maximum voltage measurement level.
- We connect the multimeter probes to the contacts of the electronic component. As a rule, two rods protrude from it. It is to them that you need to connect both probes of the detector. You need to press firmly enough so that digital readings appear on the device display. It makes no difference which probe goes to which contact. The resulting value will be the same in both cases.
We need to understand what voltage is at the terminals of the element. Depending on the indications, the discharge method is selected:
- If the reading is less than 10 volts, there is no need to discharge.
- If the display shows measurements between 10–99 volts, you can discharge it with a screwdriver.
- If values are 100 volts or higher, it is recommended to use a discharge device.
How to discharge high-voltage non-polar capacitors without damaging the capacitors themselves?
There is about 450VAC 700uF (connected in parallel), no matter where or how, the main thing is that we have charged capacitors and they need to be discharged. The option with shorted terminals is immediately bypassed - sooner or later this will kill the capacitors, and they will be charged and discharged frequently
The discharge should occur in 1-3 minutes maximum
Zero # 2022.09.30 07:01 0
User replies: score 0 : 0 won't hit anything
Well, then use a shunt of a few kilo-ohms or so, what’s the problem?
Oxotnick # 2022.09.30 20:45 0
User Answers:Simply….
Resistor 100 kOhm 2W parallel to the conductors
Olenka # 2022.10.01 11:40 0
User Answers: Balotelli anyway)
Have you tried using a resistor? Discharge time to 95% (those up to 5% of residual charge) t = 3 RC
Kradun # 2022.10.01 18:44 0
User Answers: Two-wheeled ****
These are by no means high-voltage capacitors...
DolmakimiOglan # 2022.10.02 01:06 0
User Answers: Lights up.
When operating in a 220 V network, as a starting capacitor in an engine, a current of at least 50 A will flow through it. The capacitance of a 700 µF capacitor will be about 4-5 Ohms. Therefore, the game is not worth the candle. You can discharge through a 30 Ohm resistor, preferably a 10 Watt. The flash lamp uses an 800 uF, 450 V capacitor and it discharges with almost a short circuit and nothing! Considering the huge area of the capacitor plates, the danger is only for the conductors leading to them. Yes, and even then, it is most likely exaggerated.
Elvis # 2022.10.02 06:54 0
User Answers: Why pay attention to a former chess player who has gone crazy?
well)))) if you have to, tell me - no answer - straight))))) - in public here!!!! vivalostioz # 2022.10.02 23:26 0
User answers: Free education and medicine...practically none, a rare product in rare salads on rare holiday tables)...Yandex to help!
Through a 5-10 kOhm resistor
BOKSYOR # 2022.10.03 01:05 0
User Replies:Lady Gaga
700uF/450V???? Two series-connected 60-100 watt lamps and the whole problem... or a 500 ohm 10 watt resistor, even a simple wire-wound one! You won’t even see sparks, but it’s painless for the wires and the resistor itself... it won’t even heat up... I did this myself when I soldered the drive at night and everyone was asleep... By the way: Kander won’t give a damn even from the short circuit!!! If it’s non-polar! Tested for years)))
Kill_Me_Gently # 2022.10.03 05:19 0
User Answers: I just took advantage of the opportunity to correct my figure - both ours and yours.
This is a large capacity, you cannot short-circuit, a resistor of about 10 - 50 kohm can be equipped with a thyristor, press the button, and there is no problem...
Zoot # 2022.10.03 05:51 0
User questions: Why is it necessary to undress completely in front of students before surgery, maybe I don’t want to be stared at? I’m constantly nervous about work, I don’t sleep well, I’m losing weight. I work as a teacher at school and the work is very stressful. Which is better i5 8400 or Ryzen 5 2600?
actually using a rod with a resistor and discharging it..
PEPBI3TSIK # 2022.10.03 09:33 0
User Answers:Your roof is on fire - call 01! You need a roof - call 02! You've gone crazy - call 03! Do you need......no.. they disappear somewhere on their own)
Bridge the resistance.
BRIQADIR # 2022.10.04 13:55 0
User replies:hate...It's difficult to find a song based on your information. Try online music recognition programs: Tunatic,...An ax to the head
I advise you to read this
WARLOCK # 2022.10.05 12:17 0
User replies: “...people stopped...” People, imagine, didn’t even start.
2 incandescent lamps 220V 100W in series. I turned on the toggle switch - the discharge began, and at the same time the indication began. If they go out completely, it means they are discharged
KRUTOY # 2022.10.06 00:29 0
User's responses: He wants to quickly get drunk on the road... You look through the sight... you aim... you shoot.. BINGOO... but no, you missed (that's how the sight works: D... Oooh, his look of loving eyes can incinerate...
Starting 700uF... This is a 7.5 kW motor. How will your network hold up? There, the starting current will sag the entire line, and the neighbors along the entire street will be indignant....
Discharge with a screwdriver
First we need a suitable screwdriver with an insulating handle. As a rule, the handles are made of rubber or plastic. Both materials are capable of creating a safe barrier between the hand and the metal part of the screwdriver.
If you are not sure that you have an insulating screwdriver, it is recommended to buy a new one that has a logo with the maximum permissible voltage.
Such tools are sold in the electrical goods department of any hardware department. Both a flathead and a Phillips screwdriver will do.
Now the discharge process itself.
- Grasp the element with one hand at the base, without squeezing too much;
- Place a screwdriver on both terminals;
- A discharge sound and slight sparking will be heard.
Hold the screwdriver so that it touches both legs at the same time, only then the discharge process will occur normally.
To check, you can close the terminals with a screwdriver again.
You can check the degree of discharge with the same multimeter.
Discharge with a screwdriver
First we need a suitable screwdriver with an insulating handle.
As a rule, the handles are made of rubber or plastic. Both materials are capable of creating a safe barrier between the hand and the metal part of the screwdriver. If you are not sure that you have an insulating screwdriver, it is recommended to buy a new one that has a logo with the maximum permissible voltage.
Such tools are sold in the electrical goods department of any hardware department. Both a flathead and a Phillips screwdriver will do.
Now the discharge process itself.
- Grasp the element with one hand at the base, without squeezing too much;
- Place a screwdriver on both terminals;
- A discharge sound and slight sparking will be heard.
Hold the screwdriver so that it touches both legs at the same time, only then the discharge process will occur normally.
To check, you can close the terminals with a screwdriver again.
You can check the degree of discharge with the same multimeter.
It's better to check first
First, this element needs to be de-energized. It is clear that there is no need to deprive it of its power source. It is enough to turn off the electrical appliance and disconnect the plug from the socket. If you approach this issue radically, then for safety you can turn off all the circuit breakers at the switchboard that are responsible for supplying electricity to the room.
Now we need a special device - a multimeter - to find out whether the capacitor is charged.
- Select the mode for measuring DC voltage (direct current).
- We set the device knob to the maximum voltage measurement level.
- We connect the multimeter probes to the contacts of the electronic component. As a rule, two rods protrude from it. It is to them that you need to connect both probes of the detector. You need to press firmly enough so that digital readings appear on the device display. It makes no difference which probe goes to which contact. The resulting value will be the same in both cases.
We need to understand what voltage is at the terminals of the element. Depending on the indications, the discharge method is selected:
- If the reading is less than 10 volts, there is no need to discharge.
- If the display shows measurements between 10–99 volts, you can discharge it with a screwdriver.
- If values are 100 volts or higher, it is recommended to use a discharge device.