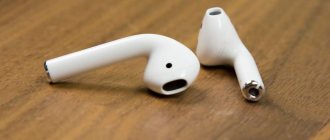
The design of modern headphones is quite reliable, however, there are often situations when devices break down. One of the typical malfunctions is the loss of sound in the left or right channel earphone. If one earphone stops working, there may be several reasons:
- Factory defect
- Incorrect driver operation
- Poor contact in the connector
- Membrane fouling
- Broken wire
Failure of one of the channels in wired or wireless models has significant differences.
Why one earphone stopped working: possible reasons
Unfortunately, it often happens that one of the headphones stops functioning. This phenomenon has even been called the “Curse of One Headphone . But before you throw them away and buy a new pair, you need to understand the possible reasons. And then try to fix the headset yourself.
Possible reasons include:
- headset plug not fully inserted;
- debris or dust in the nest;
- incorrectly configured or outdated drivers on the device;
- disruption of the sound membrane;
- wires tangled into knots;
- violation in the wire itself (break);
- sound device malfunction.
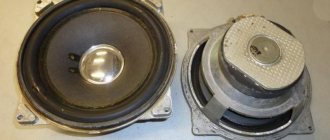
And now the donors have arrived
I think it’s clear that the donor headphone speakers should have the same dimensions. I was lucky, the drivers were 40mm in diameter at the outer edge, and the coil diameter was about 13mm. The vast majority of computer headphones have the same dimensions. But even among 40 mm speakers there are sometimes speakers with a larger coil diameter.
Now you need to gather all your concentration into a fist and carefully, as if you were a heart surgeon, peel off the diffuser. The diffuser is glued around the perimeter with some kind of rubber glue.
A needle is perfect for hooking up the diffuser. The main thing is to take your time. The diffuser is a thin polyethylene film that stretches easily and breaks quite easily.
It turned out to be more convenient to peel off from the place where the wiring runs. Before this, the wiring was sealed off from the contacts. As the peeling progressed, the knife was also actively used. By hooking the tip of a knife under the diffuser and pressing it on top with your finger, we slowly peel off the diffuser and move in a circle.
As a result, we have what we needed - a donor to repair the headphone speaker. We perform similar operations with the second speaker.
What to do if one earphone on your phone or computer does not work
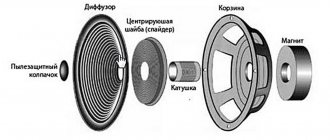
Headphone device
If a possible cause of the breakdown is found or several causes are probable, then it is worth moving on to troubleshooting the problem.
Tip 1. Check that the configured drivers on your electronic device are correct
This reason is most often possible when connecting headphones to a computer. Despite the scary and incomprehensible word “driver” for many, this problem can be solved very easily and does not require additional effort to disassemble the device.
To fix the problem you need:
1Go to the official website of the manufacturer of your headphones and find the drivers. Most often, any website has a window to search for the necessary information. Therefore, in the search, type “drivers for headphones (your model name”);
2Download them;
3After the file has been downloaded, you need to install it;
4Follow the prompts of the installation wizard (it is loaded into the computer software), update the drivers;
5Reboot the operating system and check that the headphones are working properly.
If, after performing the previously described steps, the earphone is still not working properly, then the cause of the failure is not in the drivers.
Tip 2: Remove small debris and dust accumulated in the device connector
Almost every owner of both smartphones and computers has encountered this reason, which also very often leads to problems with one of the headphones (and sometimes both headphones and even the charger fail). Dust that settles on any surfaces and inside holes, small debris in pockets and bags - they can get into the connectors and disrupt access to the necessary channels.
In order to clean the connector you will need a toothpick, a needle or paper clip and a small piece of cotton wool. It is worth cleaning with gentle movements in daylight or under the light of a lamp. With sharp and strong manipulations, there is a possibility of completely injuring the microcircuits.
You can also use a special cleaning spray to clean the connector. But before doing this, be sure to turn off the device itself and let it dry after cleaning. You can turn on the device and check its serviceability after 10-15 minutes.
If after cleaning the earphone started working, then this was the reason and to prevent the situation from recurring, it is sometimes worth carrying out preventative measures. Clean the connectors, and also purchase a special case for your phone with protection in the area of the connectors.
Before you start cleaning the connector, watch a video that shows how to do it without damaging the circuitry.
VIDEO: Cleaning the connector from dust and dirt
Clean the connector from dust and dirt
We clean iPhone 5 from dust and dirt - Caring for your equipment! How do I do it
Tip 3. Check the health of the headphone membrane
If, after you have installed the necessary drivers and cleaned the connectors in the devices, the earphone still refuses to work, you can assume that the reason is in the membrane.
The membrane is the outer part of the headphones, which is located under their cover. If you remove the lid, you can see a mesh, this is the membrane.
When it becomes dirty or detaches from the rest, either partial deformation of the sound occurs or its complete absence. In order to correct problems with the membrane:
1Carefully remove the cover from the broken earphone. If it is attached to the main part with screws, then use a screwdriver or knife;
2If there are contaminants in the form of dust on the membrane (mesh), they can be removed using medical alcohol. But don’t overdo it, you don’t need to completely saturate the cotton pad with alcohol, you just need to slightly wet it;
3If bends are found, you can try to carefully straighten them;
4If the membrane has peeled off, you can remove it from both the broken and working headphones. The sound will, of course, improve, but the frequency of the sound will worsen.
This is what a headphone membrane looks like, a malfunction or contamination of which can lead to the failure of one headphone.
Tip 4. Find the break and fix it
If none of the reasons mentioned above and their elimination led to the earphone working, then, most likely, it is likely that a break has formed at some point in the wire. Fixing this problem will require a lot of effort, so if the headphones are inexpensive, it’s easier to buy new ones or exchange them, if the warranty remains valid. If the cost of the headset is high and there is no way to exchange them under warranty for new ones, then you need to find the place of the break.
For this:
1Connect headphones to your phone or computer and play any recording;
2Slowly feel the wire, and when you hear a soft sound or crackling sound, this means that this place is a break.
When the break point is found, it is worth moving on to direct repairs. To do this you will need:
- stationery knife;
- insulating tape.
Let's move on to the repair itself:
1Remove the insulating layer in the place where you found the break;
Remove the insulation layer
2Cut the cable into two separate pieces;
Make a cut
3Cut out the tear;
4Place the cable onto the heat shrink tube;
5Twist wires of the same color together. To do this, place the wires in a cross on top of each other and slowly twist them;
Connect the wires
6 Solder the break;
Working with a soldering iron
7Solid the heat shrink tube using a regular hair dryer. Of course, you can use electrical tape, but the effect of the repair will be much lower.
Isolette
Tip 5: Check the default settings and functionality of the headset on other devices
There is a situation when headphones do not work due to incorrect settings on the devices. Website for searching individual prostitutes in Chelyabinsk Save it so you don’t lose it So to check:
- in the control panel we find the “sound” section;
- change the default playback device;
To make sure that the problem is with the headset and not with the device itself or its connector, connect it to another device (phone or computer, depending on which device your headset does not work on).
Is this not the end yet?
This could be the end of the sad story of the headphones, which by the way were only 2 months old. But it’s also not interesting))
By analogy with speakers for acoustic systems, the idea arose to move the coil from the speaker of other headphones. But an attempt to carefully tear off the coil at home was not successful and did not give positive emotions...
Almost immediately another idea came up - to transplant not just a coil, but a coil along with a diffuser from donor headphones.
It simply doesn’t make sense to use headphones in the same price category, so of course the donors are cheaper headphones. Of course, this is not good, and you can forget about the signature sound, but it’s not all that bad.
In defense of this decision, we can say that the magnetic system, which remains original, also has a very large influence on the sound, perhaps even no less than the diffuser. In addition to this, the plastic material (speaker basket?), which contains sound guides with acoustic filters designed by the manufacturer, will also remain original.
Useful tips to prevent earphones from breaking
Of course, if none of the possible troubleshooting options resulted in the earbuds working, then the broken pair will need to be replaced with a new one.
But to avoid repeating the situation with new headphones, try following these tips:
1Always keep the connectors of your smartphones or computers clean. To do this, check it once a month for cleanliness and, if necessary, carefully remove dirt. Also, purchase a special protective case.
2Do not store your headsets in a tangled state, as the likelihood that they will break sooner or later is almost 100%. To prevent this from happening, wrap them around your phone before putting them away in your bag or pocket.
3Do not use the device in the cold. With sudden changes in temperature, and especially in the cold, the plastic becomes very elastic, which means it breaks easily.
4Reinforce the areas where tears are most likely to form. At the point where there is a sharp transition from the plug to the headset itself, wrap the wire with electrical tape or a spring from a ballpoint pen.
5Do not use the headset in high humidity. No listening to music in the bathroom or in the rain. If moisture gets into the headset membrane, it will cause the device to malfunction.
VIDEO: How to fix headphones yourself
Be careful with wiring
Very often, manufacturers fill the wires running from the contacts to the coil with glue and it is not always possible to remove them undamaged. Even if the wiring has come off at the edge of the diffuser, you can do the following trick - unstick the wiring from the diffuser. Then unwind a little from the reel, and then glue them back, but at a different angle.
If the coil unwinds reluctantly, then you should not be zealous - you can easily break the wires. It is better to glue them across the diffuser. This way you can lengthen the protruding ends of the wires by almost a centimeter, which is more than enough.
The photo shows the test diffuser with which the experiments were carried out
Glue the diffuser
Now it’s time to glue the diffuser to the plastic base. I preferred to use Moment. Be sure to first test the glue on a similar material. Glue Moment supercement - led to melting and irreversible deformation. For maximum accuracy when applying, it is better to use a large needle.
At this stage, it is very important to correctly center the speaker, otherwise it will then touch the magnetic system with the coil. For alignment, I soldered a wire to the still unglued speaker to connect it to an audio device and turned on the track. At the same time, hold the diffuser so as not to break the wire. Do not turn it on too loud; even at low volume you will clearly hear a buzzing sound when touched.
Try to find a position so that the coil fits into the gap as symmetrically as possible without touching it. Remember it. After this, holding the diffuser with your fingers, coat it with glue in the area of the wires, inserting a needle with glue under the diffuser. In this case, the track can be left on to immediately detect the slightest distortion.
Place something under the speaker and apply glue around the perimeter. And again, when the track is on, try to carefully place the diffuser so that nothing rings or farts.
After this, it is advisable to press the edge of the diffuser with the eye of a needle. If it is not stuck somewhere, then firstly the speaker will begin to emit overtones, and secondly there will be a dip in low frequencies. Therefore, we additionally coat the perimeter with glue on top of the edge of the diffuser.
Don't forget to check the coil for open circuit by measuring the resistance. The resistance of such speakers is usually about 32 ohms. It is also worth checking the coil immediately after detaching it from the donors.
After applying glue, the ring was inserted into its proper place.
How to Determine Speaker Polarity
During the soldering process, the wiring coils could be mixed up. In order to determine the phasing of the speaker, it is most convenient to use a small 1.5 volt battery. We solder a couple of wires to the speaker and briefly touch their ends to different poles of the battery.
With one polarity, the speaker cone will rise, with the opposite polarity, it will be drawn into the coil. The rise of the diffuser can be taken as positive polarity. We look at how the battery is connected and mark the plus and minus on the speaker.
We do this with both speakers, after which we safely solder the lead wires and assemble the headphones.
Tinding the wires
In order to be able to immediately solder the wires to the contacts later, it is better to tin them at this stage, i.e. Cover them with tin.
Attention - do not forget the fact that the wiring directly touches the diffuser, and the copper from which they are made conducts heat well. This can easily melt and deform the diffuser.
Wiring is often coated with varnish, which does not burn even with a soldering iron. In this case, an aspirin tablet will help. You can, of course, drink it and it will help with yesterday’s hangover, but in our case it will be more useful if you put wires on it and tin directly on it. But in any case, don’t forget that you need to do everything quickly and wait until the wiring cools down, otherwise the diffuser will go in the trash.
The resulting vapors are toxic! It is advisable to perform these tricks with aspirin in a well-ventilated area.