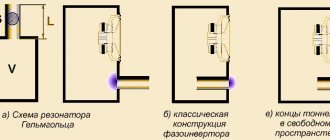
There is another type of acoustic design of a loudspeaker, capable, like the acoustic design described in the magazines “Radio”, 1972 No. 8 and 1973 No. 6, to ensure the loudspeaker reproduces lower frequencies with relatively small box dimensions. It has several names, of which the most correct are: bass reflex with a passive radiator or FI with a closed hole.
The peculiarity of this bass reflex is that the loudspeaker is placed in a box that has a hole near its installation site, with a movable system of a second loudspeaker fixed in it without a magnetic system and a centering washer. The diameter of the passive radiator diffuser in acoustics is approximately equal to the diameter of the loudspeaker diffuser. The hole in the voice coil is sealed and in this place an additional weight is attached to the diffuser. The weight of the load depends mainly on the volume of the box and the resonant frequency of the bass reflex.
Rice. 1. Speaker system with passive radiator
The principle of operation with a passive radiator is similar to the principle of operation of a conventional bass reflex (see “Radio”, 1973, No. 8). At the resonant frequency of a closed FI, the diffuser of the passive radiator oscillates in phase with the diffuser of the main woofer, ensuring effective signal reproduction in the low-frequency region. Thus, unlike the main bass reflex, here the mass in the hole is replaced by the mass of the movable passive radiator system, including an additional weight.
The weight allows you to more simply than is done when measuring the size (volume) of the passage in a conventional bass reflex, to regulate the resonant frequency of the bass reflex. When reducing the volume of the box of a conventional bass reflex, it is necessary to increase the volume of the passage or reduce the area of the hole, which reduces the efficiency of the bass reflex. A bass reflex with a closed hole is free from this drawback and this is its main advantage.
What is a passive radiator
A passive radiator (also known as a passive speaker) is a radiator that does not have a magnetic system or coil. It is not capable of converting an electrical signal into sound vibrations, which means it cannot work independently and must be excited by an active emitter installed in the same closed housing.
A passive radiator is most effective at low frequencies. At medium and high frequencies, the sound pressure created by an active radiator is simply not enough. Therefore, using a passive speaker, you can significantly improve the bass of your speaker system with your own hands.
Types of subwoofers
Subwoofer, comes from the English subwoofer, an acoustic system that is designed to reproduce low sound frequencies from 20 Hertz to 500 Hertz, the system has a relatively large body, and it has a built-in large speaker, there are some differences:
- Active subwoofer - contains its own built-in power amplifier (it allows you to remove all low-frequency load from the amplifier) and a built-in active crossover that allows you to filter (adjust) high frequencies, thereby simplifying the matching of the subwoofer with speaker systems
- From them he can receive a linear signal (with RF removed) through a special channel of some source
- Can be connected between the broadband speaker and the signal source (also called pass-through)
- Often it also has additional capabilities - adjustments to any specific conditions of its application (such as phase rotation, frequency response regulation, adjusting the position of its cutoff points, as well as the slope of the cutoff)
- A passive subwoofer, unlike an active one, is not equipped with a power amplifier (see Difference between an active subwoofer and a passive one: advantages and disadvantages), and other adjustments, so it is connected “in parallel” to the main speakers, or to a separate output from the power amplifier
- The main disadvantage of connecting a subwoofer this way is that the subwoofer additionally “loads” the amplifiers of the stereo channels at the output
- Sometimes this reduces the dynamics and overall sound volume of the entire audio system.
- And the presence of a passive crossover in the signal path (meaning the signal coming from the power amplifier to the speaker system) has a negative impact on sound quality
- The lack of adjustment tools in passive subwoofers makes them very picky about indoor placement, and to adjust it you need to move it around until you find good bass.
- When we understand the concepts of what a passive subwoofer means and what an active one is, let’s move on to the choice
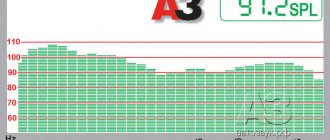
Frequency response of speakers with a passive radiator
Installing a passive radiator results in an increase in the radiating surface area. The two diffusers vibrate together, so, firstly, the level in the low frequency range increases, and secondly, the efficiency of the entire speaker system .
As an example, consider the generalized frequency response of an acoustic system before and after inserting a passive radiator.
The comparative graph shows that in the presence of a passive radiator, the frequency response of the speaker system increases significantly in the range from 20 to 500 Hz. And this is the low-frequency region, i.e. those same basses.
Both active and each passive radiator has its own resonant frequency. At this frequency its oscillations are maximum.
The main difficulty for any acoustic system is usually the lowest frequencies, so they always try to lower the resonant frequency. For this purpose, the diffuser of the passive speaker is made larger.
SUBWOOFER WITH YOUR HANDSI decided to write this article specifically for those who want, but for one reason or another cannot afford to purchase a subwoofer. This article contains step-by-step instructions on how to assemble a subwoofer with your own hands.
I will try to explain it in an accessible language for inexperienced people, and if possible, show it - that a subwoofer is not at all difficult as it may seem at first glance. If you really want to, but you can’t, then you can!
We can begin. So, I don’t claim to be the author of all the information collected here, I just collected everything I know myself and the experience of other people on one page, for the accessibility and understandability of the material.
Many people have this word on the tip of their tongue, but not everyone understands what it is.
SUBWOOFER comes from two words SUB and WOOFER - literally translated - subwoofer, i.e. speaker system for reproducing sound at lower frequencies (from approximately 20 to 200 Hz). Many people call it a “bass speaker”. Subwoofers can be active or passive. Active means that the speaker body houses an amplifier and power supply, Passive means it needs an external amplifier.
The following abbreviations are also used in the text:
AC is an acoustic system, or, simply put, a “speaker.”
Speaker is also a loudspeaker, but “dynamic head” would be more correct.
LFO - low frequency signal generator. (low frequencies mean frequencies from 20 to 20000 Hz)
ULF is an amplifier of low-frequency signals.
Step one.
Tool and material.
To make a subwoofer we need to find:
1. Self-confidence, the desire to relentlessly go to the end and be ready for material costs (maybe it will work out well!).
2. A good, proven tool, namely:
- wood hacksaw;
- chisel;
— a set of files of various calibers and types: flat, triangular, round;
— skins (from small to large);
- electric drill;
- a screwdriver (you can also use a screwdriver);
- jigsaw (even better - jigsaw);
- ruler, pen, pencil, sheet of paper and other office supplies;
— a compass (preferably with a “wingspan” of 20-25 cm);
— PVA glue, auto sealant, wood glue;
- building materials, namely: plywood with a thickness of 10mm to 20mm, chipboard - possible but not advisable, wooden blocks 20x20, 30x30, 40x40, etc.
- a mountain of self-tapping screws from 10mm to 50mm, we will need a lot of them!
3. a computer on which it is highly desirable to install the JBLSpeakerShop program.
Step two.
Loudspeaker (speaker) parameters.
Each of us has a first name, last name, and patronymic. Each of us has unique facial features, eye color, fingerprints, and retinal patterns. There are no identical people in the world. In the same way, no two speakers are the same; each of them has its own unique parameters. Even if you take two identical speakers made at the same factory on the same day, their parameters will differ, of course, slightly, but this small difference can be important. What I mean is that before we start making a subwoofer, we MUST calculate the main parameters of our speaker. Whether you bought it in a store, unscrewed it from an old speaker, or a friend brought it from the garage, in any case you need to measure its characteristics. In the future, based on these parameters, we will choose the type of box for the subwoofer.
We will write down the parameters necessary to calculate the subwoofer on a piece of paper and save it until the moment when the sound quality of the manufactured “boom box” is completely satisfactory.
So, let's begin. Since most of the currently existing programs for calculating AC boxes use the Till-Small parameters, it is these that we will calculate.
In order to start calculating the box, we need the following parameters:
Pnom - Nominal power of the speaker, given in the brand of the head (75GDN-1 75W). Fs — Self-resonance frequency of the speaker in open space. Fc - Resonant frequency in a closed box. Qts - Total quality factor at resonant frequency. Qes - Electrical quality factor at resonant frequency. Qms - Mechanical quality factor at resonant frequency. Vas — Equivalent volume of the speaker. D - Effective diffuser diameter. Xmax — Maximum diffuser displacement. It will be good to read about all the parameters of TS - read.
In principle, other parameters may be needed, but these are already enough to start calculations.
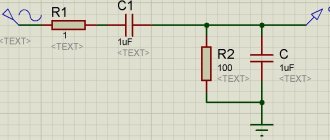
To measure the parameters you will need a calculator, a voltmeter (preferably a digital multimeter), a low-frequency generator, a hermetically sealed box of 20 liters, and you will also have to make a simple device.
Low frequency generator - you can take any one, for example G3-109 or similar. If there is no generator, then you can use a computer. We connect an amplifier to the linear output of the sound card, and from the output of the amplifier, through a 1KOM resistor, we connect the speaker under test. The resistor power should be 2W or more, otherwise it will get very hot. In principle, everything is ready. If we use a computer instead of a generator, then we need to download a program - LFO, there are a huge number of them on the network.
So, let's begin.
We hang the speaker on a rope in the center of the room to the ceiling, perhaps by a chandelier or in some other way, the main thing is that there are no objects nearby, this may affect the accuracy of the measurement.
Everything is connected, we launch the LFO program, set the frequency to 1000Hz. On the computer, set the volume to the middle position to eliminate distortion of the signal shape. connect the multimeter to the output of the amplifier. By adjusting the volume on the amplifier we set the voltage to 20V.
Attention! Now it is absolutely impossible to adjust the volume either on the amplifier, or on the computer or LFO.
We connect the voltmeter directly to the speaker. We set the generator frequency to approximately 5-10 Hz and gradually increase the frequency and monitor the voltmeter readings. We need to find the resonant frequency of the speaker, at this frequency the voltmeter will show the maximum voltage, then it will begin to decrease. So the voltmeter showed the maximum value - we write it down on our sheet as Umax. Then we record the frequency of the generator at which the maximum voltage value is recorded, this will be Fs - the resonant frequency. Now we need to find the minimum amplitude value. We again begin to gradually increase the frequency relative to Fs until the voltmeter readings stop changing, write this value as Umin, with a further increase in frequency the amplitude will increase again, but this is no longer important to us.
Now we know several parameters of our head, but this is just the beginning. Using a generator and a voltmeter, we can plot the frequency response graph shown on the left. It shows Umax - corresponding to the voltage at resonance, as well as Fs - the resonant frequency - the peak on the graph. We also found Umin, but what is Usr, you say, and what are these F1 and F2?
These are the frequencies with which we will determine the quality factor of the speaker. Previously, I calculated these parameters manually, calculated them using the formulas Uav, Qts, Qes, Qms. Now there is a useful program TSCalc, you need to download it right now - download it. Working with it is simply simple; we substitute the values and get the result. First you need to find out Rmax, to do this we multiply Umax by 1000 and write the value on a piece of paper. You will also need to measure the speaker's DC resistance using an ohmmeter, write it as Re.
Now let’s substitute the values of Rmax and Re into the program and find Rx. Divide Rx by 1000 and get Uav. Now let's find F1 and F2. We begin to reduce the frequency relative to Fs “down” and when the voltmeter shows the voltage Uav we write down F1, now the same thing only “up” from Fs and write down the value of F2. Now we substitute the values of Fs, F1, F2 into the program. And we get the values Qes, Qms, Qts.
It's time for the pre-prepared box. We take our speaker and screw it to the box with the magnet facing outwards, there is no fundamental difference in this, it’s just more convenient. Now we find the resonant frequency again, but write it as Fc. We substitute the value of Fs, Fc and the known volume of the box, we get the value Vas - the equivalent volume.
Well, that's basically all. The effective diameter of the diffuser and its maximum displacement are measured using an ordinary ruler. Don't forget to write down the values on the sheet.
Step three.
Types of boxes.
Now we have a speaker, we have its real parameters, we can start choosing a box.
I want to disappoint you right away. It is based on the parameters of the speaker that the type of housing is selected. I’m not saying that you won’t be able to assemble the box you want with it, it just may not sound the same as it would sound in the “native” box.
So, types of boxes, or options for subwoofers.
Option one - Free emitter or Free air.
This option may be suitable for speakers with Fs above 100Hz.
It still won’t make a traveling subwoofer, since its parameters are close to mid-frequency speakers. For example, it can be built into the rear parcel shelf of a car.
Of course, you can try to make something else out of it, but it’s better to look for another speaker.
Option two - Closed Box or Closed Box.
Select this box if Qts<0.8...1, optimally 0.7
product Fs/Qts=50
It’s easy to calculate, all you need to do is calculate the volume of the box.
A lot of power is required from the speaker, and the likelihood of it failing is very high. In most cases, the box turns out to be bulky, which is completely unacceptable for a home or car.
The inside of the box is filled with sound-absorbing material, cotton wool, felt, or others.
This version has the lowest efficiency.
Option three - Bass reflex or Vented Box.
Choose if Qts<0.6, optimally 0.39
product Fs/Qts=85
It will be more difficult to calculate; here the bass reflex pipe plays a very important role.
The speaker must have a flexible and durable suspension, because... performs a gigantic amount of work; at maximum power supplied, the diffuser vibrates a huge amount of air, most of which “flies into the chimney”
Option four - Passive Radiator.
A passive radiator is like a bass reflex, only instead of a pipe there is an emitter-membrane.
Calculating it is no less difficult; it is even more difficult not only to calculate a passive radiator, but also to manufacture it.
Although you can use the old speaker, remove the magnet, basket, diffuser. And glue a plate made of getinax, plexiglass or other material to the rubber suspension. Screw a weight into the center of the plate - a bolt with a nut. This weight can be used to adjust Fc.
Option five - Band Pass or Band Pass
Band Pass can be transported as a Band Pass.
Band Pass 4th order - Band Pass 4th order.
Worth choosing if Fs/Qts=105
In principle, of all the other housing options, this one is the most efficient.
But at the same time, the most difficult to manufacture, two cameras and two bass reflexes.
Band Pass 6th order A - Band Pass 6th order class A.
Band Pass 6th order B - Band Pass 6th order class B
Any of these housing options can be assembled with either one or two speakers.
You know the parameters of your speaker, what will come out of it, you have already determined it, it’s time to calculate the box.
Step four.
Box calculation.
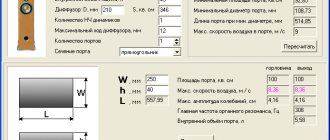
Unpack the downloaded JBLSpeakerShop program into the root folder of the disk. Then run the setup.exe file from the DISK1 folder. The installation will begin, enter the path of the second part of the DISK2 archive. Installation completed.
Launch the program Start => Programs => JBL SpeakerShop => SpeakerShop Enclosure Module.
I won’t tell you in detail about the program, it is very simple and in principle everything is clear.
First, go to the Loudspeaker menu and enter the parameters of our head. Then, having selected the box type, click - Box - Parameters - and then click on the selected type. All that remains is to enter the volume and frequency of the desired resonance; you need to experiment with these parameters, observing the resulting graphs. After you have selected the box parameters, click Vent, here we enter the parameters of the pipe (bass reflex), if of course there is one. All that remains is to calculate the dimensions of the box, go to the Dimensions submenu, choose the shape and size to suit your taste. In the Graphs menu, select the types of graphs to display.
To the fullest, print out the graphs, parameters, dimensions - Ctrl+P.
Step five, final.
Making a box.
Now, having rested a little, let’s get down to making the box. At this stage, in order not to translate precious material, you must strictly follow the rule, “measure seven times, drink once.”
We take out the prepared tools, material, patience. When choosing plywood or chipboard (whoever has what), you need to take into account that the higher the power of the speaker, the higher the thickness of the box walls and the more rigid the fastening. The best material is, of course, plywood (you shouldn’t use old, dried-out plywood - it will simply crumble), much stronger than chipboard, I don’t even understand how you can make a good subwoofer from sawdust.
We took out a ruler and a pencil, and first of all, let’s draw all the sides of the box on a sheet of plywood. Try to save money, in case you make a mistake somewhere, you will have something to correct.
Now let's cut, a good tool would be a hacksaw with a guide and fine teeth. You need to cut slowly and preferably at an angle, you don’t want the plywood to delaminate and crack. You can also use a jigsaw, preferably with a speed controller, for the reasons already stated. Saw smoothly, don’t rush, you’ll have a hard time using a file to straighten the humps and depressions.
After cutting, you still have to work with a file, you need to remove all the protruding pieces of wood, otherwise splinters, iodine, bandages.
Take out wooden blocks, choose their sizes yourself, but of course not too small or huge. Place the walls together as they should be and measure the required length of the bars.
Another important point in making the box is the huge hole for the speaker. First, using a compass, we mark a circle for the speaker, slightly larger than the diameter of the diffuser along with the rubber surround. And another smaller circle, equal to the radius of the drill and adding another 2-3mm. Here are a few ways to make holes in a piece of plywood. Don’t look for a drill, there are hardly any drills with a diameter of 100-300mm in the world, and you’ll need a giant drill. Take a drill with a diameter of 10-15mm, a regular electric drill. Drill by laying your piece of plywood on some other scrap piece of wood, this will save the bottom surface a little from cracking. Now we drill holes along the inner circumference at a distance of 1-2 mm from each other. When finished, take a narrow chisel and a hammer and punch the bridges between the holes, then knock out the resulting pancake. We take the largest round file, or better yet a rasp, and slowly, again at a slight angle, align the circle along the drawn line. Sharp corners on the front side can be rounded. In the same way we make holes for the bass reflex. Another way: draw a circle with the radius of the diffuser and a hole inside, and then use a jigsaw to cut along the line. Faster, but more chips! Attach the speaker to the hole, if the “hole” suits you, drill holes for fastening the head, and for fastening you can use screw-in metal double-sided nuts, they are used in the furniture industry.
Don't forget the plug! It is better to use concert acoustics - more reliable and practical.
Well, we’ve made all the walls, holes for the speaker and bass reflex, cut the bars, and we’ll assemble them.
Using the drill again, we place a drill half the diameter of the screws and drill through the sheets of plywood in the places where it will be attached to other sheets and bars. Now take PVA glue or wood glue and spread it thicker at the joints. We connect the walls together and screw self-tapping screws into the holes made; it’s okay if they go right through and are not visible inside, but strength is important to us. The glue will play two roles, increasing the strength of the fastener and sealing it. Make sure that the structure is not warped, that the corners are even, there must be beauty and neatness.
Do not screw the back wall yet, it will still serve us. Attach the speaker, from the outside or from the inside, as you like and depending on the design of the speaker. Coat the junction of the plywood with the speaker with autosealant, being careful not to get it on the diffuser. Auto sealant - will provide a tight seal and can be easily removed if you suddenly want to change the head for another one or during repairs.
Bass reflex - you can use a piece of plumbing pipe, an aluminum pipe, or basically any pipe you have (except metal water and sewer pipes). In the program, enter its dimensions and get the length. The bass reflex can be square, then you will need to show your imagination in its manufacture. It will also need to be secured, but not tightly yet.
The box is assembled, oh yes! back cover! A less important parameter in subwoofers, but still affecting sound quality, is damping. What is this? This is a sound-absorbing material glued to the inside of the box wall; it is needed to prevent the appearance of parasitic sound waves inside the box, reduces pressure on the walls, and gives the bass softness.
How to make a damper. The damper material can be: felt, hard foam rubber, cotton wool, thick fleece, etc. The most affordable material is cotton wool. But you can’t just stuff it inside! Here our beloved women will come to our aid, who all the time of our efforts grumble about garbage, noise and a bunch of tools mixed with pieces of wood, etc. How will they help us? Yes, it’s very simple, women’s tights, you can stuff cotton wool into them and make sound-absorbing “sausages”, which we will glue to the walls of the box.
Setting up the bass reflex. After damping, we put the back cover in place, but so that it can be removed later. Although if your speaker is pulled out, then the back wall can be firmly fixed with glue and a bunch of screws. We connect the unit to the low-frequency generator through an amplifier, and a voltmeter to the contacts of the subwoofer (i.e., the speaker located inside). By changing the frequency of the generator, we find the resonant frequency Fc using an already known method. If the resonant frequency differs from the calculated one, we will adjust it using a bass reflex and the amount of damper inside the box. The bass reflex pipe will need to be either shortened or lengthened; in some cases, the pipe may be longer than the dimensions of the subwoofer, in which case it can be bent in the shape of the letter “L”. You also need to experiment with the amount of damper, remove or add, decide on the specific situation. When the resonant frequency suits you, you can firmly fix the bass reflex or damper.
Turn on the music, the louder the better, listen for any extraneous noise, whistling, or rustling. If it whistles, it means there is a hole or gap left unclosed somewhere in the drawer, cover it with putty or sealant, and fill it with glue. If it rustles, the damper may be touching the moving speaker cone.
Now the final external processing of the box, the corners can be rounded, thoroughly sanded, and the cracks and holes can be covered with mastic or putty.
In the end, you can cover the subwoofer with vorsonite or some other material, put decorative grilles on the speaker and bass inertizer, screw on the legs if you are going to use it indoors, your imagination will tell you here.
Well, that seems to be all! I hope all my writing has helped someone! Thank you for reading to the end, all the best to you, success!
PS
Send your comments, corrections, questions to:
Site administration address
DON'T FIND WHAT YOU WERE LOOKING FOR? GOOGLE:
CUSTOM SEARCH STRING
Passive radiator speaker
A fairly popular area of application for passive radiators today is portable speakers. Given their size, it's not so easy to get really good bass. An acoustic passive radiator can greatly improve the situation.
If you want to make a portable speaker with your own hands, then you are faced with the issue of monitoring the battery charge. For these purposes, I recommend looking at the article Smart charge controller for lithium batteries - module based on tp4056. Moreover, such modules cost only 30 cents apiece.
But even if the speaker is not portable, but a tabletop one, the diameter of the passive speaker diffuser must be greater than or equal to the diameter of the active emitter.
In this case, the self-resonance of the passive radiator must lie below the resonance of the main speaker. Ideally, for tabletop acoustics it should be below 20Hz. It will be even better if the active loudspeaker has the same low resonant frequency.
A passive radiator is used only in a closed box type housing. Because it is excited only by air vibrations inside the housing from the active head. Consequently, any leakage in the casing of a speaker with a passive radiator greatly reduces the efficiency of the bass response.
Closed case
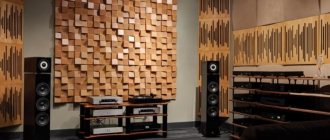
In our flagship Reference Series, we use the highest quality drivers with a carbon fiber cone. The internal structure of the diffuser includes absorbent material made from recycled denim. Manufactured to extremely precise tolerances, these tightly suspended speakers are perfectly controlled by powerful, high-current amplifiers housed within the cabinet.
And isn't our honorable client right? Of course he's right. A buyer with greater financial resources is able to afford an uncompromising subwoofer system - in closed enclosures, with impeccable design and high-quality electronics.
| Such a system may have a stereo configuration or, better yet, a line array of six subwoofers - three on each side. This is truly the height of perfection for anyone who seriously dreams of perfect sound. A complete array of No.25 models complete with BassLine Blue cables - the quintessence of high technology - will cost almost four and a half million rubles. |
But that doesn't mean that anyone who can't afford the annual rental of a Gulfstream G-550 jet for corporate use should give up on their dream.
Initially, our business was based on the principle of “learning and creating the best.” But then, as we gained experience, we began to pay more attention to practical feasibility and, as a result, reducing the cost of products. Just like Porsche, whose cars regularly win at Le Mans, we do everything possible to implement cutting-edge technical ideas in our “production cars” – affordable subwoofer models.
DIY passive radiator
You can easily make a passive radiator with your own hands by removing the magnetic system and moving coil from the low-frequency speaker. It is better to use a bass driver with a diameter no smaller than the intended active driver. It would also be a good idea to make the diffuser a little heavier.
It is not necessary to dissect a normal speaker to make a passive speaker out of it with your own hands. It is better to use it for its intended purpose, and in addition to it, it is cheap to buy a passive radiator on AliExpress.
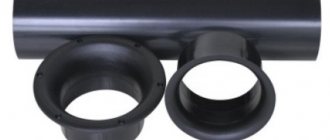
The passive radiators shown above are great for creating homemade portable speakers. They have a diameter of 2 inches and cost only 143 rubles per pair. I recommend buying from this store .
An even more interesting option:
These passive radiators are less like conventional speakers because they lack a metal basket and have minimal thickness. They have a diameter of 3 inches (79mm), due to which I can provide better bass. They will cost a little more - 515 rubles per pair. Link to store .
Larger diameter - more bass:
This is already a 4-inch passive bass radiator. Its price is also not so high and amounts to 260 rubles. You can buy it here . However, thanks to the larger diameter, it has even better low-frequency response.
Cooling structures in computers
Passive radiators must meet the following requirements:
- Quickly draw warm air from the processor.
- Conduct heat from a hot surface to a cold one.
- The captured heat is quickly dissipated in the space around.
Passive subwoofer
Passive radiators for cooling are used not only in subwoofers, but also in computer equipment. As you know, the PC processor is subject to overheating from prolonged operation. In such cases, you cannot do without a cooling system. Otherwise, overheating will lead to a reduction in the service life of the equipment or to serious problems.
In addition, radiators reduce noise emitted by processors. Since there are no fans in the design, the operation is silent. The cooling system operates according to the following scheme:
- Thanks to heat pipes and a high degree of thermal conductivity, the design “absorbs” the heat generated by the video card or microcircuit.
- Gives off heat to the surrounding air, while cooling it.
There are different types of PC heatsinks. Special for SSD or video cards. There are cooling systems for processors.
Passive subwoofer
When purchasing a passive radiator, there are some rules to keep in mind. This will help the system last a long time. First of all, the design must be compatible with the elements of the system unit. Secondly, the passive radiator must be efficient. That is, have high performance to ensure sufficient cooling.
Cooling system for SSD M2
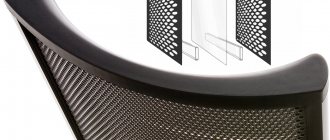
The M2 SSD's passive heatsinks are primarily made of aluminum. The designs are suitable not only for subwoofers, but also for video cards, speakers, and hard drives. Available in black with purple thermal pads. The system is easy to install. Widely used to double the cooling area.
Passive SSD heatsinks M2
The passive radiator for the SSD M2 subwoofer includes the following elements:
- X aluminum radiator;
- X thermal conductive pads;
- X silicone rings for installation;
The design weight of the M2 SSD is very light - only 25 grams. But the system performs its functions in full.
What are passive radiators made of?
Passive radiator cooling must be effective. To increase thermal conductivity inside the structure, it is made of materials with a high thermal conductivity coefficient. Such materials include silver and copper. But, since silver mechanisms are expensive, they are most often made of copper.
To increase the efficiency of heat transfer between the radiator and the heat source (chip), intermediate layers are made of thermal paste.