Speakers break quite often. This happens in most cases from listening to music at high volume for a long time, since ordinary household speakers cannot function for a long time at maximum power. They also break if too much voltage is applied to them, or if they are connected to an amplifier that is too strong. But they are unlikely to tell you this in the store. They describe how powerful they are, but no one will tell you that, working at the limit for a long time, they can break. But they will most likely serve their warranty period. Therefore, the average person has a question about how to fix the speakers with his own hands, what actually breaks there, and isn’t it easier to simply throw them away?
What are regular speakers?
Speakers are a simple type of radio equipment. They consist of a case and speakers built into it. There may be one speaker or, simply speaking, a loudspeaker. But in a more advanced model there may be several of them. If the speakers are the same, then they perfectly reproduce a wide range of frequencies. But often there are several different ones. If a speaker has three different sizes of speakers, then the largest one reproduces low frequencies, the middle one reproduces midrange frequencies, and the smallest one, as it is commonly called a “tweeter”, reproduces high frequencies.
How to repair regular type speakers, that is, inactive ones that do not have an amplifier built into them? It depends on what type of breakdown occurred. Since a cracked case can be easily repaired, we will not dwell on such nuances. Let's look at the breakdowns associated with the failure of the speakers, since apart from them there is nothing else to break in ordinary (non-active) speakers.
Causes of failure
It is important to know the reasons in order to make a decision about the advisability of repairs and prevent a similar problem from occurring in the future.
The most common reasons are:
- natural wear and tear of structural elements. Failed elements must be replaced with new ones. If all suitable spare parts are available, the life of the equipment can be extended as long as desired. The body is the last to wear out, but it can also be replaced;
- voltage drops in the network. To protect devices, you need to connect them through an individual computer power supply. Another option is to choose devices with a high-quality fuse when purchasing. This element is easiest to replace if the device suffers from a power surge;
- cable damage - devices do not receive power from the network and therefore do not work. Can I replace the wire myself? Yes. How easy it will be to do this depends on the design of the speakers;
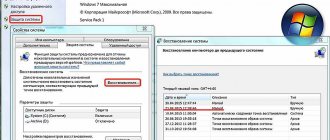
- malfunction or incorrect operation of the computer sound card. If the card is faulty, it will have to be replaced. If it does not function correctly, you need to update its drivers or roll them back;
- violation of operating rules. Speakers do not like high humidity and sudden temperature changes. Of course, high-quality equipment has a margin of safety, but it will last long only if the manufacturer’s recommendations are followed;
- low quality or manufacturing defect. It’s not worth buying a cheap “knee” assembly. However, even expensive ones may turn out to be “garage-made”. Conclusion: you need to buy products from reputable brands and do it in stores that have been operating on the market for a long time. In this case, defects are rare; if this happens, they will be replaced without any problems or quickly repaired in a warranty workshop.
Plug
Very often the problem is in the plugs. In this case, you will need to test with a multimeter. Here's how to fix the column in this case:
- First, let's diagnose the problem. To do this, first of all, remove the cover by unscrewing the fasteners.
- We set the multimeter (tester) to ring and, one by one, touching all the contacts of the plug in the places where the conductor is soldered, coming from the plug to the speaker board, we look for matches. If at least one of the contacts does not ring, that is, does not deflect the arrow or deflects barely, then the problem is either in the wire or in the plug.
- We change the wire and plug together so that “your head doesn’t hurt.”
- We tighten the column cover and check that the repair is complete.
Current speakers do not have plugs. Therefore, you need to ring the wire itself by squeezing out the contacts (clothespins) on the speaker and on the amplifier. If at least one wire does not ring, change the wire, and everything is in order.
Common JBL problems
Despite their reliability, jbl portable speakers sometimes break down. As a rule, this is due to incorrect conditions of use, but sometimes a factory defect is found in the column. The solution in 65 percent of cases will be to contact a specialized service to repair and diagnose problems with the operation of the column. Going to a specialist is not always economically feasible.
We will describe in more detail possible problems with a bluetooth speaker and explain how in some situations you can repair the device yourself.
Interrupts
Frequent problems are interruptions in the sound from the speaker at fixed intervals or stuttering. In 40 percent of cases, the problem lies in an unstable Bluetooth connection between the player and JBL. Reconnect devices or connect via wire. If the stuttering does not stop, rule out an error in the music source, for example, a telephone, and replace it.
In 30 percent of cases, the problem of stuttering lies in the incorrect operation of the JBL frequencies. To correct this option, turn on the low frequency mode - press and hold the “Bluetooth” and “Volume -” buttons for 7-10 seconds. This action will help improve the sound. If interrupts are saved, the error lies in the JBL device. Then you can’t do without a trip to the repair department.
Not charging
Another JBL malfunction is that the device stops charging. Inspect your gadgets
As a rule, the violation is detected visually by paying attention to the micro USB connector. If it is damaged, the speaker will have to be disassembled and the charging connector replaced.
Reset to factory settings
In some cases, the error lies in the speaker software. For example, the driver for the device was installed incorrectly or a bug occurred in the connected wireless devices. In order not to disassemble the column to the board, try resetting the column to factory settings. Use two points:
- To perform a rollback, hold down the “Volume +” and “Play” buttons on the JBL for 3 seconds.
- If you decide to automatically update the device version, hold down the “Connect+” and “Volume+” buttons for 10 seconds.
Change voice prompt
Users are annoyed by the sound of voice prompts from a JBL portable speaker. To correct this situation, change the device's voice prompt.
By default, the assistant volume is set to maximum and cannot be adjusted in the internal settings. To change this defect, disassemble the device and work with the product board manually. The hint changes solely due to reprogramming.
If you are savvy with circuits and electronics, try to figure it out yourself. Otherwise, contact the service for fine tuning.
Identify a short circuit on the board (on the diagram)
In most cases, the product does not work due to a lack of contact in the network or, conversely, when this contact appears in an unnecessary place. With minimal experience in electrical engineering, you can disassemble and repair the JBL yourself.
To identify a short circuit on the board, you need to climb inside the device and use a special tool to measure the voltage in the circuit - a multimeter.
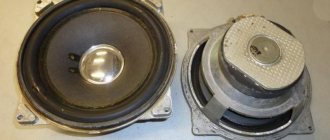
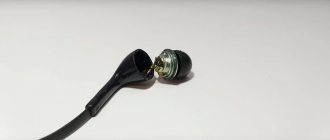
Failure of the tweeter
To the question of whether it is possible to repair a speaker if one of its speakers is burnt out, we will answer - it is possible. But in the case of a “tweeter”, that is, with a high-frequency speaker, this can only be cured by replacement, since such speakers have a closed diffuser basket and it is not worth trying to disassemble it. This item is disposable.
The damage is determined by hearing. If the speaker stops clicking, that is, producing high frequencies, or the top speaker produces a grinding noise, then the problem is in the “beeper”. What we do:
- Open the cover by unscrewing the fastening screws.
- We check the integrity of the soldering on the contacts of the low-frequency speaker, that is, whether the wires have fallen off from the contacts of the speaker. If everything is normal, then the problem is 100% in the tweeter itself.
- We unsolder the conductors from it, noticing which wire was on the plus and which on the minus (there are symbols on the side near the contacts).
- We take a new (or used, but working) tweeter from a radio equipment store or from friends, if someone has one lying around. The main thing is that the speaker matches the power. It's best to take it with you to the store. People there, if anything, will find an analogue in size.
- Let's put it in place. In order for the speaker to work without extraneous noise and produce high-quality sound, it is best to seat the speaker around the circumference on the sealant, making sure that it never gets on the diffuser funnel.
- Solder the wires. Plus - to plus, minus - to minus.
- Close the column cover by tightening all the screws.
- Let's check. Everything works great.
Repair recommendations
The general rule is to start with simple actions. It makes sense to open the case, check the circuit with a multimeter and look for the failed element after external causes have been completely ruled out.
The devices may be working properly, but there is no sound due, for example, to the fact that the plug has fallen out of the socket;
- If everything worked fine and the sound suddenly disappeared, check all connections: plugs, plug. If there is a connection to a plugged-in laptop, make sure there is electricity. The laptop runs on battery power, and you may not immediately notice that there is no light;
- If the indicator lights up properly, indicating that they are on, but there is no sound, check the volume control. It may be set to minimum and that's why you can't hear the quiet audio;
- If one speaker sounds and the other does not, check the sound settings on your computer. The balance slider should not be strongly shifted in any direction; its normal position is in the middle of the scale;
- Check if the headphones and, preferably, the microphone connected to the computer are working. If both of these devices function normally, the problem really lies in the speaker system;
- connect the devices to your phone or player. If they work, this means that the problem is not with them, but with the computer’s sound card or software;
- If there is noise, make sure the plug is inserted into the correct socket. You also need to check if the settings have gone wrong;
- The noise may also be a result of speaker damage. It is necessary to check its integrity after the reasons described in the previous paragraph have been excluded;
- You can check the speaker without a multimeter, but if the problem turns out not to be the speaker, it will be difficult to move on without this measuring tool;
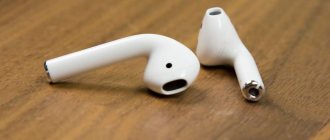
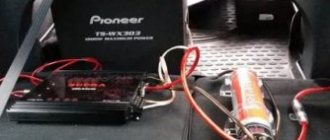
- To test the speaker, connect its contacts to a regular 1.5 V battery, plus to plus, minus to minus. If the speaker is working properly, you will hear a rustling sound and notice a slight shift in the diaphragm;
- when it becomes clear that the problem lies in the hardware of the speakers, you need to “ring” the circuit with a multimeter and find the failed element;
- During repairs, wires should only be connected by soldering. You can't just twist them or use terminals;
- All wire connections must be insulated; you can use electrical tape.
Failure of the midrange speaker
This speaker can be repaired if the membrane that holds the diffuser in the center comes off or if debris gets inside the circular slot of the magnet in which the diffuser coil runs. In this case, the speaker wheezes. And if only one of the three speakers wheezes, then that’s the only problem. We will tell you below how to fix a music speaker in these cases. If you don’t want to bother with repairing the speaker, but want to replace it with another one of the same or its equivalent, proceed in the same way as in the case of the “tweeter”.
Checking the speakers
If the power supply is working, you should check the speaker coil for open circuit with a digital multimeter.
The resistance of speaker coils most often lies in the range of 4 - 8 ohms.
Its size is usually carried by the speaker housing.
If it is less, then there are short-circuited turns.
In this case, the loudspeaker will no longer work normally.
If the coil resistance is very high, the coil is broken. These speakers must be replaced.
There is no point in repairing them.
Separation of the spider (diffuser centering washer)
How to repair a speaker on a column if the membrane of the centering washer is torn off? We proceed according to the following instructions:
- To diagnose the problem, remove the cover.
- We unscrew the problematic speaker from the case by unsoldering the wires from it. If the speaker has a plug to the board, disconnect it.
- We examine the spider. If it is torn from the basket body, it should be glued in place. This is done using Moment glue or something similar.
- Carefully clean the area in a circle where the membrane is glued. Debris should in no way get into the diffuser coil slot, so it would be best to soften the old glue with acetone and simply wipe it off with a cloth.
- Let it dry.
- Glue the centering washer into place. Before the glue hardens, center the diffuser. When pressed, the coil should move freely in the slot and should not make any extraneous grinding sounds. Otherwise, the repaired speaker will wheeze.
- After 24 hours, you can reassemble the column in the reverse order as you disassembled it.
- We connect and check. If everything is fine, enjoy. If it wheezes, either there is debris in the coil slot, or the coil winding itself is damaged due to rubbing against the walls for a long time without a spider. Then read on.
How to disassemble a Chinese copy of jbl charge 2?
Often, after ordering on aliexpress and after receiving the package, jbl often encounters connection problems.
After a visual inspection, it becomes clear that there are not a single screw on the outside (they are not visible). Therefore, the question arises: “how to disassemble a Bluetooth speaker”? It seems that the case is glued together and after disassembling it it will not be possible to assemble the parts. But that's not true.
First of all, prepare screwdrivers of different sizes. Then peel off the rubber pads. They are glued loosely, so it will be very easy to tear them off. The bolts are located on the back, they are hidden by a decorative grille. It can be removed easily, just use a screwdriver
Be careful because... Removal may damage the coating. You will find 6 bolts that can be removed using a Phillips screwdriver
After that, open the column, there will be two parts in front of you. You will see a small battery, the question immediately arises: how can the speaker work with such a battery? There is a board on both sides, with connectors on the sides.
It is not difficult to disassemble the device; it is assembled in the reverse order.
How to fix the charging connector
JBL does not have specific recommendations or instructions for disassembling the device. Newer models have no visible fastenings. This is done to ensure maximum safety in wet or dirty conditions.
For an example of opening a portable speaker, here is a video disassembling the device from the Beeline company.
Garbage coil getting caught in gap
This can also be treated, but here you will have to tinker longer and it is not a fact that you will be able to properly remove the diffuser and clean the slot from dirt, and then put it back on the glue. How can you repair the column in this case:
- Open the lid.
- Unsolder (disconnect) the wires and remove the speaker.
- We take a cotton or other rope, soak it in acetone and place it around the perimeter of the contact of the upper part of the diffuser funnel with the basket body.
- We do the same with the centering washer, since the diffuser will have to be completely dismantled.
- When the glue softens enough, carefully tear off the diffuser from the upper rim of the basket, and the spider from its bed circle.
- Remove the diffuser and clean the slot from debris. This can be done with a compressor, a vacuum cleaner, or various mechanical devices, for example, cardboard. Under no circumstances should you poke into the slots of the magnet with pieces of iron. If you scratch the surfaces of the walls, the speaker will squeak as the coil rubs against the burrs.
- When everything is clean, we reassemble the speaker in the reverse order as we disassembled it.
- After immersing the coil magnet into the slot, before firmly seating it on the glue, the diffuser should be carefully centered so that no squeaks are heard when the diffuser is immersed down. The coil should move silently in the slot.
- Next, let the glue dry for 24 hours, assemble and test. If everything sounds great, you're doing great. If not, then you're still great. At least they tried. But the speaker will have to be replaced with a new one.
Leaking pipes
If water begins to drip from the column, perhaps the reason is that fistulas have formed on the copper pipes. In order to find the location of the leak, you need to carefully inspect the heat exchanger with the water turned off. Some fistulas are easy to find; you will see water coming out of these places. Small holes can be seen by the green spots and rust around them.
There are three ways to fix a leak:
- Install a clamp with a rubber gasket. If space allows and the pipe does not fit tightly to the casing, the simplest, fastest and most effective way is to install a metal clamp with a rubber gasket. Despite its simplicity, this method allows you to eliminate the leak without damaging the structure.
- Solder the fistula.
Having previously cleaned and degreased, the leak area is covered with flux. After this, using a powerful soldering iron or a torch with a gas cylinder, the fistula is soldered. In this case, it is necessary to ensure that the solder covers the desired section of the pipe with a layer of 1-2 mm. If several holes are nearby, it will be effective to solder a piece of copper plate. It is not recommended to solder cheap Chinese heat exchangers. They are usually painted on top to hide the uneven color of copper with impurities. In such columns, the pipes are too thin and will burn through during soldering. - Use cold welding. It is important to carefully look at the instructions and make sure that it can withstand high temperatures. A piece of cold welding is taken out of the packaging and kneaded with gloved hands until it begins to harden. After this, it is applied to the pipe and smoothed until it hardens completely.
After soldering is completed, water is turned on to the water heater to check it. It is advisable to additionally clean and solder all areas with a greenish tint. Perhaps, over time, new fistulas will appear there.
A leak can also form due to worn gaskets. If water leaks from the pipe joints, you should simply replace the gaskets there with new ones.
Speakers
How to fix computer speakers, you ask. We will answer. Computer speakers are all active, that is, with built-in amplifiers. Most often, the sound chips in them burn out. If the power light is on, then the power supply is OK. Most likely, the speakers themselves are fine. And you will have to desolder and solder the microcircuit. It can burn out, and more than one, the resistor, capacitor, etc. can burn out.
Since our article is being written for those ignorant of radio engineering, we will not describe how to fix this problem. Here it is best to turn to the experts. Where can I get my computer speakers repaired? At any service center. Everything will be done there inexpensively and quickly. But, often, some models of speakers cost so much that it is better to buy new ones, because, no matter how cheap it is, sometimes for repairs (if it is not under warranty) they will charge half the cost of the speakers themselves.
Eliminating rustling noise in speakers
The most budget models of audio systems are equipped with adjustable potentiometers. These are the most common resistors that have resistance adjustment. Using a special slider, the physical value of electrical resistance changes. New and high-quality speakers provide silence during such actions, but the lubricant in them dries out over time, which leads to the appearance of foreign sounds and sparks transmitted through the UMZCH.
In order to solve this problem, you need to acquire a special tool and lubricate the “track” in the potentiometer with it. If you don’t want to tinker with the insides, you can take the equipment to a service center and replace the annoying part for a small amount.
But if you have read up to this point, then most likely you will fix all the problems yourself. Repairing computer speakers with your own hands will not only help you save money, but will also provide a unique and useful experience for future equipment repairs.
Lubricate the volume control
First you need to disassemble the column in which the potentiometer is mounted. Using a soldering iron, it must be desoldered and disassembled. Difficulties at work depend not only on you. The manufacturer very often fails in production.
After all disassembly you need to do the following:
- We remove the old agent from the potentiometer track.
- We clean the entire surface area from dirt and dust accumulations. It is best to use a regular school rubber band.
- Take technical Vaseline and apply it to the path.
- All that remains is to assemble the volume control and solder it back.
Reasons for the lack of flame on the wick of a gas water heater
- The air supply hole in the wick is clogged. This hole allows air to flow in to ensure combustion of natural gas at the igniter tip.
- The solenoid valve coil has burnt out. An electric magnet holds the valve stem; if it breaks, the valve will close.
- The thermocouple has failed. The thermocouple, while in the flame, generates voltage that is supplied to the electromagnet.
- The sensors for monitoring the water temperature and the state of the chimney (presence of draft) are faulty. At values up to + 82 0C, the sensor is in the closed position; above this temperature, its bimetallic plates diverge and the circuit opens. The normal contact between the two plates can be disrupted by surface oxidation, mechanical or thermal damage.
- The electrical circuit of the flame control system is broken. All elements of the flame control system are interconnected by wires. Their malfunction will inevitably lead to disruption of the entire system.
- The nozzle or gas supply tube to the wick is clogged. The inner diameter of the tube is 2.5 mm (external 4 mm) and the nozzle outlet diameter is 0.1 mm. These elements can become clogged with soot, dust, etc.
- The operation of the piezoelectric element is disrupted, the spark from which ignites the gas.
Installation of a gas boiler with an indirect heating boiler
Instructions for Genius SP-HF160 Black
Description: How to disassemble genius speakers - Programs, games, music on our service. Compulsory medical insurance policy is a document confirming the right of a citizen to receive free medical care services in the scope of the basic compulsory medical insurance program throughout the Russian Federation and the territorial compulsory medical insurance program in the territory of the subject of the Russian Federation in which the compulsory medical insurance policy was issued. According to the Federal Law, the production of compulsory medical insurance policies of a uniform standard is organized by the Federal Compulsory Medical Insurance Fund of the Russian Federation, and their issuance to insured persons is carried out, as before, by insurance medical organizations in the manner established by the rules of compulsory medical insurance. The issuance of uniform policies throughout Russia will take place gradually.
How to disassemble the genius sp u speakers you can open the computer speaker SP-U are quite compact and do not take up much space. After the rally, Odessa pensioners responded smartly with a small, lightweight Bluetoot h SPBT stereo system that you can take with you anywhere.
Main types of faults
Failures can be of different types:
- Program.
- Hardware.
If there is no sound from the computer speaker, then the cause may be an incorrectly installed driver. If after installing the operating system you did not install additional drivers, then the speaker may not work. If the speakers on your computer do not work, then you just need to go to the supplier’s website and download the latest updates.
If you are still undecided why the sound on your computer speakers does not work, then perhaps the reason is in the device. To deal with these breakdowns you will need certain skills.
In order to fix the speakers you need to check the device with a multimeter. The cause of their failure may be a broken plug. Read how to repair a fork yourself.
List of main problems and ways to solve them
Navien boiler.
59 photos of wall-mounted gas product Ace and diesel dual-circuit version, reviews from owners First, it’s worth mentioning what to do if the gas water heater breaks under warranty. In this case, everything is simple - you must contact the service department of the store where you bought the device. It should be repaired free of charge. If the warranty has expired, you will have to pay for repairs. Its cost depends on the manufacturer of the water heater and the type of breakdown.
Let's look at the most common problems that arise during the operation of the device.
Lack of traction
If there is a lack of traction, the corresponding sensor is triggered, which blocks the gas supply. This happens if the chimney or ventilation becomes clogged. Debris, leaves, or a sooty layer can build up there. Another symptom of a clogged chimney is the inability to light the device’s pilot light. You can also test using a lit match or piece of paper.
You can improve traction by cleaning the pipe. To do this, contact the housing and communal services or management company. They should send a drain cleaner. You can also contact a commercial company specializing in this type of activity.
The chimney is cleaned as follows:
- vacuum equipment is used to extract dirt;
- Mechanical cleaning is performed using a special cable with a brush at the end.
For serious blockages, chemical cleaning methods are used, which involve treating the pipe walls with special preparations.
Discharge of power elements
If your gas water heater is ignited using batteries, then in about a year they will run out. Therefore, if the water heater does not light up, the first thing to do is check the battery charge.
If this does not help, then we check the device for other breakdowns.
Lack of water pressure
If the gas water heater does not have enough water pressure, it will not start
Therefore, it is important to test it and open the cold water tap. If it flows out in a thin stream, you need to contact the city water utility or housing and communal services
A plumber will arrive and determine the water pressure, and also find the reason for the decrease in its pressure.
If the cold water pressure is fine, you should look for a clog that is reducing the water pressure. The problem is often caused by:
- strainer clogged;
- stretching of the gasket in the water unit;
- scale build-up in the heat exchanger;
- clogged hot water pipe;
- leakage in the radiator.
There are two ways to clean the filter, pipes or heat exchanger - yourself or with the help of a specialist. If a leak appears in the circuit, the part should be replaced with a whole one.
Gas burner contamination
During operation, the burner device becomes clogged with soot and soot. As a result, the fire has an unnatural red or yellow color, sparks, or does not ignite at all. To clean the burner, it is not necessary to call a service center specialist; you can solve this problem yourself. If desired, the burner is removed and disassembled, and all contaminated elements are cleaned in a special solution.
Gas is not supplied
If the gas heater is broken and does not ignite, then there may be no fuel supply. This will help determine the absence of the gas supply sound, which usually occurs when the burner is turned on. It is recommended to check the gas valve - it may be closed. If there really is no fuel, you need to contact the gas supply company. She will send a gas technician who will check the quality of the connection of the device to the main line, the integrity of the pipeline and supply hose, and the fuel pressure in the system. The specialist will identify the cause and quickly eliminate it.
It is important to handle the gas device carefully, to prevent damage to the pipes and blockages in the water heater components.