A new headset does not always start working correctly after inserting the plug into the correct connector on the computer. Often additional settings are required, for which you need to know how to turn on the microphone on the headphones. In addition, you need to check the functionality of the device using Skype or another application.
Types of plugs
First, determine which port the equipment will be connected to.
To do this, you need to understand what type of plug the device has.
There are 3 types of audio headsets:
- Combined devices (headphones and microphone). The cable is equipped with 2 plugs: green and red. The wire has 2 contact pads for the right and left ears.
- Headphones and microphone (combined devices). They differ from the first type by the presence of a single plug. There are 3 contact pads on the cable - for 2 headphones and a microphone. Mobile wired headsets have this connection scheme.
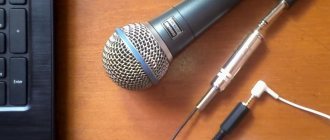
- Separate headphones and microphone. The system consists of 2 independent devices: the first has 2 contacts, the second - 1. The components can operate separately from each other.
Content
- The first stage is preparatory. Let's look at two types of 3.5mm jacks: combined and “separate” What separate audio outputs look like
- What does a combined audio output look like?
- Setting up standard 3.5mm headphones
1.
Step-by-step instructions for connecting and setting up a microphone on headphones
The connection method depends on the type of computer ports.
Connection to separate connectors is done as follows:
- Insert the device plugs into the corresponding connectors on the computer case. Combined devices are connected using an adapter. The red port is for the microphone, and the green port is for headphones. They are located next to the USB connectors.
- Check the functionality of the headset using a program such as Skype. If no errors occur when using the desired functions, the connection is correct.
Combined connectors on laptops and desktop PCs are rare. You can connect both separate and combined devices to them.
The connection principle will be as follows:
- The plug of separate devices is connected via an adapter. If this is not done, only 1 of the components will work.
- The combined headset is connected directly. After this, they move on to setting up the system.
Variety of plugs or correcting incorrect connections
Before buying headphones, check how many audio and microphone connectors are in your system unit. Modern computers and laptops have a combined jack that transmits both signals through one input.
Older system units have separate microphone and headphone jacks. In such a situation, you need to purchase a headset with two plugs. They will be in different colors:
- pink or red – microphone;
- green – headphones.
Recommendations: How to set up headphones for high-quality sound reproduction
, How to properly set the equalizer (for headphones)
How to make a microphone from headphones
They must be connected to the computer by color into the corresponding sockets. If you bought a headset with one wire, but the system unit needs a model with two, you can buy a special adapter. On one side it will have an input for a combination jack, on the other - two outputs with plugs of different colors. The cost of such a cord varies between 300 - 500 rubles.
Settings Features
The order in which the procedure is performed depends on the version of the operating system.
On Windows 7
To set up a microphone on a computer running Windows 7, follow these steps:
- Open the start menu, find “Control Panel”. Select the “Sound” section.
- Go to the “Recording” tab. Select the name of the desired device, right-click on it, and set it as the default microphone.
- If the microphone produces a quiet or excessively loud sound, adjust the sensitivity. The same action is required when interference occurs. To do this, select the “Properties” option in the context menu. Check the box next to the listening item and select the connected headphones. This way the sound from the microphone will be delivered with a slight lag, which will allow you to configure it correctly.
- Select the desired sensitivity in the “Levels” section. Move both sliders, and if interference occurs, reduce the gain. After finishing work, turn off the listening mode.
On Windows 10
When using the latest version of the operating system, there is also a need to configure audio devices.
To do this, perform the following steps:
- Open the “Options” menu section and find the “Privacy” item.
- In the “Microphone” tab, check that the device is connected correctly and that the required checkpoint is present.
- If some applications are prohibited from using a headset, the restriction is removed.
- Click on the speaker icon on the taskbar. In the “Sound” section, select “Recording”. Sets the microphone in use as the default device. Right-click on it, open the properties menu, and adjust the volume. When the system reports that the component is disabled, click on it again and perform the “Enable” action.
Sound from speakers to microphone
As a result, a window with the settings of the microphone you have selected will open. Here all the settings are located on several tabs. The most important settings start with the Listen tab. The “Listen from this device” function is available here. If you turn it on, the sound from the microphone will be transmitted directly to your speakers.
Possible problems and their solutions
When configured correctly, sound begins to be recorded and played back automatically.
If this does not happen, try to troubleshoot:
- Check the functionality of the computer and headset ports. If the latter does not work, try connecting it to a smartphone or tablet. If the headphones are working correctly, proceed to the next stage.
- Adjust the volume mixer. To do this, open the corresponding item by right-clicking on the speaker icon. They look at the sliders while speaking into a microphone or playing a piece of music. The volume scale begins to fluctuate. If this does not happen, the devices are not connected correctly.
- Download drivers for audio components. If you recently installed Windows, you may not have the necessary software tools. To download them, open the “Device Manager” and find the “Sound Card” item. Copy the contents of the first field and enter it into the search bar of the browser. Download drivers from the developers website. Reboot the computer.
Video material on the topic
To make it easier for you to understand the sequence of actions, watch the video about microphone settings on Windows 7:
Topic materials: 5 best GAL headphones
, 5 best headphones under 1000 rubles
5 Best Stereo Headphones
6 Best Surround Sound Headphones
8 Best JBL Headphones
How to disable Headphones mode on iPhone
How to connect wireless headphones to your phone
, How to use wireless Bluetooth headphones, Do-it-yourself headphone repair
Tips and tricks
Correct configuration helps to avoid problems with the operation of audio components.
The following tips will help you do it:
- When using a separate sound card that is not integrated into the motherboard, a setting is required in the proprietary menu. Sometimes it is necessary to reinstall drivers. To do this, use the sound card manufacturer's website.
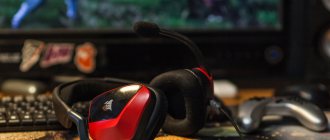
- Some models of gaming headphones are equipped with regulators. You need to check if the volume is reduced.
Unlike wireless headsets, devices with cables often stop working after sudden jerks. The problem lies in the damage to the wire; the system setting in this case is ineffective.
How to mute the microphone in headphones
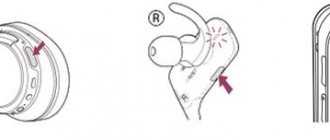
The headphones are turned off in the same way as they are activated:
- In the Task Manager: expand the “Audio inputs and outputs” branch, right-click on the microphone to disable it.
- In the settings of the audio recording device, check the box next to “Disable”.
Here, go to “Additional properties...” and select “Do not use...”.
- In the volume settings (Control Panel), right-click and select the “Disable” command.
If the microphone is turned on by a switch, move it to the appropriate position.
Connecting AirPods to iPhone
To connect AirPods you don’t even have to go into the settings, everything is extremely simple. They will connect automatically as a result of three simple steps:
- Open the Home screen on iPhone
- Open the charging case with headphones and place it next to the smartphone
- Click the “Connect” button in the animated window on the iPhone screen and wait for a notification about a successful connection
Connecting AirPods to iPhone when approaching
USB headphones
An audio device with such a connector will have to be turned on additionally. But first, it’s better to make sure that the drivers are installed correctly and the USB port is working.
Follow this plan:
- In the tray, right-click on the speaker icon and select Sound Options.
- In the window that opens, select “Generic USB Audio Device” (the name may be slightly different).
- Click on the device, selecting the “Default” mode.
- Confirm with the "Ok" key.
After such manipulations, the sound should be supplied through USB headphones.
To return to the speakers, follow the same steps and change the default settings back.
Why doesn't my JBL microphone work?
This situation often happens to iPhone users, since even with TWS headphones connected, the sound goes into the phone’s microphone by default. On the latest Android firmware, with JBL turned on, you will immediately hear the voice of the interlocutor in the mic of the headset.
Let me make a reservation right away that I am excluding purely technical operational problems from this article. If you've recently spilled water on your JBLs or dropped them, it's definitely time to take them in for repairs. To understand what type of malfunction - software or hardware - try connecting JBL headphones to a laptop or other smartphone. If the microphone works in them, then it was a problem with the settings or a synchronization error with the previous device.
What is your opinion: is WiFi harmful?
Yes
22.91%
No
77.09%
Voted: 36567
Configuration via Sound Manager
The most common manufacturers of integrated sound cards, Realtek and VIA, supply them with drivers with a sound manager for configuring sound and recording. Open via the tray icon or Control Panel.
In the settings, go to the tab with recording equipment.
Here you change the recording volume and sound amplifier, the quantization frequency, and turn on and off the noise and echo reduction options.
Also here, up to four profiles with different configurations are created.