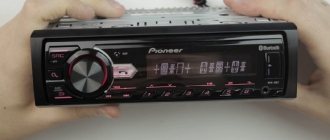
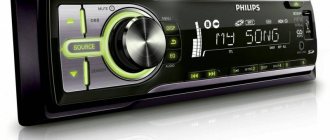
Installing a radio in a car can be simple and quick, or it can be done correctly. With minimal skills in working with electricity, you can easily handle it yourself. But in every case there are nuances. Incorrect installation can result in distorted sound, failure to save settings, and in the worst case, fire. Find out how to properly connect a radio in a car in this article.
This is true; incorrect connections often lead to problems. So this is:
- Using a small gauge wire results in a drop in voltage and current when listening at high volumes. This means distortion of the sound, complete shutdown of the radio, overheating of the wire and fire.
- Long-term parking leads to incomplete or complete discharge of the car battery, making it impossible to start the engine.
- Turning off the ignition results in loss of settings.
To prevent this from happening, you need to do everything correctly, starting with the selection of wires, then deciding on the connection diagram and finishing with installation.
What wires to use to connect the car radio
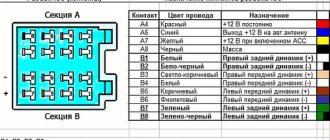
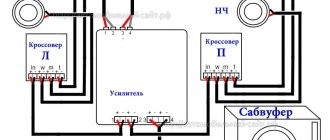
To begin with, a typical diagram for connecting a radio with color pinout of wires is given. It is standard, but may vary in some colors for connecting speakers. This is to make it clear what the conversation is about.
Typical radio connection diagram
A diagram with the purpose of the wires and their color is shown on the top cover of almost every radio. It can be in both Russian and English. Where everything is more or less clear, but if it is given in English, then here are some explanations:
- FRONT - frontal (side).
- REAR - rear, rear.
- LEFT - left.
- RIGHT - right.
- +12 V, Battery, Memory, YELLOW - yellow power wire. It goes to the amplifier through a fuse; it is needed to power the memory, that is, to save settings. But it is advisable to install another fuse 30 centimeters from the battery to protect the wire and device;
- ACC, DC12V, RED - red. Controls switching on. On modern cars there is a key position in which all systems are de-energized except for some. The operation of a multimedia system is one of them.
- GND - black, body or minus of the car.
- GREEN - green.
- GRAY - grey.
- WHITE - white.
- BLUE - blue.
- BROWN - brown.
The first thing you need to do is stretch the wires, power, controls and audio systems. The wires must be reliable, with good insulation and with a selected cross-section.
The power supply of 12 - 13 volts is small, but the currents are solid. With a conventional audio system, it is assumed that there are a couple or two speakers, the current consumption will be up to 10 A. Most tape recorders have a 10 ampere fuse.
Which cable to connect the car radio to power
First. When choosing wires, look at the wire cross-section. The table below shows the correspondence between the conductor cross-section and fuse current, and for comparison, in the American measurement system (AWG).
Table for selecting wire cross-section based on fuse current
With a fuse current of 10 A, according to the table, 1 mm² is sufficient. Mathematically, everything is correct, but I assure you this is not enough. By stretching a wire with a cross-section of 2.5 mm² at full volume, you will see a decrease in the brightness of the radio backlight.
It's all about cable resistance. To connect a tape recorder from a battery you need at least 2 meters of wire. And even though copper has the smallest resistivity, it still has an effect. Take stranded copper wire with a cross section of 4 - 6 mm².
There are also silver wires, but they are very expensive. Don't even try Chinese aluminum ones.
The second important point is isolation. It should be thick and flexible at the same time. And it is better if it is a cable rather than a wire. Cables with the same cross-section have a stronger sheath. For flexible cables, the first position in the marking may be the letter “G”, which indicates that the cable is multi-core and flexible. For example, KG is a flexible cable. Has rubberized insulation.
Example of a reliable connection to the battery output
To connect the car radio, it is more convenient to use multi-core wires. All connection points are in different places, so two or three wires are not needed.
Installation in the car
Installation of the radio begins with the removal of the decorative plugs covering the mounting socket in the center console. To mount the head unit, metal clips are used, which are held in the instrument panel by bendable antennae. If the car was equipped with a 1 Din-format radio, and you plan to install equipment with increased dimensions, then a box for small items is removed from the console. It is not possible to install a 2 Din standard player on some machines, or the installation of a new console will be required to accommodate the unit.
To install a radio instead of the original equipment, it is necessary to install adapter brackets that allow you to attach the tape recorder to the power frame of the dashboard. Installing a non-standard radio requires the use of a decorative frame that allows you to fit a rectangular front panel into a hole with beveled edges or rounded corners (depending on the type of car). The additional element is installed by hand and does not require modification of standard parts from the machine.
Connecting speakers
Connecting the radio to a car equipped with standard acoustics does not require laying patch cables. The owner will need to directly connect the plugs to the mating connectors on the head unit or use an adapter. If speakers are installed simultaneously with the installation of multimedia equipment, then signal cables will need to be laid. Depending on the design of the car, acoustics are installed in the doors, instrument panel or shelf located behind the back of the rear row of seats.
To connect the acoustics to the head unit, a special-purpose stranded copper wire coated with an elastic insulator is used. On the speaker body there are positive and negative contacts with symbols. The connection diagram for the car radio provides for connecting loudspeakers in compliance with polarity; connecting negative cables into a common bus is prohibited. Since the wires come without a chip, it is necessary to provide a plug that will ensure a reliable connection.
Antenna connection
Once the power cables and speaker patch cords have been connected, the antenna plug should be reinstalled. On some cars, the cable with the connector is folded deep into the instrument panel; the owner needs to pull the cord to the installation site himself. Standard antennas are equipped with frequency filters that eliminate interference and increase the range of signal reception from repeaters. The factory unit is connected using a plug that is installed in the mating socket on the back of the car radio.
If the car is not equipped with an antenna, then many owners connect an active type device that is mounted on the windshield. The built-in amplifier requires power, which is provided by the output in the player's jack, marked AMP or REM. After connection, the junction point is protected with insulating tape. At this stage, the procedure for installing the radio in the car ends; the owner can test the operation of the equipment.
Safety
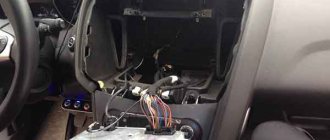
Regardless of which car radio connection scheme you choose, you will have to pull at least one cable from the battery through the partition into the passenger compartment. A standard hole is sometimes provided for this purpose. In theory, the edges of this hole should be covered with a plastic or rubber bushing. Because even a non-sharp metal edge will wear out the insulation due to friction. We check the condition of the rubber or plastic and change it if necessary.
Standard hole edge protection
At the same time, inspect the other wires that are already lying here. Contact between exposed (damaged) wiring and the car body should not be allowed.
We stretch the wiring throughout the cabin so that the risk of damage is minimal. All areas where damage is possible (even theoretically) require additional protection. Use plastic or rubber pads, bushings, etc. Even 5–10 A is already serious.
Do not connect the negative speaker terminal to the car body. Modern amplifiers in a tape recorder have a different design. By attaching a speaker in this way to save on wires, you can damage the amplifier.
Fuse
To connect the “plus” of the radio, you will need a stranded copper wire with a cross-section of at least 4 mm2. Its length should be as short as possible - without unnecessary zigzags and other things. Connecting a Sony car radio always implies the presence of a fuse on this wire with a rating of 10-20 amperes with good insulation.
It is usually installed at a distance of 50 cm from the battery terminal. Sometimes such a fuse is already provided by the manufacturer, and some of the hassle is eliminated. The negative wire should also be as short as possible.
The wires must be laid extremely carefully, without any twisting and as far as possible from third-party energy consumers such as an alarm system or a trip computer
It is important to note that these wires need to be connected only after all speakers are completely connected and insulated. Never allow the exposed “plus” to touch other devices.
It must be “tightly” insulated.
Connecting a car radio if there is an ISQ connector
The general standardization of recent decades is not such a bad thing. If you have a relatively new car, it most likely has a block near the “seat” for the car radio for connecting it. It is made according to the ISQ standard and connected to the car’s electrical/audio system. In this case, connecting the car radio is the simplest - connect two connectors and everything should work. True, you need to know which connector on the car to install the adapter in, but this should be in the description of the car... Or you can try to understand it by the inscriptions next to the sockets.
The car radio should include an adapter for the ISQ Euro connector.
If the car radio does not have such an output, then it needs an adapter from the standard connector to ISO. More or less serious manufacturers make such a connector or there is an adapter included with the radio. If you don’t have it, you can buy it or you will have to look for it exactly for your brand/model of radio, which is problematic.
ISO connector
It is much easier to purchase an adapter and, guided by the colors and pattern given on the cover, hook up the radio.
Pinout of the ISQ Euro connector for connecting a car radio
You can, of course, connect the radio without a plug. It is enough to understand the terminals on it and connect (or stretch the wires to the speakers) without confusing the plus and minus of the speakers with the amplifier outputs. However, using a chip simplifies the connection when you need to replace the radio.
How to connect?
To work, you will most likely need pliers, a screwdriver, electrical tape, a multimeter (optional), and also care when dismantling the decorative panels of the interior. When replacing an old radio with a new system, there should be no problems, because the speakers are installed, all that remains is to simply replace the device itself. All you have to do is check the integrity of the wiring, as well as the correct connection of the speakers.
The only problem may arise if the new audio system has different connectors for connection. But, as a rule, there is a single world standard, namely the ISO connector. But, if something happens, you can always buy the required adapter; there is plenty of such “good” in stores and markets. It is possible that the new radio already comes with several adapters; carefully inspect the contents of the box.
When you first connect the radio, pay attention to which wires are suitable; they must be made of oxygen-free copper, with a corresponding cross-section of 2-4 mm. https://www.youtube.com/embed/3YR_CHvgTgo
Radio connection diagrams
Not all models of domestic cars have a key position in the ignition switch in which it would be possible to turn off the power to the car's electrical equipment and remove the key. For example, position “0” for a VAZ 2107. In this position, when most consumers are turned off, the key is not pulled out.
A lock with an “ACC” position is only available on later models. Therefore, in order to protect yourself from battery discharge during prolonged inactivity, it is better to use one of the proposed schemes.
Connection to the ignition switch of imported cars
This method is “correct” for imported cars and “wrong” for domestic ones. The fact is that in imported cars there is a special key position in the ignition switch, signed ACC. When the key is in this position, power is supplied to the car radio, but the starter is not activated.
So, if you connect the car radio to the system of an imported car without an adapter, you need to:
- Connect the plus from the car battery (usually yellow) to the corresponding socket in the car radio.
- The second connection point is the ignition switch terminal labeled ACC and the same connector on the radio.
Diagram for connecting a car radio to the ignition switch of an imported car. The diagram is more than simple and understandable. The tape recorder will work either while the motor is running or if the key is in the ACC position. If the key is in the neutral position, nothing works, there is no loss of charge.
In any circuit, it is worth installing a fuse in the voltage supply circuit from the battery (yellow wire). Even if it is at the input of the radio. It's much easier to replace the fuse on the wire than to look for what's burned out in the radio.
What will happen if you connect it to a domestic car using this scheme? That is, stretch one wire from the battery, and take the second from the ignition switch. The radio will only work if the ignition is on. The engine was turned off -
To the battery via a button
Sitting in the car in silence, or listening to the radio with the ignition on is not the best choice. Therefore, when connecting the radio, they try to ensure that it works even when the engine is turned off. One way is through a button that turns on when the engine is off. When turned on, it supplies 12 V from the battery to the second input of the radio, thereby ensuring its operation. When the motor is running, the button should be off. Then the device operates according to the classical scheme.
How to connect a car radio so that it works without the ignition
The disadvantage of this method is that you will forget to disable the button. And this accelerates the “drawdown” of the battery. As an option, install a button backlight in the circuit. It will light up when the button is turned on, reminding you to turn on the power.
Self-retaining, correct operation scheme without ignition
This is one of the best ways to turn on a car radio in domestic cars. To start, you need to turn on the ignition. The device will start working and will work until you turn it off with the button. There will be power from the battery, but there will not be 12 V from the ignition switch and the device will go into sleep mode with minimal consumption. To turn it on again, you just need to turn on the ignition, and when the radio starts working, you can turn it off again.
Connecting a car radio with and without ignition
As you can see, for such a connection you will need two diodes with an operating voltage of more than 12 V and 300 mA. Turn them on towards each other - as in the diagram. Connect one end of this bundle to the output of the ignition switch. Connect the middle point (the junction of the two diodes) to the red wire. Connect the free end of the diode bundle to the antenna output (usually blue and white).
How does this scheme work? When the ignition switch is turned on, power flows through the diode and through the middle point is supplied to the +12 input. The ignition is turned off, and power is supplied through the second diode from the antenna terminal.
Connecting a car radio through an alarm system
There are two types of car alarms. The first is when -12 V appears when the alarm is disarmed, the second is when it is armed. The second option “without bells and whistles” will not work, since the radio will turn on when you arm the car. But with the first one - when the minus appears when the signaling is turned off - you can connect the car radio according to a simple circuit.
Connection diagram for car radio power supply via alarm system
If minus 12 V appears in the alarm after disarming, connect the terminal on which it appears to the relay coil. The second contact is powered by the battery. When the alarm is turned off, the relay is activated and supplies a positive signal to the tape recorder.
If a minus appears in the alarm when setting the alarm, then it is better to use a circuit with a button or implement another option.
How to connect an antenna
To connect a radio receiver, you must additionally install and connect an antenna. Most often it is located on the roof or fender of the car. A stronger and more stable signal is provided by an additional amplifier, which is located in the switching circuit. Power is supplied via a separate cord. The connection diagram depends on the model of the head unit and the technical design of the amplifier itself.
In a 2 DIN radio, the round ANT connector is responsible for connecting the antenna. The wire with positive polarity is connected to the red cable, which is responsible for supplying voltage. The negative cord is connected to the body panel.
Incorrect battery connection
There are a couple of possible connections that are popular but are incorrect. They are attracted by the simplicity and speed of execution. However, I would like to warn against using them.
Connect the red and yellow wires on the radio
In order not to make mistakes, you need to know what not to do. Often in domestic cars the car radio is connected only to the battery. Both input connectors are supplied with 12 volts from the battery. This is the easiest way to get the radio to work without the ignition, but it's not perfect.
Incorrect battery connection diagram
This method does not affect the performance of the radio. But, if you turn it off with a button, current will still be consumed. There is power as long as the car’s battery is alive and the device is always “in operation”.
The disadvantages are obvious - the battery drains faster if it is old. However, with a good battery, it will take weeks to discharge it to a minimum.
This method is good when you need to quickly check the performance of the radio. By applying a minus to the black wire and connecting the yellow and red wires to each other, when you press the power button it should turn on. You can check the sound by connecting any working speaker to the wires from the amplifier, for example, purple and purple with black.
From the cigarette lighter
Since the radio is located next to the cigarette lighter, there is a temptation to supply power from it. It’s easier, you don’t have to look for contacts and connectors. But you shouldn't do that. When using the cigarette lighter, the radio experiences interference.
The second disadvantage of this scheme is the “wrong” sound. If the speakers are powerful, you don't need to have a special ear for music to notice the difference. It really hits the ears.
Installation of a new device
Using an adapter
To insert the body of the new car radio into the dashboard niche, you need to repeat the dismantling operations in the reverse order. In new cars with “audio preparation”, it is enough to compare the connectors of the head unit and the car wiring of wires from the battery and speakers. Each of the well-known car audio brands uses connectors of its own design, which differ in configuration
If the connectors of the car electrical wiring and the new car radio match, it is enough to connect them and insert the head unit housing on the slide into the niche. For mismatched connectors, you will need to purchase an adapter, which is available for all models of car speakers.
To find an adapter in retail or at a car market, you cannot remove the connectors from the car radio. The easiest way out would be to photograph both connectors and write down the exact markings of the car radio model.
Connection without connector and adapter
In order to independently connect the wires if there is no connector in the car’s speaker system, you need to remember the color pinout of car speakers, which is used in standard systems.
The following are connected to the car radio:
- yellow cable (from the positive terminal of the battery),
- black wire to vehicle ground, red (to ignition switch).
Wires of the following colors and purposes depart from the head unit:
- purple (plus right rear speaker);
- purple with black stripe (minus right rear speaker);
- gray (plus right front speaker);
- gray-black (minus the right front speaker);
- white (plus left front speaker);
- white-black (minus left front speaker);
- green (plus left rear speaker);
- green-black (minus left rear speaker).
Expensive car radios use non-standard connectors with additional outputs.
The head unit can be equipped with the following outputs:
- MUTE (mute function, can be automatically associated with connecting the “hands free” option);
- REMOTE (used to connect an external amplifier, additional speakers, subwoofer to the head unit);
- ANT (regulates the automatic extension of the car antenna in cars equipped with such a device);
- ILLUMINATION (reduces screen brightness when driving, when stopped, increases display illumination for ease of adjustment).
If you feel that you cannot figure out the complexities of connecting an expensive device on your own (there are no Russian-language instructions for the car radio), it is better to contact a specialized car service.
You can see in detail how to properly connect a car radio in the video:
https://youtube.com/watch?v=kN1biKA0QFM
Euro and ISO sockets and working with them
Experts call power connectors not chips, but sockets. This term comes from electronics and refers to the connection location. The pinout is also a way to connect an electronic device to the vehicle's on-board system. At the same time, the layout of the radio chip may differ for cars, for example, Toyota, Mitsubishi or Volvo, as well as for model brands - Sony, Pioneer, JVC and others.
Please note that adapters for the Euro connector are available for all car radios; this helps to avoid problems with pinout and allows you to unify and protect the “native” connections from damage when disconnected. It is these connectors that are usually called chips, although the term allows for a much broader interpretation. The Euro connector is also classified as an ISO connector.
Chips (connectors, adapters, adapters) for connecting radios
Auxiliary antenna
Before you connect the antenna to the radio, you should know that there are two types of antennas - passive and active. Passive connects literally in one step, you just need to insert the plug into the required place. But with the second one you will have to tinker a little, connecting power to it. Usually, tape recorders nowadays have a special output. The output is usually a blue wire designated ANT, REM or AMP. In some cases there are two wires. These wires turn on the devices that operate when playing the audio system. This device is an antenna.
Of course, there are other methods on how to properly connect a car radio, high-quality analyzes described in the manuals.