Tuning and auto gadgets / From Alexey Stepanov
- Various connection methods
How to power it from a homemade transformerConsumables and tools
- Tools for creating a transformer: gallery
- Sequencing
Is it possible to connect the radio to a regular outlet at home? Of course! And to do this, it is not at all necessary to have deep knowledge of electrical engineering. A school physics course will suffice. Let's try to figure out how to connect a car radio to the network, and at the same time we'll think about whether it's worth doing it at all.
Various connection methods
How to power it from a homemade transformer
Let's start with the most time-consuming way to turn on the radio: using a step-down transformer made by yourself. Taking into account the wide range of electrical goods stores, fewer and fewer motorists are resorting to this method, because sitting and assembling a 12-volt unit yourself is not much pleasure. It’s easier to go and buy a ready-made one. However, if a person is limited in funds, he has to act the old fashioned way.
Consumables and tools
- An old step-down transformer (in this example a 36-volt one appears).
- Insulating tape.
- Multimeter.
- Calculator.
- Insulated wire with a cross section of 0.5–0.8 mm and a length of about 0.9 m.
Tools for creating a transformer: gallery
Sequencing
- First of all, find out what voltage will be applied to 1 turn of the secondary winding of the transformer. To do this, wind 7 turns of a new insulated wire over the old one, and then connect the device to the network.
- Using a multimeter, measure the voltage at the ends of the secondary winding wire. Let's say it was 2.9 volts. 7 turns were made, therefore, each turn is approximately 0.41 volts.
Using a multimeter, measure the voltage at the output of the transformer
Transformer with connected diode bridge and choke
Connecting using a charger
As mentioned above, the car radio consumes a direct current of 12 volts. When choosing an adapter in a store, the car owner should also pay attention to the current strength at the transformer output - it should not be less than 5 amperes. The best option is a 6.5 amp adapter:
12 volt adapter, output current 6.5 amperes
Next, the standard connector with which the radio is connected to the car is cut off, the ends of the wires are stripped, connected to the adapter cable and insulated.
Here, instead of a battery (rechargeable battery), a ready-made adapter is connected
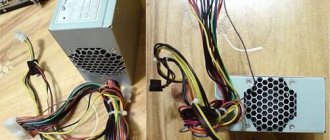
Connecting using a computer power supply
- The power supply can either be bought secondhand or removed from an old computer. Before connecting, it is disassembled and inspected for the presence of swollen capacitors. If any are found, they must be replaced.
Swollen capacitors in the power supply must be replaced
General requirements and characteristics for the power source
To power the car radio, the power source must provide a constant voltage of + 12 volts. The requirements for the accuracy of maintaining voltage are not very high - the device will work even at a slightly lower level (although the volume may decrease), the radio will not fail even with a slight excess of 1..3 volts. The main thing is that the voltage is well filtered and, preferably, stabilized. Otherwise, rumble and hum will be heard .
There are also requirements for its load capacity of the power source. A medium power radio in medium volume mode consumes 2..4 amperes . If an increased sound level is required, you need to count on 10..12 amperes. For radios with display backlighting using incandescent lamps, you may need an additional reserve of another 0.5..1 ampere (this current is consumed even at zero volume). Based on these data, you can approximately calculate the required power of the power source.
KIA Rio 2011, 123 l. With. — electronics
Cars for sale
Kia Rio, 2015
Kia Rio, 2013
Kia Rio, 2013
Kia Rio, 2013
Advantages of turning on the car radio from the network
The first advantage is versatility. We get a universal device, a full-fledged audio system with the ability to listen to radio in several bands, CDs, discs with music in MP3 format, and we also have the ability to connect external storage devices to the radio. The second advantage is that each car radio usually has not two, but four speaker outputs. This means that the audio system manufacturer has already divided the audio frequencies, all we have to do is connect the speakers.
The third advantage is savings. In the music centers that we buy as stationary ones, a huge part of the amount we pay compensates for the work of the designers; we also pay for decorative materials that have nothing to do with sound. For the interior this is, of course, important. Most likely, we would have bought a beautiful home instead of a high-quality audio center. The fourth advantage is compactness. Even if the task is not to decorate the interior, we can think about how to connect a radio at home, leaving only the control panel visible. In a word, it makes sense to take up experiments.
This is interesting: How to choose a GPS navigator for a car and install it
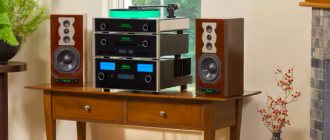
Connecting a car radio at home
Many of us have old car radios in our homes or garages that sit idle and gathering dust. They can all be given a “second life” as a regular receiver or music center. The sound quality and power of such devices is higher than that of portable or stationary ones.
How to connect a car radio at home
The main thing in connection is making a power supply or using a ready-made one (or a battery instead). Connection options are given below:
- Through the power supply. You can use a ready-made one from a desktop computer with a power of at least 400 watts. To use it, you need to send a signal to turn it on (we connect the only green wire of the largest connector to any black one), check the output voltage on the yellow wire. It should be 12 volts.
Types of main connectors in a computer power supply
You can use a car battery charger as a power supply (transformer only, new pulse ones will not work). We turn it on to the minimum current and check the output voltage (12 volts) with a multimeter. The downside of this option is that there is no filter inside the charger to protect against interference. There may be extraneous noise in the speakers.
Appearance of the VSA-5K charger
There is a method using a homemade step-down transformer, but for this you need to have minimal knowledge of radio engineering.
Appearance of a transformer with three windings
We need a transformer with two or more windings. Usually the transformer is marked with the input and output voltage for which it is designed. If there are no symbols, measure the resistance of all windings with a multimeter. The input will have a resistance of 100–300 Ohms, the output will have a resistance of 1–30 Ohms. Using the above diagram, we assemble a simple rectifier and check the output voltage (12–14 volts).
transformer rectifier circuit with filter
A ready-made element can be used as a diode bridge.
Ready diode bridge
Or you can assemble it yourself according to the diagram below. If the transformer voltage is not suitable for us, then we can change it by increasing or decreasing the number of turns of the secondary (output) winding.
Homemade diode bridge
We decided on the power source. Now let’s make the connection itself, it is performed according to the following diagram:
How to connect in a car
We do not connect the antenna power and backlight control wires. We connect the battery and ignition switch together and connect to positive, ground to negative.
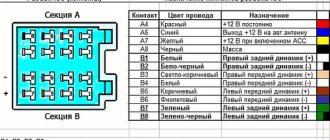
The speakers are suitable from any music center with an internal resistance of 4–16 Ohms, or car speakers with homemade housings.
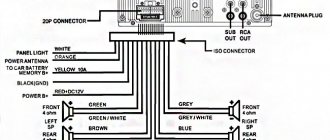
Radio pinout
To connect a car radio, more than one conductor is required. In addition to power, you need to connect speakers (in most cases from 2 to 4), control signals, etc. All connection points are output to a connector, which for a long time each manufacturer made at its own discretion. This complicated the connection of car audio equipment, so in the 80s of the last century an attempt was made in Europe to standardize car radio connectors. ISO connector became the standard , which most European manufacturers began to adhere to.
ISO connector.
This connector consists of two parts, which can be combined into one design or made in the form of two separate connectors. Audio system elements are connected to one, power and control signals are connected to the other.
ISO Audio and ISO Power connectors.
Each connector consists of 8 pins. In order not to confuse the connectors, they have different key locations. Power is connected to the ISO Power terminal. The connector pinout is shown in the table.
| Contact number | Chain | Conductor insulation color |
| 1 | Volume adjustment | Not installed |
| 2 | Mute | Not installed |
| 3 | Reserve | Not installed |
| 4 | +12 volts (memory power supply) | Yellow |
| 5 | Output for powering active antenna | Blue |
| 6 | +12 volt backlight | Orange |
| 7 | +12 volts from ignition (ACC) | Red |
| 8 | 0 volts (total) | Black |
Functional purpose of ISO Power contacts:
- pins 1,2,3 are not used in most cars;
- the internal memory of the radio is powered from the voltage on pin 4 - if the input is de-energized, the settings will be reset;
- Pin 5 removes the voltage to power the active antenna amplifier;
- pin 6 is connected to the power line of the vehicle’s side lights to turn on the backlight at night;
- pin 7 – the main power line of the radio, connects to the ignition switch line or to the ACC line, if the car has one;
- pin 8 is connected to the common wire.
When connecting the radio at home, the supply voltage must be supplied to pin 7, and if it is necessary to backlight the panel, also to pin 6. If it is possible to keep the car radio constantly on, you can also power pin 4 - then the settings will be saved until the next time you turn it on. The current consumption in this circuit is small (several tens of milliamps). If the power supply to the radio is removed from use to use, there is no point in using this line.
Not all manufacturers adhere to this standard . So many Asian, North American and almost all domestic manufacturers of car audio equipment install their own specific connectors on radios. You can find out the pinout from the operating instructions for the equipment.
Tools and materials
To work you will need:
- side cutters (nippers);
- soldering iron with tin and rosin;
- multimeter with the ability to measure alternating and direct current up to 300 volts and resistance up to 1000 ohms;
- wires with a cross section of 1–3 mm 2 and a length of 2–3 meters (depending on the placement of the speakers);
- insulating tape.
When performing all work, be sure to follow electrical safety rules! Before disassembling and reassembling, de-energize any devices, plug them into the network via a fuse, ground sockets and power tools.
A complete list of safety measures can be found in the provisions of the Occupational Safety and Health Act.
Video: example of connecting a car radio via a computer power supply
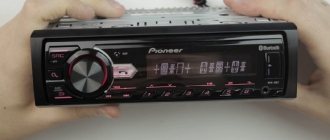
An example of the external design of a car radio is given below.
The car radio in a homemade case with speakers is equipped with one unit
After spending a few hours, we will get a music center that is not inferior in sound quality to store-bought car radios.
Selecting a car radio
Since by default we will use a device lying around idle to create a homemade speaker system, any car radio will suit us. But this “any” should still have a minimum set of functions:
- At least two-channel output with a power of 40 W each;
- Tuner;
- CD/DVD/MP3 disc player;
- USB – connector for reading information from flash drives.
In addition, you should pay attention to the sound card of the device itself. Some radios can even surpass most modern music centers in terms of purity and sound quality. And although, due to the fact that the car radio does not have large and capacitive capacitors in its “arsenal”, due to which it loses in the reproduction of low frequencies to powerful stationary acoustic systems, it is definitely at its best in the reproduction of the high-frequency range. Another definite advantage of the car radio is the presence of a multi-stage frequency-separated equalizer, while most stationary music centers are equipped with only standard presets.
How is the radio connected to the power supply?
To connect at home, you will need the necessary materials and equipment:
- the computer's power source, this is our unit; its power should be 300-350 watts;
- car radio;
- acoustic speakers or speakers;
- wires with a cross-section of more than 1.5 mm.
The acoustics must be of high quality, the device has a four-channel output, and a speaker can be connected to each output. For louder sound, you should choose speakers with a resistance of 4 ohms, usually car speakers. Home acoustics have an impedance of 8 ohms.
Power supply for the radio: how many volts and watts and where to get them
When connected normally in a car, the radio operates on 12 volts DC. This is exactly the voltage you need if you want to use it at home. Power consumption depends on the model and audio system, but in most cases it is up to 150 W.
We're using simple physics here. Power calculation formula P=UI. Hence 12V*10A=120 W. 10 amps is the size of the radio fuse. That is, this is the maximum current consumption of the radio. In reality it is somewhat smaller.
If the radio says 4*50 W (200 W), this is not entirely correct. From the formula it turns out that the current consumption is 200 W/12V≈16.7 A. The amplifiers used can indeed provide such output power, but at a voltage of 18 volts or a load of 2 Ohms.
Connecting the radio from the computer power supply
Similar parameters can be obtained from the following devices:
- Voltage converter 220/12 V.
- Power supply for a computer.
- Chargers for various devices - laptops, phones, LED lamps, small household appliances.
- 12 V batteries.
When choosing a power source for your car radio, also look at the power. If it’s too weak, it won’t work or won’t work for long. So, at least when connecting for the first time, supply power through a fuse.
Connection diagram of the car radio to the car ignition switch
Connecting power to the car radio itself is simple. When connected normally in a car, the yellow one receives power from the battery, the red one receives positive from the ignition switch. Just twist them together and connect the power source to this twist, whatever it may be.
We connect the radio from network B
The third connection option is to use an uninterruptible power supply such as Luxeon PSC 3512. This is a small and lightweight device that costs about a thousand rubles, has all the necessary connectors and terminals, and you don’t even have to take up a soldering iron to connect. In addition, the device has several degrees of protection against overload and overheating, has a power of 35 W and can operate with voltage from 90 to 230 V. Since the device is uninterruptible, it has a built-in battery that will provide autonomous 12 V power before network connections. However, it would be hard to call this option budget either.
The most inexpensive way to revive a radio without a battery is to use a computer power supply. Such power supplies are lying around in mountains of computer repair shops, just waiting to be used in some way. The fact is that Mr. Gates and his colleagues annually increase the resource intensity of the software, which affects the current consumption of a desktop computer. As a result, top models of power supplies from three years ago are being scrapped, and their place is being taken by more expensive and powerful ones. But just such a recycled power supply is suitable for us. The photo shows a diagram that makes it easy to figure out where to get 12 V power from in such a unit - this is either a connector for a floppy disk, if the PC is very old (AT power supply), or a connector going to the motherboard (in ATX power supplies ).
Inspection and troubleshooting of the power supply.
If you purchased a new power supply, then you can safely skip this point.
- Turn on the computer power supply to check the output voltage. Make sure that when current is applied, the cooler (fan) installed on the rear starts spinning.
ATTENTION. Before starting the following steps, make sure that you have disconnected the computer unit from the power supply.
- Open the lid and look inside the unit, there will probably be a lot of dust there, wipe everything thoroughly with a dry cloth, you can also use a vacuum cleaner.
- After cleaning off dirt and dust, carefully inspect the board contacts for defects and cracks in the solder.
- We carefully inspect the capacitors located on the board; if they are swollen, this indicates that the unit is faulty or does not have long to live. (capacitors are circled in red in the picture above) Swollen capacitors must be replaced. This process requires caution, since high-voltage capacitors contain a residual current charge, which can cause a slight but very noticeable electric shock.
- Assemble the power supply and start connecting
How to make the system work without a battery
Everything would be fine, but the problem of powering the equipment reduces all the advantages of a car radio at home to nothing. It’s not that it’s impossible to power the radio from the power supply; moreover, there are even special network adapters that output exactly a stable 12 volts and about 12 A of current, this is exactly what the radio needs. The problem is that the price of such a power supply, specially designed for connecting car gadgets to a 220 V household network, if not close to the price of the radio itself, then somewhere around it. On average, the price of such a thing is 1.8-2.5 thousand rubles. Not too economical.
There is another ready-to-use option, but also not too cheap. You can use a power supply from household halogen lamps. It is a pulse device that will also produce approximately 12V and 10-12A output. Such devices can be bought in household lighting stores and their prices vary greatly, depending on the brand and power of the device. If these two options are not suitable for some reason, we consider more accessible methods.