My first acquaintance with Volumio OS was the second generation ASUS EeePC netbook. It was on this “machine” that I first installed this audiophile operating system and for some time regularly used it to listen to music in my home system.
It is worth noting that the improvised network transport turned out to be very successful for its time. By controlling the process from a smartphone via a web interface, it was possible to listen to music from a home server or flash drives, but Volumio did not yet have support for streaming services at that moment.
The current, second acquaintance with OC Volumio - now in the form of pre-installed software in the proprietary Primo player - turned out to be no less interesting and informative.
Volumio - how to use?
Due to your numerous requests, I am publishing a mini-guide on installing and using Volumio on your PC.
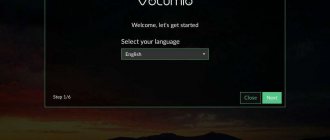
Anyone who does not want to listen to high-quality audiophile sound need not read further. So, the first thing we need is the Volumio for PC distribution. You can download it for free here: volumio.org/get-started/ Next, you will need a flash drive of at least 8GB, and the faster it is, the better. In order to install the distribution on a flash drive and make it bootable, you will need the Rufus program: rufus.ie/ru_RU.html The following steps look like this: take the flash drive with two or three fingers of your left or right hand and carefully insert it at a right angle into a free USB port of your personal computer. Next, launch Rufus and select the ISO image of Volumio, check whether Rufus is offering us the flash drive, and if everything is OK, then press the START button. In just 3-5 minutes you will have a wonderful audiophile bootable flash drive with Volumio, and that's great! When the process of creating a wonderful audiophile flash drive is completed, you can finally try out this super player of all times. To do this, without removing it, reboot and go to the BIOS. For those who have forgotten, this is done by pressing the Del button on the first loading screen. Next, depending on the motherboard model, you need to fully initiate booting from the flash drive. There is a little about this here: proremontpk.ru/ustanovka/…agruzitsja-s-fleshki.html Next, exit the BIOS and press F8, and select our flash drive in the boot menu. In theory, it should boot from a flash drive, and in a minute, or even less, a single Volumio screen will appear: If everything went exactly like this, then we can congratulate you - you have taken another step towards a great audiophile sound! No need to thank me. Sit down please.
Source
Player vs DAC
In the first test, I compared the Volumio Primo and a PC, using them as a digital transport with a USB DAC, which costs twice as much as the player itself. When comparing the sound of the analog outputs of the player and the USB DAC, the latter showed itself to be better in developing timbres and other nuances - at the same time, the sound character of both options turned out to be similar, since my DAC is also based on a chip from the ESS Saber series.
In short, a direct comparison of the analog part in my system was not very representative. If you base your sound assessment on the experience of listening to competitors of similar price and quality class, the situation changes radically. The Volumio Primo turns out to be a surprisingly good device for its price.
In addition to a focused sound picture, smooth tonal balance and excellent dynamics, it offers high detail for its class, combined with expressiveness and genre versatility. All this helps the player reproduce content of various qualities vividly and musically.
On DSD and Hi-Res, this device allows you to feel the richness and fullness of timbres, but at the same time it does not emphasize the shortcomings of compressed formats, making the MP3 sound as lively and interesting as possible.
Volumio login on boot
Raspberry Pi
(['rɑːzbərɪ paɪ], Razberi pai) is a single-board computer the size of a bank card, originally developed as a low-cost system for teaching computer science, which later became much more widely used and popular than its authors expected. Developed by the Raspberry Pi Foundation. As of the end of 2019, more than 30 million Raspberry Pi devices had been sold.
Version differences
: Raspberry Pi comes in several configurations: model “A”, “B”, “B+”, “2B”, “Zero”, “Zero W”, “3B”, “3B+”, “3A+” and “4B”. Schematic diagrams of Raspberry Pi can be found here: (Schematics) Seemingly identical Raspberry Pi boards can be of different revisions: (Raspberry Pi revision codes)* *for Raspberry Pi4 revision 1.3 means fixing the Type-C cable connection
What is inside?
If you are the same person who has been familiar with audiophile operating systems for a long time, and has repeatedly told everyone that “there is no point in buying an expensive hi-fi network player” and that “you can assemble a normal device yourself for mere pennies” - immediately copy the link to this publication and Send it to everyone who dares to object to you.
The fact is that Volumio Primo, in fact being a hi-fi player, its internal content best suits the very scheme you were talking about: a microcomputer, a cool DAC and an audiophile OS. And, by the way, it is inexpensive, considering that a lifetime subscription to OC Volumio is given to the user absolutely free, and the internal content is not simple.
The basis was not the popular budget microcomputer Raspberry Pi, but the more productive Tinker Board S from ASUS with 2 GB RAM, a quad-core processor and an improved I2S audio interface. Digital-to-analog conversion in Volumio Primo is carried out by a 2-channel DAC chip ES9038Q2M, working in conjunction with a high-precision clock generator.
The entire audio part - digital filters, DAC, analog output and their power circuits - is placed on a separate board, which is connected to the microcomputer via a cable. The entire device is powered by an external AC adapter, and an additional filter is installed immediately after the input connector to eliminate interference coming from the network.
For those who prefer to use an external DAC instead of the built-in one, standard USB 2.0 and coaxial SPDIF interfaces are available. There is also an HDMI output, but its main purpose is rather to display an interface for control with a mouse or external keyboard. Connection to the home network and the Internet is carried out via the LAN port and using the built-in Wi-Fi module.
Setting up Volumio on Raspberry
2) We write the image to a micro-SD card. 2Gb is enough. I used Win32 Disk Imager.
3) Insert the SD card into the raspberry. Let me remind you that it is assumed that a DAC, HiFiBerry+ or a clone, is physically assembled with a raspberry and a sound receiver is connected to its output, a linear input for example a receiver or active speakers.
First we connect the Ethernet cable to the raspberry. You can connect a monitor via HDMI, but there’s not much point. If you are going to listen to music from USB flash drives, connect it too. We connect the USB power cable last. Malinka starts blinking the LED and boots up.
4) Go to the browser
(You can look at the router and use the IP address, but in my experience the URL works better)
Let's go to the menu, it's in the upper right corner.
5) Set up the network. Menu->Network
For a wired connection everything is obvious. Wireless can be configured if you have a working wired one. I am a retrograde person by nature, I love static addresses. So I configured the router so that volumino, recognized by the MAC address, always receives the address 192.168.1.100 After setting up and checking the functionality of the WiFi connection, the wire can be disconnected.
What can he do?
In terms of functionality, Volumio Primo is a very attractive device. This is a super-compact network player that, in addition to playing files from USB drives and from the home network, has the ability to install the streaming applications the user needs, supports DLNA, Airplay 2, Spotify Connect, Tidal Connect and even Roon technologies!
To control and access all the necessary settings, a proprietary application and a whole scattering of alternative “controllers” of varying degrees of usefulness are used, the history of which stretches back to the popularity of OC Volumio in the DIY environment. The design and architecture of the modern application is no different from earlier versions of the web interface, which is generally not bad.
This is not to say that Volumio’s menu structure is ideal and 100% intuitive - you have to get used to some things. However, it is much worse when the manufacturer radically redesigns the interface over and over again, changing the operating algorithms and confusing regular users. As for the design, the ability to customize the appearance is also available in the official application, so it may not come to the point of using alternatives.
For me personally, the original interface turned out to be absolutely familiar in both design and structure, but the response time was somewhat confusing. If you do not access the application for just a few minutes, it loses connection with the player and reconnecting takes some time.
A pause of a couple of seconds is not critical if you need to change an album or playlist once an hour, but when the need arises to quickly switch a track or mute the sound, it does not happen as quickly as we would like. The situation is similar with alternative applications: the time lag is exactly the same as that of the original software.
There are also killer advantages in favor of the Volumio OS - and real audiophiles will find them quite significant. So, in terms of sound output settings, the Primo player outshines most of its competitors.
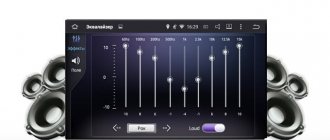
Selecting a resampling mode for any standard frequency, DSD output settings (native/DoP), setting the adjustment step and shape of the volume curve, several settings for the digital filter of the built-in DAC, manually changing the buffer size, switchable volume normalization for PCM and DSD - even owners will envy such tools High End players, let alone inexpensive Hi-Fi and multi-room devices.
Purely practical things are also taken into account in the settings. For example, it is possible to disable the software volume control. If you build multiroom on Volumio devices, it is more convenient to adjust the sound in the application, and if you build a stereo system on it and squeeze out maximum quality, then turn off the digital mixer and adjust the volume on the amplifier.
About food
Volumio Primo came to the test not alone, but with a very unusual “support group” in the person of the audiophile iPower X power supply from the iFi brand. Compared to the modest standard network adapter, the alternative one looks much more solid and weighs significantly more. It is also pulsed, but, according to the description, it is equipped with an advanced filtering system for electromagnetic and radio frequency interference.
It is not a set of passive components, but an active electronic circuit that works on the principle of noise reduction in headphones. Thus, the player will receive impeccably clean power from iPower X, which allows us to expect a noticeable increase in quality. This is what happened in practice.
Replacing the power supply worked a real miracle. When listening from the analog outputs of Volumio Primo, the highs became richer and more detailed, the bass deeper and more precise, the resolution across the entire range increased, and the transfer of space improved. If you use an external DAC, the changes are not so dramatic, but still noticeable.
They are expressed in a feeling of integrity of the sound picture, transparency of the upper frequencies and a lighter, more relaxed presentation of any musical material. Even if the power supply only affects the digital part of the path, the effect is noticeable - and the thought that you can return to the standard version does not arise.
Definitely, iFi charges money not only for beauty. Proprietary technologies work “for all the money.” DIY enthusiasts will immediately object that for the same amount they themselves will assemble the world’s best linear power supply on a toroidal transformer, but this does not change the essence of the matter. The main thing is that if you invest work or money into a power upgrade, Volumio Primo will play even better. And which way to go to perfection is everyone’s personal business.