A sound card is an important part of a personal computer. Without this device, you cannot listen to music in good quality and watch movies with multiple audio tracks. For fans of computer games, the audio controller provides complete immersion into the virtual world. An audio card is required to connect microphones and musical instruments. There are many controllers of different levels on sale, however, many experienced users prefer to make a sound card with their own hands.
DIY USB sound card
Audio devices connected via the USB port have different designs. The simplest controllers are inserted directly into the connector. More complex and multifunctional devices are connected to the port using a cable. There may be several reasons for making an audio system. This is the high cost of industrial designs or poor sound quality obtained from the chipset integrated into the motherboard. Most often they try to make a USB sound card with their own hands to use it for a laptop. These devices, especially older models, use low-level integrated circuits that drive the built-in speaker and cannot provide high-quality sound.
How to install a sound card
By the way, many professional sound cards from Creative are installed in the PCI Express x1 slot, which is present on many motherboards and is usually not occupied by anything. You also need to remember that on some motherboards, after installing a discrete (separately installed) sound card in your system unit, the built-in sound card must be disabled in the BIOS. However, you can install a discrete sound card not because your built-in sound card has burned out; maybe you are simply not satisfied with the quality of the built-in audio solution of your motherboard. For example, let's install a PCI interface sound card in our computer. With the computer turned off, open the side cover of the system unit and carefully look at our motherboard, it has two PCI slots and two free PCI Express x1 slots, in any of which you can install a PCI Express x1 interface sound card. One PCI slot is not available, it is closed by the video card cooling system, which means another one remains.
We have two PCI sound cards, the first is a simple budget C-Media at a price of 250 rubles, the second is a professional Sound Blaster. They are equally easy to install.
If the video card bothers you, you can remove it, install the sound card and put the video card back. Now we install the sound card in the PCI connector and attach it to the case with a mounting screw.
View of the rear wall of the system unit after installing the sound card.
As you can see, in my case, the Sound Blaster sound card also covers half of the video card fan, but my system unit has been working like this for a long time, the temperature of the video card remains normal, and there are no complaints about the sound card either.
If you install a budget sound card instead of a Sound Blaster, the video card cooler will remain almost uncovered.
After installing a discrete sound card, do I need to disable the built-in one in the BIOS? It depends on the motherboard. For example, on old motherboards you need to go to the Advanced tab and set the High Definition Audio Driver option to Disabled, then save the changes and exit the BIOS.
How to make a sound card with your own hands
To make a homemade USB device, PCM27-PCM29 microcircuits are used. These are digital-to-analog converters that provide output to headphones or small speakers with high-quality sound. The PCM2705 is a stereo DAC with a USB interface. Designed for stereo signal processing. The controller does not require firmware, but it is possible to change the manufacturer or device ID. The digital-to-analog converter implements synchronization of the audio signal from the clock pulses of the transmitted information via the USB interface. Built-in phase-locked loop allows you to obtain a very small deviation in frequency and phase. Main characteristics of the microcircuit:
- 16-bit DAC
- Conversion frequency – 32, 44.1 and 48 kHz
- S/PDIF output
- Clock generator 12 MHz
• An example of a USB sound card runs on ATMega32U4 microcontrollers, at a clock frequency of 8 MHz (translator's note: you can also use a clock frequency of 16 MHz). • The USB device interface operates in low consumption mode (Low Power Bus Powered Device, current consumption is less than 100 mA). • The USB Audio device works as an external sound card on PC computers running Windows® (version 98SE or later), Linux® or Mac OS®. • Less than 14 KB of code space required. • The USB device supports speaker (headphones) and microphone.
This document describes a simple audio device design. It allows you to quickly test USB hardware using the ATMega32U4 microcontroller, and no driver installation is required (the driver built into the operating system is used). It is assumed that the reader is familiar with the USB Software Library for AT90USBxxx Microcontrollers [4] and the USB AUDIO standard (see usb.org).
[2. Hardware requirements]
The USB audio application requires the following equipment:
• AVR USB evaluation board (ATEVK527 or AVR-USB32U4). • AVR USB microcontroller (AVR with hardware support for the USB interface). • USB cable (with Type A and Mini B connectors). • PC running Windows® (98SE, ME, 2000, XP), Linux ® or MAC® OS with USB 1.1 or USB 2.0 host support. • Microtelephone headset (headphones).
[3. How to program a microcontroller]
In-System programming ( ISP ) and updating using the Atmel bootloader (Device Firmware Upgrade, DFU ) can be performed using the following methods:
• Via the JTAG interface using the JTAGICE mkII debugger. • Via SPI interface using AVRISP mkII [5], AVR Dragon programmers or JTAGICE mkII debugger. FLIP utility (already flashed into the microcontroller’s memory at the factory) . This does not require any additional external programmer. • Via a parallel programming interface using STK®500 or STK®600 programmers.
Please refer to your board's user manual for a description of the hardware and how to program it.
Note: The FLIP utility [6] is provided free of charge by Atmel along with the USB bootloader drivers. Unfortunately, the source code of the utility and the source code of the loaders are closed. But the DFU protocol is published, and there is an alternative open source DFU loader in the LUFA library.
[4. Quick start]
1. Download the microcontroller software package [7]. The downloaded archive contains ready-made firmware in the form of a HEX file named EVK527-series4-audio.a90 or EVK527-series4-audio-2_0_3.a90, write it to the microcontroller memory (how to do this, see section 3).
2. Connect the programmed board via USB to your computer. After the enumeration procedure, the board will be detected as a USB Audio Device sound card, after which it can be used to connect headphones and a microphone to the computer:
Rice. 4-1. Detected USB Audio device in Windows Device Manager.
The figure below shows the ATEVK527 board with a microphone and headphone jack installed on it.
Rice. 4-2. ATEVK527 evaluation board.
Note: if you used the AVR-USB32U4 development board, then the generated output audio signal can be viewed with an oscilloscope on the pin of the PD7 port. The signal from the microphone amplifier can be connected to the ADC input via the PD6 port.
[5. Application overview]
The USB Audio application handles data exchange between a USB host (PC) and PWM (Pulse-Width Modulation, PWM, which generates an audio output signal) and ADC (Analog-Digital Converter, ADC, which can be fed with external audio) equipment. signal from the microphone. Amplified, of course). When audio is played by a computer through a USB Audio sound card, the USB device periodically receives packets at the OUT endpoints, and sends packets of audio recorded from the microphone through the IN endpoints.
Rice. 5-1. Data exchange in the USB Audio application.
During the enumeration procedure, the USB device describes the formats of digitized audio data (sampling rate, number of bits per sample) that it can process. This demo uses PCM (Pulse-Code Modulation) format, the output is encoded as 16-bit mono at 32 kHz sampling rate, and the microphone input data is encoded as 16-bit mono at 8 kHz sampling rate.
[6.Firmware]
As described in the USB Software Library for AT90USBxxx Microcontrollers [4], all USB firmware microcontroller projects are based on the same architecture. This section describes only those parts that relate to the audio processing module. Modification of some project files by the user allows him to build his own audio application.
Rice. 6-1. USB Audio Firmware Architecture.
6.1. audio_task.c . This file contains:
• Initialization of timers. • Timer interrupt handlers. • Routines for collecting and issuing audio data.
Output (headphones or speaker) . The main audio processing task receives data with audio samples from the OUT endpoint, and places them in a RAM buffer. The clock tolerance prevents the output from being sampled exactly at 32 kHz, so the main loop adjusts the timer 1 interrupt to avoid undersampling or overflow. Timer 1 interrupt transfers data from RAM to the PWM (high-speed timer) modulator. Timer 1 is responsible for adjusting the data flow to the PWM resolution and sound volume set by the USB host.
Note: Only 9 bits of the possible 10 bits of PWM resolution are used - to avoid saturation in the board's op-amp.
Input (microphone) . Timer 0 interrupt is used to receive a sample of digitized audio from the ADC every 125 µs (8 kHz sampling rate), and if an IN endpoint was requested by the host, this value will be placed into that endpoint.
Rice. 6-2. Sharing data in the USB Audio demo application.
6.2. evk_527.c . This file contains all the routines for managing the hardware resources of the EVK527 board (joystick, LEDs, etc.). The user does not need to change this file if he is using the EVK527 board. If another board is used, then the project must use another module instead of evk_527.c, which will support the hardware of this other board.
6.3. usb_specific_request.c . This file contains a routine that accepts audio control requests, such as setting the audio level and muting the audio (Mute).
6.4. usb_descriptor.c . This file specifies the audio topology of the USB Audio device, which is placed in the USB descriptor as described in the AUDIO specification (see the corresponding standard at usb.org). This demo uses the topology shown in the figure.
Rice. 6.3. Audio Function topology in the USB Audio demo application.
[7. Host software (PC)]
The USB audio demo application does not require any special PC software. When running the Windows® operating system, you can use the standard built-in audio recording application “Sound Recorder” to try recording audio from a microphone.
[8. Limitations]
If audio playback is running at a sampling rate of 32 kHz, recording and playback cannot occur simultaneously due to the insufficient speed of the AVR CPU, which operates at a clock frequency of 8 MHz.
Note translator: to speed up the CPU, you can port the USB Audio application to a clock frequency of 16 MHz - this clock frequency is also acceptable for the USB interface.
[Links]
1 . AVR298: USB Audio Demonstration with ATmega32(16)U4 site:atmel.com. 2 . LUFA is a free USB library for Atmel AVR microcontrollers. 3 . Development board AVR-USB32U4. 4 . AVR276: USB Software Library for AT90USBxxx Microcontrollers. 5 . AVR-USB162MU: prototyping and manufacturing of the AVRISP-MKII programmer at home. 6 . AVR282: firmware update via USB. 7 . 141127avr298.zip - project source files, ATmega32U4 microcontroller firmware, documentation.
DIY external USB sound card
You can implement a USB sound card with your own hands on the PCM2705 chip . The design has a minimum number of discrete elements. The circuit does not use a digital output, but it can always be used. It is located on pin 5 of the microcircuit. By increasing the capacitors C14 and C15, the transmission of low frequencies improves. +5 V from USB is converted to 3.3 V using a separate regulator and supplied through the inductor and filter capacitors.
How to make an external sound card with your own hands
A more complex and high-quality sound card for a PC, made by hand, is implemented on a digital-to-analog converter RSM2902-E. To ensure high-quality operation of the device, you do not need to use power from USB, but supply voltage to the VCCCI from an external stabilizer with a voltage of 3.3 V. To reduce distortion, the device uses a diode VD1, which increases the voltage to 3.5 V. Interference from the computer is reduced dividing the “ground” into digital and analog. The control buttons are used to control the volume and reduce the level. It is better to use separate stabilizers to power the analog and digital parts of the circuit. LED2 indicates the status of the microcircuit. When the controller is operating normally, it does not light up. LED1 lights up when an audio card is connected to the port. The quality of the input signal is significantly affected by capacitors C3 and C4, so they must be film. The analog output signals are taken from a passive LC filter. It provides a cutoff frequency of 28 kHz and cleans the signal from digital quantization noise.
DIY multi-channel sound card
to provide power to a multi-channel sound card made by yourself , using external sources. For this purpose, small-sized network adapters for external devices are used. They can be of any type, but must produce 9 VDC. The circuit uses two adapters that are connected to stabilizers on LM317 chips. They are switched on according to the classical scheme.
Trimmer resistors R2 and R4 are used to accurately set the +5 V voltage at the outputs of the stabilizers. Capacitors C1 and C8 have a capacity of 10 µF X 25 V. C4, C11 - 100 nf. The remaining capacitors are 1000.0 X 25 V. The power supply system is assembled on a separate printed circuit board.
Opening sound card inputs
Several years have passed since I first “opened the entrance” to a sound card according to O. Shmelev’s article “Computer Measuring Complex” [1]. A very convenient and, I would even say, necessary thing when setting up and testing all kinds of audio paths using programs like SpectraLab or SpectraPLUS. Look at constant levels, check the frequency response, and just write a temporary file into memory for later comparison or careful viewing of signals - very often you have to do it... But every time I use this sound card, I think that I should have moved the input connector to the front panel system engineer, set the switches “input divider by 10” (or even by 100) and “open/closed input”. That is, to get closer to the usual conveniences of an oscilloscope.
And then I accidentally came across an old PCI sound card VIA TREMOR. Well, that’s it, I think, now I’ll definitely make the entrance block. I’ll place all the additional parts in the case from the old CD drive, put switches on its face and connect it all to the sound card with a piece of signal cable from the monitor - it has a lot of conductors, it’s shielded, and some conductors are even double - everything should work out...
The drive started to fail...
Yes, first, you probably need to explain why you need to redo something in the sound card, when it seems that there is nothing complicated about it - remove the capacitors at the input, and you will get an “open input”. But the fact is that the input pins of the codec have a constant voltage (about 2.5 volts) that it needs to operate. If it is equal to the internal reference potential, relative to which the analog-to-digital converter monitors changes in the input signal, then the horizontal line drawn by the program's oscilloscope will follow the zero mark of the scale. If you reduce this voltage, say, by 1 V, then the horizontal line of the oscilloscope will float down by 1 V. And it turns out that if you simply remove the capacitor from the input circuit, then the connected signal source, if it does not have a capacitor at the output, will sag it's constant tension. Therefore, it is necessary to add additional chains to “bypass” this obstacle. The task, in general, is not difficult and can be solved at the level of initial study of circuit design using operational amplifiers ( Fig. 1 ) [2]. If the lower terminal of resistor R2 in the circuit is grounded, then when a signal with a level of 0.25 V is applied to the input of the op-amp, at the output we obtain a level equal to 0.25*(1+(R3/R2). If, with the same resistances of resistors R2 and R3, apply a constant negative voltage of 2.5 V to the lower terminal of resistor R2, then at the op-amp output we obtain a constant positive voltage of 2.5 V. If the value of resistor R1 does not exceed 100 kOhm, then when using general-purpose operational amplifiers with a sufficiently large input resistance, we can say that the input resistance of the cascade is equal to the resistance of resistor R1.
Fig.1
The final circuit of the input block turned out to be small. Half of the space on the board is taken up by the power stabilizer and filters. You can’t do without them - the key power converters of the computer and processor create a large electromagnetic “background”, which is induced on any conductor located in the system unit case, be it a power supply or a signal one.
But, let's start in order.
So, I started to screw up the drive. I sawed off the excess plastic - there was a lot of free space... I figured out what and how it would be attached... According to the diagram ( Fig. 2 ), signals from the input connector J are sent to switches S1 and S2, which switch the opening or closing of the inputs. When the switches are opened, the lower cutoff frequency at the -3 dB level becomes about 1.2 Hz if the 10-dividers (S3 and S4) are not turned on and about 3 Hz when these dividers are turned on. All switches are separate, i.e. not paired - this allows you to select different modes in different channels. The input impedance of the block depends on whether the dividers by 10 are turned on or not. When they are open, Rinput is approximately equal to 86 kOhm (R1+R3+R7 or R2+R4+R8), and when closed – 37 kOhm (R1+R3+R5 or R2+R4+R6). Of course, this part of the circuit can be done differently, for example, as shown in Figure 3 - so that when the divider by 10 is turned on, the input resistance also increases 10 times (approximately) - up to 870 kOhm. But at the same time, it is necessary to take into account the change in the cutoff frequency of the low-pass filter formed by resistors R1R5 and the total capacitance, consisting of the capacitance of the limiting diodes, the input capacitance of the operational amplifier and the mounting capacitance. What is important here is not so much that the frequencies begin to “fall off”, but that the phase shift of the signal begins already from 3-5 kHz, and this is already critical in some phase measurements. When calculating these circuits, it is convenient to use the RFSim99 program (the file for calculation is attached as an attachment to the article).
Fig.2
Fig.3
Let's return to the diagram in Figure 2 . Diodes VD1...VD12 protect the op-amp from large input signals, limiting their amplitude to a level of 1.7-2.2 volts. Depending on the input sensitivity of the sound card, it may be necessary to install chains of fewer series diodes.
As can be seen from the diagram, the resistors that provide the above input resistances of the block are also input signal dividers even without turning on S3 and S4. This was done specifically to compensate for the gain caused by the difference in resistance of the resistors in the feedback of the operational amplifiers (R2 and R3 according to the numbering in Figure 1 ). This happens due to the fact that R2 in the real circuit according to Figure 2 consists of several - R9, R11, R12, R16 and R19, which perform the function of generating +2.5 V voltage at the output of the block and allowing you to change its level within the range from 2 ,4 to 2.6 V. This is necessary to correct the drift of the output voltage +2.5 V, which appears as the elements warm up both in the input block and in the sound card codec. Also, when working in the SpectraPLUS program, sometimes there is a need to shift one of the graphs vertically, which can be done by turning one of the resistor sliders R11 and R14 installed on the front panel of the unit. At the outputs of the op-amp there are dividers R21R23 and R22R24, which attenuate the signal by approximately 3.5 dB. This was done in order to attenuate the noise arising in the op-amp. You don’t have to do this and remove R21 and R22, but then you need to increase the resistance of resistors R19 and R20 to about 6.8 kOhm so that the output of the block has a constant voltage of +2.5 V. Resistors R23 and R24 are not installed on the board input block, and in the sound card at the codec input. This allows you to reduce interference on the signal conductors of the connecting cable.
The -5 V stabilizer is a standard 7905 microcircuit. You can also install a low-current 79L05. Filtering of 12 V voltages is performed using LRC elements. It is advisable to use all electrolytic capacitors with a capacity of more than 1000 μF, and chokes with an inductance of more than 47 μH, but within reasonable limits - otherwise, with a large inductance, impulse noise will pass through the inductor through the interturn capacitance.
All parts, except for the input connector J, switches S1...S4, capacitors C1 and C2 and resistors R11, R13 are installed on a foil single-sided printed circuit board measuring 110x60 mm ( Fig. 4 ) (the board file in the Sprint-Layout 5.0 program format is included in the attachment article). The board is mounted on a surface; no holes need to be drilled, even for lead-out parts. All diodes are KD522 (or KD521) with almost completely bitten off leads. Resistors R1, R2, R5 and R6 are MLT, one terminal is soldered to the printed track, and the wires coming from the switch are soldered to the other. All other resistors and all ceramic capacitors are smd 0805. All electrolytic capacitors lie on the board and are glued to it with hot glue. Chokes in filters can be used either domestic or imported. Operational amplifiers - KR140UD608, can be replaced with any other general purpose ones, the main thing is that they have an input impedance of more than 300-400 kOhm.
Fig.4
You can configure the assembled board with soldered variable resistors on the table by soldering resistors R23 and R24 and applying bipolar voltage to the board from a laboratory power source. After making sure that there is power at the op-amp and -5 V terminals, you need to use resistors R12R14 to adjust the +2.5 V level at the connection points of the output dividers R21R23 and R22R24. If something is wrong, select resistances R19 and R20. Then you need to check the input circuits by applying alternating and direct voltages to the input and monitoring them at the output of the op-amp. If you want to have a different division coefficient, you need to select the resistances of resistors R5 and R6.
Switches S1…S4 brand MT1 can be replaced with P1T-1-1. They are fixed on a metal plate of a suitable size ( Fig. 5 ). The plate is connected with a short conductor to the body of the CD drive. Capacitors C1 and C2 - K73-17 with a capacity of 1.5 µF for a voltage of 160 V, are soldered directly to terminals S1 and S2. The input jack uses the original CD drive (3.5 mm). Resistors R11 and R14 were taken from old monitor boards. They are soldered into a small scarf, which is inserted into pre-sawed grooves in the front part of the plastic frame of the drive ( Fig. 6 ).
Fig.5
Fig.6
A circuit board made of foil PCB was cut to fit the size of the plastic frame ( Fig. 7 ). To ensure it fits in place, grooves are cut into it and holes are drilled. You can, of course, make a board not from PCB, but in order for it to attach properly, its thickness should be about 1.5 mm.
Fig.7
The input block board is installed on the mounting board on brass racks from motherboards ( Fig. 8 ). Getinaks washers are placed under the head of the mounting screws so that the “ground” of the board is not galvanically connected to the drive housing, and through it to the system unit housing. If this is not done, then through the connecting cable you will get a “ground loop” into which interference from the electromagnetic pulses of the converters will be induced.
Fig.8
The connection diagram between the input unit and the sound card is shown in Figure 9 . The “grounds” of both devices are connected via only one wire – light brown.
Fig.9
Figures 10 , 11 and 12 show the general view and the power connector installed on the rear wall of the plastic frame. The connector was taken from an old video card - cut straight from a piece of the printed circuit board. All “ground” conductors connecting some of the connector legs to each other are cut. This was done for the same reason - the “grounds” must be connected in one place on the sound card. The shown printed circuit board is slightly different from the one shown above in the text - in the photo there is an option with op-amp power supply voltages of +/-5V and some differences in additional SMD components, but this is not fundamental.
Fig.10
Fig.11
Fig.12
As I already said, the sound card used was an old one - VIA TREMOR with the VT1617A codec. Its sensitivity is about 1 V(rms) - after that it begins to become heavily overloaded. The card turned out to be very noisy in the computer we were using ( Fig. 13 ) and required minor modifications related to power filtering.
Fig.13
First, I cut the power traces of the VT1723 and VT1617 microcircuits (red marks on the left and right, respectively, in Figure 14 ):
Fig.14
Then, using a hinged mounting, directly on the board, I soldered the CLC filter for the VT1723 and the stabilizer for the VT1617 ( Fig. 15 , Fig. 16 and Fig. 17 ). On the left in Figure 15, the letter “A” and the numbers following it indicate the numbers of PCI bus contacts on the “A” side.
Fig.15
Fig.16
Fig.17
Figure 17 shows a conductor running from the left leg of the MLT resistor to pin 2 of the PCI bus. This is a connection to +12 V. A thin MGTF wire is carefully soldered to the very edge of the contact track. If you get a large drop of solder, it may interfere with installing the card, resting against the plastic housing of the connector. Figure 18 shows in more detail where the wire is soldered to the -12 V pin.
Fig.18
If, suddenly, the card does not have +/- 12 V contacts on the bus, then they can be made by cutting them out of copper foil and gluing them with BF glue. This had to be done on the C-MEDIA card with a -12 V power supply. More than three years have passed, now it is already on the third computer and has withstood several dozen “distortions” during this time.
Figure 19 shows a general photo of the modified VIA TREMOR map. A piece of PCB fastened with two screws is visible, to which the cable is rigidly attached. Both surfaces of this mounting board are grounded, and on one of them there are pads cut out to which the wires are soldered. The input capacitors at the linear input are soldered off, and the MGTF wires going to the signal (red and green) wires of the cable are soldered to the patches of the tracks that go into the codec. All braids, screens and free cable conductors are soldered to ground on the mounting board.
Fig.19
After all these executions and the installation of additional electrolytic capacitors for power supply in different places of the sound card, the noise became less ( Fig. 20 ), but, unfortunately, interference with a frequency of 46.88 Hz and its odd harmonics still remained. They, of course, have almost halved, but this is not the result that we would like to get.
Fig.20
I haven’t figured out what caused this interference yet. But, given that its level is less than 100 µV (rms), and at frequencies above 1 kHz its harmonics are below 110 dB, it is quite possible not to take it into account, especially in oscilloscope mode. Of course, I couldn’t resist looking at what she was like. Figure 21 shows that the interference is digital in nature, occurs synchronously in both channels and has approximately the same level - most likely, it is induced from the processor power converter. Installing resistors R23R24 3.9 kOhm from the codec inputs to ground helped (when working together with the input block). The fundamental frequency level dropped to -90 dB, and harmonics above the 5th were attenuated to almost noise levels. Soldering additional electrolytic capacitors for the power supply in the sound card and ceramic capacitors for the power supply of the processor and in the power supply did not bring tangible results. Shielding the card with soft sheet metal and “untying” it from the computer case was also unsuccessful.
Fig.21
The graph shows a smooth increase in potential in a positive direction. In fact, this shift is associated with instability of the op-amp supply and it is not smooth, but chaotic and is in the frequency range from 0 to 10 Hz. But the level of these low-frequency fluctuations is quite small - no more than 1-2 mV, and, if desired, can be easily treated by installing op-amp supply voltage stabilizers (this version of the printed circuit board is also included in the attachment).
In Figure 22 there is interference from the previous figure, but increased in time:
Fig.22
When used in conjunction with the input block of another sound card (based on the CMI8738 codec), this interference is absent. It is possible that the VIA card’s “ground” is incorrectly laid out - everything is very primitive there...
Now about setting parameters in the SpectraPLUS program and its calibration. They say that there is a description on the Internet on how to do this correctly, but I couldn’t “intersect” with it, so I had to remember metrology. And as far as I remember, in order to use the device as a measuring instrument, you need to link the program scales to the actually present signal levels at the input (here we consider the sound card and the input block as a single whole).
A sample sinusoidal signal with a frequency of 1 kHz was taken from a G3-118 low-frequency generator. The level was monitored with a VR-11A voltmeter and an oscilloscope. The connection diagram is shown in Figure 23 .
Fig.23
First, in the general volume menu of the Windows program, we find the desired sound card and in the settings, select it to work as an input and put a tick just opposite the line “Lin. entrance". For now, we set the control motor responsible for sensitivity to the middle position.
Now you need to make basic settings in the SpectraPLUS program. Select the desired sound card in the Device Selection menu in the Input Device window (path Option – Device...). We confirm. Then select Real Time mode in the Mode item, Spectrum mode in the View item, then in the Processing Settings menu (path Option – Settings...), set the settings as in Figure 24 . The main thing we did here was to select the sampling frequency of the sound card (48000), the FFT size, which determines the number of available spectral lines, chose 16-bit bit depth and displaying two channels on the screen at once - Stereo. We confirm.
Fig.24
Next, go to the Amplitude Calibration menu (path Option - Calibration...), select settings as in Figure 25 , but in the Detected levels (Percent full scale) windows in the left and right channels we set the numbers “60” - then you will most likely have to adjust. Here we have set the Y scale values (rms), the correction factor for adjusting the input reference level to the 0 dBVrms value, and enabled this factor to be taken into account. We confirm.
Fig.25
Then, on the blank field of the spectrum analyzer scale, right-click and go to the properties of the analyzer screens, selecting “Properties”. We make the settings according to Figure 26 . Here, in the Plot Options section in the Plot Top window, the maximum value of the Y scale (0 dBVrms) is set, and below, in the Plot Range window, its ranking is set, i.e. how much will its lower value differ from the upper one (in this case, by 130 dB). In the Frequency Span section, in the Start (Hz) window, the lower displayed boundary of the frequency grid (X scale) is selected, and in the Stop (Hz) window, the upper one is selected. We confirm.
Fig.26
After all these settings, by turning on the low-frequency generator and setting the resistor ( according to Figure 23 ) to 1 V, you can start the spectrum analyzer and see how different the measured value is from the real one. If there are no signals on the screen, this means that either the card is not selected, or the wrong input is selected. If a signal at the desired frequency is visible on the screen, then you need to go to the Windows volume settings again and set the input sensitivity slider there to the minimum position at which the signal still passes through (for me it’s completely “zero”).
For ease of control and more accurate installation, it is better to display the utility window that measures the peak amplitude (path Utilites - Peak Amplitude) and by going to the Amplitude Calibration menu (path Option - Calibration...), adjust the values in the Detected levels (Percent full scale) windows of both channels so that the utility shows a value close to 0 dBVrms ( Fig. 27 ). You also need to display another window of the utility that measures nonlinear distortion (the Utilites path - Total Harmonic Distortion (THD)), and by changing the output level from the low-frequency generator, see at what moment strong distortions begin to appear.
Fig.27
You can check that the calibration was successful by attenuating the input signal level by a known value - for example, the G13-118 has a discrete attenuator and when it attenuates the signal by 50 dB, we see that the analyzer also showed a value of -50 dBVrms ( Fig. 28 ).
Fig.28
Now we need to see at what level of the input signal the card shows minimal distortion ( Fig. 29 ) and monitor and measure the equipment at levels close to this value. For example, for a VIA TREMOR card these are values from -16 to -30dB, for a C-MEDIA card on the 8738 codec – from -16 to -40dB. At these signal levels, the distortion factor does not exceed or is about 0.01%.
Fig.29
Checking the compliance of signal levels in oscilloscope mode in Figure 30 . It can be seen that the amplitude of the sinusoid is about 1.41 V, which corresponds to a reading of 1 V with a VR-11A multimeter.
Fig.30
Now we check the operation with constant voltages - the circuit according to Figure 31 . From a bipolar power supply, opposite-polar voltages are supplied to a variable resistor, from the motor of which the set voltage goes to the input block. Monitoring is carried out with the same VR-11A multimeter. In principle, the above-described calibration and setting of correction factors can be carried out when monitoring DC voltage in oscilloscope mode and use only one device for this and for setting up the board - a tester.
Fig.31
An example of constant level changes is shown in
Figure 32 .
The initial state is one volt negative, then half a volt is negative, then zero, half a volt is positive, one volt and one and a half volts. At a potential of more than 1.5 V, the input clamping diodes begin to operate. So, when 1.8 V is applied, the program shows a level of 1.6 V. This, of course, is only 12% of the error, but then it increases even more, and when measuring up to 1.5 V, it does not exceed 2-3%. Fig.32
General view of the input block in Figure 33 .
Fig.33
The final test of the functionality of the sound card with an open input was carried out by monitoring changes in the 220 V mains voltage. A simple circuit was assembled ( Fig. 34 ) and connected to one of the inputs. The other input was not connected anywhere, but was used to control the drift of the zero scale value.
Fig.34
As a result, after 30 minutes of recording, the graphs shown in
Figure 35 .
The top one is changes in the network, the bottom one is monitoring the drift of the zero scale value. It can be seen that the scales do not float anywhere, at least not visually noticeable at such gradations. The spikes in the graphs are interference from turning on/off the lighting, soldering iron and other electronics - the wires to the rectifier under study were long and unshielded. Fig.35
Some design considerations that have not yet been implemented.
On the original CD card used, in addition to the stereo connector, there are also details related to its output audio part, i.e. an operational amplifier microcircuit, a double volume control resistor (2x18 kOhm) and other small things. I think this resistor can be used. For example, place it in the input circuit of one of the channels, thereby obtaining a small but smooth sensitivity adjustment ( Fig. 36 ). In this circuit design, a maximum additional attenuation of 3 dB is obtained when the 10 divider is turned off, and 6 dB when the divider is turned on.
Fig.36
If you use dual-type switches S1…S4 (for each channel), then the second pair of contacts can switch the power supply to the LEDs indicating the switch states.
Perhaps you should also install an audio output connector on the front panel - after all, when working with the SpectraPLUS program, output signals are often used.
It would be nice to make a stabilized power supply +/-9 V for the op-amp. This reduces the impact of +/-12 V changes and therefore the input block noise at frequencies below 10 Hz. I tried to supply voltages from five-volt stabilizers, but the noise of the microcircuits at medium frequencies increased very much.
Most likely, when using modern op-amps, the parameters of the input block can be improved.
In the end, I would like to remind you that the computer case must be grounded during such measurements. Otherwise, when connecting the input block to a grounded device, both the op-amp of the block and the sound card chips may fail.
Attached are two diagrams in the Splan7 program format, two versions of a printed circuit board for Sprint-Layout 5.0 (for LUT - mirror!) and a file for recalculating the resistance of the input divider for the RFSim99 program.
Literature, links: 1. Shmelev O. “Computer measuring complex.” Radio magazine No. 6, 2007, p. 27. 2. Titze U., Schenk K. “Semiconductor circuitry.” Moscow, ed. "World", 1982.
Andrey Goltsov, r9o-11, Iskitim, spring 2014.
List of radioelements
| Designation | Type | Denomination | Quantity | Note | Shop | My notepad |
| Figure 2 | ||||||
| OP1, OP2 | Operational amplifier | KR140UD608 | 2 | Search in the Otron store | To notepad | |
| VR1 | Linear regulator | LM79L05 | 1 | Search in the Otron store | To notepad | |
| VD1-VD12 | Diode | KD522A | 12 | Search in the Otron store | To notepad | |
| R1, R2 | Resistor | 33 kOhm | 2 | MLT-0.25 | Search in the Otron store | To notepad |
| R3, R4, R21, R22 | SMD resistor 0805 | 2.2 kOhm | 4 | R3, R4 select (see text) | Search in the Otron store | To notepad |
| R5, R6 | Resistor MLT-0.25 | 2 kOhm | 2 | Select denomination (see text) | Search in the Otron store | To notepad |
| R7, R8 | SMD resistor 0805 | 51 kOhm | 2 | Search in the Otron store | To notepad | |
| R9, R10, R15, R17 | SMD resistor 0805 | 15 kOhm | 4 | Search in the Otron store | To notepad | |
| R16, R18 | Resistor MLT-0.25 | 2.7 kOhm | 2 | Select denomination (see text) | Search in the Otron store | To notepad |
| R19, R20 | Resistor MLT-0.25 | 1.8 kOhm | 2 | Select denomination (see text) | Search in the Otron store | To notepad |
| R23, R24 | SMD resistor 0805 | 3.9 kOhm | 2 | Search in the Otron store | To notepad | |
| R25, R26 | SMD resistor 0805 | 330 Ohm | 2 | Search in the Otron store | To notepad | |
| C1, C2 | Capacitor S1-73 | 1.5 µF 160 V | 2 | Search in the Otron store | To notepad | |
| R11, R13 | Variable resistor | 10 kOhm | 2 | see text | Search in the Otron store | To notepad |
| R12, R14 | SMD trim resistor | PVZ3A 50 kOhm | 2 | Search in the Otron store | To notepad | |
| C3, C4, C6, C7, C12-C19 | Capacitor SMD 0805 | 100 nF | 18 | Search in the Otron store | To notepad | |
| C5, C8 | Electrolytic capacitor | 1000uF 16V | 2 | Search in the Otron store | To notepad | |
| C9, C10, C11 | Electrolytic capacitor | 470uF 16V | 3 | Search in the Otron store | To notepad | |
| S1-S4 | Switch | P1T-1-1 | 4 | Search in the Otron store | To notepad | |
| L1-L4 | Inductor | 68 µH | 4 | Search in the Otron store | To notepad | |
| Add all | ||||||
Attached files:
- Sound Card Input Unit.rar (35 KB)
Tags:
- Sprint-Layout
What can a sound card be made from?
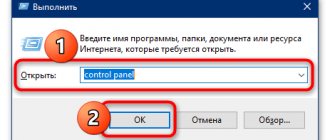
How to make an external sound card . After completing the installation work, you need to check the functionality of the audio board. First, the supply voltage to the DAC is checked. Next, the device is connected to the computer. Windows OS has all the drivers that will be installed after connecting the card to the USB port. The PCM2902 audio controller is defined as a USB Audio codec. Next, in the Device Manager, in the line “Sound, video and game devices” we find USB Audio codec. It remains to make a few simple settings.
In the Control Panel, the “Sound” item opens and there, on the “Playback” tab, the USB Audio codec is installed by the default device. Next, in the “Properties” menu, on the “Advanced” tab, set the format: 16 bit 48000 Hz (DVD disc). Next, in the “Sound” item, you need to open the recording tab and select the default USB Audio codec microphone. Then you need to open “Properties” and the “Listen” tab. The specified parameters should be set there.
This field, in the “Advanced” tab, sets the following format: 2 channel, 16 bits, 48000 Hz (DVD disc). This completes the setup of a DIY digital-to-analog adapter. Headphones or the input of a low-frequency amplifier are connected to the analog output. Using technical principles, a USB audio board can be made based on any digital-to-analog converter.
Setting up the microphone on the sound card
Before setting up the microphone, you need to connect it, otherwise the device will not be displayed. To do this, the microphone plug is inserted into the pink jack on the sound controller. Then you need to open Realtek HD Audio Manager. This can be done through the control panel by opening the line with the corresponding icon, or by clicking on the colored speaker symbol in the notification panel.
Next, in the main window you need to use the sliders to set the microphone gain and recording level. Gain should not be made above +20.0 dB, as distortion may occur. It is advisable to enable the noise reduction system by checking the boxes next to “Noise reduction” and “Echo suppression”. You can make a test recording and adjust the gain and level based on the listening results. Setting up an external sound card is only possible with connected devices and installed drivers.