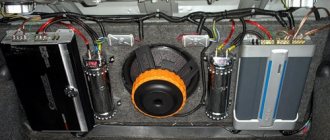
More precisely, the connection diagram of the MYSTERY MSK-12 subwoofer kit to the MYSTERY MDD-6270NV radio (head unit).
I’m not a fan or an ardent admirer of MYSTERY, but it so happened that I bought MYSTERY by accident; at that time I was not interested in the manufacturer, but in the fact that it had navigation, and all this was relatively cheap. And I got the sub kit from my uncle, for which I thank him very much.
So what do we have and what needs to be connected.
consisting of a low-frequency speaker (subwoofer)
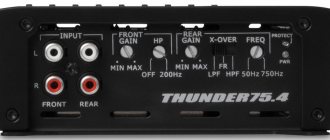
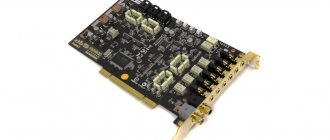
and 2-channel amplifier
all this needs to be connected to the GU
having these RCA outputs (SUB/FRONT/REAR, there are also video outputs, but we are not interested in them now.)
Sub out (RCA)
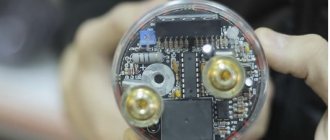
I don’t know why, but for some reason the manufacturer decided to make the sub output with one tulip, and not two (as is often the case). Faced with this problem, I decided to consult with the seller (a well-known VEGA store in Perm). To which the seller told me, given that there is only one way out - you need to install a splitter.
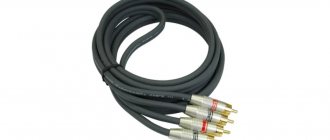
That is, we take a classic interconnect RCA cable 5 m long and use only one of the 2 wires and connect it to the splitter
the black tulip will hang out, maybe if I change the GU and there will be 2 outputs for the sub, it will come in handy.
Thus, what goes with the splitter goes to the amplifier
and the second end to the dark green tulip GU (SUB output). All interconnections are completed.
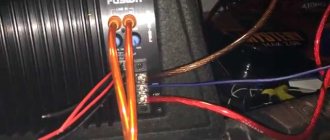
Next are the power cables. I read in the instructions for the harness that the power wires should be 4Ga. And in stores this MSK-12 subwoofer kit includes wires with a cross-section of 6mm^2. Although the cross-section of 4Ga should be 21.2 mm^2. Already the manufacturer has discrepancies in instructions and production! In the same store, the same seller showed me that a 4Ga wire costs 330r/m. But I need 6 m (5 for + and 1 for -), to put it mildly, I was not ready to pay 1950 rubles for 6 meters of good wire. To which the seller offered me a more budget-friendly option.
In the photo, I think you can see the list, the power section of 9mm^2 is of course not 21 mm^2, but it’s better than 6 mm^2
Well, here it’s already clear and just 5 m of red, we end one end with a ring terminal and put it on heat shrink (included in the kit) and hook it to the battery (+). After 30 cm into the gap we install a 30A fuse with a housing (also included in the kit).
We also terminate the other end of the red cable with a Y-shaped terminal and hook it to the amplifier at (+)
For a car enthusiast, a car is like a second home, where everything should correspond to the tastes and preferences of the owner. A weak sound system installed by the manufacturer usually does not reproduce bass well. To “tune” the sound system in cars, music lovers install a subwoofer.
Car subwoofer: types and design features
A subwoofer (SBV) is an acoustic system that converts low-frequency sound waves.
You don't need it to listen to most music tracks. A sub is needed for high-quality sound of low frequencies (bass).
Subwoofers come in two types:
- Active - they already have a built-in power amplifier;
- Passive - there is no amplifier and requires additional connection so that the output sound is clear without distortion or interference.
A passive subwoofer may look like a regular large speaker or a box in which the speaker is placed.
Structurally, an active sub consists of the following elements:
- body - wooden or plastic;
- woofer;
- signal regulator;
- amplifier;
- signal frequency regulator.
For high-quality sound, the active sub must be correctly connected to the radio.
Types of subwoofers by design:
- Horn - the type has a folded horn-speaker, used at concerts;
- Closed - is a speaker installed inside and tightly adjacent to the walls of a closed box;
- Bass inverter - a type using a ventilation pipe, from which, under the force of sound waves, air comes out along with low-frequency sound;
- Quarter-wave resonator - acoustics with a tunnel design, a tunnel-pipe, of a given length and cross-sectional size through which sound comes out;
- Bendpass is a box with a bass inverter, divided in the middle by a wall into two chambers, different in volume, the speaker is placed in the partition between them.
Amplifier purpose
At the initial stage, it is necessary to decide what the car enthusiast wants to get in the end. Typically, when installing a car amplifier in a car, two goals are pursued:
- improving the quality of the audio signal output from the car speakers;
- increasing the overall volume of music tracks.
Car amplifier
A car amplifier is a universal device that allows you to increase the output signal level. In everyday life, many people use home theaters that include an amplifier. But household appliances typically use a 220-volt power source, while automotive systems are powered by a 12-volt on-board network. That's why such amplifiers are called automobile amplifiers.
Connecting a subwoofer to a radio via an amplifier
To connect the SBV to the car radio you will need a set of tools and materials:
- knife;
- set of screwdrivers and keys;
- pliers and wire cutters;
- insulating tape;
- circuit breakers;
- capacitor;
- consumable fasteners (nuts/bolts);
- O-rings;
- wiring (“tulips”, speaker cable, power supply).
Important: before connecting, be sure to disconnect the terminals from the battery to avoid short circuits.
Connection process
Select a location in the car to mount the device. Depending on the model and size, this will be the trunk or the cavity under the rear seat of the car.
Now you need to lay the power cable from the battery from under the hood to the place where the amplifier and subwoofer will be installed in the luggage compartment. The connecting wires from the radio to the amplifier are laid in the same way.
Next, connect the “black” and “red” wires to the “-” and “+” contacts of the amplifier, respectively.
When the amplifier is powered, it is connected to the car radio; ordinary RCA wires - “tulips” and a power wire (usually “blue”) are suitable for these purposes.
Now you need to carefully remove the radio using a screwdriver and knife.
Then “tulips” are connected to the radio according to the colors of the connecting wires. In order for the sub to turn on simultaneously with the car radio, you can immediately connect the “+” power wire.
RCA connecting wires are connected to the amplifier ports according to polarity. The power cable is also connected.
An additional fuse is inserted into the resulting connection diagram to protect against voltage surges and short circuits. It is better if it is installed next to the battery so that it can be easily changed.
Next, the wires are connected to the radio into the linear output connectors (LO), and their opposite end into the LINE-IN connector of the amplifier.
Recommendation: To avoid voltage surges in the car’s electrical network, experts advise additionally installing a capacitor on the circuit. This is not necessary if the subwoofer power is below 350 W.
Advice: in order for the sound to be of high quality and reproduced without interference in the connections, it is recommended to use speaker wires with a cross-sectional thickness of 4 mm or more.
Connecting with tulips
To correctly connect the wires to the RCA connectors, you need to remove the radio from the panel in the car and find the linear output block on the back wall. It is usually labeled Line Out. The tulip sockets are marked SUB, Front and Rear and are intended for connecting an amplifier, subwoofer and various speaker systems. The likelihood of finding at least two pairs of bell outputs on standard radios is not great. And many have to part with standard models and replace them with newer and more advanced ones.
But what to do if a car enthusiast does not have the funds to buy a more advanced model with the required number of outputs, or the radio is too expensive for the owner, and he does not want to part with it? What to do if there are not enough RCA outputs? Let’s say you’ve already connected to an amplifier for one pair of speakers, and the desire to also connect a subwoofer intensifies every day.
In this case, there are two solutions to this problem:
- Use additional equipment to output another pair of linear outputs.
- Use a so-called “Y” splitter or adapter.
Using the latter, you can compensate for the lack of linear outputs on the car radio.
From what has been written above, it becomes clear that connecting tulips to a radio to solve acoustic problems in the interior of your favorite car is not a very difficult task. The main thing is to understand the significance of this or that connection. Evaluate the importance and purpose of connected equipment. And it doesn’t even matter what kind of radio is installed in your car, an old Pioneer or a modern system with a quad-core processor. In the modern world, you can solve any problem of connecting speaker systems in a car.
Examples of circuits for connecting active and passive subwoofers
Please note that not all car radios have LV. As a rule, factory models do not have this connector.
In such cases, it is recommended to additionally purchase a special adapter to connect a passive subwoofer, which connects to a radio that does not have a LP. In turn, the subwoofer will be connected to this adapter. How to do this correctly is shown in the diagram below.
Active connection diagram. subwoofer to a car radio without a LV channel via an adapter.
Passive connection diagram. SBV through an amplifier.
Output functions for tulips
Oddly enough, it all depends on the cost of the equipment. The more expensive the radio, the richer its functionality. Accordingly, the number of RCA connectors will be greater in expensive models. Let's look at the purposes of different configurations of tulip outlets:
- a pair. It is practically present in all inexpensive players and is very convenient for connecting a subwoofer.
- two pairs. With two pairs of linear outputs, you can build a system of rear and front outputs. Such radios have an average price range. There is a possibility that they contain subwoofer settings with an HPF filter for adjusting low frequencies.
- three pairs. This is the best option. With this configuration, you can connect a complete set with an amplifier for all channels to the car radio. And if the radio has a built-in processor, then you can create a completely sophisticated audio system. But such a car radio will cost a lot of money.
So, if it makes sense to change the standard radio to a more advanced one, you should first decide what tasks it will have to face in the future.
How to connect a subwoofer without an amplifier
- On the rear panel of the car radio there are two inputs through which the subwoofer and the radio are connected using a linear cable.
- Then the power is connected: the power cable is laid under the interior trim and connected to the “+” terminal of the battery with one edge, and the other is connected to the subwoofer.
- The negative contact is connected to the battery “-” terminal and is grounded to the housing with a bolt connection. For these purposes, the edge of the wire must be stripped in advance. Cleaning is done with a knife and wire cutters.
- Since the power supply to the battery is 12V, the connection is only permissible through a fuse, which is installed on the power cable near the battery.
- Next, the connecting RCA wires are laid from the subwoofer through the interior and connected through the LOW-Input connectors, having previously cleaned the edges. If the connectors in the radio do not have RCA connectors, then you can connect them via the HI-Input connector.
Important! When connecting a device, do not confuse the active with the passive; remember that the active already has a built-in amplifier, while the passive does not, so the connection diagrams are different in both cases.
RCA connector what is it
The composite RCA connector or “phono connector” was developed and used to connect electronic equipment components since the 40s of the twentieth century. The design consists of two elements, conventionally called “Dad” and “Mother”. The active male connector is installed on the cable, and the passive female element is usually a socket and mounted on the housing of the electronic equipment. In some cases, for adapters, the passive element may also be mounted on the cable.
The active connector is made of a coaxial design, where the signal pin is located inside a metal cup, which serves as a screen and is connected to the common wire. The signal contact is a metal rod that protrudes slightly beyond the housing. The space between the central terminal and the housing is filled with insulating material. In budget connectors, polyethylene or polyvinyl chloride is used for this; in more advanced designs, textolite or fiberglass is used, and in professional connectors, Teflon or ceramics provide insulation. The body of the product can be made of metal or plastic. In everyday life, a connector of this type is usually called “Tulip”. The signal wire is connected to the central contact by fixing it with a screw or soldering. The common wire is connected to the metal cup by soldering or mechanically crimping the core into a special petal.
To securely fix the metal cup in the socket, it has slots that spring the connection point, ensuring reliable contact. In a passive connector element, the signal wire is soldered to the central terminal, and the ground (GND) is soldered to a special tab.
The protruding central contact of the active element allows you to connect individual blocks to each other by touch. But this is a disadvantage, since the signal wire is connected first, and there is no ground contact. When connecting some units of household equipment to each other, the resulting potential difference can lead to damage to the electronic components of the circuit. Most often this happens when connecting the TV to the TV output of the video card.
Problems you may encounter when connecting
The following difficulties may occur when connecting the device:
- A factory car radio usually does not have a special audio connector for an amplifier - this can be solved by purchasing a special adapter;
- Setting and correlation of low and high frequencies with the main acoustics of the car.
Please note: to properly connect the subwoofer to the car radio, you must have basic knowledge of electrical engineering. Otherwise, it is better to contact a car service center for specialist help.
Some car owners don't like the audio capabilities of their stock radio. This characteristic can only be corrected by connecting a subwoofer. Independent installation of built-in devices for transport can be carried out only if you have professional tools and study in detail the radio setup diagram. With a detailed algorithm, it is not difficult to fix the technique in a new way.
What is line output
In order to connect the amplifier to the car radio, there must be linear outputs on the back wall of the player. Another name for such connectors is RCA outputs. To connect to audio equipment, a special cable is used, equipped at the ends with special plugs, popularly called tulips or bells.
There can be several tulip outputs on the radio, from one pair to three. There are advanced players that have more than three pairs of linear outputs. You can find out their number by looking at the technical specifications of your radio.
Line output
Connecting to the radio via tulips using linear outputs is considered very reliable, since the connecting parts fit very tightly to each other. But when choosing a cable with tulips, it is worth remembering that a high-quality cable will not be cheap.
Important to remember! Don't take cheap Chinese stampings, they won't last long. When purchasing, consider the length of the cable; it should be generous when connecting devices.
Where to install
The question of where is the best place to install a sub can turn into a problem: a successful solution is directly related to the model range of the car. The main nuance comes down not only to the settings stage, but also to finding a place for the amplifier.
Owners of a minivan or hatchback often stop at the trunk, since it has exaggerated parameters. With any sedan the situation is a little more complicated: there the device needs to be connected through the armrests or fixed on the shelf in the back. A convertible will be considered the most uncomfortable body type: such cars have a limited trunk volume, and turning on the subwoofer can be a big nuisance from a technical standpoint.
Process and connection diagrams
In order to correctly navigate how to connect a subwoofer, it is worth understanding what type of equipment the purchased model should be classified as. They come in 2 variations: active and passive. When studying popular schemes for connecting subwoofers in cars with settings for a standard radio, you need to focus on such points as:
Are you a car driver?! Then you can take this simple test and find out. Go to test »
- the frame and amplifier (overall parts) should be located as compactly as possible, and you need to think in advance where to place them;
- take care of good cooling (during operation, powerful heating occurs, so the air must circulate freely);
- stop a short circuit (if there is no analogue for communication and control wires, then the program will need power from the battery).
The System Remote Control format is also required for control: without it, the connection diagram will not work. When the device a priori does not have this output, it is advised to route a continuous flow of volts directly to the beginning of the subwoofer.
What you need to connect
To effectively organize the connection of a capacitor in a subwoofer on your own at home, you should prepare the following set of tools:
- tongs (construction) and knife;
- wrench and adjustable wrench;
- electrical tape (or something similar for temporary fixation);
- pliers;
- wiring (battery, “tulips” and “+” wire);
- plastic ties and pullers;
- power and speaker cables;
- fuse (minimum 60A).
During installation, special attention should be paid to the selection of elements for feeding the subwoofer and cable for acoustics. This depends on the category of transport and the availability for subsequent installation of wiring directly under the decorative trim of the car dealership. The cross-section is closely intertwined with the power of the kit or amplifier: the current strength must match the power cable and not reach overheating.
Connecting a passive subwoofer
The algorithm according to which a passive subwoofer is connected looks like a special design that includes 1 or slightly more low-frequency speakers, a set of filters and an amplifier. They are combined into a single body, which is made of plywood or wood (dense base). If you want to connect a passive subwoofer to the receiver, you will have to spend about 1-3 hours, which depends on your personal skills and the condition of the car.
The procedure consists of the following steps:
- Before starting work on the battery, remove the terminals (which will automatically eliminate the possibility of a short circuit).
- You need to find the hole made, which is covered with a plug. On domestic transport it may not be observed, and you will have to additionally make a hole and seal the seal with sealant.
- To combine with a radio, you will need “tulips”, as well as a spare wire that allows you to control the power.
- “Tulips” are connected in accordance with the colors of the connectors. To connect the subwoofer and equipment in parallel, use the required “+” wire.
- The wiring under the hood should be placed in a standard harness and carefully brought into the cabin; Think in advance about how the power cable will be installed.
- Sometimes it will be necessary to temporarily remove the interior trim and sill trims to avoid pinching or kinking.
- After the final installation, all used parts are attached back to the body through the hole. And connecting a passive subwoofer with power is oriented towards polarity.
- You should find the location of the terminal and connect it to the power cable of the built-in radio.
All that remains is to configure the connection of the subwoofer to the receiver. When changing the settings of a two-channel amplifier to share power, all channels are connected to one device.
The capacitor does not need to be used at all: this part is only necessary when the amplifier has a maximum power above 400 W. But setting up a subwoofer in a direct connection will provoke a large consumption of energy, which will lead to rapid discharge.
Without amplifier
Sometimes it is necessary to activate a connected passive subwoofer directly to the equipment, without adjacent amplifying additions.
It is possible to set up a connection this way, but it is necessary that the entire frequency line goes to the dynamic head instead of low copies.
Then the signal to the subwoofer is dialed from any of the radio channels.
Direct connection to a monoblock - sometimes a central type amplifier can fail, since the resistance can be of different calibers, which leads to an overload of the output in the radio.
Connecting an active subwoofer
An active sub is a pre-prepared acoustic unit that includes not only a speaker and a filter, but also a device amplifier. It is much easier to connect such equipment, and the quality of the melody is superior to the passive analogue. Although, according to the act, the sound level depends on how well the connection is made. The most reliable way to set up an active subwoofer is a primitive sequence of steps:
- Disconnect the car and then remove the terminals from the battery.
- Lay the power cable to the subwoofer fixation point, while the cable itself should preferably not remain under the pedals or interfere with neighboring mechanisms.
- Leave the fuse close to the battery. There is no need to connect the power cable to the battery terminal.
- Remove the original radio and carefully inspect the rear panel to find the linear output for low frequencies and the control wire.
- To connect an active subwoofer to the radio, you should lay the acoustic elements and the REM wire under the casing and secure them firmly.
- The grounding must be taken from the metal surface of the car body, the twisting area must be isolated and the device must be installed in its normal location.
- Finally, it is worth connecting the power cable directly to the “+” terminal of the battery and ensuring a large cross-section.
When the active subwoofer radio is immediately supplemented with a special connector in the connection diagram, the switching will be much easier. Then it is enough to install a coaxial cable with a connector: on the first side the wire will connect to the SubOut output, and on the opposite side - to Lineln. Connecting an active subwoofer to the receiver features a built-in amplifier, which makes it possible to save space in the vehicle.
Without line output
Sometimes car enthusiasts find themselves in a situation where attempts to connect a subwoofer to a standard radio are met with a problem in the form of a lack of communication with a passive amplifier or an active program. But there is no need to replace equipment in a car without a linear output. You can configure the device through an alternative input, as a spare signal level converter. A high-level stream is taken from the adapter to the amplifier. Depending on the type available, the feed can be controlled if necessary (for the sake of disappearing distortion).
Connecting from a computer to a radio
When the standard supply of standard melody in a car is not satisfactory, and you need ways to quickly improve the sound, then a good solution is to try to connect a subwoofer directly from a computer.
The device can be configured in 2 ways: by supplying power via a 12/220W inverter or through any contacts (+12W) on the board.
A tester and minimal knowledge of radio electronics will help you connect it correctly. Having orientated yourself with the battery, you need to send an audio signal to the subwoofer, having previously arranged it from the straight-line output of the equipment using a screen cable of the requested length.
Through crossover
This replacement duplicates the filter, dividing frequencies into ranges and thereby improving the sound level in the car radio. They are not only active and passive, but also one- and two-way. Each drive option has its own advantages and disadvantages, as well as price.
It is worth paying attention to their location:
- passive ones are configured in front of the speakers, 1 piece is enough;
- active crossovers are placed opposite several amplifiers.
The speakers themselves need to be connected to the subwoofer with a separate channel wire. It is important to consider that if you do not use a frequency filter when connecting a subwoofer, the full range will be supplied - from low to high. And without separation, the sound will be worse.
Connecting two subwoofers
To connect two subwoofers, you need to connect their adjacent wires according to the standard principle: “+” connect to “+”, “-” to a similar “-”. It is necessary that the configured device be carefully matched to the relative technical characteristics of the other device. The pair connection can be:
- Consistent. So the car owner will receive a total resistance of 4 ohms, and a large proportion of AB format amplifiers are designed only for a fixed resistance. The total power of the speakers is summed up.
- Parallel. In a spare circuit, the final resistance size must be 1 ohm; this indicator is already considered critical for most AB type amplifiers, and for the neighboring class D it is the operating level.
In the process, everything depends on how to install the amplifier, where the 2 subwoofers in question will be connected in the future.
Laying wires
Fixing the power cables and supplying audio signals becomes the initial plank during the adjustments made. Before starting installation, you should decide on the initial location for setting up the amplifier: according to the standard rule, the cable should be laid under 300 mm (including the spare part), and the laying itself should be left under the interior trim. At the same time, the wire can be connected to the battery terminals or to the power cable of standard electrical wiring (as an additional option).
A protective fuse must be fixed in the circuit: the installation point must guarantee free access for careful examination or replacement. If, when trying to connect a capacitor, the gasket needs to be directed through the body partition, then it should be routed to non-standard channels. If they are missing, it is recommended to create holes protected with special plastic clips.
Subwoofer wires should not come into direct contact with sharp metal edges, be pinched by sheathing, or be located in areas susceptible to condensation damage.
Grounding
Correctly connecting the ground or negative power wire can be done in parallel with the positive wire setting. To install the cable in question, it is recommended to use special bolts that are in the car (on the body).
To achieve good contact performance, you need to thoroughly clean the metal from any signs of corrosion, paint residues and primer.
The edge of the wire must be supplemented with a special terminal, which is secured as tightly as possible with a nut.
How to set up a subwoofer in a car
Setting up the subwoofer should be done while designing the speaker box. The main role here is played by the parameters of the speaker, which determine the boundaries of its functioning in the acoustic design. If you have a dilemma about how to set up a sub in a bass reflex enclosure, it is recommended to install the port both higher and lower, depending on your favorite type of music. And for a device in a factory frame, connecting a subwoofer with a bridge is limited, but with a well-chosen circuit it is more than possible to achieve good sound.
As a backup option, use special applications for your phone (Subwoofer Bass).
Setting up the LPF lowpassfilter filter
Nowadays, a classic LPF filter is almost always present on a subwoofer. This type of filter allows you to select the threshold at which high frequencies begin to be blocked, which allows you to simply mix the signal with other speakers. To properly configure the filter, you need to know in advance how this is done.
First, you need to make sure that the initial parameter was not too high, and that the woofers on the subwoofer do not overlap: this risks leading to unnecessary emphasis on one frequency level (about 120 Hz) and unclear sounding of the acoustics. But if connected too low, there may be a large gap between the car signal and the speakers.
At the start, it is recommended to set the LPF filter at a frequency of 80 Hz, and then conduct a sound test and change it as desired until it sounds as the owner requires. It’s better to deactivate the filter on the radio. When there is a chance to apply LPF on the main device, you need to activate it only there. You should not run the filter at the same time as the amplifier.
Setting up a subsonic
Subsonic is an infrasonic format filter that can block ultra-low frequencies that always appear in some compositions. These frequencies cannot be heard at a typical threshold because they operate below the threshold of human hearing. But when they are not initially trimmed, the device will consume additional energy through startup relative to the all-in-one.
You can set up an active subwoofer in your car, automatically blocking infra-low frequencies - the device will be able to effectively reproduce only those that are present within the established limits. Thus, unpredictable failure of a two-coil subwoofer after accelerated movement of the diffuser is eliminated.
The speaker will try to repeat frequencies that lie outside the perceptible range (20-25 Hz and below). Then the diffuser will speed up, which risks causing the two-coil device to exit near the gap and result in damage. Subsequently, the quality of reproduction of the required bass range increases in quality, in addition, the volume increases.
To tune the subsonic, you should set it at least 5 Hz below the level of the bass reflex port. To do this, turn on the switch and move it to the desired data. When the subwoofer is configured correctly, passengers in the car will not hear it, since it should not provoke interference with the central signal.
Setting the input sensitivity GAIN
Sometimes car owners do not know how to correctly adjust the input sensitivity. This value demonstrates how it is possible to apply a signal to the input in order to result in rated power. It should be adjusted for the incoming flow voltage. It is worth adjusting the input sensitivity correctly to prevent accidental signal changes, distorted sound, or other problems with the speakers.
To change the GAIN values, you will need:
- digital voltmeter, which can measure AC voltage values;
- test CD or file where a sine wave is saved with an initial level of 0 decibels (it is important not to use a weak test signal);
- instructions for the subwoofer for the car, which mentions the permissible output voltage.
You must disconnect the speaker wires from the unit and ensure that the bass, equalizers, and other settings on the head unit are turned off to get clear sound. The level of input sensitivity should be minimal, so it is better to switch to bridge mode. You can use an oscilloscope to collect more accurate data.