The subwoofer speaker is the main component in building powerful and high-quality bass. But the box where you place it plays an equally important role. Depending on the design and type of box, the same subwoofer speaker can be made to play differently. For example, make the bass softer or harder, faster or louder. And if the box is designed incorrectly, you will be completely disappointed in the purchased subwoofer. In this section of our information portal you will find: various drawings of boxes for popular subwoofer speakers designed and tested by professionals. You can choose the box setting that best suits your musical taste. Ready-made detailing with dimensions of parts. that is, you can give the drawing to a company that provides wood cutting services (furniture), and after a certain time pick up the finished parts. Or you can save money and make the cut yourself. In any case, everything is routine work; what displacement of the box is needed, what the length or volume of the port should be, and much, much more we took upon ourselves. All you have to do is download the calculation of the box for the subwoofer, saw it, twist it, tighten it if desired, and enjoy the loud and high-quality bass.
Box for Pride LP 15
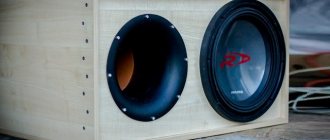
Pride LP 15 is the most budget 15-inch subwoofer from Pride. High quality workmanship and a large diffuser stroke and a rated power of 450 watts make this subwoofer a very attractive option for purchasing on a limited budget.
A closed box for Pride LP 15 should have a volume of 60 liters. This is the optimal volume for this subwoofer. The frequency response is completely direct with a slight acoustic gain from 50 Hz and below. An excellent option for everyday wear. Lp15 will play smaller in a box, but there will be noticeably less bass.
Frequency response of 60L box for Pride LP15.
Drawing of a 60L box for Pride LP 15
A closed box for two Pride LP 15 should have a volume of 120 liters. For two Pride LP 15 this is the optimal box volume. If necessary, you can reduce the volume to 100 liters.
What materials do we need to assemble the subwoofer?
Multilayer plywood for the subwoofer box The material for making the subwoofer box must be strong, dense and well insulating sound. Multilayer plywood or chipboard is perfect for this. The main advantages of these materials are their affordable price and ease of processing. They are quite durable and provide good sound insulation. We will make a subwoofer from 30 mm thick multilayer plywood.
To make a subwoofer box we will need:
Wood screws (approximately 50-55 mm, 100 pieces) Soundproofing material (Shumka) Drill and screwdriver (or screwdriver) Jigsaw Liquid nails Sealant PVA glue Carpet, approximately 3 meters Terminal block
Subwoofer box drawings
In this article we will make a box for a subwoofer with a 12-inch speaker. The recommended box volume for one 10-12 inch speaker is 40-50 liters. Calculating a box for a subwoofer is not difficult, here is an approximate diagram with panel sizes
Diagram and drawing of the box It is worth paying attention to the minimum distance from the walls of the case to the speaker. It, like the volume of the entire box, is calculated based on the inner surface
Assembling a subwoofer box with your own hands
You can start assembling. We use a 12-inch Lanzar VW-124 speaker. 12-inch subwoofer speaker Its diameter is 30 cm, and the first thing you need to do is cut a hole for the speaker. The minimum distance from the center of the diffuser to the subwoofer wall is 20 cm. We measured 23 cm (20 cm + 3 cm plywood width) from the edge of the panel and cut a hole with a jigsaw. Next, we cut a hole for the bass reflex slot; in our example, it has a size of 35*5 cm.
Cut out the bass reflex slot and the hole for the speaker
Instead of a slot, you can use a classic air duct - a tube. Now we assemble the bass reflex slot and attach it to the front panel of the subwoofer. We go along the joints with liquid nails and tighten them with self-tapping screws
Assembling the bass reflex slot panels It is important to tighten the screws very tightly so as not to leave any voids. They will create resonant vibrations that will ruin the sound of the subwoofer.
Next, we assemble the side walls of the box, having previously lubricated them with liquid nails, and tighten them tightly with self-tapping screws. Side walls of the box On the back cover of the box you need to cut a small hole for the terminal block. We connect all parts of the body. We make sure that we cut and fastened all the parts correctly. Box assembly Insert the speaker. Let's look and admire.
Interior decoration
Let's move on to the interior decoration of the box. The first thing you need to do is seal all the joints and cracks with epoxy glue or sealant. Next, using PVA glue, we glue soundproofing material onto the entire inner surface of the box. We cover the body with Shumka. We cover the body with Shumka. Now we cover the entire outer plane of the box with carpet, including the bass reflex slot. You can attach it with epoxy glue or using a furniture stapler. The box is covered with carpet. Next, we insert and screw the speaker tightly. The subwoofer is almost ready, all that remains is to stretch the wires from the speaker to the terminal block and connect the amplifier. Installed subwoofer with amplifier We bought an additional amplifier, but you can also make it yourself. This is quite difficult, as it requires knowledge and practice in the field of radio engineering. You can also use ready-made kits and circuits for radio amateurs, like Master-KIT, and assemble the amplifier yourself. The only requirement for the amplifier is that its maximum power must be less than the maximum power of the speaker.
Purpose, design and principle of operation of the CV box
The design of the HF box is aimed at modulating the sound flow. The effect of sound transmission and reflection is used. Thanks to the special housing design, sound harmonization is achieved. This is especially noticeable at low frequencies and when installing a subwoofer. With the appropriate dimensions, the HF box will make the bass sound quite loud, bright, but unusually deep.
Subwoofer box
Manufacturing
Make a box for the subwoofer
Let's get started:
The first step is to determine the size and shape of the future box. It will be useful to find a suitable housing drawing;
What to make a subwoofer box from
We determine the material from which we will assemble the box. As mentioned above, marine plywood is considered the best material. If we couldn’t find it, then we use MDF or multilayer plywood.
- You don't have to cut plywood in your own garage. You can do this right in the store if you ask the seller to observe the appropriate dimensions. In many stores, cutting is completely free;
- We prepare the necessary materials: glue, preferably PVA, brushes, self-tapping screws or furniture screws, liquid nails and much more.
We are building a building
First of all, let's start making the box body. Let's start:
It is advisable to make the front part of the box, where the head will be fixed, double. We just put two sheets of plywood here and that's it. If the thickness of the plywood sheet is chosen to be 18 mm, then in this part the thickness should be all 36 mm, which will provide greater rigidity
This is very important, because it is this part of the box that has the greatest impact.
Let's continue:
We glue the plywood sheets together and then fix them with self-tapping screws
It is important not to skip screws, but to attach them to every 1 cm2 of wall area
We protect and modify the hull
Let's get started:
A special varnish applied to the surface will help protect the plywood from moisture; We glue vibration-insulating material inside the case. It will not only protect the body, but will also significantly increase the rigidity of the entire structure; Some experts recommend protecting the subwoofer housing with vibration-insulating material on the outside
This will make it possible to obtain pleasant and high-quality bass; We glue all the joints and connections, paying special attention to the place where the wires come from.
How to make a box for a subwoofer
At this point, the process of making a subwoofer box with your own hands can be called complete. The instructions must not be ignored under any circumstances.
Video reviews and photos are of no small importance - materials that also need to be given attention (see How to cover a subwoofer with carpet: we do it ourselves). Thus, the price of the subwoofer housing will be the lowest, since you will only need to spend money on consumables
Operating principle
Motorists may be familiar with a resonator, another example of which is the CV box For example, it is used as a functional element of a muffler. In this case, the hollow structure has its own characteristics and another purpose.
From a technical point of view, a resonator is an oscillatory system that accumulates vibrations due to frequency resonance. Typically, the design involves “working” with a limited set of frequency characteristics. Depending on the design, resonators of cumulative and instantaneous action differ.
Homemade wooden box
The storage resonator accumulates external energy by reducing the frequency of internal oscillations. In a mathematical context, any resonator design whose oscillation frequency is greater than the oscillation frequency of the external influence is cumulative. This happens whether the diameter is 10 or 12 inches, but you need to choose a different volume.
Instantaneous action implies the correspondence of the internal oscillatory force in period to external oscillations. Such resonators increase the sound power due to thermal absorption of the surrounding space, shifting the frequency at the input power - changes due to an increase in the playback interval.
The common CV box has a rectangular shape with partitions resembling a caterpillar in arrangement. The appearance will depend on the speaker and its features, size – 10″ or 12 inches. At the moment, you can find drawing diagrams for any frequency device and make a resonator at no extra cost. It will differ slightly from the brand name.
You can make a resonator in a mini version. This solution is shown in the figure.
Drawing of a CV box for 12″
Preparation
Let's figure out how to make a subwoofer enclosure! To make a subwoofer with your own hands you will need:
- Drawing;
- Materials: plywood or MDF, glue, screws, terminal block, wire for connection;
- Tools - jigsaw, screwdriver, pencil, template for mounting hole or compass.
Drawing
Having the housing parameters for the subwoofer in hand (volume, area and length of the port), you can make a drawing yourself using special programs (in my opinion, SketchUp from Google is the most convenient for this). But if you make the box for yourself, then there is no point in wasting time learning the software and doing everything the old fashioned way - by hand.
If you do not know how to calculate the enclosure, then read the material “How to calculate the enclosure for a subwoofer.” You can also order a paid estimate on the Internet; as a rule, it is accompanied by a clear drawing for manufacturing.
An example of a drawing of a housing with a bass reflex (FI)
Materials and fasteners
Housing material
In order to make a box for a subwoofer, you need a material that should vibrate as little as possible. From experience, it is best to use MDF (not painted, not laminated, etc.)
MDF (MDF - Medium Density Fiberboard). In Russian - medium density fiberboard.
MDF is easy to process, has good density, due to its structure it has no resonances and does not delaminate - the bass in such a box is soft and dense. MDF is more expensive than plywood and is “afraid” of moisture.
Plywood is the most common option and costs less than MDF.
Do not use chipboard or old furniture to make subwoofer boxes. A plywood or MDF body will always sound better.
Do not use material thinner than 18 mm. and the larger the volume of your case, the thicker the walls should be.
Many large stores that sell sheet material offer a cutting service to your dimensions, where they will cut the perfect parts for you on a machine, all that remains is to assemble the body.
Fasteners
For fastening, it is best to use yellow self-tapping screws with a length at least 2 times the wall thickness. The heads of black ones often break off; they are thinner and not as strong. An advanced solution is furniture bolts, but if this is your first sub, then it will be easier with self-tapping screws.
Yellow screws, black screws, furniture bolts.
Cage nuts for attaching the subwoofer to the cabinet are cool! The sub can also be secured with self-tapping screws, but with bolts in the mountings, the speaker is attracted as tightly as possible, and if necessary, it can be removed and installed as many times as necessary without damage. And the polished hex bolts look really cool.
Bolt with cage nut
Video about installing cage nuts (a more convenient option):
Glue
If you are sawing the walls with a jigsaw or a hand-held circular saw, then the glue will additionally act as a sealant between the uneven edges; any liquid wood nails will do for this. If you unraveled the material on the machine and the edges of the body walls are perfect, then apply the glue in a very thin layer, but still do not forget to coat the joints from the inside.
Terminal block
You can route the wires directly, but it is better to make a box for the subwoofer with a terminal block.
Terminal block for housing
Use threaded options - they are more reliable. For round seats, it is convenient to cut a hole using a nozzle.
Wires
You will need a piece of wire to connect the subwoofer coil to the output terminal block. Take any copper wire no thinner than 4 mm. in most cases this will be sufficient.
Tools
You will need:
Circular saw - for cutting material, it can be either manual or stationary, it all depends on your capabilities. It is better not to cut with a jigsaw, the edges will be too uneven, even if you attach a guide bar, since the file can still wander.
Manual circular
- A jigsaw is for cutting out holes for the speaker and for the terminal block, it can also be a router, with its help the holes will be smooth and neat. To cut out the wall for a round terminal block, you can use a saw attachment. Select the right jigsaw blade for the job at hand.
- Screwdriver - for tightening screws and drilling holes.
How to calculate a resonator for the Urals yourself?
First of all, we note that the main material for making this audio device is multi-layer moisture-resistant plywood. The speaker input is sized according to the selected model. The volume and design will depend on the technical tasks: interior features, required power and other features.
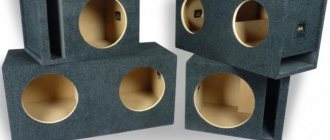
Designs depending on the direction of the port
The figure shows that the direction of the port and other parameters also influence the design. Sometimes drivers, after making calculations, are concerned that the dimensions are very large compared to the available space in the cabin, so they recommend a design that is suitable for this task.
Other housing options
The photo shows an example of the calculation of the HF box, but in total the cross-sectional area of the tunnel is taken into account (for example, 10″ or 12″), depending on the caliber of the subwoofer, for example, Machete m10d2.
Example
Use the Quarter Wave Box calculation program. You will only need to enter the speaker parameters and box volume. Otherwise you will have to make the drawings yourself.
To do this, use ready-made recommendations - a table with subwoofer sizes for 10, 12 inches and others. The cells show the volume that needs to be taken as a basis to achieve certain audio parameters. A “tuning” is also selected depending on the machine owner’s preferences and frequency. The box can be designed for two or more speakers, they can be different 10″ or 15″.
The proposed variations demonstrate some solutions for organizing a car interior media system that are available for self-production. With a little effort, you will get a high-quality sound system in your car for your new Machete m10d2 or Ural, taking into account the features of your interior and preferences.
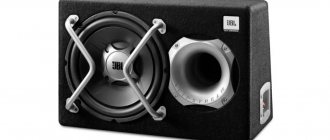
Band pass loudspeaker
The third type of subwoofer, quite often used in car installations (although less often than the previous two) is a bandpass speaker. If a closed box and a bass reflex are acoustic high-pass filters, then a band-pass filter, as the name implies, combines high- and low-pass filters. The simplest bandpass loudspeaker is a single 4th order (single vented). It consists of a closed volume, the so-called. rear chamber and a second one, equipped with a tunnel, like a conventional bass reflex (front chamber). The speaker is installed in the partition between the chambers so that both sides of the diffuser operate in completely or partially closed volumes - hence the term “symmetrical load”.
Of the traditional designs, the bandpass loudspeaker, in any version, is the champion in efficiency. Moreover, efficiency is directly related to bandwidth. The frequency response of a bandpass loudspeaker has the shape of a bell. By choosing the appropriate volumes and frequency tuning of the front chamber, it is possible to build a subwoofer with a wide bandwidth, but limited output, that is, the bell will be low and wide, or it can be with a narrow bandwidth and very high efficiency. in this strip. At the same time, the bell will stretch in height.
The bandpass is a capricious thing to calculate and the most labor-intensive to manufacture. Since the speaker is buried inside the case, it is necessary to go to some lengths to assemble the box so that the presence of a removable panel does not violate the rigidity and tightness of the structure. The impulse characteristics are also not the best, especially with a wide bandwidth.
How is this compensated? First of all, as stated - the highest efficiency. Secondly, the fact that all sound is emitted through the tunnel, and the speaker is completely closed. When assembling such a subwoofer, considerable opportunities open up for installing it in a car. It is enough to find a small place at the junction of the trunk and the passenger compartment where the mouth of the tunnel can be placed - and the way is open to the most powerful bass. Especially for such installations, JLAudio, for example, produces flexible plastic tunnel sleeves with which it offers to connect the subwoofer output to the cabin. Like a vacuum cleaner hose, only thicker and stiffer.
Which box you choose for your speaker is of course up to you. And our auto studio will make this box for you.
As you know, a subwoofer in a car is an integral element for obtaining high-quality, rich and powerful sound. Moreover, in addition to the speaker for the subwoofer, the most important part is the box for the subwoofer.
The sound quality, volume, as well as the ability of the subwoofer to fully “open up”, etc. will depend on the box. In this article we will look at what to pay attention to when designing, as well as how to make a subwoofer box yourself.
Case size calculation
When the volume of the body is known, the shape of this body does not affect the sound. There are various programs for calculating a box for a subwoofer (a program for calculating a subwoofer box is “JBL SpeakerShop” or “Winisd beta.”), but you can simply do the calculation, knowing yourself that the volume is V=hx L x A (where h is the height , L - length, A - width).
For example, how to calculate a box for a subwoofer, if for a 12-inch subwoofer (305 mm), the recommended volume is 45 liters. The measured permissible height for the body in a car is 340 mm (h=340 mm), length 680 mm (L=680 mm), let's calculate the width. A=V/Lxh