Provides ASIO output support.
Version 2.1.2 highlights: * Fixed phase inversion with 32-bit output.
Please note that this component is meant for systems where ASIO is the only available output method. It is highly recommended to use the default output modes instead of ASIO. Contrary to popular “audiophile” claims, there are NO benefits from using ASIO as far as music playback quality is concerned, while bugs in ASIO drivers may severely degrade the performance.
In this article we will look at setting up the fooobar software audio player to listen to DSD audio.
It is worth noting that to play a DSD stream, you will also need appropriate audio equipment, for example a DSD DAC, which will process the DSD stream. In my case it will be an AH-D5 DAC in conjunction with an amanero USB transport.
So let's get started with the setup.
The first thing we need to do is install drivers for the audio hardware we are using. In most cases, you can download these drivers from your DAC manufacturer's website. In my case, these will be drivers for amanero usb transport. For some reason, driver version 1.057 did not work with my combo384, but versions 1.056 and 1.059 worked immediately (you can download them from the links provided from the developer’s website or from the attachment to the article).
Setting up ASIO and SACD plugin:
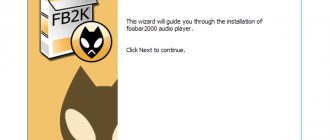
- Let's install the Foobar2000 player itself directly, if it is not already installed.
- Next, install the ASIO plugin for Foobar (https://www.foobar2000.org/components/view/foo_out_asio).
- Next, install the SACD Decoder plugin for Foobar (can be downloaded from the attachment). Unpack the archive and install foo_input_sacd.fb2k-component, you can also install foo_dsd_processor.fb2k-component.
- Open Foobar2000 to configure
- Select: File > Preferences -> Playback -> Output -> Device and select DSD: ASIO: Combo384 ASIO 1.0x.
Plugins for foobar2000
The basic version of the program plays most popular formats, but not all. Some require you to download special extensions.
also install plugins to customize sound . As a standard, the player outputs the audio stream to a digital-to-analog converter via DirectSound, which adjusts non-standard sampling rates and bit rates to the system ones (in most cases, these are 16 bits and 48 kHz). However, if you try to play an audio file with different parameters, the sound quality will not be different, i.e. 16-bit/48 kHz audio will sound the same as 24-bit/192 kHz. To avoid such equalization, you can use third-party plugins that can give the audio sound close to the original.
ASIO plugin in foobar2000
Incompatible with some sound cards, although there are very few of them. ASIO is a professional audio subsystem used in many programs. The main advantage of ASIO is the ultra-low latency of the audio signal. For example, this is very useful when playing on a midi keyboard - the sound will be processed in real time.
As mentioned above, to get the highest quality sound, you need to bypass DirectSound. ASIO directs the audio stream bypassing the system mixer, while the sampling frequency and sound depth do not change.
ASIO has the fb2k-component format and is easily installed into the player.
WASAPI plugin in foobar
In the player, sound can be transmitted through one of two interfaces - MME and ASIO. MME is the Windows audio subsystem used by default in the vast majority of programs. MME has a special WASAPI mode that drives the audio signal past the system mixer.
When using WASAPI, all sounds from other programs will be muted, i.e., playback only from the player is possible. The adapter will not be available for other applications. However, some expensive sound cards can handle WASAPI and ASIO audio simultaneously.
Important! When playing audio via WASAPI, skips, clicks and other defects may appear. To remove this, you need to configure the WASAPI buffer. This is done through Preferences - Advanced - Playback - WASAPI.
SACD decoder plugin for foobar2000
SACD – Super Audio CD decoder. The add-on allows you to listen to ISO images of high-quality CDs without loss. Additionally, DTS, DSD and DSDIFF formats are supported.
To install, you need to download the archive, then extract the files foo_input_sacd.dll and foo_dsd_processor.dll to the components folder. The decoder supports PCM audio stream, DSD stream 2.8/5.6 MHz, 24-bit dithering, sampling rates 88.2/176.4 and 96/192 kHz.
DVD-Audio plugin in foobar2000
Using this plugin you can play protected and regular DVD-audio discs. You can go to the player’s website by typing “foo_input_dvda” in the search, then transfer the dll file to the components folder in the root directory of foobar2000.
After setting the settings, you can open files from the AUDIO_TS folder from the disk directly in the player. This will display a list of all tracks with additional information (number of channels and their parameters).
Reference! Sound in DVD-audio format can be multi-channel. To output multi-channel audio you need to use ASIO.
DTS plugin in foobar2000
A DTS decoder is needed to play DTS (DTS Coherent Acoustics) and DTSWAV files. Also, with the plugin connected, the player will be able to play Matroska files that contain DTS tracks from lossless PCM streams at 44.1 and 48 kHz. The plugin supports Wav, audio-CD, FLAC, Wavpack.
APE plugin in foobar2000
Monkey's Audio Decoder extension is used to decode APE audio files and APL metadata files (APE Link). The component can be downloaded from the official website of the player, then move the foo_input_monkey.dll file to the components directory in the foobar2000 folder (or simply install using the built-in foobar tools). In most cases, the component is already installed in the player by default.
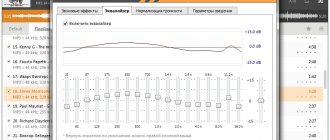
iZotope Ozone 8 plugin in foobar2000
iZotope Ozone 8 is a plugin for audio mixing and editing. Typically used as a VST plugin in audio editors (for example, FlStudio) or sequencers, but you can also connect it to the foobar2000 player. The installation process is the same for all versions of the plugin.
First, you will need to install another component to be able to connect VST plugins to the player. Foobar2000 VST 2.4 adapter is suitable for this. Download it and install it like any other plugin.
Afterwards you need to go to foobar2000 settings. There should be a new menu item under Components if the VST adapter was installed correctly. Download the iZotope Ozone 8 plugin to your computer and connect the iZotope Ozone 8.dll file in this submenu using the Add button.
A new line should appear. If this does not happen, restart the player. Now you can adjust the sound through the DSP manager, since the iZotope Ozone 8 item will appear there. The sound editing window looks like this:
Cue plugin in foobar2000
Cue files are opened by the player by default. Cue playlist filter is needed in order to filter duplicate files , since sometimes in a playlist it turns out that the entire album and each track separately are open at the same time. The filter also filters out damaged cue files. The latest version of the plugin has higher performance than previous ones.
Foobar 2000 DSD playback - new SACD plugin
Foobar 2000 DSD playback - new SACD plugin (0.9.x and 1. x. x)
This article is divided into two sections, the first of which is for those who have a DSD capable DAC and want to set up Foobar for DSD playback and output. The second section below is for those whose DAC is PCM only, or for those who for some reason want their DSD files to be converted to PCM.
Since version 0.9.8, the foobar2000 SACD player plugin only outputs DSD in DoP format either via WASAPI or ASIO. DoP is short for DSD over PCM. The CD disc is in PCM format, so this is already a kind of standard in digital music. With the advent of the DSD format, the main challenge was to solve the problem of playing this format on devices that only support the PCM format. It is the DoP digital audio transmission method that ensures this compatibility. There are still some people who are confused about how DoP works and probably think there is some kind of intermediate conversion format, but there isn't. DSD is DSD all the time.
A DoP is simply a container that holds DSD and tricks non-DSD compatible USB chips into believing they are transporting PCM. Another chip inside the DAC will remove this container and send the native DSD to the decoding chip. This process is less efficient because it requires much more USB bandwidth, which reduces the maximum supported DSD sample rate. Most DACs with this method tend to be limited to 384K PCM, which means that only DSD128 will be the maximum DSD speed. DACs that support DSD can easily reach DSD256 and even DSD512. We'll describe three different configuration methods in the following sections, ordered from easiest to most complex:
1.Perfect sound with DoP output
2. Ideal with native DSD output
3. Ideal DSD plus “PCM to DSD” with oversampling
For now there are still two old foo_dsd_asio modes (methods 4 and 5) in place in case anyone has problems with the DSDTranscoder component, but they will eventually be removed as they are no longer needed.
The SACD plugin currently has version 1.1.4:
07/26/19: Version 1.1.4 -Experimental: Foobar 1.5.X SDK, without Windows XP support.
· Mode 1: Perfect Sound
Using this configuration, all PCM and DSD formats will be sent “as is” (i.e., raw) to the DAC.
Important note: Please remember that the plugin only supports the standard DoP format for DSD. Some older DAC applications may not support this mode.
The first step is to configure the plugin to use “DSD output” or “DSD+PCM” modes. Go to the "File" menu and click the "Settings" button, in the left pane of the window, find the Tools item and, if it is closed, click the "+" sign to the left of the word to expand it, and then click on the SACD button:
The difference between "DSD" and "DSD+PCM" is that the latter will send the converted PCM stream to Foobar2000, so graphical add-ons such as VU meters, spectrographs, etc. will work the same as with playing normal PCM files
Other available items:
· Preferred area : options available:
— No: the plugin will show all available tracks on SACD
-stereo: only stereo tracks are displayed
-multi-channel: limits the display of tracks to only multi-channel ones
· Editable tags: Yes/no
· Edited Master Playback: Yes/No
· Store tags from ISO: Yes/No (it doesn't actually write to ISO, it stores tag information in the plugin folder)
· Linked Tags 2CH/MCH: By selecting this option, ISO file tag editing will be applied to both stereo and multi-channel versions of the track/tracks, saving time.
The second step will be to select for our preference either the driver option of our DAC “DSD: ASIO: xxxxxxxxx”, “DSD:WASAPI (Event): xxxxxxxxx”, or “DSD:WASAPI (Push): xxxxxxxxx” (where xxxxxxxxx is the name of our DAC driver) as Foobar output device:
Mode 2: Perfect Sound - Native DSD output via DSDTranscoder
If your DAC has pure DSD compatible ASIO drivers, you can remove the DoP output from the SACD plugin. Instead, you can send pure DSD using the DSDTranscoder component.
To enable this feature, you must run the installer from the DSDTranscoder folder and accept all default settings before the installation completes.
DSDTranscoder version history:
08/14/17: version 1.0.10 - Start / Stop bug fixed.
Open Foobar, go to the “File” menu and select “Preferences”, then find “Output” and select the component as the output device, As shown - DSD:ASIO:DSD Transcoder (DoP/Native).
Next, to configure DSDTranscoder, double-click it in ASIO devices:
The following pop-up window will appear:
At this point you must select an ASIO output device and can set the desired output mode separately for each DSD input frequency and sample rate (44.1K or 48K) so that you can match the supported formats of your specific DAC.
Mode 3: Resampling with the new “DSD Processor” component (v. 1.1.1 or later)
Version 1.0.0 of the plugin introduced a component called "DSD Processor" which provides a very simple way to compare PCM and/or DSD to DSD (although be warned that DSD to DSD resampling involves an intermediate PCM conversion step). Like the plugin itself, the "standard" DoP is the only output available, so it can limit the sample rate selection options for those using DACs that work better with "native DSD" (pure).
Version 1.1.1 introduces two new user-configurable fields (window length and window type) plus the ability to perform sample rate conversion during the upsampling process, more these few paragraphs down.
To enable the DSD processor, it must be selected in the SACD plugin configuration area:
Then go to the "DSD Processor" panel and check the "Use DSD Processor" checkbox:
Now you can configure the output you want for each input independently. The example first compares PCM input formats to DSD256 using “SDM type D” without recalculating their fundamental frequency and without “Sample & Hold”, but all DSD inputs are left unprocessed.
a) column " output
" sets the output sample rate and should not be set to an output rate above the maximum DoP rate supported by your DAC.
This item allows the user to select whether the same frequency will be used as the original one, or changed to an alternative one. If you do not want resampling, the output must be set to any of the rates that do not have a “/48” at the end for 44.1 kHz based frequencies (44.1, 88.2, 176.4 and 352.8 kHz ) and with “/48” for 48 kHz based music (48,96,192 and 384 kHz). This can be a very useful option for those who own DACs that don't support 48kHz-based DSD or those who want to experiment with different frequency combinations.
B) window length : refers to the sample rate converter. Length is measured in samples. The value can range from 8 to 8192 samples with a default value of 27 (which is the recommended value). Increasing the length value produces a filter with a stronger narrowing of the transition region (between the passband and the stopband), a flatter passband and more rejection in the stopband, but it has the downside of increased ringing (due to more oscillation in the transition region) and heavier CPU load for longer windows.
c) window type :
The following values can be selected:
The dafult value is Hann (v. 1.1.2, in v. 1.1.1 the default is rectangular and is deprecated). See Wikipedia for details.
d) " converter " coulmn sets the algorithm that will be used for upsampling. Four different algorithms for PCM to DSD conversion based on Philips ProTech tools are provided:
There are no details on how each of them works, and Philips only provides the following table:
It's up to you to test and decide which one you like best or works best on your system, although types "B" and "D" are good starting points.
c) The " Sample & Hold " column provides an alternative version of upsampling for power-constrained computer processors. Enabling “Sample & Hold” simply distributes one PCM sample multiple times in the SDM. This is a “cheap “sampling method” at no cost” to get 2.8 or 5.6 MHz PCM. This is for PCM - >DSD and DSD - >>DSD. Suitable for low performance systems only. Available options::
This number determines the retention time of each sample. The default value is 8X, which is recommended for the least powerful processors if your computer can't handle it with any of your preferred options
d) The “ Precision ” field refers to the number type used to perform all upsampling calculations. Options are 32-bit floating point ( 32fp ), 64-bit floating point ( 64fp ), and integer ( Int ). The default value is 32fp.
How to install plugins in foobar2000
Before installing plugins for the player, you must place all the necessary plugins in one directory. Almost all popular extensions are available on the player’s official website. Use foobar version 1.4.6 - it is the most stable at the moment.
Important! Plugins are downloaded as archives in zip (most often) or fb2k-component format. There is no need to unzip them into the program directory (unless otherwise indicated in the plugin description), the program will do this itself during installation.
There are 2 installation methods.
First way:
- If the downloaded archive is in zip or fb2k-component format, then open foobar2000, then click on the File item at the top and go to Preferences.
- Click on the first item in the menu on the left - Components.
- Click on the Install button below to install the third-party plugin. In this case, the program itself will extract the necessary files from the archive and place them in the correct directory. The plugin will appear in the list.
Second way:
- If the downloaded archive is in a different format, you must first unpack it (for example, using WinRar).
- Find the file with the dll extension and transfer it to the Components folder in the directory where the program is installed.
- Restart the player. The plugin should appear in the list of components.
As you can see, foobar2000 is easy to customize, since there are a huge number of plugins with which you can select the required sound quality. The installation process is also extremely simple and can be done in 2 clicks.
From the history of foobar2000
Initially, all plugins looked like foo_*.dll (* - any combination of characters). Moreover, the plugins of the handler group looked like foo_dsp_*.dll, the output plugins — foo_out_*.dll, etc. These dll files were distributed in archives, and to install the plugin, you had to unpack the archive and place the dll file in the foobar2000components folder (for example, C: Program Filesfoobar2000componentsfoo_out_ks.dll).
Then it became possible to enable the mode of dividing player settings by users. In this mode, all folders with configuration files, databases, playlists, etc. were stored at an address like C:Users\%USERNAME%AppDataRoamingfoobar2000, where %USERNAME% is the user name. Soon it became possible to install components for each player user. The components folder in foobar's installation folder remained, but by default it contained only the main components of the player; additional plugins were installed by each user separately in a folder like C:Users\%USERNAME%AppDataRoamingfoobar2000user-components. And what is very important, the address of the dll file should look like C:Users\%USERNAME%AppDataRoamingfoobar2000user-componentsfoo_*foo_*.dll - i.e. in the user-components folder there is also a separate folder for each plugin. For example, user-componentsfoo_out_ksfoo_out.ks.dll. This also made it possible to store additional files used by these plugins next to the plugin dll files.
In addition, there was still a portable mode, in which all files, folders and settings are located in the player’s installation folder. In this case, the components and user-components folders were also located there.
Now about how to install plugins. After the user-components folder appeared, it became possible to install plugins not only manually, by creating a separate folder and copying dlls with accompanying files there, but also through the player interface (Preferences->Components). Initially, you could drag the foo_*.dll file into the list of components and it would be automatically installed in a separate folder in user-components (in the user folder or in the player folder - depending on the player installation mode). An Install button also appeared there, which opened Explorer to select a dll file.