Usually, over the years, a large amount of equipment accumulates, which must be placed compactly and preferably aesthetically. All equipment should be located nearby, so the best placement option would be an equipment rack.
Buying it in a store is much easier than making it yourself, but store racks usually consist of a TV stand with a shelf for a VCR. Now this is no longer relevant, since modern TVs are hung on the wall, and VCRs are a thing of the past.
You may have 2-3 units of different equipment, but those who like to listen to cool music can have up to 6-7 different devices. By making an equipment rack with your own hands, you can safely arrange everything that is available in the apartment.
DIY stand for audio equipment made of solid beech
I have long wanted to have a shelf for amplifiers and a record player to organize everything.
I spent a lot of time on the Internet choosing the desired shape and design. The price for new racks is quite high, especially since you can do it yourself if you have the tools. The plan was even made of marble, but it will turn out to be heavy. In the end, the choice fell on solid wood. Between ash, oak and beech, I chose the latter. The price for oak reached the level of marble, but it’s worth it, the texture of the oak is very beautiful, and even more so with the coating. But the shelf will be practically covered with equipment and all the main beauty will be hidden, which is why I chose beech. If you make a stand for speaker systems, then the beauty of the wood will be more visible, and I advise you to invest in oak. A few shelf options to consider:
I chose the design for the same long time, but in the end I came to a simple solution - a pair of legs on each side, into which shelves were cut and glued. Size is also an important point. The height of each shelf is 40 mm, the side bars are 40x40 mm, I wanted 50s, but they weren’t there. The shelf depth is 300 mm, anything more would be cumbersome for me. Width, the widest amplifier I have come across is the Odyssey-u-010, its width is 460 mm. Therefore, I chose the width of the shelf with a margin of 20 mm on the sides plus 20 mm that will cut into the side bars - it turns out 540 mm, the total width is 580 mm (the remaining 20 mm in the side bars). Height, here you need to estimate it in 3D and at your discretion. I needed 5 places with a margin of 10 mm in each shelf. The result was a height of 900 - 1000 mm. 1000 mm looks pretty ugly so I chose 900 mm.
Hardness of different types of wood:
I ordered a tree online. Look on websites that sell wooden stairs, that’s where I ordered. Received the order in 2 weeks (including work). The wood arrived good, dry, perfectly even and smooth, everything was sealed in durable polyethylene, moisture ingress during transportation was excluded.
The work involved making grooves in the side bars, rounding some corners and gluing everything together. You need to cut the grooves precisely; I did this in all the bars at once. I even built a special table . The tool is a hand router; cutting out with a hacksaw is of course not an option.
I did everything in a day. I rounded the corners on all the shelves, but only the front ones, and on the bars as well, I left those corners that are glued to the shelves sharp. By the way, rounded corners look better than sharp ones, but again, not everywhere.
I put all the wood back together and glued the shelf together at home. Clay applied "Moment Carpenter". I covered all the wood adjacent to the gluing area with carpenter's tape to avoid glue getting into unnecessary areas.
The result was a massive and beautiful shelf weighing 27 kg. Size HxWxD: 900x580x300 mm.
The shelf is coated with medium dark wood oil:
Source
Hi-Fi and High-End equipment or encyclopedia of sound and video
Equipment rack
Actually, originally I was going to make a narrow and tall bookcase. However, after consultation with the family, the closet design was rejected as unsightly: too tall, too narrow. Then another idea was born, the embodiment of which you will see here: a wide TV stand, combining an equipment rack and a collection cabinet. At the time of starting work, the space for the product looked like this (the stand should be placed between the display case and the bookshelves):
The stand had to replace the old stand and at the same time fill the space occupied by the boxes (by the way, there are scraps of wood in the bottom box!). The TV was planned to be replaced with a 32″ LCD. Since the amount of work here is already quite large, I did not dare to buy unplaned boards (I bought it with an eye to the cabinet). I bought dimensioned lumber, i.e. already processed material. It consisted of: 1) five 50×50 bars 3 m long per frame (according to calculations, 4 were enough, the fifth was taken as a reserve); 2) two panels 1500x603 20 mm thick for shelves; 3) extension 80 mm wide, 12 mm thick, 220 cm long - 5 pcs. for panels. All oak. I bought it in Drev-Massiv, it cost 9400 rubles. plus 600 rub. car. Everything was available, there was no need to wait for anything. The shield, of course, is not quite the size that is needed, but I’ll figure it out somehow. In general, the company focuses on manufacturers of stairs, so its assortment is appropriate (semi-finished oak products). The beam turned out to be re-glued; I didn’t expect this when I went to the Kashirsky yard, but already on the spot I decided to take it due to the lack of other options.
The first task is to split the timber into two slats with a cross-section of 24×50. The frame of the cabinet is made of such slats connected into a tongue-and-groove pattern. Dissolving such a long beam in an apartment with a bar only 110 cm long and a circular saw that does not cut 50 mm to the end (on the bar) is a non-trivial task. We start by constructing a trestle from two stools and two chairs. Stools are lower, so you have to put pads on them.
This is what the prepared pieces look like. Several pieces are placed so that there is a place for the tire to lie. Also, the tire cannot be attached in the middle of the beam (the clamp must be at the end), so the tire has to be attached to the adjacent beam, and all the beams must be tightened together with clamps. I don’t want to cut without a tire anymore.
This is what the entire structure looks like placed in the corridor. The total length is about 5 meters. The cut occurs in the area in which the bars lie side by side.
The tire is installed. Of course, it is possible to press it only from one end. But the cut is still not clean (then into the planer), so this is acceptable. At the worst possible moment, the vacuum cleaner pipe taped together with electrical tape falls off. It’s interesting that for some reason (I didn’t understand why) I started sawing from the other end, so the cut started in the middle of the beam. With a plunge-cut saw it’s the same, but I still haven’t figured out why I did it that way.
Well, the first beam has been sawn. Of course, he immediately bent out. But it seems like there is nowhere to retreat, and I continue to saw. Inside the timber, material of a lower quality is found, but again, where to go? Cutting one block is done in six steps (three on each side) and takes 20-40 minutes. Most of the time is spent on installing and clamping the workpieces and tires.
Result (the nearest block is not actually sawn, it’s the extra one). Having looked at the insides of the beam and how it was bent, I thought that perhaps I should have bought additional wood and glued it myself; it would have been the same 24 mm thickness with higher quality and a comparable price. The only question is whether I could glue the addition or not. Well, the length of the extension is a bit short.
After cutting four bars. In my opinion, the result in dust removal is not bad (after all, 1200 cubic cm of dust).
Those same 1200 cc. see. The dust collector was clogged and pulled poorly at the end.
Next, the bars were driven through a planer with the sawn side. The result was slats with a cross section of 23×50 mm and a length of 3 meters. Actually, after this operation, the project was completely redone from a cabinet to a cabinet.
After drawing the project and calculating the overall dimensions of the bars, I cut the bars with a circular saw into a set of required lengths. This is how a set of bars end up to the same length:
Next, using clamps, a general view of the frame is assembled to see the future product with your own eyes. On top there is a pair of makore boards from which the tabletop will be made:
And this is a prototype of the drawers that will be in the side parts of the rack. The 80 mm wide extension is sawn lengthwise, dovetailed manually, the bottom is made of 4.5 mm plywood in a groove.
And this is what a collection of stones in a box should look like. The grate prevents stones from colliding with each other; it is made from the same circular material.
The main part of the connections is made on plug-in tenons. The grooves are made with a mortiser, the tenons are homemade: the board is planed with a thicknesser to 10.5 mm, sawn lengthwise and the edges are rounded with a router. These are the homemade dominoes, 36 mm wide and 40 mm long. The thickness is determined by the width of the groove; Despite the fact that the groove was made with a 10 mm cutter, it turned out to be a little larger. Either the Skil 1830 milling cutter is making a fool, or I don’t have enough steadiness in my hands, or the Encore groove cutter is hitting me. There are a total of 34 tenons in the design (respectively 68 grooves).
Flat panels glued together from the same panel are inserted into the vertical side frames. To optimize the cutting, I bought an additional two widths, 80 and 100 mm, the combination 80+100+80 gives the desired width. The edge of the extension turned out to be not of very high quality (not suitable for gluing), so I stacked pairs of pieces on top of each other and sawed the edge along the tire, removing about a millimeter, so that the disk was half in the air. The resulting edges have quite good geometry. To align the gluing, I cut #0 into the edge of the lamella. I glued it with Anchor assembly clamps:
The grooves for the panels are visible here. They were selected with a 12 mm straight cutter, in two passes:
Well, the frame is assembled and the side panels are inserted. The shelves are cut from a finished board. It turned out so well that the sum of the widths of the shelves turned out to be exactly equal to the width of the shield, not a millimeter was lost.
Let's try the box in place...
There are 4 vertical panels in total, with the middle ones divided into two parts by a crossbar. The back wall of the side cabinets is made of FK 4/4 plywood, 4.5 mm thick, in grooves. This is much closer to the final result.
A little different perspective.
In disassembled condition:
The outer joints on the racks were treated with a scraper to remove traces of glue and steps.
The manufacture of drawer guides and the assembly of vertical panels are placed on a separate page.
After gluing the vertical panels, we get the parts for assembling the central part with shelves:
Apply glue to four dowels and 12 slats and clamp:
Clamping is not very convenient; in some places you can put something in, but in others you can’t. The clamp on the far right presses on the drawer guide.
Here I made a mistake. Firstly, gluing seemed easy to me, so I took Titebond II instead of the third. In fact, gluing was also difficult. Secondly, there is an extra lamella in the middle. For strength, the outer ones are enough, the presence of the third caused incomplete closure in the middle of the shelf, and I have nothing to hold it there (there are no clamps with such a reach). The photo shows the gap that has formed between the shelf and the wall.
Nevertheless, the gluing was successful, although the distance between the side walls at the top (where they hang in the air) is 3 mm greater than at the bottom. I hope this can be corrected with further gluing.
The last assembly is dry (although the middle part is already glued together, so it’s not completely dry).
In this lighting, the contrast between finished and unfinished wood is striking (Nikon D60, automatic white balance, natural lighting).
Careful measurements showed that there were some inconsistencies. Trimming the parts: hang the tire according to the markings and cut off the extra millimeters while hanging:
Final gluing of the frame:
To strengthen the frame, I glued the corners on the lamellas from below. The corners are trivially cut from the cut with a saw along the bar, but milling grooves in them is not so easy: the corners are small, it’s uncomfortable to hold them, your fingers just climb onto the cutter. I made a couple of stops from waste and the process of making grooves for the slats became simple and enjoyable:
I glued the corners to the body:
Next came the final finishing of the frame (no pictures). First, grind the ESM (I did fill up the corners here and there), 100-150-180-240, if I’m not mistaken. In hard-to-reach places, use a 180 sanding sponge. The plywood back walls, covered with water-based parquet varnish, were sealed along the edges with masking tape. I wiped everything down with Finnish white spirit, then applied two coats of Minwax Antique Oil at 24-hour intervals to those parts that were not covered at the preliminary stage. After the second layer, I went over it with a 180 (or 240?) sponge, and applied another layer to the entire frame (more precisely, to the outer parts, the inside remains unfinished). After waiting some more time, I went over it with a sponge again and applied the fourth layer, the last one (after the sponge, of course, I wiped it with white spirit). The result was a fairly smooth and fairly glossy surface. I applied it with a cloth, thoroughly rubbing the oil. I leave a thin layer, so I don’t wash it off after absorption, as the instructions recommend. Since there is no brush involved in the process, there is no need to wash it!
The frame has acquired a more or less finished look and can even be placed in its future place. This is me trying out which TV to buy: 32″ or 37″ (in this case, there is a mock-up of a 40″ TV taped to the wall on the wall, which was considered too large).
After consultation with my wife, the design was changed in terms of the number and height of the drawers. From 22 drawers there became 16. 12 guides were cut off; due to the design, moving the guides was no longer possible, so they combined them as best they could.
The manufacture of the tabletop is included on a separate page. After finishing it, I waited a few days for the oil to gain strength and glued the tabletop onto the slats along the back edge:
If you remember, screws are screwed into the bottom along the front edge. Just in time, I found a countersink, which I no longer hoped to find and was going to buy a new one. When screwed in, the screws are not visible, but the holes have an elongated shape, allowing the tabletop to expand/contract. Pressing the screws fixed a small screw on the table top, pulling it towards the body. These screws are the only metal elements in the case.
After that, the cabinet fell into place and it housed equipment and some children's books; drawers can be made without moving the cabinet. In the photo, blanks for the drawers are already inserted into the cabinet. Not long before this, I also bought a Sony KDL-37W5500 TV; in the photo it shows my photo of a pond in Abramtsevo in “photo” mode.
You can also see that the TV is level, but the floor is crooked, so the cabinet is tilted, and you also have to put it under the leg... I had to saw one leg. The leg is back, so it’s not so scary. As a last resort, you can add something if you have to move the bedside table to another place; not visible from behind. For marking, it is convenient to use a thicknesser set to the desired size:
Making boxes is included on a separate page.
After making the drawers and purchasing the missing handles from Leroy Merlin, the bedside table was ready. You can compare it with the photo at the beginning of this page. On the TV is one of the photos from this article, in full resolution.
Overall it turned out well, and I am proud of this product, despite the obvious shortcomings indicated in the text. True, the length of the process over time somewhat blurred the joy. It’s not easy to calculate the total cost of the project, because it took a long time to complete and there were a lot of details. Maybe I'll try later.
More photos:
The tabletop frame shimmers in the sunlight. Tangential cut pattern of the middle part.
Woodworms. The passages are not filled with putty, I hope none of them will crawl out.
Handles and drawers.
Shine finish on the countertop.
The contrast between the finish of the drawer fronts and the clean wood of their walls.
Filling several top drawers.
The contents are no less beautiful than the cabinet itself.
Some interesting (to me) facts:
1. Metal elements: only screws securing the tabletop in front and drawer handles.
2. Types of wood used: oak (frame, drawers), some kind of rubella, presumably makore (tabletop), maple (decorative elements in the tabletop), beech (dowels), birch (plywood in the back walls and bottoms of the drawers).
3. The total duration of work was a little more than a year (other projects and adaptations were being made at the same time, and a country workshop was erected and partially equipped).
4. The number of round dowels used is 328 pcs. (mainly in the system of drawer guides), I can’t accurately count the number of flat dowels (slats) used, approximately 100 pcs., the number of inserted oak tenons on which the frame was assembled was 34 pcs.
5. The total number of parts (not including insertion tenons and without breaking the panels and tabletop) is 31 pcs. frame, 28 pcs. guides, 48 pcs. boxes, total 107 pcs.
6. The number of grooves in box joints is about 600.
7. Without a jointer, the router is an unfortunate Skil 1830 (though the frame and drawers are made of semi-finished oak), the frame is in the apartment, the tabletop and drawers are partially in the barn.
autumn 2008-autumn 2009
Making countertops || Making drawer guides || Making boxes || Return to list of projects
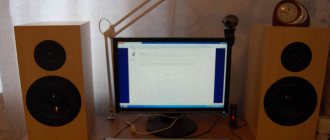
Audio racks in my test listening room
Hi-Fi stands assemblies
Hello to all lovers of good sound! Recently I was thinking about how to make my own stands for audio equipment in my test listening room.
I thought, analyzed, and consulted a lot. However, the idea was suggested to Kamal by an audiophile friend from VK (Zukomania club in VK) for which many thanks to him. By the way, he made himself such a stand, but only much higher. For the umpteenth time I am convinced that, as always, the best is simple.
stand for audio equipment 2 stand ready
Class A amplifier review
No chipboard, MDF or fibreboard.
However, I thought that the racks could be made from chipboard, MDF and fiberboard, but these cheap semblances of wood did not suit me, I wanted to make everything from real, very real wood, so this cheap and bad idea disappeared instantly! Only wood and metal. No chipboard, MDF or fibreboard.
wood stand Amplifier in class A + acoustics on full-range speakers Amplifier in class A + acoustics on full-range speakers Amplifier in class A + acoustics on full-range speakers on a new stand
Rack materials and requirements
Electrical equipment has significant weight, which means the shelf must be strong. There are a lot of wires coming out of the back panel, which means it needs to be open at the back. Since the equipment rack occupies a central place in any living room, it must be beautiful and original.
It can be made from different materials. Weld from strong metal corners, assemble from galvanized profile. You can make a rack for equipment from plywood, fiberboard, MDF and wood. An interesting option would be to combine materials. The legs can be metal, wood, or plastic tubes. It is good if wheels are installed at the bottom, since dust will collect behind the rack where the wires are located in a bunch. By moving the shelf on wheels, you can wipe the floor and check the wire connections. Very comfortably.
Order a Hi-Fi stand from the experts
Have you been thinking for a long time about how to make stands for audio equipment yourself or order from specialists? But in the end, I decided to do it myself. But nevertheless, after consulting with my wife, I decided that I would do everything myself, and she would help me, if anything.
Hi-Fi stand
Of course, it was a pity for the time, but the desire to make a stand for audio equipment myself still outweighed it.
A tree was purchased, by the way, larch 3cm thick. 60 cm wide and 3 meters long. I really had to cut it myself, fortunately I have an electric jigsaw.
studs and wood for the stand
After cutting, the wood was sanded over the entire surface with 3 different sandpapers, then I applied 1 layer of varnish on top. And I waited 2 days until the varnish dried, then applied another 5 layers of varnish, and my future wooden counter became much darker than before. I did everything on the loggia, fortunately my loggia is large and wide, 6m x 2m.
While the varnish was drying, I went and bought studs, bolts and nuts for them.
wood and studs for racks
By the way, I had to tinker with the hairpins, because they were only sold in 2-meter ones. I had to take out my jigsaw and buy metal files for it, in the first 10 minutes 3 files were broken at once, but then I realized how to cut studs and with 4 metal files I sawed all the studs, and very quickly.
cut studs with a jigsaw
we cut the studs with a jigsaw and a metal file
Spikes for racks
Since I have a real audiophile stand, I naturally need to put the stand on good spikes, I mean all the studs on the spikes, of course - all 2 pieces. racks with 12 spikes!
spikes and stands for spikes for racks 12 pcs.
thorns
We needed the highest quality ones; they won’t sell Chinese ones from Aliexpress. It’s good that I had such high-quality spikes in stock, all 12 of them!
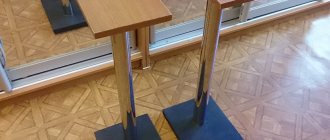
stand for sound equipment
Artificially aged stand
Nowadays, aged furniture made from thick “brutal” boards is very fashionable. We cut 4 identical boards with a width of 50 mm to size, for the sides - 2 small rectangles. The stand is assembled on dowels (round sticks). To do this, first clearly measure and drill holes on the sidewalls and on the shelves themselves, not through them. Ready-made wooden dowels are sold in the store. They usually have a diameter of 8 mm, but there are also 12 mm. We take a thicker one, since the shelf is voluminous. First, everything is assembled without glue.
After fitting, all the parts are disassembled, and the most difficult part begins - antique painting. To do this, we take a turbine, put a metal brush on it and process the wood. The brush removes the soft layers and leaves the hard ones. The brush on the turbine is replaced with a plastic one and small burrs are removed. Then paint it with stain. Then comes sanding, but not too much. Then we cover it with a layer of primer, sand off the raised lint, and finally cover it with varnish. After drying, the assembly of the stand on the dowels begins, already with glue. Wheels are screwed to the bottom.
Varnishing the wood
I spent a long, long time fiddling with the wood until I varnished all these wooden tabletops, after which they took a long time to dry.
studs, nuts and washer on the stand
After the final drying, holes were made for the studs and quickly assembled, in literally 10 minutes and 2 stands for sound equipment were already in place.
stand pin and nut
There are nuts at the top and bottom of each wooden shelf, and washers underneath. I didn’t cover/hide anything, I mean the studs. We got 2 racks in loft style.
assembling a rack for equipment
In reality it looks very chic, especially the silver metal pins themselves contrast against the background of light wood.
assembly of racks rack
rack for equipment
assembling the stand
rack 1 is ready
Spikes, studs and nuts
By the way, I didn’t talk about the thorns at all. After all, it was customary to put all the posts on spikes, but how to glue or weld them to the nuts so that they don’t lose their appearance?
spikes and nuts inside cold welded
I thought for a long time, but still decided on cold welding, which is calmly placed/hammered inside the nut under the tenon and voila, everything holds up sooooo well , I even tapped this structure with a hammer from above and nothing, everything holds together fine as one whole.
spikes for rack and spike stand
assembly of 2 racks for equipment
Results . I spent a little money buying all this and it turned out to be quite excellent and audiophile racks. Now they not only make me happy, but all my audiophile and music lover friends.
amplifier in rack
amplifiers in rack
equipment in rack
By the way, I would like to convey a big thank you to my wife for “motivating” me to use these racks.
Hi-Fi stands assemblies
Now all my equipment is in all its places, and the racks themselves delight and will continue to delight with their convenience and beauty.
test of new amplifiers in a rack
I hope the article helped someone
If you are a manufacturer, importer, distributor or agent in the field of audio reproduction and would like to contact us, please contact me via VK or email. mail
Do you need a good headphone amplifier, a new tube amplifier or an excellent DAC, player, headphones, speakers or other audio equipment (amplifier, receiver, etc.) then write to VK, I will help you buy good audio equipment profitably and with a guarantee...
For any questions, write to me by email. mail or VK https://vk.com/zvukomaniyak or https://ok.ru/aleksandr.levchuk2
Don't forget to bookmark us! (CTRL+SHiFT+D)
Subscribe, comment, share on social networks. I wish you good luck in finding your exact sound!
On our website Zvukomania there is useful information on sound and video that is useful for everyone, and for every day, we update the Zvukomania website constantly and try to search and write only excellent, verified and necessary information.
If you want to know more about this topic and stay updated, please subscribe to our website
Source
Original do-it-yourself wooden equipment rack
To make this shelf, you need a circular saw on an angle to cut the triangular legs for the shelf. The glued panels are cut to the size of future shelves. The legs on the dowels we already know are glued to them so that the joints are not visible. In order for the legs to stand stable, a router is used to make a groove on one side and the other. The resulting stand is completely collapsible. It can be made up of 4 parts at will or installed side by side (2+2).
It is very simple to make a stand for equipment with your own hands according to the photos presented on the site. We wish you good luck and creative success!