The USB Audio class is very popular and is also used because it is supported by all operating systems and therefore platforms. We see this being used in Windows, Linux, macOS, etc. So, connecting a USB Audio Class compliant device is as easy as plug and play without any additional worries.
Contents [show]
- USB Audio Class Standards
- Types of DACs in USB Audio Class
- Not just for computers
What is the difference between a sound card and a DAC?
Sound cards
, unlike DACs, are more focused not only on listening to music, but also on creating it, not to mention a wider range of applications and multimedia functions (games, movie voice telephony, etc.).
Interesting materials:
What does wheel balancing mean? What does base rate mean? What does touchless car wash mean? What do you mean without roaming? What does it mean to win without checked baggage? What does Unlimited mean within the network? What does it mean to be critical? What does it mean to be positive? What does it mean to be online? What does cca mean on a battery?
USB Audio Class Standards
We have two different standards, the first is USB Audio Class 1.0, which was proposed in 1999 and is based on version 1.0 of the USB standard.
- Specifications indicate; 24-bit stereo, two-channel, up to 96 kHz sampling.
- Every millisecond a packet is sent through a USB port, the packet size limit in the USB standard is 1024 bytes. USB Audio Class 1.0 sends 576 bytes per millisecond, but much higher sample rates cannot be used due to packet limit.
A decade later, USB Audio Class 2.0 was proposed, intended for USB 2.0 standards and beyond. Because throughput has dropped from 12 megabits per second to 480 megabits per second. The limitations of USB Audio Class 1.0 are gone.
- Audio quality varies from 24-bit to 32-bit, and you can get sample rates for both playback and recording up to 192 kHz.
- The difference in bandwidth from USB 1 to USB 2 is such that it is 40 times greater that it is possible to record 60 simultaneous channels with the same quality as USB Audio Class 1.0, when only 2 channels were possible in the previous version of the standard.
- It is backward compatible with version 1.0 of the standard.
High-end gaming headphones with one speaker per channel use the second version of the standard, which is designed not only to reproduce higher quality audio, but also to handle more simultaneous channels.
Special emulator for the head unit
There are devices such as CD changer emulators for radios. This device connects to a special connector (on the rear panel of the radio) and allows you to read music from SD cards, USB drives, or receive it from your phone via AUX or Bluetooth. And the radio “thinks” that it works with a regular CD changer. Everything connects beautifully and works, without any hassle. Suitable for old stock car radios.
It is connected via the input for the CD changer. Or through a special adapter.
As a rule, it is displayed somewhere in the glove compartment, or in another convenient place. The head unit identifies it as a CD changer.
Nothing complicated, just be careful when choosing this device. There are a lot of them on AliExpress. Be sure to find out whether a particular model will suit your specific vehicle. It is necessary that certain protocols supported by the emulator and the head unit match. Read reviews, ask the seller, Google information on your car model.
The first method is via Bluetooth
In order to connect a JBL speaker this way, your computer must have a Bluetooth adapter. It can be either built into the motherboard or external.
An example of an external adapter is shown below. You can purchase it at any electronics hypermarket or order it online. The price is around 500 rubles.
So, if your computer has a Bluetooth signal receiver, the connection process is as follows:
- Turn on Bluetooth on your JBL speaker
- Open Windows Settings on your PC
- Go to the "Devices" section
- Move the Bluetooth slider to the On position.
- Now click on “Add Bluetooth or other device” to start searching for available devices to connect
- In the window that appears, select the very first item (mice, keyboards, audio)
- A few seconds will pass and you will see the name of your JBL speaker in the list of devices
- Click on its name to start pairing devices
Ready. The sound should be played from the speaker. If this does not happen, return to the computer settings menu and open the “System” section
In the left menu, go to the “Sound” tab
Select JBL speaker as audio output source
In the same way, you can connect JBL wireless headphones to your PC or laptop.
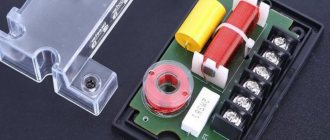
Connecting 5.1 speakers
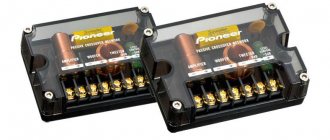
5.1 is a surround sound system of six speakers, and one line output on a sound card is not enough. Cards designed to connect 5.1 acoustics have connectors for a subwoofer, front, rear and center speakers.
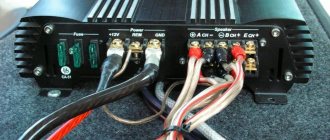
Connection is made with complete cables:
- front speakers – green connector;
- rear – black;
- subwoofer or center – yellow.
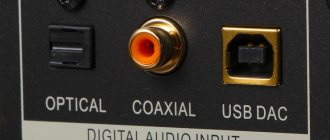
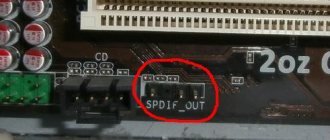
There are audio systems that are connected to the computer with one cable - coaxial or optical S/PDIF.
Connecting 2.1 speakers
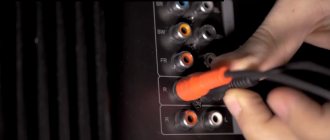
2.1 acoustics are two speakers and a subwoofer, with four “tulips” at the back of the case, i.e. RCA 3.5mm jack. A pair of red and a pair of white, for transmitting sound to a specific speaker. The connection is made using the supplied cables, observing polarity – color to color.
There are audio systems where, instead of sockets and plugs, there are cords connected with terminals, or even cables that are screwed to the contacts on the subwoofer.
The subwoofer is connected to the computer with a cable with a 3.5 mm connector, which is inserted into the corresponding green socket.
Via USB cable
The goal is to use the phone simply as a storage device. That is, there is music on the phone’s flash drive (or internal memory), we connect the phone to the radio via USB in data transfer mode, the radio scans the phone’s memory, finds audio files there and starts playing them. It’s as if we connected a regular flash drive.
Note! The capabilities of this connection method greatly depend on the functionality of the radio. For example, there are radios that support connecting Android devices via USB. In this case, a special application is installed on the phone. You can control playback from both your phone and the radio.
What is important:
- The car radio must have a USB input. Again, if this is a standard system, then the USB input is most likely located in the glove compartment or armrest.
- You probably won't be able to connect an iPhone this way. Because the iPhone cannot be used as a storage device. Unless your car has Apple CarPlay support. Or the radio tape recorder supports connecting an iPhone via cable (see specifications). This feature is available on some models from Alpine, BOSS, JVC, Kenwood, Pioneer.
- Most often you need a USB to Micro USB cable. Or USB - USB Type-C (on new, top-end smartphones). But not every cable will work. The fact is that there are cables that were originally designed only for charging the phone. It is difficult to distinguish him. You just need a USB cable to transfer data. The one that comes with the phone should work.
- You can only listen to music that is saved in the phone’s memory (or on a flash drive). You won’t be able to listen to music via the Internet, various music services (Spotify, Deezer), apps, browser. The exception is cars with Android Auto and Apple CarPlay (I’ll talk about them at the end of the article). When connecting a smartphone via a USB cable, they will have enormous functionality. Including access to online music services.
- You can try connecting not only an Android smartphone, but also some kind of regular push-button phone. The main thing is that it is defined as a USB drive. If you connect it via USB to a computer and just transfer files, then you can most likely connect it in the car.
- The phone will charge immediately.
We connect the smartphone with the radio:
- Connect one end of the USB cable to the phone and the other to the car radio.
- The phone may ask in which mode to connect. Or manually select “File transfer” (data storage device) in the settings.
- If the radio does not automatically switch to “USB” mode, then do it manually.
- After reading the USB drive, audio files should appear and music from the phone will start playing.
- Most often, you can control playback only on the car radio.
The method is working, you can use it. But as we have already found out, it has many disadvantages and various nuances.
However…
The exceptions I've encountered - and I'm sure there are many more - include the Google Pixel 2 XL and the new Razer Phone. They have no analogue transmission at all. And while Google sends you to a site where you can buy a digital accessory, the Razer Phone doesn't even bother to tell you why you don't have audio.
The good old analog headphone jack just works
And the problem will only get worse as people upgrade their devices and the number of USB-C headphones and dongles increases. After all, admit it: you can sell or give away the phone, but most likely you will keep the headphones or dongles for yourself.
Eh, if only we had a virtually universal technology or port that worked exactly as expected... Hmm...
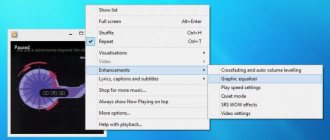
Reducing audio latency
To reduce audio latency, the SoundWire app provides a range of tools.
- Setting up buffering (Audio buffer size);
- Compression of the audio stream, only demo for a few minutes (Audio compression);
- Enabling an alternative audio path (Android native audio).
- Setting up buffering in milliseconds (Audio buffer size);
- Audio compression;
- Enabling an alternative audio path (Android native audio);
- Reducing the Latency steering amount.
And now in more detail about each option.
Audio buffer size
The first thing you can do to reduce audio latency is to reduce the buffer size of the incoming audio stream. To do this, press the menu button, then select the “Settings” option, in the settings that open, click on the “Audio buffer size” item and select the desired buffer size.
Methods for connecting a smartphone to a car radio
Most of the solutions that I will talk about in this article, I tested from my own experience. I'll start with the most convenient and relevant (in my opinion). Since the article will be large, using the menu (article content) below, you can immediately go to the connection method that suits you. If you don’t yet know which method to choose (based on the capabilities of your radio and smartphone), then I recommend that you familiarize yourself with all the possible options.
- Wireless connection via Bluetooth
- Connection via AUX
- Using a USB cable
- Via Bluetooth transmitter (if the radio does not have Bluetooth)
- Via radio (FM transmitter)
- Special emulator
- Apple CarPlay or Android Auto
What we have at the moment
So, I assume that you are the happy owner of an Android device and, naturally, a Windows-based computer. Unfortunately, I don’t have the opportunity to review iMac and compatible devices, but I’m sure everything happens in a similar way there. The examples will be based on Ableton , although other sequencers with MIDI support can be used. Now about the Android device. In my case, it’s a Lenovo A750 phone with Android ICS 4. Again, I don’t have the opportunity to check on earlier OSes, so we’ll start from this configuration.
I chose free programs available on the Google-Play service. Links will be provided below. The first is Touch OSC (https://play.google.com/store/apps/details? >
Types of DACs in USB Audio Class
Although sound is processed digitally when it is processed in our computer as data. During transmission to the speakers, it comes in the form of an analog signal, which needs to be converted using a digital-to-analog converter, or better known by its English acronym DAC.
Thus, the audio output must be synchronized with the speed of the audio tracks themselves, which are not always symmetrical. This means that there are several different DACs for different classes of USB Audio.
- The first type, Synchronous USB DAC: This is the worst quality, used in low-cost products, accepts data packets as they arrive, and is most prone to audio quality glitches.
- Second type, Adaptive USB DAC: Here the clock speed of the DAC is adjusted so that there is complete coordination between sending and receiving data.
- Third type, Asynchronous USB DAC: The most advanced of all and the best, it has a block that marks the timing of the data stream, resulting in greater accuracy and avoiding the need for CPU coordination. This is a type of DAC that is used in high-end products.
Interestingly, if you buy headphones with USB, you will see that many of them are not connected via USB, but with a small box with a mini-jack on one end and a USB output on the other side. Well, this box is nothing more than a very cheap DAC because typically PC USB ports usually do not have a built-in DAC, so special devices are needed that perform this function.
In high-quality multi-channel headphones, because it is not normal for a USB that can carry audio to be included in the PC motherboard, they usually have a DAC inside them. In any case, if you have a sound card, it is possible that some of its USB ports have a built-in DAC.
Connecting speakers from different manufacturers
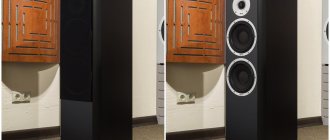
There is no difference in connection - standard 3.5 mm or optical, coaxial cables are used. It all depends on the characteristics of the audio system. For example, Sven SPS-619 speakers with a power of 20 W are connected to a PC via a 3.5 mm mini-jack port. “Pumped up” models, 540 W, for example, Edifier S760D, provide connection via stereo and multi-channel analog inputs, digital coaxial and three optical.
They also produce wireless speakers that connect to a sound source via Bluetooth. Compact in size, the JBL portable speaker produces sound that is sometimes clearer than computer speakers. True, not every motherboard has a wireless communication module. In such cases, use a USB Bluetooth adapter.
Touch OSC
This application differs from the previous one in that it is multi-platform. Its client is available not only for Android, but also for iOS. And the server, accordingly, can work on mac-compatible computers. But I will consider the android+windows 7 combination, as mentioned above. The server for Windows can be downloaded from the official website using this link: https://hexler.net/pub/touchosc/touchosc-bridge-1.0.1-win32.zip.
We install it on the phone and on the PC, if everything is correct, then the TouchOSC bridge icon will appear in the system tray on the PC (Fig. 9).
Setting up the SoundWire program
At the first stage of working with the SoundWire utility, you need to download and install the program on your computer - there is a client for the Windows and Linux operating systems. It acts as a server where the IP address is displayed and tools for adjusting the volume level are located.
The second stage is to download the SoundWire utility from Google Play to your smartphone (free).
The third step of working with SoundWire is to launch the application on your computer and smartphone. A window will open on the gadget screen where you need to select a server. The default mode in the “Server” line is (Auto locate). The utility will automatically detect the IP address. If the system cannot find a suitable server, connect manually. To do this, specify the Server Address in the information entry line - it is displayed in the main program window on the computer.
Synchronization between devices - PC and gadget - is performed via Wi-Fi. For this reason, they must be connected to the same network.
Once connected, you can play music or videos on your computer. The sound will be transmitted to the smartphone and played through the gadget's speakers. The PC program also has a sound recording function. Volume adjustment is carried out via a smartphone or using standard Windows tools.