Buying an expensive car radio is only half the battle. Many motorists who love music spend a lot of money on purchasing a high-quality audio center and find themselves terribly disappointed when what comes out of the speakers is not at all what they expected.
Indeed, the task of correctly setting up sound is not at all as simple as it seems - it is not without reason that many highly specialized network resources are devoted to this topic
Our task is to acquaint the curious reader with how to set up a radio, including all its components, because this, according to many experts, determines 50-60% of its sound quality.
Special Settings
The following functions will be useful for some car enthusiasts:
- turning off Demo mode;
- setting date and time;
- setting up the display of traffic jams via TMC on the radio.
Demo mode is needed to demonstrate the capabilities of the device in a store environment. If you leave it, then when the device is turned off, the backlight and luminous inscriptions on the display will work.
You can disable Demo mode in the hidden menu by pressing the SRC key on the radio that is turned off. By turning the joystick handle, find the DEMO item and switch the sensor from the ON to OFF position. The BAND button is used to exit the menu.
Time and date are also selected in a hidden menu, but in the System section, where you can select 12 or 24-hour mode and change the desired indicators by turning the wheel.
Traffic displays via TMC are supported by Garmin and iGo programs. By installing one of them, you can receive information about traffic on the roads of large cities (about traffic jams, accidents, road repairs, etc.). iGo has the ability to save a list of radio stations that broadcast data of interest to the car owner. Using these programs, the display of the radio can display the route between specified points, the time of possible delays due to traffic jams, etc. To operate these applications, you need a set of iGo Primo licenses and special TMC licenses.
In order to set sound reproduction parameters in the car radio that will allow the owner to enjoy good quality music, it is not necessary to contact specialists; you can do it yourself. High sound quality can be achieved from an inexpensive audio system by correctly defining the sound reproduction parameters. Some models have the ability to install additional applications that will increase the level of comfort when traveling by car.
source
Page 15
Sound options and
During reception/playback, press the select button.
Rotate the encoder dial until the desired menu item is displayed, then press the encoder dial.
Rotate the encoder dial to select a setting, then press the encoder dial.
The following parameters can be set:
*1 Not displayed when “SET
POSITION” is set to “OFF”.
*2 When audio output is set to
*3 When AUX source is activated
Advanced Control Features
The new, improved sound processor uses digital signal processing to create an ideal acoustic field inside the car.
Selecting sound quality
You can select an equalizer curve from 7 options (XPLOD, VOCAL, EDGE, CRUISE, SPACE, GRAVITY, CUSTOM or OFF).
SET POSITION
(Setting the listening position) (page 17)
ADJ POSITION
*
listening position) (page 17) SET SW POS
*
Adjusting the sound balance: “RIGHT-15” – “CENTER” – “LEFT-15”.
Relative level adjustment: “FRONT-15” – “CENTER” – “REAR-15”.
RB ENH
(Rear Bass Boost) (page 18)
Subwoofer volume adjustment: “+10 dB” – “0 dB” – “–10 dB”. (“ATT” is displayed when the minimum value is set.)
(AUX volume level)
Adjusts the volume of each connected auxiliary equipment: “+18 dB” - “0 dB” - “–8 dB”. This setting eliminates the need to adjust volume for different sources.
Sony has been producing household appliances and electronics for more than half a century. All equipment produced by the company is of high quality and reliability, and car radios produced under the Sony brand are no exception.
Each model has its own characteristics, advantages and disadvantages, and sometimes some little thing can play a role when choosing a device for a particular model.
Brand Sony
Peculiarities
Setting up the radio: instructions and recommendations
Features of Sony car radios may vary depending on the model of the head unit.
We invite you to familiarize yourself with the main features of audio systems using the gt660ue model as an example; this radio is considered one of the most popular among buyers:
- This model is equipped with a USB connector. Radio tape recorders with a flash drive allow you to read data from drives.
- There is an AUX output on the front panel of this model. With its help, the driver can listen to music by connecting a mobile gadget or MP3 player to the car radio.
- In accordance with the data specified in the operating instructions, this model is equipped with a fairly powerful sound processor. It should be noted that this feature is also typical for many other models, in particular xplod, g3100ue, a30, a35ue, etc.
- Almost all radio models of this brand are characterized by enormous functionality, which includes many settings for low frequencies and equalizer.
- This particular model - gt660ue - is characterized by dynamic loudness compensation.
- If necessary, the consumer can adjust the time delays of the sound.
- The device works with Russian-language tags.
- The user has a wide choice of options for illuminating the control keys and audio system display. In particular, this model has 20 standard colors, but if the need arises, the user can add about 36 thousand new colors.
- The head unit also includes a remote control.
- The audio system also comes with a detailed diagram for connecting and setting up the audio system, which includes detailed pinouts.
In the discussion: I can’t adjust the bass on the jvc KW-AVX800
Good afternoon! Please tell me, I can’t adjust the low frequencies on the radio. I found only the equalizer settings, but with any selected mode, the bass is still not enough. There is no buffer, there are 4 standard speakers. When the original head was in place, everything was fine with the bass. There is either some hidden submenu here that I cannot find, or it produces such a sound on its own.
- I can't set up the scene from the stock head.
- Can't configure DLS A6
- I can't configure the system. help plzzzz. =(
- I can’t configure Alpine SWR 1222
- Others. I can’t adjust the bass in the back, help!
Setup and operation
Subtleties of setting up the pioneer radio in your car
According to the operating instructions for the Sony car radio, when you turn it on for the first time, you must configure all the necessary parameters.
How to set the time
The clock of Sony audio devices has a 24-hour display format. You can configure them as follows:
- press and hold the selection button (the setup menu is displayed on the screen);
- after the word CLOCK-ADJ appears, press the SEEK button;
- when the hour indication starts flashing, turn the volume control to select the desired value;
- the indicator is moved by pressing the SEEK button, after which the required parameter is set;
- Pressing the selection button completes the time setting.
How to set up the radio
You can tune radio stations on your Sony radio in the following ways:
- Automatic saving. After pressing the SOURSE button, wait until the TUNER indicator appears. To change the range use the MODE key. After selecting the desired radio station, press the SEEK button. The settings are saved in the device memory. Radio stations are arranged in order of increasing frequencies.
- Manual saving. While receiving a radio station, press and hold the number button. When MEMORY appears, the settings have been saved.
How to unlock the radio
According to the instructions for using the car radio, unlocking is done as follows:
- The device is dismantled. The code located on the top cover is written down or remembered.
- After the CODE indication appears, enter the required numbers. This is done by pressing the radio station preset buttons. To confirm press *. If the code is entered incorrectly, you can enter it again. The number of attempts spent is reflected on the screen.
A car enthusiast who knows how to set up a Sony radio in a car can easily carry out repair work.
“>
Audio
Front speakers
All about the connector for connecting radios of various models
Having configured the radio receiver, as well as connecting sound sources, you can focus on sound quality.
- After adjusting the volume, press the knob to get to the settings menu.
- Here they look for the “Audio” item.
- By pressing the handle, you enter this menu.
- After looking through it, they find the Fader instruction.
- Click on the knob to get to this submenu.
- As usual, select the Fader menu (it should blink).
- Turn the knob and set the value to 15 units.
- Swing the knob to the left once to return to the “Audio” menu.
- Now you need to find a high-pass filter - HIGH PASS FILTER (HPF).
- Included in the menu.
- On the screen, most likely, the HPF is also zero.
- Twist the handle and set it to 50.
- Swing the handle to the left to exit the menu.
Rear speakers
The front speakers work cleanly, now it’s time to switch the rear speakers on the shelf into subwoofer mode - fortunately Pioneer can do this too.
- Turn off the radio.
- Press and hold the power button (as if you were going to set up the “demo” mode).
- Once in the menu, look for the inscription in the form of SW Kontrol.
- By pushing down the handle, you enter this menu.
- By rotating it, the parameter is set to SW.
- Confirm by pressing the handle again.
- Press the power button to save parameters and exit the menu.
- Then they return to the “Audio” menu (press the volume knob and rotate to select).
- By pressing the handle, you enter the menu.
- Here they look for the inscription SW SETTING1. Click on the handle to enter.
- Of the three options presented in the menu, you need to choose one of two - Normal or Rev.
- Having chosen, swing the knob to the left - return to “Audio”.
- Turning the knob clockwise will highlight the SW SETTING2 menu.
- They enter it by pressing the handle. The factory setting will show 80 HZ 0. Rotate the knob to decrease the first value.
- Having chosen what you want, swing the knob to the right to change the second parameter. This is the power level. The range here is from minus six to plus six. It will not be possible to give optimal parameters - it all depends on the quality of the speakers used.
- Press Band to exit the menu.
Before moving on to the next settings, check at different volumes how the selected settings work. If you don’t like something, repeat the steps described, trying other values.
Loudness compensation
This option is hidden in the same “Audio” menu.
- Enter the menu, find the Loudness parameter.
- Select by pressing the knob.
- There are three values available here - High, Middle, Low (respectively high, medium, low).
- This parameter is responsible for adjusting frequencies at low volume levels. It is also impossible to give optimal settings here - they are set experimentally.
- Swing the knob to the left to go to “Audio” or from settings by pressing Band.
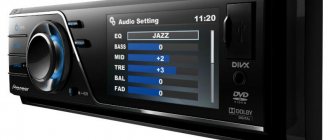
Equalizer settings
For advanced music lovers, here are a few more equalizer settings. They are hidden in the same “Audio” menu.
- Once in the menu, rotate the knob to select the EQ SETTING parameter.
- Enter this menu (depending on the model, you may need to enter another menu here). The three parameters offered in this menu are responsible separately for the settings of the low, mid, and high frequencies.
- Set according to your preferences. On some models, you can select several preset settings here. Depending on the speakers and your own preferences, adjust these parameters.
The settings here are no different from others - select by pressing, change by rotating, going to a higher level by swinging the knob to the left.
How to set up a monoblock for a subwoofer in a car
A monoblock or single-channel amplifier is designed to connect only one speaker system, so such models are often used for subwoofers. The device has exactly the same adjustments as a multi-channel amplifier, so setting up the blocks is no different.
An important step is to jointly set up the subwoofer on the amplifier. The fact is that the front speaker amplifier also has filters, the settings of which may not match. If the filter on the subwoofer cuts off all frequencies above 60 Hz, and the filter on the front speaker amplifier cuts off all frequencies below 100 Hz, then a dip in the amplitude-frequency response will form between the two devices and frequencies in the range of 60-100 Hz will simply not be reproduced. This can be avoided by adjusting the cutoff frequencies of the two filters so that they slightly overlap each other. The quality of playback deteriorates both at the dip and at the hump of the frequency response. Setting up a subwoofer in a car is for dummies. Professionals use measuring equipment and more complex techniques.
Installing a car radio and how to remove it
After connecting the car radio to the on-board network using one of the above methods, the following work is performed:
- Connecting speakers. To do this, use multi-core acoustic wire with a cross-section of 2-4 mm. The speakers are equipped with 2 terminals of different sizes. The wide pin is connected to the plus, the narrow one to the minus. The length of the wires should be kept to a minimum, otherwise the sound quality will deteriorate. It is recommended to connect 4 speakers - 2 rear and 2 side.
- Antenna connection. This part of the system makes it possible to listen to the radio. If a standard antenna is not available, it is recommended to buy an active one. It's easy to install. The antenna is glued to the windshield of the car. After this, it must be connected to a white wire marked REM or AMP.
You can remove the car radio as follows:
- weight is removed from the battery, which helps prevent a short circuit;
- the outer panel is removed by pulling out the latches and pulling it up;
- unscrew the screws located above the climate control system console;
- remove the ashtray (after this you need to remove the screws holding the radio head unit).
After completing the above work, the audio device can be removed.
Multimedia center with USB
JVC KW-AV 61W with iPod/iPhone support is equipped with a 6.1-inch display. The model differs from its previous brothers in the presence of a Bluetooth module for secure communication by phone on the road. It is possible to listen to music via the USB connector directly from the phone. You can connect a USB flash drive, a phone for charging, and Apple devices.
This JVC car radio has many options to expand the system's functions. It supports connecting a rear view camera and additional monitors for convenient viewing of video in the back seat. Outputs to external amplifiers can be adjusted to a high-quality audio system with a subwoofer and good acoustics.
- Touchpad;
- widescreen WVGA monitor;
- wireless technology with Bluetooth adapter;
- playback of video and audio files from iPod/iPhone via USB interface;
- function for setting background images;
- removable control panel;
- Dolby Digital format;
- wired microphone and Bluetooth adapter;
- rear view camera support;
- subwoofer control.
basic settings
In addition to adjusting the sound quality, the user configures additional parameters to expand the functionality of the head player. The list of options depends on the design of the product; some radios allow the connection of external drives or smartphones via the Bluetooth wireless protocol. The function allows you to store songs on a portable storage device, the radio is used to play or amplify the sound.
Radio
There are 3 ways to configure the radio to receive radio stations:
- Automatic search for frequencies through the BSM section. The equipment scans the range and sequentially writes into memory the frequencies of radio stations with the most powerful or stable signal. In this case, the screen may display the cell number, the name of the radio station or frequency (depending on the type of radio). The user can pre-select the range scanning step (100 or 50 kHz).
- Semi-automatic search, launched by pressing the broadcast scanning keys. After detecting a signal, the search stops, the user listens to the broadcast music in the car. The driver can save the wave he likes in the head unit’s memory and proceed to further scan the range. Recorded stations are selected by pressing the buttons corresponding to the memory locations. Also, to select frequencies, a standard multifunction steering wheel is used; the unit is connected to the Chinese radio through a signal converter.
- Manual scanning of the range is performed until the required frequency of the radio station is detected, which is displayed on the display. Then the car owner either writes the frequency into memory or listens to the content before turning off the equipment. A correctly configured car radio, working with a working antenna in an area of stable signal reception, ensures sound transmission without crackling or interference.
When setting up a radio receiver, the user sets the level of the signal broadcast in the FM range. The radios allow you to configure the reception of signals about the TA traffic situation with the ability to automatically switch to another radio station broadcasting identical information (AF parameter).
Time
The car owner sets the time on the radio through the Clock section provided in the menu. Changing the hour or minute value is done using the buttons or rotating the volume control. Some equipment automatically synchronizes time using RDS signals transmitted on the subcarrier frequency of FM radio stations. To display the time correctly, you need to change the summer or winter time settings (required on some players). The clock is displayed on the display, and the position of the display can be adjusted.
Language and calendar
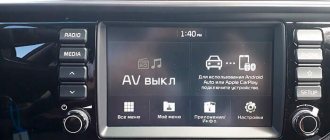
Setting up the radio allows you to adjust the language, although many owners use the English menu (enabled by default). To change the mode, you must enter the menu; the language in 1 DIN standard equipment is switched by pressing the buttons. If the car has a radio with a touch screen, the required parameter is selected from the drop-down list. The calendar used in equipment based on the Android operating system is configured in a similar way.
The standard radios have a calendar, which is programmed through the head unit menu or through the information display of the on-board computer. The clock and date are displayed on displays located on the instrument cluster and radio. The setup algorithm depends on the machine model; programming features are outlined in the operating instructions.
Traffic display
The navigation unit, found on some cars, is part of the standard equipment design, equipped with touch screens with a diagonal of 5-8″ (depending on the modification). The screen displays a map of the area and shows the position of the vehicle, determined by GPS or GLONASS satellites. Setting up the standard radio does not provide for informing the driver about traffic jams, since the exchange of such data with satellites is not provided.
The equipment allows receiving information through a TMS subscription on a separate component of the broadcast frequency of FM radio stations. Setting up the display of traffic jams via TMC on the radio consists of installing an IMEI converter for Garmin maps and a key generator. After receiving a code consisting of 25 characters (numbers and letters of the Latin alphabet), the information is entered into the registration window. The user then configures the colors to display free or busy routes and traffic symbols.
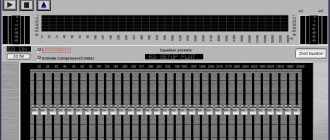
MEASUREMENTS
All audio path settings are grouped in one menu item and can be called up by pressing the encoder. When pressed for a long time (at least three seconds), the receiver enters the configurator (two or three bars). By default and after a forced reset, dual-band mode is enabled, the configuration memory is non-volatile and does not respond to battery disconnection.
At the very top of the list is a 25-band paragraphic equalizer. The choice of stripes was made wisely, taking into account the acoustics of the car interior. Instead of frequencies of 40 and 50 Hz, the average frequency was chosen - 45 Hz, and 80, 200 Hz and 2 kHz, which are useless in a car, were excluded. The equalizer provides simultaneous selection of the quality factor of all bands (1.0; 1.5; 2.5 and 3.5). The level is adjusted in 1 dB steps over a range of +/– 9 dB; in addition to smooth adjustment, there are eight fixed presets, including linear and user.
For the sake of compactness, the graphs are grouped in pairs. The seventh preset is linear frequency response (“Natural”), the eighth is custom
The user has access to adjustments at frequencies of 32, 45, 63, 100, 125, 160, 250, 315, 400, 500, 630, 800 Hz, 1, 1.25, 1.6, 2.5, 3.15, 4, 5, 6.3, 8.0, 10, 12.5, 16, 20 kHz. The graph shows only the extreme bands and one middle one, all with a “default” quality factor of 1.5 - otherwise there would be Vologda lace here instead of the frequency response
The second group of frequency correction includes a five-level bass boost and two-level loudness compensation. They are fixed and do not depend on the position of the volume control - therefore, at high volumes (above 30 out of 40 available), it is better to turn them off - otherwise distortion is possible.
The maximum volume corresponds to 40, the boost adjustment step is about 1 dB. Wideband adjustment, center frequency approximately 80 Hz
Loudness compensation works similarly to bass boost, but adds a boost to the high frequencies.
We are left with filters. Let's look at two-way mode first. Low-pass filters in the front and rear channels are adjusted independently from 30 to 250 Hz (off/30/40/50/60/70/80/90/100/120/150/180/220/250 Hz), slope - 6/ 12/18/24 dB/oct. For the front channels, you can additionally select the inflection frequency of the “shelf” correction of the frequency response in the tweeter band (from 1 to 12.5 kHz) and the degree of attenuation: up to -8 dB in 1 dB steps, independently for the left and right channels. This will help optimize the performance of two-way speakers with a passive crossover. The subwoofer channel has the same range of cutoff and slope frequencies; it provides switching of the polarity (phase) of the output signal
User guide
The car radio documentation included with the Ford Focus 2 manual contains basic operating tips:
- the head unit is turned on and off using a separate button, the built-in timer ensures power supply for an hour after the ignition is turned off;
- The date and time are displayed by pressing the Clock button;
- The sound volume is changed by turning the knob;
- to adjust the tonality or balance, you need to activate the mode using the Bass/Tre or Fade/Bal buttons;
- There is a separate key for starting and ending a telephone conversation, marked with a handset icon.
How to turn on Bluetooth
To turn Bluetooth off or on on the 6000CD, you need to:
- Enter setup mode by pressing the Menu button.
- Click on the right section navigation key.
- Press the Menu button successively until the text message BT ON or BT OFF appears on the display. Then you need to switch the function to the desired state.
Some cars assembled in Russia did not have a speakerphone unit installed. When Bluetooth is activated, the cell phone does not recognize the head unit. You can check the presence of a switching module by performing computer diagnostics of the vehicle. The wireless communication unit is intended for telephone conversations; the design does not provide for broadcasting music recordings.
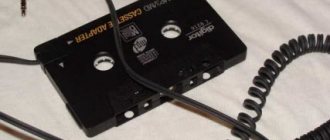
How to connect AUX
The AUX connector located in the car is intended for installing external audio sources. The sound volume is changed using the amplifier in the radio. To connect to AUX, a cable equipped with a standard 3.5 mm headphone plug is used. To start listening, you need to switch the head unit to the appropriate mode (using the button).
Volume and tone adjustments are carried out using controls on the cassette player; switching songs, pausing and starting playback are performed using buttons on the external player. Some Ford vehicles with a 6000CD head unit are not equipped with a standard AUX connector, which you can install yourself.
Connector installation procedure using Fiesta as an example:
- Purchase a connecting cord with 3.5 mm round connectors.
- Remove the glove box body by squeezing the sides with your hands. Remove the head unit clamps using thin metal plates. The tool is installed in 4 grooves located on the front panel of the radio; the working sides are trimmed.
- Remove the radio from the shaft and disconnect the wire connectors.
- Connect the AUX port to the contacts and output it to the glove box.
- Reinstall the removed parts and check the functionality of the connector.
How to connect a flash drive
The 6000CD head unit is not equipped with a standard USB port for connecting a flash drive or other external storage device. It is possible to independently connect a signal converter, which is attached to the AUX plug. A number of owners use an MP3 file decoder. The power supply is connected to the on-board network through an additional stabilizer, which reduces the voltage to 9 V. The remaining wires of the decoder are connected to the standard plug on the radio body. The USB port is located on a plastic element of the center console or on a button cover.
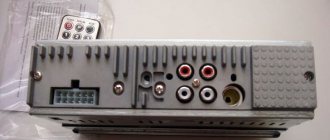
Radio connection diagram
The connection diagram for the audio head unit includes several connectors located on the rear of the case. The pinout of the 6000 CD radio complies with the ISO standard, the top plugs are intended for connecting loudspeakers and power supply. Additionally, there are connection wires to the digital CAN bus. Horizontal connectors allow you to connect external equipment or a Bluetooth wireless module.
PERSONAL EXPERIENCE
In addition to the mandatory MP3, the device plays WAV and FLAC from a flash drive, and does it efficiently. The names of folders and files are displayed, Cyrillic is supported both in tags and in file and folder names
The sound section works at a solid “A”, the adjustment limits are chosen well. The names of the equalizer presets are very arbitrary; when choosing, it is better to rely on your hearing rather than on the display. I would advise you to customize your version based on one of the existing ones - this simplifies the adjustment. When moving from the selected preset to the user setting, the signal levels set in the preset for all bands are displayed there, and making the necessary adjustments “on the spot” is much easier than starting “from scratch.”
Playback from a tablet via Bluetooth - you can work with a list of songs
Main application screen when playing audio. The vinyl spins and the tags are displayed. The song, by the way, is heartwarming - “someone stole his wife,” the guy breathed a sigh of relief...
Pioneer radios: how to turn them off, why clicks occur, speakers wheeze, subwoofer does not work
Pioneer radios stand out for their high-quality sound and a large number of functionality. But when “communicating” with them, users may encounter various difficulties. The radio's settings are wide, but this is not a plus for it. Often, owners of cars with standard or installed Pioneer radios are faced with the problem that they simply cannot turn it off. When turned off, the radio goes into clock mode, and at the same time the key backlight works. We will look at how to solve this and other problems related to Pioneer radios in this article.
A feature of a number of Pioneer radios is that they switch to “standby mode” instead of turning off, which causes several inconveniences:
- In a parked car, the clock on the radio display lights up, and the buttons are also illuminated, which increases the likelihood of the device being stolen;
- When driving at night with the radio turned off, the driver may be distracted by the backlight of the buttons;
- Turning off the radio not completely leads to increased battery power consumption.
The instructions for using the Pioneer radio do not tell you how to turn it off completely so that the clock does not light up on the screen and the keys are not backlit. Here is a typical procedure that is suitable for almost all Pioneer radio models that have a similar problem:
- Press button “2” on the radio and go to the menu;
- Select System from the list of partitions;
- Next, click PW Save;
- Turn off the radio using the OFF button;
- After these actions, it will go back into “sleep mode”. Press button “1” to turn off the radio;
- The clock display appears. Press button "4" to turn it off completely.
Such complex manipulations will only need to be carried out once to turn off the Pioneer radio, after which it can be completely turned off by pressing the “1” button.
Please note: If the radio settings are reset, for example, when disconnecting the device from the battery, you will need to repeat all the instructions described above again
What to do if the Pioneer radio clicks when the engine is running
Another common problem faced by owners of Pioneer radios is clicking noises when the engine is running. That is, if the engine is not running, the radio operates without problems or interference. When the engine starts and runs, the sound is distorted by constant clicks.
This problem occurs due to a failure or complete absence of an interference absorber in the radio. The interference itself inevitably appears, since when the engine is running, small voltage surges constantly occur, which will “result” in clicks. To fix this problem, you need to supply power to the radio through a noise filter.
Speakers wheeze when Pioneer radio is running
The next problem that owners of Pioneer radios face, especially if the settings were made in automatic mode, is the wheezing of the speakers. In some cases, the problem arises directly from the speakers themselves, but this is also possible for a number of other reasons:
Incorrect radio settings
You need to go to the system options and pay attention to the sound balance setting. Make sure the sound is evenly distributed between the speakers
If everything is in order with this setting, then also check that the settings are not set to excessively low frequencies; Problems with capacitors. Wheezing may occur due to broken capacitors, make sure that everything is in order with them; Bad contacts. The next reason why the speakers may wheeze when the Pioneer radio is working is directly due to a poor connection of wires and contacts. Make sure that all wires leading to the speakers are well insulated and securely fastened.
Subwoofer does not work with Pioneer radio
If your car is equipped with a standard Pioneer radio, some drivers may experience problems with the subwoofer not working. This problem occurs due to a poorly soldered output to the low-frequency speaker. Unfortunately, this is a standard “disease” of Pioneer radios, which can be solved in two ways:
- Try to exchange (or repair) the radio under warranty;
- Soldering the connector yourself is more reliable.
Once the connector is well soldered, the problem should go away.
(86 votes, average: 4.90 out of 5) Loading.
If this is your first time on our Forum:
why not read the instructions for example? What are the standard speakers and how are they connected? Do I have it or what? Write in more detail.
I read the instructions, but couldn't find them. There is no amplifier, there are speakers on the doors, I don’t know what model of speakers, the car is Alion, these are the relatives that are there.
There are equalizer settings that produce completely useless bass; I can’t find the loud function. So the question is, is there some kind of submenu or is everything limited purely to the equalizer?
Music lovers, well, no one knows where I should dig? The sound is like a radio, damn it, the jivisi is disappointed, the native staff one sang better.
read pages 63-64 of the instructions, and JVC wasn’t particularly famous for its bass, put it on Subic and everything will be fixable.
It’s better to replace the standard acoustics (it’s possible that they are 2 Ohms) I’ll put it more simply, if you take a Mercedes engine and put a Lada on the body, they won’t run like a gelding - the standard system is adjusted to the standard dins and it’s agreed that they don’t have any power and the Jivis can’t give the full picture on them (either a non-linear full of distortion, or an overload of the speakers), the frequency range is narrow and it is not possible to reveal its advantages. The only nuance in this topic depends on what kind of bass you get at a certain volume level, if it’s good, then you definitely can’t do without a subwoofer. And the question If the stock worked well and suited me, why change it? I took the DVD console and Monica and left everything as is. - any replacement requires changes in a circle.
Romalet, You probably have a good two-din 5.1 with a good DAC and an optical output. She would like an acoustic system and amplifiers with a subwoofer. And so, probably the phasing was not correct during the replacement, since you are hearing from the standard device, there was bass. Although what kind of bass can there be in principle?
Yes, it turned up by chance, inexpensively, so I took it. If you install a subwoofer, will you have to change the standard speakers? Again, the car needs to make noise, well, at least the doors. Now the sound is clear, it sings loudly, but there is little, almost no bass.
To be honest, I'm a novice in this matter. Tell me what is the best amplifier to put under this head so as not to throw away extra money, something in between without fanaticism. I know that they are active and that they are passive with a separate amplifier. Do I need to change the standard speakers, and in general, what else is needed to make it sing as it should? Since I’ve already stuck my head in, I’m thinking of bringing everything to fruition. There are 4 standard speakers on the doors, do they need to be replaced? Or can I leave them plus the sub?
The subwoofer is an important part of the car music system. Working at high power and low frequencies, it gives the sound a rich and rich sound. Conventional acoustic speakers have a number of limitations in the range of reproduced frequencies. They are not able to provide deep bass, without which musical fragments lose their strength and expressiveness. Speakers are divided into passive and active devices. A passive subwoofer consists of a loudspeaker specifically designed to reproduce low frequencies, a crossover filter, and an enclosure. Such a system requires a low frequency amplifier. The LF system can be connected to the terminals of a multi-channel amplifier or a separate amplifier can be provided for it. The active system for reproducing low frequencies has a special amplifier with a filter system. It is built into the housing where the woofer is located. In order for the car's sound system to work correctly, you will need to configure the subwoofer in the car.
Connection
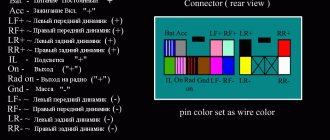
There are several components for connecting car radios. Let's look at them.
Connectors
First of all, the important components when connecting are connectors or connectors. They can be individual or ISO, that is, made according to an international standard. The differences between them are as follows:
If the connectors (see Connector for speaker cable and why it is needed) are individual, then you need to select an ISO adapter for them or cut the wires, and then connect them to the individual connector block according to the diagram.
Note. On the other hand, cutting the wires and making connections in the manner described above is highly not recommended.
It will be better to use shrink sleeves and other precautions
As for the ISO connectors, they are much more convenient. If the Sony car radio is equipped with them, then connecting it will be a matter of minutes.
Sony car radio connector pinout