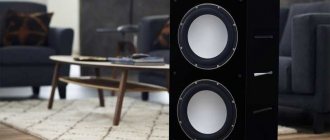
Powerful electrodynamic loudspeakers have a convex hemisphere installed in the center of the diffuser. It can be made of the same paper pulp from which the diffuser is made or other materials. Caps come in the following types:
- Paper
- Impregnated fabric
- Plastic
- Aluminum
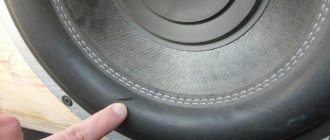
The hemisphere not only protects the gap of the magnetic system from foreign particles getting there, but also equalizes the amplitude-frequency response of the speaker in the mid-frequency region. Due to mechanical impacts, this cap may become dented. In such cases, you need to know how to pull out the speaker cap.
Jammed cone on speaker speaker
Some say that it’s nothing to worry about and that it’s just a cosmetic aspect. But experts and music lovers will argue the opposite - the working surface, so carefully calculated, the dynamics, sound waves are not the same, and so on.
How to remove a dent on a speaker?
I will not find out whether this is a harmful or completely harmless defect, but will only give one of the simplest methods for eliminating a dent on a speaker cone.
It’s such a basic solution that sometimes you think it won’t help. But believe me, in most cases, with this method there will be no trace of a dent left on the speaker. Ordinary transparent tape
. Depending on the size of the speaker and the size of the dent, you should choose adhesive tape that is suitable in width. Cut a small piece and carefully glue it to the crumpled part of the diffuser, leaving part of the tape not glued. Make sure there are no air bubbles under the tape.
After this, with a sharp, clear movement, tear off the tape from the speaker with one hand. At the same time, hold the speaker with your free hand. Pull the tape perpendicular to the surface of the speaker! And miracles - the dent disappeared!
This method is especially good for shiny plastic diffusers - the tape sticks to them perfectly, without leaving any traces of the defect! As for paper diffusers, there may be small pieces of paper left on the sticky side of the tape - but that's okay.
Care should be taken, because with poorly glued diffusers, in principle, the diffuser itself can be torn off. Therefore, I, as the author of this article, want to immediately dissociate myself from any responsibility for your careless attempts at self-repair. This is only a description of one of the methods I use in practice, but not a clear guide to action!
Source
Speaker repair: troubleshooting methods
Speaker repair and a detailed description of methods for troubleshooting dynamic emitters with your own hands at home, using affordable means. Therefore, there is no need to rush to get rid of speakers and subwoofers that have begun to wheeze or make extraneous sounds, but rather try to restore them yourself.
In this article we will talk about an experimental copy of the S-30 10AC-222 sound column from the Riga Radio Plant. Until this moment, it worked for me as a subwoofer in my car. But at some time this rarity began to act up and make strange sounds, that is, wheezing a little.
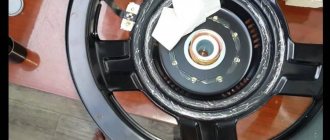
After I removed the cover of the speaker housing and took out the woofer, it turned out to be 25GDN-1-4, released in 1986. Even without particularly examining it, it immediately became clear that the speaker needed repair, since even with gentle pressure on the diffuser, the characteristic grinding sound of the coil could be heard. Therefore, it simply did not make sense to further explore it and call it with various devices.
First of all, I unsoldered the “pigtail” wires from the loudspeaker leading from the coil to the terminal, which is attached to the basket
Next, I filled the syringe with solvent 646, then wetted the place where the cap was glued to the diffuser in a circle using a needle.
and also the place where the speaker centering washer meets the diffuser
did the same thing in the place where the diffuser is attached to the basket
Now it was necessary to leave the wetted components of the speaker for about twenty minutes, periodically wetting the same gluing areas so that the holding adhesive joints were thoroughly softened.
Attention! When performing all of the above described actions with the solvent, you must remember that this is a highly flammable liquid and when working with it you must strictly follow the safety precautions that are indicated on the solvent label.
Be careful when wetting the speaker parts, namely, use a syringe to deliver the solvent to the gluing areas in small portions so that it does not get on the place where the coil is glued.
Once the dust cap is removed, you will need to remove any remaining solvent near the spool arbor.
While the cap was being removed, during this time the glue holding the centering washer should have softened. Also, carefully use a knife to pry it up and separate it from the basket.
At this step, you need to clean all the places where there was old glue and dry the speaker with a hairdryer. Now we need to find the reason why it stopped working normally. If the coil does not have obvious signs of friction, that is, there is no damaged layer of varnish on the wire and none of the turns are peeled off, then it is in order. If one or more turns have come loose, then you need to glue them in place using BF-2 glue.
In my case there was a problem with the flexible pigtail wire. When I looked carefully at the place where they were connected to the diffuser, I discovered a malfunction. The “pigtail” that fits the diffuser, due to the long period of use of the loudspeaker, was almost completely frayed and was held on by one vein. Naturally, there was no contact.
Carefully unbend the copper “clamp” securing the wire...
...and unsolder the acoustic “pigtail”.
Just in case, we do the same with the second “pigtail” (after so many years of using the speaker, it is also not reliable).
We cut the wire in the place where it is damaged...
... now you need to tin the very tip of the wire; the length of the tinned section should be the same as the width of the clamp on the diffuser - no more. That is, the entire section of the wire up to the clamp must be absolutely flexible. Of course, the best option would be to replace the entire “pigtail” with a new one so that its length matches the “native” one. Besides, new is new.
The next step is to solder the “pigtail” into place, fix it with a clamp, but do not solder the clamp blades, and now you also need to additionally glue this acoustic wiring to the diffuser.
How to straighten a speaker cap
Powerful electrodynamic loudspeakers have a convex hemisphere installed in the center of the diffuser. It can be made of the same paper pulp from which the diffuser is made or other materials. Caps come in the following types:
The hemisphere not only protects the gap of the magnetic system from foreign particles getting there, but also equalizes the amplitude-frequency response of the speaker in the mid-frequency region. Due to mechanical impacts, this cap may become dented. In such cases, you need to know how to pull out the speaker cap.
Speaker repair
Any sound reproduction system consists of an electronic and mechanical part. The electronic part is the amplifier, and the mechanical part is the loudspeakers, which are the basis of the speaker system. They often fail, so do-it-yourself speaker repair
will save the owner of the acoustics from serious expenses.
High-quality systems are expensive, and it is not always possible to repair them in specialized workshops. To figure out how to restore a speaker with your own hands,
you need to know its design.
How to align the speaker cap
There are several ways to fix this defect. Here a lot depends on the material from which the hemispherical dome is made. How to straighten the cap on the speaker if there are concerns that as a result of your actions, it may completely come off. In this case, it is recommended to forcefully separate it from the diffuser, straighten it and then glue it in place. To dissolve the glue around the perimeter of the dome, you need to use a disposable syringe, onto which a medical needle with a ground tip is placed. Solvent type 646 is drawn into the syringe. The solvent is carefully applied to the adhesive seam between the diffuser and the dome using a needle. It is important that it does not get on the diffuser. After abundantly moistening the seam, you can carefully lift the edge of the dome with a thin and sharp object until the hemisphere comes off completely. Then the mechanical damage is eliminated, and the dome is glued into place using Moment glue.
Acoustic speaker repair
When repairing acoustic speakers with your own hands
The most difficult process will be rewinding the voice coil. This is labor-intensive and delicate work. After the diffuser along with the coil is removed from the housing, you need to carefully wind up the burnt or torn wire. You don’t have to count the turns so as not to get lost. It is enough to measure the length of the wound wire and measure its diameter with a micrometer to select a similar piece. To wind the coil, you need to use a mandrel of the appropriate diameter onto which the voice coil is placed. This way you can avoid creasing the paper frame. The voice coil is wound strictly turn to turn. For fixation, it is best to use BF-2 glue.
Once the coil has completely dried, the assembly can be assembled. With a little experience, the answer to the question of whether the speakers can be restored will be positive.
How to bend a speaker cap
If the dome is glued securely, you can use other methods. A strip of tape is suitable for removing dents on the central hemisphere. To do this, you should glue one end of it to the dented area and vigorously and sharply pull the free end. This is the best way to remove dents on a dome made of plastic film. The adhesive tape sticks well to a smooth surface and after peeling it off, no traces remain on the dome. Instead of tape, a thread is glued to the dent using Moment glue. After drying, the deflection can be eliminated by pulling the thread. If necessary, these operations are performed several times, changing the points of gluing the tape or thread.
You can pull out the dome dent using a thin steel wire. The thinnest guitar string is suitable for this purpose. Its tip must be bent at a right angle to a distance of 2-3 mm to form the letter “G”. Next, this tool pierces the dome material in the right place and, by bending the wire like a lever, the dent is removed. The disadvantage of this method is the appearance of small holes in the dome, so after completion of the work they need to be carefully covered with a thin layer of glue. A more complex process is to eliminate mechanical damage to a dome made of aluminum alloys. In this case, the best option would be to peel off the metal hemisphere and straighten it on a semicircular hard surface.
Source
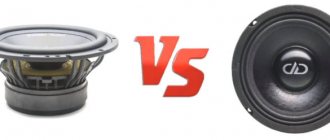
Car Speaker Repair
Car sound systems consist of two or three-way coaxial-type systems and a subwoofer. The coaxial device has an oval or round shape. Its design feature is the installation of a high-frequency head or “tweeter” on a special plate above the broadband acoustics diffuser. The system takes up little space, and the high-frequency head does not interfere with the propagation of sound waves. Car acoustics are subject to many negative influences. The presence of dust and constant vibration are the cause of failure of automotive audio systems.
Some models of coaxial car speakers consist of three speakers. Two of which - high-frequency and mid-frequency - are installed above the woofer. Most often, a malfunction occurs in the broadband head. Restore the speakers in the car
Can. This will require a simple tool and some skills. When repairing oval speakers with your own hands, you first need to remove the high-frequency unit.
To do this, you need to unscrew the central screw located on the rear flange of the speaker. The screw head is usually sealed. You need to remove the label, then the screw head will be accessible.
After the module is removed, you need to carefully unsolder the wires that go to it. Now you can work on the broadband head. The rubber suspension of the diffuser is pressed against a plastic pad. It needs to be pryed off with a flat screwdriver or a knife blade and removed from the diffuser holder. Then separate the rubber diffuser suspension. It is glued with elastic rubber-type glue, so you can pick up the edge with a screwdriver and then carefully peel it off with your hands. When the edge of the diffuser is completely separated from the metal base, the centering washer is removed. First, the voice coil wires should be unsoldered from the contact plate. Then very carefully peel off the centering washer. It is very easy to damage, so it is better to do the job with a flat and thin screwdriver.
When the speaker is completely disassembled, you can start looking for the defect. A malfunction of the acoustic system is determined by ear during operation. The sound in the speaker becomes distorted, wheezing and crackling appear, especially at high volume levels. Sometimes high frequencies disappear completely, and the sound becomes dull and unintelligible. Mostly do-it -yourself auto speaker repair
comes down to cleaning the magnetic gap of the broadband head from foreign inclusions. Most often, dirt or dust gets into the gap of the permanent magnet.
You can use a vacuum cleaner to remove debris. It is more difficult to remove metal particles from the gap. The speaker magnet is strong and a vacuum cleaner will not help here. When removing magnetic particles, regular tape will help. Small strips of it are inserted into the gap using a thin plate of textolite or other non-magnetic material. Then they are removed along with the adhered particles.
This operation should be repeated several times. You can see the quality of work using a powerful lamp and magnifying glass. The assembly is assembled in the reverse order. It is better not to remove the old glue, as this will allow the diffuser to be installed accurately. All gluing can be done with regular Moment glue. After installing the diffuser, you need to check by hand how well the voice coil moves in the magnet gap. There should be no mechanical interference. The coil should move without effort or rustling. Car speaker restoration and repair
does not require special knowledge, so
anyone can repair speakers with their own hands
Crumpled caps
Yes, you guessed it, today’s topic is about jammed protective speaker caps on speaker systems. Whether the children poked your finger or you accidentally touched it, a drunk cat rushed, or the speakers fell on their own and it’s not your fault - the result is the same - the moral burden of seeing a jammed cap. It’s a small thing, but how unpleasant, you’ll agree. I will not tell you for a long time how to straighten the cap, if possible, but today, in the age of fast Internet, I will show, using the example of a video from YouTube, how to restore the gloss and roundness of a damaged cap. So the first example is to pull out, or rather suck out, the cap back using a vacuum cleaner. We suck at an angle from different angles until we achieve complete roundness.
In video number 2, the villain deliberately crushed the boot and tried to pull it out with tape, but that was not the case and the vacuum cleaner came to the rescue again.
Example number 3 also shows us that there is no trick against a crowbar, or rather a vacuum cleaner. Sucks everything.
The next guy does a very original thing, melting the end of a plastic tube and sticking it to a cloth cap. I doubted that anything would come of it in the end. Something came out, but the result is not important - it is better not to follow his example.
Another popular method for pulling out the cap is with tape. Unlike the hero of the video, I would advise using tape that is not the same as in the video, but more adhesive.
The author of the following video literally sucks the cap through the jar using the power of his audiophile lungs.
The next author proceeds in a more original way by pulling out the cap with a regular suction cup.
In the next video, the uncle first warms up the cap with hot air from the soldering station, and then - hop - and instantly pulls out its shape with a vacuum cleaner.
The author of the following technique makes a hellish construction from a plastic bag and a gnawed handle - after which - “Breathe deeper, beaver!”
If these methods do not help you, then you need to move on to a more rigid Kama Sutra, peeling off the cap and replacing it with a similar one. And the most adequate method and the winner of our rating is a vacuum cleaner.
4 Comments
Source
How to fix a dent on a speaker
Powerful electrodynamic loudspeakers have a convex hemisphere installed in the center of the diffuser. It can be made of the same paper pulp from which the diffuser is made or other materials. Caps come in the following types:
The hemisphere not only protects the gap of the magnetic system from foreign particles getting there, but also equalizes the amplitude-frequency response of the speaker in the mid-frequency region. Due to mechanical impacts, this cap may become dented. In such cases, you need to know how to pull out the speaker cap.
Do-it-yourself speaker repair without disassembly
Speakers that are built into acoustic systems can experience not only internal defects, but also external ones. Most often, this is a loosening of the speaker mounts to the front panel of the speaker systems. This causes extraneous noise in the speakers and disrupts the acoustic picture. This happens especially often in car sound systems. If the fastening becomes loose, you need to remove the false panel and tighten all connections. If there is no sound from the speakers, this is often due to a break in the wires running from the amplifier to the speakers. Therefore, before opening the acoustic module, you need to check its functionality.
Source
How to align the speaker cap
There are several ways to fix this defect. Here a lot depends on the material from which the hemispherical dome is made. How to straighten the cap on the speaker if there are concerns that as a result of your actions, it may completely come off. In this case, it is recommended to forcefully separate it from the diffuser, straighten it and then glue it in place. To dissolve the glue around the perimeter of the dome, you need to use a disposable syringe, onto which a medical needle with a ground tip is placed. Solvent type 646 is drawn into the syringe. The solvent is carefully applied to the adhesive seam between the diffuser and the dome using a needle. It is important that it does not get on the diffuser. After abundantly moistening the seam, you can carefully lift the edge of the dome with a thin and sharp object until the hemisphere comes off completely. Then the mechanical damage is eliminated, and the dome is glued into place using Moment glue.
Speaker restoration
A common defect is diffuser rupture. Repairing a torn speaker
with your own hands is to restore it. There are different reasons for diffuser damage:
As a result of wear and tear on the diffuser or exposure to moisture, ruptures may occur. This causes the sound in speaker systems to become distorted. In this case, repairing the acoustic speaker
possible by placing a patch on the damaged area. Despite the density of the diffuser, for its restoration you need to use soft paper such as newsprint. A4 office paper is not suitable for this purpose. Elastic glue is used to glue the patch. It could be PVA or something similar. The back side of the diffuser at the break point is coated with glue. Then a small rectangle of soft paper is coated with glue and placed on the back side of the tear. The paper must be smoothed carefully using a round and smooth object.
If the gap is large, then strips of paper are glued so that they overlap each other and extend onto the undamaged segment of the diffuser. After leveling and smoothing, a second layer of paper strips is applied. From the outside, the crack site is coated with glue. There should be no excess glue, so wipe the diffuser with a soft cloth. The finished structure must dry for at least a day. After complete drying, the quality of sealing and the free movement of the diffuser are checked. If the gluing area turns out to be thinner than the rest of the material, then the gluing procedure must be repeated. Different thicknesses will lead to a tear forming in this place again. The final quality check involves feeding a piece of music from the amplifier output to the speaker. It is best to listen to an excerpt from a symphonic work, since almost the entire frequency range is present there. Car speaker repair
is performed according to a similar scheme.
How to bend a speaker cap
If the dome is glued securely, you can use other methods. A strip of tape is suitable for removing dents on the central hemisphere. To do this, you should glue one end of it to the dented area and vigorously and sharply pull the free end. This is the best way to remove dents on a dome made of plastic film. The adhesive tape sticks well to a smooth surface and after peeling it off, no traces remain on the dome. Instead of tape, a thread is glued to the dent using Moment glue. After drying, the deflection can be eliminated by pulling the thread. If necessary, these operations are performed several times, changing the points of gluing the tape or thread.
You can pull out the dome dent using a thin steel wire. The thinnest guitar string is suitable for this purpose. Its tip must be bent at a right angle to a distance of 2-3 mm to form the letter “G”. Next, this tool pierces the dome material in the right place and, by bending the wire like a lever, the dent is removed. The disadvantage of this method is the appearance of small holes in the dome, so after completion of the work they need to be carefully covered with a thin layer of glue. A more complex process is to eliminate mechanical damage to a dome made of aluminum alloys. In this case, the best option would be to peel off the metal hemisphere and straighten it on a semicircular hard surface.
Speaker repair and subsequent assembly
We install the restored diffuser into the loudspeaker basket, and the terminals of the acoustic wiring must coincide with the terminals on which they are attached. Now you need to determine the polarity of the speaker. To do this, take a 1.5v battery and connect it to the terminals of the dynamic head.
If at the same time the diffuser moves outward, then this connection is correct, and if it is drawn inward, then this is reverse polarity. Thus, you will determine which terminal of the speaker is “+”, and then we solder it to the terminal with the corresponding designation on the basket.
In order to maintain the original length of the supply wires, which were shortened during repairs, now they need to be soldered not by inserting the wire into the hole on the plate, but directly to the terminal, so that there is no tension.
At this step, you need to center the coil relative to the magnetic gap using wedges made of thin electrical cardboard or photographic film, which establish a gap between the coil and the core. In this case, one non-applicable condition must be strictly observed - when placing the wedges in the gap, absolute symmetry with respect to 3 points must be ensured.
Speaker repair. Centering the coil using wedges
Using the example of a dynamic emitter 25GDN-1-4, 4 wedges made of thin cardboard, installed in two pairs opposite each other, are sufficient. The length of such a wedge is selected in this way; If you put the speaker on the table with the diffuser down and the wedges do not interfere, then everything is fine. Next we glue the diffuser.
In my case, I did this: I pushed the speaker membrane up about 15 mm, so that the centering washer did not rest on the basket, then I took a small brush and applied glue to it and the basket. He waited a little, and then moved the diffuser inside and carefully pressed the washer against the basket with his fingers along the entire circumference. Next, in the extended position, I place the diffuser on the glue, while making sure that it does not warp.
After that, I turned the speaker over, put a weight on top and left it for about three hours so that the glue would completely set.
How to Straighten a Speaker Cap
For a new device you will need the body of the old magnet, the remaining parts are taken from metal. According to the principle of operation, we get a large-sized lifter, as in PDR technology, which is quite suitable for amateur use, and when modified, for professional use. Thanks to the lever, the lifting force of the central rod is quite high, which means that with such a tool you can straighten hard metal, or lift a dent to a rough one so that it can be reworked later. When copying material, link to sdelairukami. The material on the site is presented for informational purposes only. The site administration is not responsible for possible consequences after reading the material. Username or email. To use social login you have to agree with the storage and handling of your data by this website. Search Search for: Search. You are here: Home Body Tool for straightening dents from the speaker.
Correcting a dent on the speaker
Many, I think, have encountered this problem both in the car and at home, when some bad person pressed through your dust cap. It doesn't seem to be a big deal, but the quality and volume are not affected, but still not pleasant. So recently the same misfortune happened, someone pushed through the cap, which made me very upset. I was already thinking about prying off the glue and then gluing it again, when I decided to ask a friend if there were any options for straightening it? It turns out everything is very simple. We pick up the vacuum cleaner, turn it on, gradually adjusting the power so that it doesn’t vomit at all, and wait until the cap returns to its place. There is another way - you glue the head of a match to the dent and then pull it out and carefully cut the match!