When the subwoofer is receiving power, it can be damaged if it is set to too high or low power. Typically a subwoofer can handle what it's designed to do, but better design means the speaker can last longer. If it does happen that the subwoofer speaker breaks, there are simple ways to fix it.
Depth
For various types of wind organs in halls specially renovated for musical instruments, the sub-bass has a significant influence on the timbre of the sound. It is for the sounds of nature and various man-made disasters, such as unexpected explosions, that quite strong sub-bass components are characteristic.
It is worth noting that most people either do not hear sub-bass at all, or they hear it, but not well enough. For example, if you filter out the fundamentally different sounds of a nuclear explosion and a strong hurricane, like a tornado in the tropics, from everything except sub-bass, then we can say with absolute certainty that it is unlikely that any of the listeners will be able to understand what is actually happening.
How to seal the subwoofer suspension? — car audio in all its manifestations
https://photofile.ru/...83/27489608.JPG
Also “are there missing fragments?” IMHO, without serious consequences for acoustics, it is unlikely to be repairable...
It’s too late, of course, to drink Borjomi... but if there are children and dinosaurs in the house, the use of grills is not even discussed! Moreover, preferably metal ones with a small cell, like car acoustics, and God bless him, with this sound - my daughter “made it for a friend” gift”: I pierced the expensive B&W with a pencil...On the third day after the purchase...
§
Do not use a soldering iron. You have already been given advice, both on materials and technologies. Switch your brain to work, otherwise you’ll be wondering what to do with the cat. In cases of breakthroughs - at the joint with superglue, then on top of Radical Square, or with a piece of silk. If there are no fragments, it needs to be created, again with the help of a piece of silk and Radical glue. And don’t worry about how this will affect Qms - it won’t affect it in any practical sense. The point is that the place of merging or restoration of the fragment does not become tanned and that’s it. If it gets stale, it will burst or tear the diffuser nearby.
How to tape a subwoofer
One way to fix the tear is with glue and a paper towel. Not a perfect solution, but simple. Take a paper towel and, if it has two layers, remove one layer. Tear the paper towel to fit the size of your work surface. The paper towel should be wide enough to cover the tear, but not too large.
Take Moment glue and spread it over a piece of paper towel to go across the gap. The glue should saturate the paper towel, but not be liquid.
Apply the adhesive tissue paper to the speaker, gently pressing and smoothing it onto the speaker using a knife. Repeat this process for the back of the speaker
Wait for everything to dry and then apply matte black spray paint if you wish. This procedure can help the broken speaker fiber to come back together with the help of glue and a paper towel.
Sometimes subwoofer repairs can be quite simple, so decide whether you want to take the time to fix the speaker yourself or have someone do it for you.
Glue selection
When choosing glue for speakers, pay attention to its composition and scope of application. Take the appropriate one, taking into account the nature of the damage
Diffusor SL is a universal adhesive consisting of one component. Its main constituent element is polychloroprene. Originally created to correct defects in dynamic loudspeakers. A good choice for assembling speakers. Thanks to special technology, this composition forms a colorless, neat, high-strength seam. It sets within two hours, complete drying is completed after a day, and then you can use the speaker for work. The choice of specialists involved in the repair of subwoofers.
DKD is a modern choice of adhesive material. Its composition is distinguished by a single-component structure with low viscosity. Used to restore the turns of the winding enameled wire necessary for gluing the voice coil. Complete drying takes about two to three hours, and can be accelerated with a hair dryer.
Akfi 705 is suitable for quick assembly. It is distinguished by its versatility. This two-component composition is suitable for quick speaker repairs. Well proven for rubber and plastic surfaces.
Interbond is a two-component viscous composition based on ethyl-2 cyanoacrylate. Used for repairing centering washer, coil gluing, flexible leads.
What glue to use to seal the speaker?
To figure out how to seal the lip of a subwoofer, you need to familiarize yourself with the best adhesives for these purposes. Each of them has its own properties, pros and cons.
Diffusor SL
This one-component composition is excellent for repairing an element in the column that may have broken for any reason. The basis of this mixture is polychloroprene.
The seam that was applied with this composition turns out neat and is practically invisible, because the mass has no color.
Possible faults
Repair of subwoofers by Vostok-Polyus specialists will be carried out in different ways. Most often, restoring the functionality of such devices involves replacing power supplies, control boards, power cords and other numerous body parts.
Subwoofers need repair when they are subject to various mechanical damage (shocks, falls, shocks, etc.). Long-term operation of the unit implies the accumulation of dust inside the housing, which over time damages individual operating components. To resume their operation, they will need periodic cleaning or lubrication, but this should only be carried out by a professional.
Failure of any electronic components, as well as power supplies, is the most difficult to repair and therefore their restoration always requires maximum effort and attention.
There can be many reasons why a subwoofer breaks down, but the most common are unstable voltage in the electrical network and improper operation of the equipment.
Failure of the tweeter
To the question of whether it is possible to repair a speaker if one of its speakers is burnt out, we will answer - it is possible. But in the case of a “tweeter”, that is, with a high-frequency speaker, this can only be cured by replacement, since such speakers have a closed diffuser basket and it is not worth trying to disassemble it. This item is disposable.
The damage is determined by hearing. If the speaker stops clicking, that is, producing high frequencies, or the top speaker produces a grinding noise, then the problem is in the “beeper”. What we do:
- Open the cover by unscrewing the fastening screws.
- We check the integrity of the soldering on the contacts of the low-frequency speaker, that is, whether the wires have fallen off from the contacts of the speaker. If everything is normal, then the problem is 100% in the tweeter itself.
- We unsolder the conductors from it, noticing which wire was on the plus and which on the minus (there are symbols on the side near the contacts).
- We take a new (or used, but working) tweeter from a radio equipment store or from friends, if someone has one lying around. The main thing is that the speaker matches the power. It's best to take it with you to the store. People there, if anything, will find an analogue in size.
- Let's put it in place. In order for the speaker to work without extraneous noise and produce high-quality sound, it is best to seat the speaker around the circumference on the sealant, making sure that it never gets on the diffuser funnel.
- Solder the wires. Plus - to plus, minus - to minus.
- Close the column cover by tightening all the screws.
- Let's check. Everything works great.
How to glue the speaker
For repairs, you can use different types of modern glue, which are produced for specific work.
Colorless one-component SL adhesive is suitable for gluing the diffuser. Initial setting occurs within 10-20 minutes, complete drying within a day. Features high adhesive strength. Available in 100 ml plastic bottles.
Partially damaged rubber, fabric or polypropylene suspension can be restored using silicone sealant. Initial setting occurs within 30 minutes, final drying - 24 hours. Silicone maintains the elasticity of the suspensions, allowing the diffuser to move freely.
The voice coil turns are glued well with DKD epoxy glue. The time for complete polymerization is 3 hours, provided that you use a hair dryer and heat the air stream to 120°C. The adhesive is suitable for working with organic materials used to make voice coils. Available in plastic bottles of 50 ml.
Akfix705 glue was developed for speaker assembly. Available complete with an aerosol activator. Bonding strength is achieved in a few minutes. Recommended for gluing rubber and plastic. Available in a set: 200 ml activator + 50 g glue.
Interbond adhesive is also suitable for assembling speaker components, especially bonding the coil and flexible leads. Available as a kit: 100 ml activator + 25 g glue.
What glue to use for speakers - review
So, in order to repair the suspension, namely gluing it, you need to use special adhesives intended for this. Let's look at the most popular and widespread adhesives among craftsmen in this industry. They differ both in their composition and characteristics.
- SL glue . A universal one-component adhesive developed on the basis of polychloroprene, which is used specifically for repairs and assembling loudspeakers. After gluing, it forms a transparent seam in its structure, which sets within two hours. It is highly durable, but you can use this audio equipment only after 24 hours, test after it has completely dried, and not just set. It is offered to customers in a plastic container with a volume of 100 ml, and the price ranges from 500 to 650 rubles.
- DKD glue . A one-component adhesive with low viscosity, which is very convenient when repairing speakers of different power and sizes. It has an epoxy base and is therefore most often used for attaching coils and their turns. When heated with a construction hairdryer to a temperature of 110–130 degrees, it polymerizes, thereby forming a reliable adhesion of surfaces made of fiberglass and materials from which inductors used in audio equipment are made.
- Glue AK FIX 705 . It is a two-component adhesive that consists of a liquid gel and an activating substance, which is in the form of an aerosol. Due to its high viscosity, it does not drip or spread over the surface, and after drying it ensures high strength of the gluing areas. Suitable for joining rubber, many types of plastic materials. The set consists of 200 grams of activator and 50 g of glue. The price is about 450 rubles.
- Universal glue B7000 . It is used for gluing elements and components of acoustic systems made of wood, plastic, glass, or metal. When heated to a temperature of about 100 degrees, it becomes plastic, and if there is a need to clean it, then in such a soft state it is easy to do. Has a transparent structure. Also used for repairing and assembling various electronic gadgets. The price is about 200 rubles per package with a capacity of 15 ml.
- Universal glue T7000 . A black silicone-based adhesive that has found application in many areas of human activity and repair, and in particular for restoring the functionality of speakers.
- “Super-Grip” epoxy equal-component glue . An epoxy-based adhesive that is used for gluing various materials, as well as for creating a varnish coating. It has a non-permeable structure after complete drying, and is also endowed with excellent dielectric properties, therefore it is often used for repairing speakers. It is prepared immediately before use by mixing the hardener and resin included in the kit; the procedure takes about 5–10 minutes, and after application it is converted into a viscous, non-flowing structure in half an hour.
Causes of car speaker failure
In most cases, the problem occurs due to a fault called thermal failure. Thermal damage occurs when a device draws more power than it can handle and overheats. Overheating often damages the adhesive that holds all the components of the speaker system together.
Also, overheating often leads to melting or burning of wires and voice coil. Damage to the coil will result in poor or even no sound.
Mechanical failure occurs when a speaker component called the cone becomes misaligned. The diffuser suspension usually moves due to incorrect acoustic settings. If it moves from where it should be, parts of the speaker may collide with each other or with the cabinet. A collision can break, weaken, or tear these components.
High quality acoustic components also break down over time, even when used correctly. Any electronic devices wear out and break during operation. Read the instructions in the article to learn how to seal the speaker membrane.
Spare part requirements
Good sound is ensured largely by centering. It directly affects the quality of the loudspeaker head and ensures the correct positioning of the voice coil. The characteristics that a good centering washer should have are determined by its function:
- maximum rigidity in a horizontal position to prevent the voice coil from coming into contact with the walls of the gap of the magnetic system;
- high plasticity in the axis, which ensures a low frequency of resonant movements;
- significant elasticity, due to which nonlinear distortions of the reproduced signal are minimized.
Only if these conditions are met will good sound quality and purity be possible. In order to buy centering washers for speakers, you need to measure the outer and inner diameters of the part itself, as well as the waves. It is these parameters, in combination with the material from which the part is made, that are key when choosing.
Let's get started
Having assembled a simple repair kit, let's get down to business:
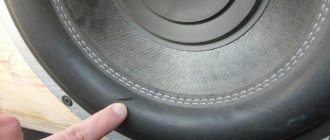
Disconnect the subwoofer from the amplifier, remove the grille from the speaker using a screwdriver and unscrew the mounting screws from the speaker, carefully remove the speaker from the housing, disconnect the speaker wires. Inspect the condition of the speaker cone, immediately make sure that the leads from the voice coil have not been damaged. Use scissors to cut it out. a patch made of thin cardboard, of such a size that it covers this hole by a centimeter in any direction. You don’t have to look for electric cardboard, almost any will do, you can even use a cardboard candy box. It often happens that the shape of the diffuser is formed by the so-called double curvature surface Then you need to make two or three patches that need to be glued overlapping one to the other. Align the edges of the damaged part on the diffuser, soak the back side with glue “Moment”, the material of the diffuser, wait a little for the glue to dry. Prepare patches from cardboard in advance, then moisten them generously with glue damaged area on the diffuser on the back side, then immediately apply patches, our goal is to saturate the parts to be joined with glue. Then immediately remove the patches from the diffuser without removing them, you need to wait 20-30 seconds, then apply both patches back. From the back side, press them towards the diffuser, placing a roll of cotton wool or synthetic padding inside the speaker basket. You need to ensure that the diffuser does not immediately bulge at the place where it is glued, which means you need to select the optimal force for pressing the patches in order to maintain the initial shape of its diffuser. After 24 hours, remove the placed supporting roller from the speaker basket, inspect it, how well the connection has stuck together. If you notice un-glued areas, then bring the tube of glue to the crack, and gently press on the tube and press a drop of glue into it. The main goal is to eliminate rattling when the speaker is working. Using a hair dryer, carefully heat the glue seam until the glue boils, remove the hair dryer and compress the place gluing with your fingers Hold for at least a minute, after which the glue will grab tightly and hold the patch Carefully move the diffuser both in and out to make sure that when it moves, the coil does not touch the magnet If necessary, replace the sealing rubber band, connect the speaker cables back to the speaker and install the speaker in place As you can see, gluing the subwoofer is not so difficult. Then you need to do a test run at low volume to make sure that there is no rattling during operation. Then gradually increase the volume to maximum, listen carefully for the appearance or absence of any extraneous sounds If no extraneous sounds are found, you can return the grille to its place
That's all, in my opinion everything is clear even without video.
How to properly glue speaker hangers - instructions
Replacing the surround on a subwoofer speaker is easy.
All you need to get the job done is:
- new suspension;
- construction hair dryer;
- sharp knife;
- thin flat screwdriver;
- solvent;
- glue;
- brush or cotton swab for applying glue.
VIDEO INSTRUCTIONS Procedure using the example of using one-component SL adhesive:
- We dismantle the damaged suspension - peel it off from the basket (case), from the diffuser, and remove the dust cap. To do this quickly and accurately, you need to thoroughly heat the adhesive joints with a hair dryer. Old elements must be peeled off carefully so as not to damage the diffuser. A flathead screwdriver works well for this purpose.
- Thoroughly clean the basket and diffuser of old glue residues and degrease the gluing area with a solvent.
- We center the diffuser so that it moves freely without touching the coil. You need to approach this moment responsibly, otherwise you will have to disassemble everything again and glue the speaker suspension again.
- Using a brush or cotton swab, apply a small layer of adhesive to the diffuser and to the suspension (the glue must be thoroughly mixed first). The optimal glue thickness is 2-3 mm.
- We perform gluing: we maintain a technological pause so that the glue dries to a state of residual stickiness. We apply the suspension to the diffuser and evenly press the surfaces to be glued. The glue drying time in accordance with the instructions is 10-20 minutes. However, full strength is achieved only after a day. After this, you can test the speaker.
READ MORE: Home delivery of groceries: TOP 10 services during quarantine
Detailed description of diagnostics and repair of medium and high power speakers. The article was written for those who want to repair speakers and have winding and soldering skills. I have been repairing speakers for 15 years and want to pass on the acquired skills and work techniques to the Datagorians. Sorry for the lack of detailed photos of the process, all the equipment and work are now a thing of the past.
We check the winding resistance with the device. There are three possible options: 1) Open circuit. 2) Nominal resistance. 3) Reduced resistance.
Now for the second check. Place the speaker on the magnet and carefully move the diffuser up and down. If you hear a rustling or creaking sound, or there is no movement, the speaker will have to be disassembled.
If there is no grinding noise, but the winding is broken, you need to check the conductivity of the flexible wires from the terminals to the soldering of the winding. They are made of threads intertwined with copper strands, which break down over time. They can be replaced without disassembling the speaker with M.G. wire. T.F. suitable section or braided tape to remove excess solder. We solder the wires so that they do not stretch when the diffuser moves and do not touch it. We glue the soldering area with Moment glue.
If the speaker needs to be disassembled, disconnect the wires from the terminals, place the speaker on the magnet and use a swab soaked in acetone to soften the glue around the protective cap and remove it by prying it off with a non-sharp scalpel. Using the same method, peel off the outer edge of the diffuser and the outer edge of the centering washer. Carefully pull out the diffuser vertically upward without distortion.
I do not recommend unsticking the coil frame from the diffuser and the centering washer, so as not to disturb the alignment of the speaker.
To rewind, you need to assemble a simple device, the structure of which is clear from the figure. The most difficult part is the reel mandrel. To make it you need to contact a turner. Mandrel length 100-150 mm, material – any metal.
Measure the inner diameter of the coil (x). The reel mandrel should have a diameter of x 0.5 mm on one edge and x-0.5 mm on the other edge. At the larger end, drill a 3.2 mm hole and cut an M4 thread for attaching the handle. Drill a 6.5 mm through hole for the stud. The surface of the mandrel must be sanded.
Now you can start winding. We will need alcohol-based glue, for example, BF-2 or BF-6, paper from the MBM capacitor, wire and a lot of patience.
We dilute the glue with alcohol. We pierce the centering washer with a needle, thread the winding wire and solder it to the flexible wire. We fix the wire at the soldering point and at the beginning of the winding, gluing pieces of paper. If the coil frame is made of metal, we paste it with a layer of capacitor paper without overlapping layers. We wind the wire turn to turn, gluing it before winding and over it. Remove excess glue with your finger. We try to wind it not tightly, but tightly.
On the first layer we glue the paper from the capacitor without overlapping layers and perform the same steps in reverse order. When the winding is ready and soldered to the terminals, you need to connect them to a 4-5 Volt power source with a current of 1-2 Amps for drying. The winding will heat up to 50-60 degrees, while the glue will dry and harden, the coil will expand slightly. This will help you easily remove it from the mandrel.
READ MORE: Guide to choosing a camera | Photos and videos | News Digest | DNS Club
We check the free movement of the coil in the speaker gap and begin assembly. We need to align the coil exactly in the center. There are 2 ways to do this. 1) Place a spacer made of photographic film or X-ray film into the gap. 2) Apply a small constant voltage of 2-3 Volts to the coil so that it is pulled inward a little.
Apply a layer of Moment glue to the outer edge of the diffuser and the outer edge of the centering washer and lower the diffuser vertically down without distortion and without radial displacement, and press it. You can turn the speaker over onto a flat table, and while the glue dries, solder the wires to the terminals.
After the glue has dried, remove the gasket and check the free movement of the coil in the speaker gap. If everything is in order, glue the protective cap in place and enjoy the result!
Thank you for your attention!
Pavel (pavel_k)
Israel, Migdal HaEmek
Born in Siberia in 1960. Since 1975, amateur radio designer. In 1977 he entered Tomsk TIASUR.
In 1979-1981 he served in the army, in communications.
After the army he worked at the Academy of Sciences. USSR, was engaged in the assembly and testing of tube pulse modulators and high-voltage power supplies for them up to 25 kV. He also worked at the Department of Industrial Engineering. electronics assembler-tester.
From 1990 to 1996 he worked as a radio-television technician in a repair shop.
I have been living in Israel since 1996. I work as an electrical technician servicing equipment.
All the time he did not give up his hobby. I have made 9 tube and 12 transistor amplifiers. Did a complete restoration of Marschall and Fender tube amplifiers from the 60s. Many projects to repair and improve the parameters of various equipment.
I use the Internet to search for diagrams and exchange experiences. I can help my colleagues with advice.
Simple speaker repair
The most common mechanical damage to the cone is caused by careless handling of the speaker.
If the damage is minor, then a patch made of not too hard drawing paper (for example, half-wattman paper) can be glued onto the resulting hole or crack. You can glue it with celluloid or any paper glue.
If the diffuser is torn very badly, then its entire cone should be replaced. For such a replacement, a blank is cut out of half-wattman, the dimensions of which depend on the size of the part of the diffuser being replaced and on its opening angle. The shape of the workpiece is shown in Fig. 1, a.
Picture 1
In order to determine the required dimensions of the workpiece, it is necessary to measure the damaged diffuser cone. It is necessary to measure the major and minor diameters of the part of the cone that we want to replace, as well as its depth, indicated in Fig. 1, b with the letter h. Knowing these values, according to the graph in Fig. 2 we find the angle β of the cutout in the workpiece, as well as the ratio of the internal and external diameters of the workpiece to the corresponding diameter of the diffuser belt being replaced. Knowing this ratio and the diameters of the edges of the belt being replaced, it is easy to calculate the required diameters of the workpiece using the formulas:
D1=k∙d1 and D2=k∙d2,
where k= D/d, taken from the graph in Fig. 2.
The graph is compiled for opening angles from 90° to 110°; the opening angles of speaker cones should lie within these limits. At a smaller angle, the diffuser turns out to be too heavy, and at a larger angle, it becomes insufficiently rigid.
Figure 2
The most unpleasant thing is damage to the diffuser corrugations. You cannot put a patch here, since the sealed area will violate the pliability of the suspension. In case of such damage, you can replace the corrugation with a suspension made of heavy and dense material (such as cloth). It is possible to make a suspension from soft paper, but such a system does not provide good reproduction of low frequencies. In all cases, repairs must be carried out so that the rigidity of the corrugations around the circumference is the same.
Sometimes the centering washer is also damaged. There are two types of centering washers used in speakers - external and internal. The washers placed inside the diffuser are made of thin getinax or textolite. To replace the washer, you can also cut it out of thin cardboard. You need to cut it according to the shape of the washer that was in the speaker, but its diameter should be increased by about 3 mm. After manufacturing, the outer edge of the washer is cut to a depth of ~ 1.5 mm and bent perpendicular to the plane of the washer so that it can be tightly inserted inside the voice coil and glued.
External washers are made of both textolite and paper. The paper centering washer is made in the same way as the diffuser, by casting. Such a washer can be replaced with a figured one made of cardboard.
Sometimes the voice coil becomes damaged. This usually happens as a result of aging of the glue. If the defect is only that the coil turns are loose, then this can be easily corrected using celluloid or shellac glue. If the turns come off the coil and the wire breaks, you will have to wind a new coil.
The voice coil is wound on a frame made of thin writing paper, made exactly to the size of the speaker coil. The frame is made on a round template, the diameter of which should be approximately equal to the inner diameter of the speaker coil. All production of the coil, including its gluing to the diffuser, is carried out on a template. This prevents distortions and deformation of the coil. The wire for winding is taken the same as on the damaged coil. After winding, the wire is glued to the frame using shellac glue.
You can glue the voice coil frame to the diffuser using any paper glue. Having installed and glued the frame, let the glue dry for several hours (it is better to leave the system to dry overnight). Only after the gluing area has completely dried can the coil be removed from the template.
Installing the moving system in place and centering it is carried out in the following order. Four long strips of writing paper 4-6 mm wide are inserted inside the voice coil. These strips should be evenly distributed around the circumference of the coil. Then the coil along with strips of paper is inserted into the working gap, the centering washer is secured with screws and the outer edges of the diffuser are glued to the holder
After the glue has dried, carefully remove the paper strips and, lightly pressing on the diffuser, check whether the voice coil moves freely in the gap. When installed correctly, the coil should not touch its walls
If the coil touches the walls of the gap somewhere, then you should loosen the screws securing the centering washer and perform alignment again using strips of writing paper.
Based on materials from the book “Electrodynamic Loudspeaker”, Zhuk M.S.
Features of adhesive speaker repair
If there is a need to apply a couple of patches of the required diameter, we glue the parts overlapping each other. You can use cardboard patches when repairing large holes. It is important to pay special attention to ensure that the diffuser does not deform during gluing; select the optimal pressing force on the patches. After 24 hours, make sure that all elements of the acoustic loudspeaker are set; if necessary, glue again. When testing the speaker, first set the volume to a low volume and then gradually increase it.
For more information about speaker repair, watch the video.
Seal the speaker
As a rule, there are more speakers in an audio system, so you will need instructions for gluing them:
- If your speaker begins to produce extraneous noise, this means that it may have become worn out over time.
- To glue the speaker, just buy “Moment” glue (“subwoofer glue” and glue “for speakers” do not exist) and take a piece of fabric or bandage
- And if the damage is significant, then you won’t be able to do without a soldering iron.
Car speaker
To repair the speaker yourself, you will need:
- The same glue "Moment"
- A couple of pieces of thin cloth (possibly a bandage) or toilet paper as a last resort
- Sharp knife or scalpel
- Tweezers
- Acetone
Let's get started
The procedure for repairing the speaker, photo above:
Immediately prepare a bandage, gauze or fabric, then tint it to match the color of the speakers. Then apply glue to the fabric and carefully glue it on the inside and outside. If you are afraid of damaging it or gluing it incorrectly, you can limit yourself to applying the sticker only on the outside. Correct the sticker with tweezers. Wait until the glue dries completely. If you have a problem with the speaker, more than holes in the fabric, then the following steps: First, we need to unsolder the current-carrying wires from the terminal block. Then moisten the cap located in the center of the diffuser with acetone. After the glue has dissolved, take a scalpel, carefully pry it off and then throw away the cap. The same steps must be repeated for the centering washer. Now, using acetone, the diffuser suspension is separated. After separation, remove the diffuser and centering washer from the basket. Now you will have to rewind the coil. If the coil in the speaker is burned out near the base, then you will first need to solder it, but so, so that it does not protrude beyond the base. When you have everything ready, you can start rewinding. You need to insert a tube of the required diameter into the coil and rewind the old winding entirely, remembering (which is important) the number of turns. The coil should be lubricated with “Moment” and wind a new wire. After this, solder the new one. winding to the terminals and you can start assembling Then we clean the basket and insert the diffuser there. Using photographic film you need to center the coil (roll the film into a ring, then it is inserted between the core of this speaker and the coil) First you need to glue the diffuser suspension with glue, after drying it, centering it washer (be sure to press down on the gluing points) After the glue has hardened, tear off the film and check the motion of the coil. If the motion is normal, glue the protective cap, then you need to put the column somewhere until it dries completely. If during the check you hear the crackling of the coil, then you will have to peel off everything and check the winding or centering washer again. After this, the speaker needs to be checked at its rated power
That's all, you can of course buy a new one if the price is not important to you.
Grigory adored cars since childhood, and in his teens, when he independently connected the car radio in his father’s nine, he realized that cars would be his job, hobby, calling.
Grigory Romanchuk
Published: 07/02/2015
Add to favorites Print version
Features of sealing the speaker...
The number of speakers included in the acoustic system is more significant. Therefore, you should also be able to seal them...
· If, over time, extraneous sounds begin to appear in the sound, then there may be problems with the speaker.
· In order to eliminate the holes formed in the dynamics, it is worth using an adhesive composition, pieces of bandage, or fabric.
· In the event that more significant damage is present, then it is also worth preparing a soldering iron.
For self-repair, you should prepare:
§ The same adhesive composition “Moment”.
§ Several pieces of fabric.
§ A scalpel or a fairly sharp knife.
§ Solvent or acetone.
§ Tweezers.
Let's move on to the events
Basic procedure:
O The bandage prepared in advance should be covered with paint of the same tone as the speaker. After this, the fabric should be treated with glue and carefully attached.
O If you have not encountered such events before, you can only apply the patch from the outside.
O In order to correct it, you should use tweezers.
O Then you should wait until the adhesive is completely dry.
O If there are serious holes in the speaker fabric, then initially you need to eliminate the wires that go to the terminal block.
O After this, the cap should be treated with acetone. This cap is located in the central part of the diffuser. This will make it possible to easily remove the previously installed cap. The same measures should be taken with regard to the centering washer.
O You should also use acetone to separate the suspension.
O This will allow you to quickly remove the centering washer, as well as the installed basket.
O Then you need to rewind the previously installed reel.
O In the event that the coil burns out in the immediate vicinity of the base, it must be carefully soldered so that all this does not go beyond the limits.
O And only after this you can start direct rewinding. For these purposes, you can use a tube, which must be concentrated in the central part of the coil. It is imperative to take into account the number of turns.
O You should start winding a new wire only after it has been treated with adhesive.
O Once the new winding has been applied, you can proceed to the actual assembly.
O Before placing the diffuser in the basket, it is worth cleaning it.
O When using photographic film, it is worth centering the reel.
O Then we proceed to attach the diffuser suspension, and after that an element such as a centering washer. All joints should be carefully pressed.
O Once the adhesive has hardened, you need to carefully remove the film and check exactly how it moves.
O If there are no problems with this, then you can begin installing the column. If there are problems, then additional checks need to be made.
O Then a detailed check of the speaker is performed, setting the rated power.
Of course, you can also purchase a new device.
Information taken from: https://www.auto-magnitola.ru
What are the types of speaker malfunctions?
Speaker malfunctions occur due to improper use, improper assembly, or normal wear and tear.
Incorrect operation.
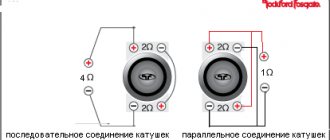
Most often, damage occurs due to excess power supplied to the speaker. One of the reasons for such errors may be confusion with the method for determining the power of the speaker and amplifier. This is due to the fact that the same numerical values of effective, root-mean-square (RMS), or as it is also called, sinusoidal power and amplitude or musical power create a current in the speaker coil that differs by a factor of two.
Another reason that causes speaker overload is the careless redistribution of power between the heads of multi-way speakers. Most often, tweeters - tweeters - suffer from this. The fact is that the power of tweeters in multi-band systems can be less than 10% of the total speaker power. And if the user, using an equalizer, supplies most of the amplifier's power to the tweeter, then the death of the latter can be instantaneous.
There are also mechanical damages to the dust cap, suspension and diffuser. Sometimes these damages lead to misalignment, which in turn leads to the destruction of the coil and sleeve.
Destruction of the sleeve and coil can also be caused by displacement of the core. In such cases, the sleeve along with the coil gets jammed in the magnetic gap. This usually occurs as a result of a loudspeaker or speaker being dropped.
Unskilled assembly.
Due to unskilled assembly, the sleeve, coil, suspension or centering washer may come off. Poor quality gluing can also cause extraneous sounds.
Improper fastening of flexible leads can significantly reduce their service life.
Normal wear and tear.
If the loudspeaker head is assembled well, the suspension and flexible leads suffer the most as a result of normal wear and tear. The diffuser can also collapse if its safety factor does not match the power of the speaker.
Return to top to "Navigation".
Repairing a car subwoofer yourself
Since all elements of a car sound system are constantly subject to shaking and vibration, the most common defect is a breakdown in contact. This applies to both the power supply system and audio interconnect lines. If a characteristic hiss is heard in the speakers, then the functionality of the amplifier can be checked by touching the input terminal with a screwdriver. No sound from the speakers may be due to a faulty connecting wire. If the power supply produces normal voltage, but the speakers are completely silent, you need to check the ULF elements, starting with the output stage. Only a specialist can perform diagnostics and troubleshooting in the amplifier, so if you lack experience, it is better to contact a workshop.
Do-it-yourself speaker repair without disassembly
Speakers that are built into acoustic systems can experience not only internal defects, but also external ones. Most often, this is a loosening of the speaker mounts to the front panel of the speaker systems. This causes extraneous noise in the speakers and disrupts the acoustic picture. This happens especially often in car sound systems. If the fastening becomes loose, you need to remove the false panel and tighten all connections. If there is no sound from the speakers, this is often due to a break in the wires running from the amplifier to the speakers. Therefore, before opening the acoustic module, you need to check its functionality.
Leave a request and we will call you back within 48 hours!
Speakers break quite often. This happens in most cases from listening to music at high volume for a long time, since ordinary household speakers cannot function for a long time at maximum power. They also break if too much voltage is applied to them, or if they are connected to an amplifier that is too strong. But they are unlikely to tell you this in the store. They describe how powerful they are, but no one will tell you that, working at the limit for a long time, they can break. But they will most likely serve their warranty period. Therefore, the average person has a question about how to fix the speakers with his own hands, what actually breaks there, and isn’t it easier to simply throw them away?
Steps
1Get to the speaker. Ideally, you should remove the speaker to gain access to both sides of the cone
Remove door panels and grilles or trim to remove mounting screws or fasteners.
2Hold the speaker. If the diffuser is old, it may be fragile, so work carefully. Hold the speaker so that it does not fall out after the last pair of screws are removed.
3Carefully pull the speaker out of the socket. If the speaker has been sitting in the socket for long enough, it may stick to the sealant or paint.
4Inspect the connectors on the speaker. The speakers receive the signal from the source or amplifier through two wires
Polarity (the order in which the wires are connected to the connectors) is important. Take a photo (on your phone), draw a picture, and write labels on the wires or connectors so as not to confuse the connection order when installing it back.
Fix the holes
1Get repair material. Most diffusers are made of paper or thin plastic. To seal a hole, you will need material of approximately the same density and type, but slightly larger than the hole itself
If you can't find thin plastic, like some speakers, you can use paper.
2Prepare the speaker. Carefully remove dust, dirt, etc. from the front of the diffuser. If the diffuser is old, it may be fragile, so be careful.
3Use scissors or a razor to remove any overhanging edges near the hole. The smaller the hole and the smoother its edges, the better the repair will be.
Find the sweet spot between the size of the hole and the evenness of its edges.
4Cut the patch from the material chosen for repair. The patch should be slightly larger than the hole and roughly follow its shape.
5Apply nail polish to the edges of the hole. Apply a generous coat of nail polish around the edge of the hole on the diffuser.
6Apply nail polish to the edges of the patch. Apply a generous coat of nail polish to the edges of the patch.
7Connect the patch and diffuser. Align the patch with the hole and stick it in place. Press on both sides at the same time. Don't press on just one side or the hole will break even bigger.
8Allow to dry completely.
9Tweak it. Check the areas that have not stuck and add just enough varnish to fill the void. Securely adhere the edges that are not glued with varnish.
10Install the speakers back into place in the reverse order of their removal, remembering to maintain the correct polarity of the wires.
Repair of Breaks
- 1 Remove and prepare the speaker.
Follow the steps above to prepare your speaker. Do not cut or tear anything from the diffuser. - 2
Apply a generous coat of nail polish to the tear.“Paint” the break itself and around it with nail polish. Apply polish to both sides of the diffuser.
- 3
Let dry completely. - 4
Apply a second coat of varnish. - 5
Let dry completely. - 6
Reinstall the speakers in the reverse order of removing them, remembering to maintain the polarity of the wires. - 7
Ready.
How to glue a speaker on a column: step by step
Most often, partial or complete damage to the suspension occurs. Repairing a speaker with replacing a damaged suspension with a new one in 6 steps:
- Remove the damaged suspension. It can be easily removed using a flat screwdriver if the gluing areas with the diffuser are preheated with hot air.
- Clean the diffuser and body from any adhesive residue using a solvent. The operation can be repeated twice. Contact of solvent with skin may cause irritation. Work must be carried out wearing rubber gloves.
- Install the diffuser in the center so that it does not come into contact with the coil.
- Apply SL glue with a brush in a thin layer (no more than 3 mm) along the contour of the diffuser and suspension.
- Attach the new suspension to the diffuser, press the surfaces to be glued, wait 10-20 minutes until initial setting.
- After 24 hours, assemble the speaker and test it.
Repairing a partially damaged hanger without excavation in 6 steps:
- Remove the speaker from the housing.
- Clean from dust and dirt.
- Using a brush, carefully apply silicone sealant with light movements to the remaining part of the rubber suspension, supporting from below those places where the rubber has burst. Leave for 30 minutes to set.
- Cut pieces from thick tarpaulin fabric in the form of small squares, which will be used to seal the areas with the crumbled pendant. Apply silicone to the squares and gluing points on the diffuser and diffuser holder where they will be glued. Apply a layer of silicone on top of the glued squares. Leave for 30 minutes.
- Apply another layer of silicone in a dense layer along the contour of the restored suspension and leave for 24 hours.
- Put the speaker in place in the case and test it.
You can seal the speaker yourself, however, in this case, you must follow all the recommendations.
Subscribe to our Social networks
How to calculate hull displacement
What is the volume of the case? This is one of the main quantities on which the sound of the speakers in the subwoofer will directly depend. There are two ways to calculate the volume of the case: using professional programs or manually.
In addition, the programs will calculate the dimensions of all parts and elements necessary for manufacturing, so you just have to take the derived parameters and make a box based on them.
How to calculate the volume of a case manually
Calculations without the use of specialized software are simpler, although it will be impossible to imagine the model of the future subwoofer or the dimensions of its housing.
The volume of the box is calculated using the formula V = h*L*A.
In this case, the following values must be substituted into the formula:
- h is the height of the box;
- L is the length of the box;
- A is its height.
Knowing all these parameters, it is easy to determine the volume of the subwoofer housing.
The program algorithm will take into account all your wishes and calculate the volume and other parameters of the case quickly and correctly
Tools
It is easy to repair the column and repair the speaker yourself. For repair you will need:
- Spare gimbal.
- Brush.
- Knife.
- Glue.
- Screwdriver.
- Construction hairdryer.
- Solvent.
Procedure:
- Remove the damaged suspension from the column. To do this, you will have to disassemble the loudspeaker: peel off the suspension from the body, disconnect the diffuser, remove the dust cap. You can make this procedure easier by heating the seams using a hair dryer. It is necessary to separate the component parts with care to avoid damage to the diffuser elements. Use a screwdriver or plastic card to remove the parts.
- Clean the diffuser basket from particles of dried glue using a solvent and degrease the gluing areas.
- Align the diffuser. You need to install it so that it has enough free movement and does not touch surrounding surfaces. To do this, use a centering washer.
- Apply glue to the contact areas of the speaker components. It is necessary to apply a small layer of glue to the diffuser and suspension using a brush.
- It is necessary to pause while gluing the elements; this is required to dry the glue to residual stickiness.
- After drying, press the suspension to the diffuser, pressing on the gluing points. Allow 15-30 minutes for initial drying of the glued surfaces. The glue reaches full strength within a day. After the required time has passed, a speaker test can be performed.
How to glue the speaker cap?
to glue the cap
it must be completely peeled off.
moisten with acetone and slowly peel off. smear the cap
and the place where it is glued moment 88 or moment crystal, let the glue dry for about 5 minutes and insert
the cap
into place. dried glue does not spread.
Interesting materials:
How to terminate a contract under Federal Law 223? How to dissolve ceftriaxone? How to unlock Apple Watch 4? How to unblock Belarusbank Internet banking via SMS? How to unlock a QIWI wallet? How to unlock LG Smart TV? How to unlock App Store and iTunes account? How to unlock an account in Apple Store? How to divide headers and footers into sections? How to split a PDF page into 2 parts online?
Discount cards
Subwoofer not working? Doesn't work at all or wheezes? This could very well happen. What happened? Where to look for the reason? In electronics boards or in electromechanical devices? There is no clear answer to these questions. The reason could be either electronics or speakers. Despite its apparent simplicity, a subwoofer is a combination of a perfectly tuned amplifier, crossover and speakers. Testing a subwoofer is not difficult. Just listen to how it sounds at low frequencies at extremely high power. Of course, this is far from a complete test, which requires hearing or at least an approximate idea of what exactly should be heard during normal operation. However, if a sufficiently strong and clear sound is heard, in most cases this indicates a high-quality setup and good performance of the subwoofer. This, in fact, is the main task when repairing and subsequently adjusting a subwoofer.