Stopped playing in one ear? Has it started rustling? Wait, throw it away, repair it!
Below are typical headphone problems. In 99% of cases, one of the options is yours.
Internal break in the cord
Manifestations:
the sound begins to rustle in one of the headphones (less often in both), and over time disappears completely.
Diagnostics:
The break occurs at the bend of the cord, i.e. either directly at the connector, or at the wire entry into the earphone itself. You can accurately set the location if you turn on playback and rotate the cord. A cracking sound or sound indicates the exact location of the break.
Repair:
Cut the cord below the break point and solder it again.
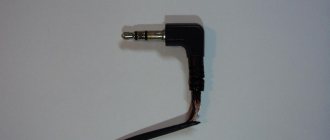
Option with a break at the connector
Plugs usually come in two types - solid, flexible plastic, a molded hard core, and a soft rubber cap.
It is necessary to remove the rubber cap; if this is not possible, cut it with a knife. Cut through the casting with wire cutters and get to the place where the wire is soldered to the metal contacts of the connector. Strip and solder the wire, and put everything back together.
Fill cavities due to removed plastic parts with epoxy glue, faster curing is better.
The cut elastic can be strengthened with bondage made from synthetic threads. Heat shrink tubing can also give good results.
Option with a break at the earphone
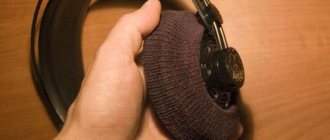
It is necessary to disassemble the earphone.
Large headphones are assembled with screws. Smaller headphones with clips. Headphones droplets, earbuds - adhesive connection. The adhesive joint is disassembled either with a knife, or by squeezing the headphones in a yew - due to elastic bending, the crack usually runs along the glued joint. The wire inside the earphone is tied in a knot to prevent it from being pulled out. Cut the wire, strip it, tie it in a knot and solder it as before. Glue the earphone back together.
Channel blockage
This malfunction is only possible with closed acoustic earphones.
The membrane is separated from the channel by a thin metal mesh. Ear wax, as the earphone is used, covers this mesh and interferes with the passage of acoustic waves. Diagnostics:
absence of sound despite the fact that the continuity shows the integrity of the headphone windings.
Repair:
Disassemble the earphone and wash the mesh in alcohol. Disassembly is preferable so as not to stain the membrane with leaking alcohol and dirt particles.
Membrane damage
Manifestations:
crackling, rattling in one of the headphones, difference in playback timbre.
Diagnostics:
visual inspection and opening of the earphone.
Repair:
After opening, straighten the membrane if it is wrinkled. The effect will be temporary and the headphones will need to be replaced. If there are foreign particles on the membrane, remove them. Wash the mesh that separates the membrane from the surrounding space.
Why is this happening?
Let's look at the photo of the place where the cores broke:
With a small bending radius, the cores accumulate a large fatigue load and break. If you take a paper clip, straighten it and bend it in the middle, first in one direction, then in the other, then after several such bends it will break. The same thing happens with the conductors in the wire.
They fight this in two ways. At first, it is a special wire with a special weave of cores. The central channel made of synthetic threads provides the wire with tensile strength, and the wires wound in a spiral when the wire is bent experience more torsional load than bending. When loaded with torsion, the core is more stable. The second method is to increase the bend radius. To do this, the connector or earphone ends in an openwork flexible plastic structure, which, bending along with the wire, increases the bending radius. But correctly selected rigidity of the plastic is strictly necessary; if the plastic is too hard or too soft, the design will not be of any use.
Additional information: Basic information about soldering can be gleaned from
Headphones come in different designs. However, the most common breakdowns for all types of headphones are similar. Most often, damage to one of the cores inside the cord occurs. This usually occurs due to chafing or constant bending of the wire in one place. This is due to intensive use.
The cord may also break at the plug. This happens when there are strong bending loads on the cable at the base of the plug. The wire there may break if it is pulled sharply.
The wires break not only at the plug, but also in the headphone housing. This can happen due to a strong jerk if the wire gets caught on something.
How to connect broken headphone wires
With headphones, the most vulnerable point is the wire. Due to frequent bending, the copper wires break and one or two speakers stop sounding. To repair the headset, you must first determine the location of the break. The search is carried out simply: by probing with your fingers or a multimeter. But now we’ll look at how to connect the headphone wires if they are broken.
How to find a damaged area?
It is almost impossible to visually find the location of a wire break inside the cable, since the outer insulation remains intact.
But it is still possible to determine the approximate location of the fracture. To do this, connect the headphones to any sound source, for example, a mobile phone, and turn on the melody on it, bend the cable along its entire length.
We look for the place of damage by bending the wire
When bending in a problem area, the sound should change its character, and it should change when bending in different directions or stretching the cable. As practice shows, most often the wire breaks near the entrance to the plug - in this place it is more mobile. If this happens, and the wire is indeed damaged in the location indicated above, the problem can be solved by cutting off the damaged section and re-soldering the plug.
Determining the location of the rupture
If the speaker makes a crackling sound or is silent, then we can say with 99% confidence that the wire has broken. You shouldn't bother with cheap Chinese headphones. It's easier to throw them away. An expensive headset is worth trying to repair. There are two ways to find a cliff.
Recommendations: How to protect headphones from mechanical damage and strengthen the wire
How to solder a headphone plug
How to fix headphones yourself if one stops working
Simple search by palpation
The first search method is based on feeling the cable with your fingers. The headset is connected to a mobile phone and a music file is played. The wire along its entire length, starting from the plug and ending with the input to the headphones, is kneaded with your fingers.
When a non-functioning speaker produces a crackling or intermittent sound, the section of wire being diagnosed is marked for repair. The search method will give results if the broken wires are not far apart from each other inside the insulation.
Search with a multimeter
The second method is justified when a search by probing does not produce results. If the cable gets caught while walking, a jerk occurs. The copper core bursts and the insulation stretches. Probing won't help here. The ends of the cores are far from each other and will not come closer when the cable is kneaded.
The search for a break is performed with a multimeter:
- To test the cable with a multimeter, you will have to peel off the insulation in places. The method is aggressive, but there is no other way out. It is advisable to try to disassemble the earphone in order to first ring the entire cable from the speaker contacts to the metal part of the plug. If there is a signal on the multimeter, then the reason is in the dynamics and there is no need to cut the wire.
- If there is no signal or if it is impossible to disassemble the earphone, an incision is made into the insulation. A broken wire most often occurs near a plug, speaker, or at a split in the wire. To check the plug, remove 5 mm of cable insulation at a distance of 5 cm from the earphone. You must clean it carefully, otherwise the thin wire will be damaged. One multimeter probe is placed against the plug contact, and the other probe is placed on the cleaned area. The appearance of a signal indicates that the input section of the headphone has failed.
- The absence of a signal on the multimeter indicates damage to another area. The next insulation cut is made at a distance of 5 cm from the plug. Carry out a new measurement. A signal appeared - the wire broke near the plug. There is no signal - the search process continues.
Insulation cuts are made every 5–10 cm until the problem area is found. After repair, the exposed wire is insulated. It looks unsightly, but the headset will work.
Types of breakdown
Problems with headphones can arise for various reasons. If they stop working, then you need to determine whether the problem is actually related to their functionality. Before you repair headphones without a soldering iron, you need to perform a test. You can do this in two ways:
- connect working headphones (the functionality of which is beyond doubt) to the connector of your phone or computer; if there is no sound, then the problem may be related to the connector itself;
- connect the supposedly non-working headphones to another exactly working connector.
If the problem is still related to this device, then it could be caused by:
- Broken cable. To determine the problem, you need to connect headphones to the audio output, then play a melody, and then alternately bend and unbend the cable. If you hear intermittent sound from the speakers, then the problem is a broken cable.
- Broken plug. This problem can be identified by the appearance of a sound when the plug is pressed or twisted in the connector.
Connecting wires using a soldering iron: instructions with step-by-step photos
A gap has been found and must be repaired. The most effective way to connect wires is soldering. It can be considered lucky if only one core breaks and this section is accurately detected. The wires are soldered together without cutting the entire cable. Serious damage is eliminated by cutting off the problem area, soldering the wires and applying a bandage.
The step-by-step soldering process looks like this:
Use pliers or a knife to cut off the damaged area. At one end of the cable, 2–3 cm of braiding is peeled off to free the cores. The number of wires depends on the headphone model. A headset with a microphone has 4–5 wires. Simple headphones are connected with 3–4 wires.
Don't be afraid. The wires are covered with multi-colored insulation, so it is impossible to mix them up when soldering. There are two twisted wires going to the microphone: signal and ground. They are immediately visible under the braid. The ground conductor usually has yellow insulation.
A similar procedure is performed with the second end of the cable. When all the cores are freed from the braid, insulation 5 mm long is removed from their ends. You will see a strand of thin copper hairs that are twisted clockwise with your fingers.
The contacts are briefly burned with a lighter. The fire will remove the protective varnish from the veins. The firing process is required. Varnish not only interferes with soldering, but is also a dielectric. If the protective layer is not removed, good solder will set, but the contact between the connected wires will be poor.
All ends of the cores must first be tinned with tin. A piece of thick heat-shrinkable tubing is placed over the cable braid. This will be the insulation of the bandage. Pieces of thin heat-shrinkable tube are similarly placed on each core. This will be contact insulation.
The ends of the tinned wires are twisted, matching the color of the insulation. Each twist is heated with a soldering iron until the tin completely surrounds the connection of the wires.
After soldering is completed, the functionality of the headphones is checked. If sound appears in the speakers, proceed to applying the bandage. First, thin heat-shrinkable tubes are placed over the twists and heated with a lighter. The insulation will protect the soldering of the cores from short circuiting. The resulting wiring harness is tied with a harsh thread, a thick heat-shrinkable tube is pulled over the cable braid and heated with fire.
Finding out the reasons that caused the headphones to break down
The most likely reason that can lead to breakdown is the consequences of chafing of the wire inside the connecting cable, caused by frequent kinks. Often this occurs in the same places: near the connection between the wire and the headphone, or at the junction of the wire and the plug. In some cases, the conductors inside the cable are damaged, but this can happen later due to one-time mechanical impacts, that is, the cable was pinched by something, for example, doors or a box.
It is quite easy to find out if a particular earphone is not working. If you turn on music, the speaker of the damaged one will be silent.
If the wire strands were not completely frayed, then you can use a multimeter to determine the location of the break. To do this, you need to measure the resistance value of the common wire and the wire that goes to the damaged speaker. To determine the location of the break, you need to measure the tester readings, changing the spatial position of the wire. If the contacts are not broken, then, no matter how you twist the wire, the resistance readings that are reflected by the multimeter will have a constant value. A different effect can be observed if the cable is partially frayed: the numbers on the device will change at the slightest deviation of the wire from the position in which it was originally.
In theory, you can even use so-called traditional methods. That is, to detect a headphone with faulty contacts, you need to pay attention to the presence of a characteristic crackling sound in the speaker, which is heard when the wire swings.
You should look for a fault in the earphone by running your hand and bending the wire from top to bottom, that is, from the point where the wire enters the earphone to the plug itself. The most typical places of failure are areas where wires and other elements are connected. If you know the location of the faulty channel and understand where the wires and speakers connect, you will most likely be able to pinpoint the faulty location.
How to properly solder a new plug to the headphones, observing the pinout of the wires
To properly solder a headphone or headset plug, you need to know the pinout. It is shown in the table below and taken from the website.
Such pinouts of 2- and 3-pin plugs are available for speakers and microphones.
Plugs and their pinouts for more specialized devices (video cameras, headsets) by manufacturer (Nokia, Samsung, Sony, Panasonic) are shown in the following table.
How does a three-pin jack work?
A regular three-pin stereo jack is designed according to the coaxial principle. Each contact is located in a dielectric sleeve (bushing) and is located inside another sleeve.
The plug contacts are separated from each other by plastic bushings. So this plastic is afraid of overheating, it begins to melt and the contacts will dangle. So if you want to solder a plug for, then you should remember about overheating of the contacts.
How to repair a headphone plug yourself
To repair a headphone or headset plug with your own hands, you need to carefully remove it from the case if it has not yet fallen out. Usually the plug is filled with rubber. When disassembling, we cut this body along the seam with a sharp knife. The neater the cut, the easier it is to restore the body after repair.
The process of soldering wires
When directly repairing broken headphones, it is necessary to restore the contacts in the damaged core.
To carry out the work we will need:
- soldering iron;
- solder;
- rosin;
- stationery or construction knife.
To ensure complete certainty of troubleshooting in the problem area, you need to cut off a part of the wire with a length of 2-3 cm from the headphones.
A construction knife is used to strip the outer insulation of the cable. It contains two channels of wires of different colors. Often red is used for the left channels, green for the right. Common channels are marked with blue or yellow colors. Some devices use bare copper wires as a common channel.
At a distance of about.5 cm, remove the insulation from the area at the end of the wire. Based on what material is used for insulation, we choose the appropriate method:
- Using a knife, remove the polymer insulation with careful movements to prevent damage to the conductive material.
- To remove varnish and paint, we use burning with a soldering iron or a mechanical method, which requires fine sandpaper.
The stripped end of the inner core is tinned using solder. It is necessary to connect the soldering iron to the mains and leave it for several minutes until it is completely heated. After this, solder is applied to the tip of the soldering iron. Next, take rosin and place a section of the stripped end of the cable on it. By uniformly distributing the heated solder, we apply it to the entire cleaned surface. This way we prepared the wires for soldering.
To simplify the process, you can tin and remove the varnish insulation at the same time.
To do this you will need aspirin (acetylsalicylic acid) in the amount of 1 tablet. or another medicine containing aspirin. The tablets may even be expired, in this case it does not matter.
Headphone repair: useful tips
An alternative method that allows combining varnish removal and tinning involves the use of fine-grained types of sanding paper. Small rosin is placed on the working side of the paper. On this piece we place the ends of the wires to be tinning. Apply solder to the tip of the heated soldering iron tool and press down the cable. After melting the rosin and heating the wire, using a little force, pull it out from under the soldering iron. With such manipulations, abrasive grains remove heated and slightly softened insulation residues. And at the same moment tinning is carried out. By repeating this procedure, the ends of the wire are evenly coated and are ready for soldering.
We carefully disassemble part of the body of the cut off headphones using a knife along the contour of the assembly lines. We place the contact section of the connection of the old wire on the end of the heated soldering tip. When the solder softens, it is necessary to remove the wires.
We pass the cables with the stripped ends into the holes of the headphone housings. Here it is necessary to provide for tying a safety knot. Thanks to it, the contacts remain intact with a slight jerk of the wires; it bears the entire main load.
As a result, all that remains is to solder the end, ready for soldering, to its contact place in the housing under the earphone. When performing these steps, it is necessary to take into account the correct connection of the contact according to its color markings.
Soldering headphone wires is quite simple if you use wooden clothespins as auxiliary tools. They will play a kind of role as mini-clamps, which will allow for a strong fixation of the workpiece, and will also save your fingers from unexpected injuries such as burns.
Also, similar actions should be followed in case of repairing the wire at the junction of the plug, step by step:
- cable cutting;
- stripping of insulation;
- tinning of mounting ends;
- disassembling the plug housing (if necessary);
- soldering the ends in place;
- carrying out reassembly.
By learning how to solder headphones, you can restore the devices’ functionality without any problems and save a lot of money on it. Don't be afraid, experiment and listen to your favorite music using refurbished headphones with your own hands.
Soldering wires at the break point
If damage occurs on a long section of wire, to eliminate the fault, you will have to cut off a part 20-30 mm long in the place where a lack of contact is detected. Using a stationery or construction knife with a beveled blade, the cable insulation is stripped; If electrical varnish is present, firing is used to remove it.
All wires inside are divided by color into 2 channels - for each headphone, the common grounding conductor has no insulation or is placed in a yellow braid.
Next, all that remains is to tin and solder the ends of the wires corresponding to each other. If a thermal tube is used for insulation, it is placed on the cable in advance. In other cases, use electrical tape.
Soldering the speaker
If the damage is localized in the headphone dynamics, repairs begin with dismantling their housing. You must act carefully so as not to damage the board. By freeing the contact pad, you can visually detect the location of the break. It is stripped of solder, the ends of the detached wire are also cleaned, then they are covered with a half-house and connected. After soldering is completed, all that remains is to assemble the earphone and check its functionality.
Soldering at the headphone jack
The repair procedure in the case of a problem localized in the headphone plug area is quite simple.
- The soldering iron is heated to the melting temperature of the solder.
- The wire is cut 0.5-1.5 cm above the plug.
- The free end is divided into individual elements. Each wire is stripped.
- The varnish is removed from the tips of the exposed core by firing or mechanically using sandpaper.
- The old plug is disassembled using a utility knife along the seam. It is needed for correct pinout of wires. If you do not plan to change the part, you will have to remove the insulation from the old plug. In this case, you must first remember the location of the contacts.
- Insert the wires into the plug body along with the heat shrink tube. Tin their ends.
- Solder the wires to the contacts. Check functionality.
- Insulate the surface. If heat shrink tubing was previously used, it will need to be heated. You can replace this option with regular electrical tape.
The headphone repair is complete.
Soldering at the headset connector
This connector has 5 wires, 1 of which is for the microphone.
The main problem when soldering is precisely determining the order in which the contacts are connected.
For all headsets released after 2012, the order of attaching the wires from the edge of the plug is as follows:
- red M+ (microphone);
- yellow M-, on the other side of it the grounding is fixed, it is of the same shade;
- green - right earphone, blue - left.
This color scheme is considered standard, but individual brands may vary the color of the braid. It is important to note that the microphone contacts are located on one side of the connector, and for grounding and headphones are fixed on the other. Otherwise, the soldering procedure is similar to the standard one.
There are also headphone versions with 6 wires per 4 contacts. Typically, such a set is found in models where a block with a button is installed. All wires with yellow/copper inclusions in this case refer to grounding. The rest correspond to the microphone, left and right earphone.
Connecting wires without a soldering iron
Connect the headphone wires only by soldering, otherwise there will be no good contact. If you don’t have a soldering iron at hand, you will have to resort to alternative methods.
Read also: Thermal conductivity of aluminum and brass
Connecting cores with solder paste or solder
The method will ensure reliable contact, since it is based on soldering, but the soldering iron is not involved in this process. To connect the wire you will need two tin cans, solder, rosin and an open flame.
When the cable cores are stripped, proceed to primitive soldering:
- Place tin in a tin can and rosin in another and heat over an open fire until melting begins. The procedure can be conveniently performed on a gas stove. When melting begins, the end of each core, stripped of insulation, is first immersed in rosin and then in tin.
- After about 5 seconds, the copper wire will turn silver. The tinned ends of the wires are twisted, matching the color of the insulation. The twists are slightly heated with a lighter fire for soldering. You can simply immerse the connection in molten tin.
After soldering all the wires, insulation and bandage are applied.
Connecting wires with simple twists
The method is bad, since it will not ensure normal contact, but in the absence of a soldering iron, temporarily connecting the wire by twisting will save the situation. The process is simple. The conductors are stripped of insulation and twisted with fingers into a tight bundle.
Each twist is insulated with tape, electrical tape or heat shrink tubing. To prevent the wire from breaking, a bandage of thick thread is placed at the connection. For aesthetics, tape is wound on top or heat-shrinkable tubing is stretched.
Of all the methods considered, only soldering the wire will ensure high-quality sound from the headphones. Twisting is a temporary salvation. They will have to be soldered, otherwise, after the copper wires oxidize, the sound in the speakers will disappear.
Topic materials: 5 best Bluedio headphones
, 5 best headphones under 1000 rubles
How to connect a microphone to a laptop
, How to clean headphones
, How to disassemble headphones: instructions with step-by-step photos of repairing all elements of the headset
, No sound in headphones
, Headphone wiring
, DIY headphone repair
, Making your own simple headphones and headsets with a microphone
It's no secret that the most common malfunction of any headphones (plugs, earbuds or large over-ear ones) is a broken wire near the plug. In this situation, there is nothing left to do except change the plug on the headphones. This is easy and can be done by anyone who has ever held a soldering iron in their hands. The only thing that would be desirable is to understand the intricacy of the wires (in some headphones there are as many as 6 wires under the cable insulation!)
Today we’ll talk about how to solder headphones to a plug without making any mistakes.
You don't need to think about anything, just follow the step-by-step instructions provided and you can easily repair your favorite headphones.
1. Ruthlessly bite off the plug: 2. How to replace the plug on headphones? For this we will use the old connector. Let's gut it using a sharp stationery knife, ripping it right along the seam. This method allows you to disassemble almost any plug: Open the plastic shell and take out the insides. Do you see a group of contacts with pieces of wire soldered to them? We remember the pinout of the headphone wires (or better yet, write down on a piece of paper which wire was soldered to which contact). Here is the standard wiring of headphone wires by color:
- green wire is the left channel;
- the red wire is the right channel;
- yellow (copper) wire is common.
You will find more detailed information about which wire in the headphones is responsible for what later in this article (scroll to the very end).
3. Now you need to clean up the headphone wires a little. What the result should look like: we connect the common wires (which are in colorless varnish) together and tin the very ends: A few words about how to re-solder the plug on the headphones. It will be bad to pick, because... the wires are covered with varnish insulation. To make the process easier, you can lightly burn the very ends with a lighter.
How to tin wires from headphones using an aspirin tablet, as shown in this video:
Personally, I made do with an ordinary knife, which I used to carefully clean off the enamel coating from the wires. And after that I tinned it in the usual way - with solder and rosin.
4. Now we find an old unnecessary pen somewhere:
and separate the very tip from it: This will be the body of our new plug.
5. Prepare a piece of heat shrink that will protect the wires from sharp bends at the exit from the plug: 6. It's time to solder the headphone wires to the plug. You need to solder in full accordance with the colors of the wires in the headphones (we remember where which color was soldered or look for our piece of paper where everything is written down):
7. Make sure everything works. To do this, turn the multimeter into dialing mode, plug the headphones into your ears and alternately touch the probes to different contacts. All sorts of rustling and clicking noises should be heard in different channels.
Or you can try to plug this unfinished plug into your phone or MP3 player and start playing music. In the latter case, it is important to make sure that the right and left channels work independently of each other (use the balance adjustment).
8. If everything sounds as it should , we shrink the heat shrink using a hair dryer or a regular lighter: 9. Apply a couple of drops of epoxy glue: glue everything together and leave for several hours until complete polymerization.
10. We are happy with how we fixed the headphone plug!
Look at the photo of how I managed to solder the new plug to the headphones:
In my opinion, this is the easiest way to fix a headphone plug of all those proposed on the Internet. Despite the fact that the result is quite decent. If you don’t look closely, it’s not even clear that it’s homemade.
By the way, at first I had the idea to make a paste from baking soda and superglue to use it instead of epoxy resin. But it turned out that this mixture hardens so quickly (almost instantly!) that this option had to be discarded as unsuitable.
Read also: Rubber disc for grinder
That's all. Now you know how to make headphones if the plug is broken and which wire in the headphones is responsible for what. Always try to figure out how everything works, how to repair the plug on your headphones with your own hands, save your money!
Using Heat Shrink Tube
This method is relevant if it is not so much the wire that is damaged as its insulation. You can carry out repairs by following the instructions:
- Cut a piece of heat shrink tubing to the desired size.
- Place it on the damaged section of the wire, then hold it over the flame for a while (for this purpose, you can use a banal lighter, blowtorch, gas or electric stove). Exposure to high temperatures will cause the tube to settle, which will protect the headphone wires from further damage.
It is possible to repair headphones in almost field conditions, but only if you have solder with rosin, electrical tape or heat-shrinkable tubing on hand. By performing all actions as carefully as possible and in accordance with the instructions, you can significantly extend the life of this device.
Additionally about the colors of wires in headphones
How to properly solder wires to a headphone plug is out of the question if you are not familiar with the colors of wires in headphones and their meaning (for example, do you know what the green wire is responsible for?)
A different number of wires may come to the headphone plug:
- 2 wires (for mono headphones);
- 3 wires (for mono or stereo headphones depending on the connection diagram);
- 4 wires (for stereo headphones);
- 5 or 6 wires (for stereo headset with microphone).
2 wires
I don’t think anyone needs to explain how to repair a headphone plug if they only have two wires. It is basically impossible to confuse anything here.
3 wires
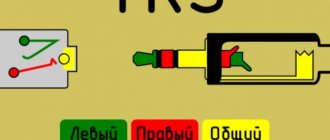
There are always two wires coming from each ear - plus and minus, but sometimes the manufacturer combines the minuses of both speakers together and it turns out that only three wires come to the plug. To make it clearer, here is a soldering diagram for a headphone plug:
This picture explains even more clearly where to solder the wires to the headphone plug:
Most often, the wires are coated with varnish of different colors:
- red – right channel;
- green, blue or white wire – left channel;
- colorless varnish – common wire (ground).
Of course, there are no strict standards and colors may vary. Here's what it looks like in real life:
Let's see how to properly solder a wire to the headphones (3 wires):
4 wires
If your plug has 4 wires, then there may be options.
Option one: you have regular headphones without a microphone and without buttons (the plug has only 3 contacts). Then these four wires are simply two pairs of wires from each of the speakers. Their disadvantages are the same color (copper), and their advantages are different (usually blue and red or green and red):
In this case, common wires (those of the same color) are connected together and soldered to the common contact of the plug. You should immediately understand how to solder 4 wires from the headphones to the plug from the figure:
Here's how to solder headphones to such a jack:
Option two: you have a full-fledged headset (i.e., headphones with a microphone) and the plug has 4 contacts. Then, most likely, these four wires are one wire from each speaker, one signal wire from the microphone, and one common wire for all.
Schematically, this can be indicated as follows:
And here's how to make a plug on the headphones (correct soldering of headphones when there are 4 wires):
Most often, a microphone wire only looks like one wire, but in reality it is two wires: a thin wire in white PVC insulation completely wrapped in enameled copper wire (in colorless enamel). Something like this: And in this case it would be more correct to say that the headphones have not 4 wires, but all 5.
5, 6 or more wires
Depending on the implementation option, there may be 5 or more wires inside the cable from the headset. Up to 10! Be that as it may, they always try to make the signal wire from the microphone in its own “ground” braid.
In short, if you gutted your cable and it looks something like this:
or even this: no one will immediately tell you how to properly solder the plug to such headphones. There can only be one piece of advice here: take a tester and test all the wires until you determine where the right ear is and where the left is. The remaining wires are to the microphone.
Determine by color which wires may be common and connect them all together. Solder all signal signals according to the connector pinout (see pictures above).
Then test the headphones and microphone. If something is wrong, look for the reason. No one will really tell you anything here; proceed using the scientific dildo method.
Sometimes situations arise when you urgently need to solder wires, but there is no soldering iron at hand. A problem arises: how to solder a wire without a soldering iron? This is where advice from home craftsmen comes to the rescue.
Repairing the plug
Often a break can be found at the plug, especially if the headphones are inexpensive and the manufacturers have not taken much care to protect them. You will need tools, and if the plug itself fails, you will need to buy a suitable one.
You will need the following tools and supplies:
- tin with rosin and, of course, a soldering iron;
- special stationery knife;
- lighter;
- vice;
- glue;
- cambric (heat shrink).
Let's start fixing the plug. You need to disconnect the jack from the cable by cutting it off. Do this just above the place where the wiring is broken.
It is necessary to remove interfering and unnecessary plastic from the connector, and some people buy a new break or take a whole one from old headphones. Strip the wiring no less than 2 cm.
Your task is to find out which of them - left, right, common - through experience.
Connect the wires one by one, and in which speaker you hear the sound, that determines the wire (left or right). The remaining common wire will sound on the left channel.
Solder these wires to your channels. Act like this.
- It is necessary to expose one end of the vein, then the second.
- Our jack is secured in a vice.
- It is required to solder each core to a specific channel. Adhesions need to be protected. To do this, the nylon thread that is in the wire is attached directly to the plug. This is insurance for the soldered joint.
- You will need heat shrink cambric to hide the exposed ends with adhesions. You need to cut a piece of the required length, put it on the exposed veins and hold this place over the fire, and it will stick.
If you want to make the protection more reliable, use 2 cambrics here. Cut off the excess with a utility knife. If you follow the recommendations, you will be able to fix the jack yourself.
If you understand the structure of the headphones, you will be able to fix them. Self-confidence will appear during work. Check what works and what doesn't. Start fixing it.
Using the tinning method when soldering
A quick way to solder wires is tinning. To do this, you can use an ordinary nail or a piece of copper wire, the end of which must be flattened with a hammer. Soldering is done as follows:
- The ends of the wires, stripped of insulation, are twisted.
- Flux is applied to the twist.
- Solder is converted into powder using a file or needle file.
- The flux on the twist is generously sprinkled with lead-tin chips.
- A metal rod (nail, copper wire, etc.) is heated over an open fire. A gas burner or a blowtorch can be used for this.
- The hot core is passed along the twisted wires until a tinned connection surface is obtained.
Classification
Plugs, like any mass-produced part, have their own classification, which depends on the equipment being connected and plays a vital role in repairs. So, there is a division according to the size and number of connected wires.
By size
In practice, plugs of three sizes are most often found:
micro-jack with a diameter of 2.5 mm (1/4″) - used to connect headphones to small gadgets and old mobile phones;
mini-jack with a diameter of 3.5 mm (1/8″) - used to connect headphones to players, smartphones (for example, iPhone, Xiaomi, etc.) or audio cards installed in personal computers;
jack with a diameter of 6.35 mm - it is used to connect professional headphones, pop microphones, etc. to the sound source.
Features of soldering in the groove
Connecting both single-core and multi-core cables with a cross-section of 3 mm2 without soldering equipment is possible in an original way:
- twist the stripped ends of the wires;
- a piece of foil is bent so as to form an elongated bath;
- a twist is placed in it;
- Flux is applied to the stripped wires and tin powder is added;
- the foil is heated with an open flame from a lighter or other flame source;
- during heating, the twist is rotated around its axis;
- upon completion of soldering, the remaining foil is removed;
- the soldered twist is wrapped in shrink film and heated until a dense layer of insulation is obtained.
Read also: What is a servo drive in a machine
Most common color
- earth (common) – yellow (gold)
- left - blue (green)
- right - red
In fact, the common wire is neither yellow nor gold, it is the color of pure copper coated with a clear varnish. But to be clear, let’s call it yellow.
Like any rule, this one also has exceptions, especially when it comes to headsets. For example, it happens that the right one is green, the left one is blue, and the red one is a microphone. Sometimes the wires are not completely the same color, but have a colored stripe in combination with yellow . But pure YELLOW always EARTH . Mixtures of colors with yellow, in most cases also earth, but you need to check.
The yellow one goes to both headphones, so it is common; current flows through it, as it were, from each speaker, and through the other two colored wires, current flows into the speakers. Well this is sooooo rude