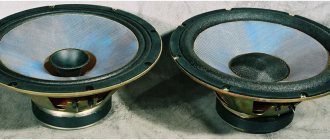
KinAp has (or existed) three types of good wideband speakers: 4A-33, 4A-32, 4A-32-6. I've listed them in order of preference. The last speaker has the narrowest frequency range and the greatest frequency response unevenness, but it has the only cast aluminum diffuser holder, which does not require stringent measures for its damping like the first two speakers. The first speaker has the widest range of reproduced frequencies and the least uneven frequency response. The size is also one and a half times smaller than the last two.
Before installing any speakers (domestic and imported) into acoustic systems, in some cases preliminary modification is required. This applies not only to wideband speakers, but also to low- and mid-range speakers.
The fact is that in addition to the main resonant frequency, dynamic emitters also have a bunch of mechanical resonances of the diffuser housing; these resonances are often multiplied with the reproduced signal, which leads to the appearance of complex intermodulation distortions. To excite parasitic resonances, a musical signal with a wide spectrum is ideally suited.
Reducing the parasitic mechanical resonances of the speaker is the first task after purchase. Not everyone (almost no one) pays attention to this and installs speakers in the case just like that without “clothing”. The fight against resonances is carried out in two directions: damping the body, “shock absorption”. The idea of damping was inspired by photographs of professional wideband speakers in rubber-coated housings.
When carrying out any activities, it is important to know whether we are moving in the right or wrong direction. To control, I used the old simple old-fashioned method, which justifies itself: take the speaker with your left hand by the magnet itself or place the magnet down on a soft surface, and with your right hand slap a heavy object (such as the handle of a screwdriver) on the o-ring, which is found on any speaker with external or internal side.
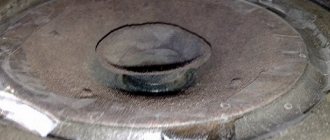
In a quiet room, if you listen closely, you can hear the low tone of the main resonance and the bell ringing of the diffuser holder. It is this ringing that we must fight against. The diffuser holder can be conventionally represented in the form of two rings connected by racks. Racks and rings form windows (three or four). The greatest radiation comes from the edges of disks and windows. In addition to the ringing of bells, you can sometimes hear rattling sounds. This is the most unpleasant thing that indicates a defective assembly. Usually unadhesive diffusers (almost all 10GD-36) rattle, sometimes at the junction of the magnetic system and the diffuser holder.
Now you can follow the finishing order:
- A thorough inspection of the diffuser, with light picking of suspicious places with a small screwdriver, to look for leaks, abrasions, and tears. If any are detected, it is necessary to eliminate the deficiency with 88 glue or moment, or BF-6. Maybe where you need to put a patch made of soft paper or fabric.
- Immediately I generously coat the joint of the magnetic system and the housing with Moment glue, regardless of whether it rattles or not. To prevent the magnetic system from crumbling, I coat it with BF-2 or BF-6 glue.
- After the first two points, I leave the speakers to dry for at least a day.
- The diffuser holders’ own resonances are significantly weakened if round or semicircular rubber bands are glued along the radii of the disks and the perimeters of the windows. I get these harnesses, excuse the expression, from plumbing sealing rings with a cross-sectional diameter of 5...6 mm. I also use pieces of rubber from old car tires. Damping the larger “ring” has the greatest effect. I cover it with rubber bands on the inside and outside. These harnesses must fit snugly to the mechanical base. For gluing, “Moment” or 88 glue is good. The latter holds stronger, but it dries for… knows how long. The harness on the outside will now serve as an o-ring, there’s nothing wrong with that.
- The remaining empty spaces on the metal body are sealed with rubber pieces of various shapes. Recently I was given the idea of wrapping the racks with linen tape, I’ll have to try it.
- After these procedures and the glue has dried, you can proceed to the last stage of “depreciation.” I think this is important. A change in air pressure during operation of acoustic systems affects the diffuser holder and magnetic system as a shock, exciting parasitic resonances. This blow can also be weakened, but first you need to decide for yourself the question: to do or not to do magnetic shielding with an iron casing. “Cushioning” consists of covering the body of the diffuser holder and the magnetic system with batting. I cut out small strips of this wonderful material, roll them up and glue them with PVA glue or Bustilat, and the glue is applied in a solid layer only to the surface of the body, and not to the batting. The result can be considered satisfactory if, when tapping the magnetic system with a weighty object, such as a hammer (not a sledgehammer), nothing is heard.
- The lugs for mounting screws or screws must be left free of cotton so that round rubber pads 5...7 mm thick can be glued to them, through which the mounting screws will go. It is very important to prevent direct contact of the screw head with the speaker body, as well as the speaker mounting lugs with the body deck.
That's all for now. Then I can talk about the fine-tuning of the diffuser of the wideband speakers and the design of the cabinet. But there will be completely seditious things going on there, so if someone doesn’t like it, I can stop in time and not waste time on nonsense. I think that this is the most convenient place to post this material in the conference threads. I will be grateful for advice and comments.
I want to be like OTTO
The appearance of successful acoustic systems among the products of the Soviet “hi-fi” industry was, in many ways, a matter of chance. But this was not due to the lack of qualifications of the developers, but to financing on a residual basis and the general approach of management to entertainment electronics as something deeply secondary. Nevertheless, individual stars in the sky still lit up, often, however, thanks to copying foreign models.
The predecessor of the famous S-90 was produced since 1977 by the Riga software company Radiotekhnika (KB Orbita). This three-way speaker was one of the first designed for high-quality sound reproduction in stereo home systems. For those years, its sound was definitely the best among domestic models. Its resistance was 4 Ohms, the power input was 35 Watts, and one speaker cost 110 rubles.
Radio engineering S-90 (35AC-212)
Perhaps the most popular and widespread acoustic systems in the USSR. The model was first released in 1980 by the Radiotekhnika production association, and since 1984, according to the new GOST, it became known as “35AS-012”. Formally, these speakers were the first in the USSR to comply with the world Hi-Fi standard - their range of reproduced frequencies was from 31.5 to 20,000 Hz. The name S-90 was intended for foreign markets, but it also took root within the Soviet Union. The maximum input power was 90 Watts, the three-way design initially included speakers 75GDN-1-4, 20GDS-1-8 and 6GDV-6-16. The nominal impedance was 4 Ohms, the sensitivity was 85 dB, the weight of one speaker was 23 kilograms.
Radio engineering S-70 (35AC-213)
Electronics 100AC-060 (100AC-063)
This acoustic system has been produced since 1988; its distinctive feature is the use of an acoustic transformer or Hale emitter for sounding the mid- and high-frequency ranges. The low-frequency section had an acoustic design in the form of a passive radiator located on the front wall of the case. The input power was up to 150 Watts, the reproduced frequency range was from 40 to 25,000 Hz. The sensitivity of the system was 91 dB, the nominal impedance was 8 Ohms.
Amphiton/Lorta 150AS-007
Source
Chapter 2 about speakers.
When a speaker is new, it is better not to touch its diffuser, because the KinAp(ov) speakers and the Novosibirsk 10GD-36 have already been coated with the necessary impregnations and reefing, which prevents the spread of “harmful” vibrations.
It’s another matter when you come across old speakers with traces of violence - dents on the diffuser, these dents must be covered, for example, with a liquid solution of Guerlain on the outside and, if possible, on the inside. The only thing left is to equalize the frequency response from above and below. There is nothing new here.
To smooth out the frequency response from below, you need to work on the diffuser corrugation, if this corrugation is paper. Corrugation, as a rule, is made with a sinus profile with two “periods”. It is better to dampen according to the Shorov method, that is, with guerlain, but do not spread the entire corrugation, but only the first half-cycle closest to the center and a 0.5 cm wide strip adjacent to the corrugation. Guerlain should be diluted to a consistency that does not form sagging or smudges on the surface .
It should spread in an even layer. It is better to soak the remaining half-life of the corrugation with vegetable oil to increase the flexibility of the suspension. This will reduce the frequency of the main resonance and level out the frequency response. For speakers with rubber or polyurethane foam corrugations, “impregnation” can only do harm.
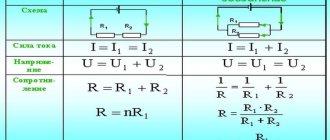
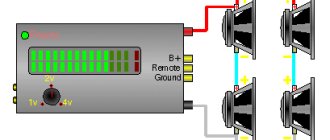
Good results in reducing the resonant frequency are obtained by installing speakers in one housing, and the speakers must be connected in parallel. Indicative results in improving the linearity of the speakers are obtained by connecting in parallel to each of the paired speakers resistors equal in value to the active resistance of the coil.
For full-range speakers, additional radiating cones are used to increase the output at high frequencies. The frequency response of such speakers is mainly in the high frequency region determined by the geometry of the cone, but even here something can be improved. Now I impregnate the cones and coat them with BF-6 glue.
This increases the rigidity of the cone, which leads to a widening of the frequency band and smoothing of the frequency response. So for 4A-28 speakers it is possible to expand the band to 17...18 kHz. Impregnation is carried out in three layers on the outside of the cone and once the BASE of the cone is coated with glue on the inside; it is better not to touch the inside, with the exception of a narrow 2 mm strip along the edge of the cone.
The drying time for one layer of glue is 6 hours, complete drying takes a week, during which time it is not recommended to send a signal to the speaker. BF-6 forms a special film that prevents the propagation of longitudinal waves. Some people use tsapon varnish for the same purposes; what stops me from using it is the excessively hard polymer film that it forms. On 4A-xx speakers, the protective cap is made of molded fabric; it is better not to cover it with glue, but if glue gets on the edges of the cap, then nothing bad will happen
Impregnating the base of the diffuser with glue for low-frequency and mid-frequency speakers will also only have a positive result.
Chapter 4 for all “lucky” owners of 4A28 from LOMO
Looking at the 4A28 from Lomo, you immediately understand that in front of you are not speakers, but semi-finished products, which are very, very far from Lafters. Nevertheless, you can get good sound from the 4A28, although the work is painstaking and requires a calm disposition of mind.
Of all the unpleasant features of the 4A28 Lomo, the following can be highlighted:
- Limitation of the frequency range from below and above;
- Colored sound, manifested to a greater extent in the low-frequency region of the spectrum;
- Abundance of parasitic resonances.
- Much of this can be eliminated. Especially the second one - the biggest nuisance.
It was invaluable in that most of the prefabricated parts of these speakers are fastened to each other with screws and pins, only the dust cap has an adhesive connection (the suppliers failed - they did not send screws of the appropriate caliber). This all helps when modifying the speakers.
I have found that the greatest contribution to the coloration of the sound is made by three aluminum gaskets between the magnetic system and the diffuser housing. At frequencies close to the main resonance (60...80 Hz), these gaskets emit a piercing rattling sound.
This phenomenon can be of both mechanical and electrical nature. Without going into details of theoretical reasoning, I removed these aluminum gaskets and replaced them with rubber ones. This is not an easy task and requires a fearless heart, and certain skills. The most unpleasant moment in disassembling the speakers, and they must be completely disassembled, is soaking the dust cap.
The most effective soaking agent is acetone, but it is harmful to health, so I use 96% alcohol.
Using a suitable sized brush, alcohol is applied to the glued seam until the cap can be carefully removed with a scalpel without damage. I was not able to remove a single cap completely cleanly, so I treated small abrasions on the HF horn to which this cap was glued with BF-6 glue.
Further disassembly of the speakers is trivially simple: remove the brackets securing the diffuser, unsolder the flexible leads, unscrew the brackets securing the centering washer, unscrew the screws on the inside of the case that secure the magnetic system. I did not separate the core and the magnet of the magnetic system. I did not find the appropriate dimensions of the tube for their alignment, and without this, reassembling the magnetic system will not work. In my opinion, it is enough to simply coat the joints of the steel washers and the “88” magnet with glue.
Next, I took an old inner tube from a car to make two rubber gaskets. Using the aluminum spacers as a template, I cut two rubber ones of a similar shape. One rubber gasket is glued to the magnetic system, the second to the diffuser holder body.
For gluing I recommend “88” glue.
Then the magnetic system is screwed into place. Under the head of the screw it makes sense to collect: a grommet, a steel washer, a rubber washer from the same tire. The screws must be tightened to the same depth, as tightly as possible. After this, it is advisable to coat the joints with “88”.
A disassembled speaker provides a vast field for modifications. You can coat the outer diameter of the diffuser with non-drying mastic (not to be confused with the corrugated collar). I used the same mastic to coat the inside of the diffuser holder body: the posts and the larger diameter. This must be done carefully, without getting into the joints of the speaker parts.
Next comes the most crucial moments - assembly and alignment. For centering, you need to prepare 8 strips of thick paper. In my case, paper from an old envelope for a 5'' floppy disk was optimal. The length of the strips should be such that they do not fall into the magnetic system, and the width should be 5...6 mm.
The outer edge of the corrugation is carefully coated with a thin layer of “88”, as well as the edge of the diffuser holder body to which the corrugation is glued. All this is dried for 10...15 minutes. Then the entire diffuser structure is gently placed in place, so that the mounting holes in the centering washer and flexible leads fall into place.
At this moment, you need to show maximum composure so as not to prematurely glue the corrugation that adheres above the joint. The corrugation can be finally lowered after the speaker coil takes an axisymmetric position relative to the core of the magnetic system. There should be no obvious displacement of the axes visible to the eye. Then the corrugation is carefully pressed down with your fingers. This takes longer to explain than to do.
To center, strips of paper are carefully pushed vertically into the gap between the coil and the core of the magnetic system evenly along the entire diameter. Then the centering washer is fixed with appropriate brackets. After fixing the strips of paper, remove them and check the alignment by lightly pressing your fingers on the four points of the diffuser. When pressed, no friction between the coil and the core should be heard or felt.
After all this, it is nice to make sure that the tone from the audio frequency generator is heard clearly and smoothly. After this modification, both low and high frequencies sound cleaner, not to mention the mids. By the way, I found a good product as a viscous and non-drying mastic - putty for windows, white or tinted in pure colors. Tar putty will not work, it is too greasy.
The second disadvantage of the 4A28 is the rather high frequency of the main resonance. This is due, first of all, to the rigidity of the suspension - the centering washer and the diffuser corrugation. It’s better not to touch the washer, but it makes sense to modify the corrugation.
I haven’t found anything more effective than softening the corrugation with glycerin (bought at the pharmacy). But the diffuser and corrugation are impregnated at the factory with a special composition that glycerin cannot cope with; alcohol comes to its aid. All procedures are carried out with a thin brush.
I decided to soak only the grooves of the corrugation, without touching its protruding ribs. This gives the necessary flexibility and maintains the shape of the corrugation. So, the flowing ribs of the corrugation are first moistened with alcohol, then the first layer of glycenin is applied over the wet one.
Glycerin is absorbed within 0.5…2 hours.
and on the third, or even the second layer, you need to stop so as not to “overdo it,” because the density of the paper in different series may be different. Otherwise, if the corrugation becomes very messy, there is little good. After the third time, the frequency of the main resonance moves to 50...55 Hz. Then it’s a matter of taste, but it’s important to know when to stop and remember that theoretically it won’t be possible to go below 45 Hz.
The last procedure is to apply a thin layer of viscous mastic to the outer diameter of the diffuser with a tape 5 mm wide. and not the last rib of the corrugation. All these procedures not only expand the low-frequency limit of the speaker's frequency range, but also smooth out the frequency response. Subjectively, overtones also decrease.
I have already reported on the modification of the HF emitter cone. I just want to share the following thoughts:
- The lower part of the cone (top) is responsible for sound production at frequencies above 10 kHz.
- As Alexey correctly pointed out, the outer edge of the cone (base) is responsible for creating parasitic overtones.
Therefore, I limited myself to coating only a narrow part of the cone with BF-6 glue, which did not bring about a noticeable expansion of the strip. And I covered the edge of the cone with a thin layer of putty. After this, the sound became more pleasant and the frequency response smoother.
The most unpleasant thing I had to deal with was the frequency dependence of the acoustic impedance or frequency response of the horn HF emitter. The fact is that any horn is an analogue of a high-pass filter with its own main resonance frequency, which corresponds to the cutoff frequency.
The dependence of the acoustic impedance or frequency response of a horn has the same features as electric filters corresponding to Butterworth, Bessel, Chebyshev... But the 4A28 horn seems to have a Chebyshev with an uneven frequency response in terms of acoustic pressure of 6...9 dB, and the first maximum occurs at 3 kHz, the following maxima are multiples of this frequency.
The only thing that helps suppress resonances is to place an object with an area equal to the area of the horn opening at a height of about 5 cm from the opening. It’s not for nothing that Lafters glue “wooden bulbs” - diffusers - to their speakers. All this does not fit well with my speaker design. Looks like I won't be making any diffusers.
All the work done made it possible to obtain the sound of the 4A28 Lomo speakers comparable to similar Hungarian speakers. This omits some of the details about muting speaker cabinets that I reported on earlier.