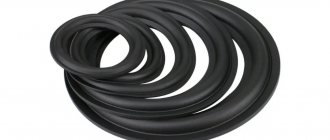
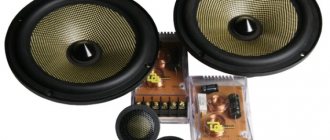
Any electrodynamic loudspeaker consists of the same elements. These are a voice coil, a magnetic system and a diffuser. Depending on the purpose of the speaker, the sound emitter diffuser can reach a diameter of 15 inches. In order for it to move freely along with the sound winding in the field of a permanent magnet, a suspension is located between the metal mandrel and the diffuser material. This elastic structure runs along the perimeter of the diffuser. The suspension can be made of the same material as the diffuser, that is, paper. In this case, the paper is formed in such a way that a corrugation is formed on it. Hangers can be made of impregnated fabric, polyurethane or rubber.
Over time and during long breaks in use, the structure of the material is disrupted, and micro-tears and cracks may form on paper and fabric hangers. Impregnating speaker surrounds can actually extend its service life. This also applies to elastic materials such as rubber or polyurethane, since such suspensions are also susceptible to aging. It is quite possible to improve the health of electrodynamic heads of acoustic systems using impregnation. The main thing is to choose the right impregnating composition.
How to impregnate the speaker suspension
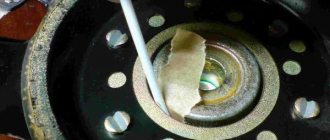
Impregnation of speaker surrounds not only restores material damaged by time or other reasons, but also has a beneficial effect on the amplitude-frequency response of the loudspeaker. The elastic impregnating composition increases the damping properties of the diffuser, while sharp peaks are smoothed out and the frequency response is leveled. The speaker suspension is treated with Guerlain non-hardening mastic. It is produced in the form of a layer applied to special paper and covered with a protective film. Before applying to the diffuser, the mastic is diluted in gasoline to a creamy consistency. The finished mixture is applied with a brush in a thin layer to the speaker suspension. For speakers up to 4 watts, it is enough to apply 2-3 layers, and for more powerful electrodynamic heads, the process can be repeated several times.
Applying a solution of mastic in gasoline should be done in a ventilated area. Before applying audio frequency voltage to the speaker, it must dry for an hour.
Processing speaker surrounds
It happens that the recommended composition is difficult to obtain, and the question of how to treat the speaker suspension arose very urgently. For this purpose, you can use other, less scarce, compositions. Good results are obtained by dissolving natural rubber in gasoline. Raw rubber can be purchased at any tire shop. It is better to make the mixture liquid and apply it in several layers. You can impregnate speaker surrounds with synthetic latex. It's called styrene butadiene. First, the old impregnation must be removed using ethyl acetate or butyl acetate for this purpose. These are low-toxic solvents that will help quickly remove old impregnation. Acetone and solvents 647, 649 cannot be used for this purpose. A good result is obtained by impregnating loudspeaker suspensions with Sapphire silicone grease.
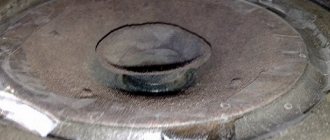
First, the diffuser is cleaned of dust and dirt. Inside the bottle there is a ball, which, when shaken, mixes the components of the lubricant, so you need to shake the can a little. Then the first layer is applied and after 10 minutes the second. After complete drying, the loudspeakers are installed in the speaker systems.
Refinement of speakers
A reward was awarded for the post
This material was written by a site visitor and was compensated for. Everything will happen in 5 parts. So I ask:
Part 1. About the revision of 4a32. KinAp has (or existed) three types of good wideband speakers: •4A-33 •4A-32 •4A-32-6 I have arranged them in order of preference. The last speaker has the narrowest frequency range and the greatest frequency response unevenness, but it has the only cast aluminum diffuser holder, which does not require stringent measures for its damping like the first two speakers. The first speaker has the widest range of reproduced frequencies and the least uneven frequency response. The size is also one and a half times smaller than the last two. Refinement of speakers Before installing any speakers (domestic and imported) into acoustic systems, in some cases preliminary modification is required. This applies not only to wideband speakers, but also to low- and mid-range speakers. The fact is that in addition to the main resonant frequency, dynamic emitters also have a bunch of mechanical resonances of the diffuser housing; these resonances are often multiplied with the reproduced signal, which leads to the appearance of complex intermodulation distortions. To excite parasitic resonances, a musical signal with a wide spectrum is ideally suited. Reducing the parasitic mechanical resonances of the speaker is the first task after purchase. Not everyone (almost no one) pays attention to this and puts the speakers in the case just like that without “clothing”. The fight against resonances is carried out in two directions: damping of the body, “depreciation”. The idea of damping was inspired by photographs of professional wideband speakers in rubber-coated housings. When carrying out any activities, it is important to know whether we are moving in the right or wrong direction. To control, I used the old simple old-fashioned method, which justifies itself: take the speaker with your left hand by the magnet itself or place the magnet down on a soft surface, and with your right hand slap a heavy object (such as the handle of a screwdriver) on the o-ring, which is found on any speaker with external or internal side. In a quiet room, if you listen closely, you can hear the low tone of the main resonance and the bell ringing of the diffuser holder. It is this ringing that we must fight against. The diffuser holder can be conventionally represented in the form of two rings connected by racks. Racks and rings form windows (three or four). The greatest radiation comes from the edges of disks and windows. In addition to the ringing of bells, you can sometimes hear rattling sounds. This is the most unpleasant thing that indicates a defective assembly. Usually unadhesive diffusers (almost all 10GD-36) rattle, sometimes at the junction of the magnetic system and the diffuser holder. Now you can follow the order of fine-tuning: 1. Thorough inspection of the diffuser, with light picking of suspicious places with a small screwdriver, looking for leaks, abrasions, and tears. If any are detected, it is necessary to eliminate the deficiency with 88 glue or moment, or BF-6. Maybe where you need to put a patch made of soft paper or fabric. 2.I immediately generously coat the junction of the magnetic system and the housing with glue <Moment>, regardless of whether it rattles or not. To prevent the magnetic system from crumbling, I coat it with BF-2 or BF-6 glue. 3.After the first two points, I leave the speakers to dry for at least a day. 4. The diffuser holders’ own resonances are significantly weakened if round or semicircular rubber bands are glued along the radii of the disks and the perimeters of the windows. I get these harnesses, excuse the expression, from plumbing sealing rings with a cross-sectional diameter of 5...6 mm. I also use pieces of rubber from old car tires. Damping the larger <ring> has the greatest effect. I cover it with rubber bands on the inside and outside. These harnesses must fit snugly to the mechanical base. The glue “Moment” or 88 is good for gluing. The latter holds stronger, but it dries for… knows how long. The harness on the outside will now serve as an o-ring, there’s nothing wrong with that. 5. The remaining empty spaces on the metal body are sealed with rubber pieces of various shapes. Recently I was given the idea of wrapping the racks with linen tape, I’ll have to try it. 6.After these procedures and the glue has dried, you can proceed to the last stage of “cushioning”. I think this is important. A change in air pressure during operation of acoustic systems affects the diffuser holder and magnetic system as a shock, exciting parasitic resonances. This blow can also be weakened, but first you need to decide for yourself the question: to do or not to do magnetic shielding with an iron casing. “Cushioning” consists of covering the body of the diffuser holder and the magnetic system with batting. I cut out small strips of this wonderful material, roll them up and glue them to PVA glue or "Bustilat", and the glue is applied in a solid layer only to the surface of the body, and not to the batting. The result can be considered satisfactory if, when tapping the magnetic system with a weighty object, such as a hammer (not a sledgehammer), nothing is heard. 7. The lugs for mounting screws or screws must be left free of cotton so that round rubber pads 5...7 mm thick can be glued to them, through which the mounting screws will go. It is very important to prevent direct contact of the screw head with the speaker body, as well as the speaker mounting lugs with the body deck. Part 2. Let's work on the diffusers... When the speaker is new, it is better not to touch its diffuser, because the KinAp (ov) speakers and the Novosibirsk 10GD-36 have already applied the necessary impregnations and reefing, which prevents the spread of “harmful” vibrations. It’s another matter when you come across old speakers with traces of violence - dents on the diffuser, these dents must be covered, for example, with a liquid solution of Guerlain on the outside and, if possible, on the inside. The only thing left is to equalize the frequency response from above and below. There is nothing new here. To smooth out the frequency response from below, you need to work on the diffuser corrugation, if this corrugation is paper. Corrugation, as a rule, is made with a sinus profile with two “periods”. It is better to dampen according to the Shorov method, that is, with guerlain, but do not spread the entire corrugation, but only the first half-cycle closest to the center and a 0.5 cm wide strip adjacent to the corrugation. Guerlain should be diluted to a consistency that does not form sagging or smudges on the surface . It should spread in an even layer. It is better to soak the remaining half-life of the corrugation with vegetable oil to increase the flexibility of the suspension. This will reduce the frequency of the main resonance and level out the frequency response. For speakers with rubber or polyurethane foam corrugations, “impregnation” can only do harm. Good results in reducing the resonant frequency are obtained by installing speakers in one housing, and the speakers must be connected in parallel. Indicative results for improving linearity are obtained by connecting resistors in parallel to each of the paired speakers, equal in value to the active resistance of the coil. For full-range speakers, additional radiating cones are used to increase the output at high frequencies. The frequency response of such speakers is mainly in the high frequency region determined by the geometry of the cone, but even here something can be improved. Now I impregnate the cones and coat them with BF-6 glue. This increases the rigidity of the cone, which leads to a widening of the frequency band and smoothing of the frequency response. So for 4A-28 speakers it is possible to expand the band to 17...18 kHz. Impregnation is carried out in three layers on the outside of the cone and once the BASE of the cone is coated with glue on the inside; it is better not to touch the inside, with the exception of a narrow 2 mm strip along the edge of the cone. The drying time for one layer of glue is 6 hours, complete drying takes a week, during which time it is not recommended to send a signal to the speaker. BF-6 forms a special film that prevents the propagation of longitudinal waves. Some people use tsapon varnish for the same purposes; what stops me from using it is the excessively hard polymer film that it forms. On 4A-xx speakers, the protective cap is made of molded fabric; it is better not to cover it with glue, but if glue gets on the edges of the cap, then nothing bad will happen. Impregnating the base of the diffuser with glue for low-frequency and mid-frequency speakers will also only have a positive result. Part 3. About the design of the speakers. The acoustic design—the housing of the speaker systems—has a great influence on the uniformity of the frequency response. If you arrange the main types of housings in order of increasing unevenness, starting with the smallest, you will get the following row, regardless of whether the speaker is open or closed: 1. Ball-shaped housing (half a ball for an open speaker); 2. Irregularly shaped trapezium; 3.Cylinder with a hole on the side wall; 4.Parallelepiped with an off-center hole; 5.Cube; 6.Cylinder with a hole on the top wall - disk. From this we can conclude that the most technologically advanced type of housing and the preferred shape of the frequency response is a trapezoid, in which the speaker is not located at the geometric center. The most delicate point in the design of the speakers is the front deck on which the speakers are mounted. A hole for a speaker, and worse if there are two of them, weakens the mechanical strength of the deck, making it prone to resonances at mid frequencies. Without touching on the methods of attaching the deck, in my opinion, it should be thick and made up of separate sheets. But if the hole for the speaker is made the same for all sheets, then a local cylinder is obtained. You have to compromise and make holes of different diameters on different deck sheets (usually 2, 3) with increasing diameter. The outer sheet to which the speakers will be attached has a smaller diameter. It is better not to glue the sheets together, but to twist them with screws through layers of dense fabric. When placing several speakers on the deck, special attention should be paid to strengthening the isthmuses between them. In some cases of particularly narrow isthmuses, transverse supports must be placed under them, screwed to the side walls, to give greater rigidity to the structure. The isthmuses between the speakers should be screwed to these supports. The panels of the side walls, the bars for fastening, are best not glued together, but screwed together. Between the joints it is necessary to lay seals made of thin felt (cloth) or porous rubber. Screws securing two parts must be rigidly connected to only one of them. The hole for the screw in the second part should be of such a diameter that the probability of contact with the screw is minimal. It is advisable to place a washer and a felt or rubber seal under the screw head. It is better to lay a thicker seal of 3...5 mm under the front deck. Some people like speaker supports in the form of spikes, but I am quite happy with wooden “queens” with felt pads at both ends. I can say the following about the location and direction of speakers with broadband speakers: the acoustic axes should be directed towards the listener, since this type of speaker has a quite narrow directivity pattern in the frequency range above 5 kHz. This can be easily achieved by making a sloping front deck and turning the speakers in the desired direction. It has been noted that the stereo panorama in its entire breadth unfolds ABOVE the speaker systems, so it makes sense that the height of floor-standing home speakers should not exceed the listener’s eye level for a feeling of comfort. A lot has already been said about the choice of sizes and damping materials, so that seems to be all. Part 4. About the revision of 4a28. Looking at the 4A28 from Lomo, you immediately understand that in front of you are not speakers, but semi-finished products, which are very, very far from Lafters. Nevertheless, you can get good sound from the 4A28, although the work is painstaking and requires a calm disposition of mind. Of all the unpleasant features of the 4A28 “Lomo”, the following can be highlighted: •1) Limitation of the frequency range from below and above; •2) Colored sound, manifested to a greater extent in the low-frequency region of the spectrum; •3) Abundance of parasitic resonances. Much of this can be eliminated. Especially the second one - the biggest nuisance. It was invaluable in that most of the prefabricated parts of these speakers are fastened to each other with screws and pins, only the dust cap has an adhesive connection (the suppliers failed - they did not send screws of the appropriate caliber). This all helps when modifying the speakers. I have found that the greatest contribution to the coloration of the sound is made by three aluminum gaskets between the magnetic system and the diffuser housing. At frequencies close to the main resonance (60...80 Hz), these gaskets emit a piercing rattling sound. This phenomenon can be of both mechanical and electrical nature. Without going into details of theoretical reasoning, I removed these aluminum gaskets and replaced them with rubber ones. This is not an easy task and requires a fearless heart, and certain skills. The most unpleasant moment in disassembling the speakers, and they must be completely disassembled, is soaking the dust cap. The most effective soaking agent is acetone, but it is harmful to health, so I use 96% alcohol. Using a suitable sized brush, alcohol is applied to the glued seam until the cap can be carefully removed with a scalpel without damage. I was not able to remove a single cap completely cleanly, so I treated small abrasions on the HF horn to which this cap was glued with BF-6 glue. Further disassembly of the speakers is trivially simple: remove the brackets securing the diffuser, unsolder the flexible leads, unscrew the brackets securing the centering washer, unscrew the screws on the inside of the case that secure the magnetic system. I did not separate the core and the magnet of the magnetic system. I did not find the appropriate dimensions of the tube for their alignment, and without this, reassembling the magnetic system will not work. In my opinion, it is enough to simply coat the joints of the steel washers and the “88” magnet with glue. Next, I took an old inner tube from a car to make two rubber gaskets. Using the aluminum spacers as a template, I cut two rubber ones of a similar shape. One rubber gasket is glued to the magnetic system, the second to the diffuser holder body. For gluing I recommend “88” glue. Then the magnetic system is screwed into place. Under the head of the screw it makes sense to collect: a grommet, a steel washer, a rubber washer from the same tire. The screws must be tightened to the same depth, as tightly as possible. After this, it is advisable to coat the joints with “88”. A disassembled speaker provides a vast field for improvements. You can coat the outer diameter of the diffuser with non-drying mastic (not to be confused with the corrugated collar). I used the same mastic to coat the inside of the diffuser holder body: the posts and the larger diameter. This must be done carefully, without getting into the joints of the speaker parts. Next comes the most crucial moments - assembly and alignment. For centering, you need to prepare 8 strips of thick paper. In my case, paper from an old envelope for a 5'' floppy disk was optimal. The length of the strips should be such that they do not fall into the magnetic system, and the width should be 5...6 mm. The outer edge of the corrugation is carefully coated with a thin layer of “88”, as well as the edge of the diffuser holder body to which the corrugation is glued. All this is dried for 10...15 minutes. Then the entire diffuser structure is gently placed in place, so that the mounting holes in the centering washer and flexible leads fall into place. At this moment, you need to show maximum composure so as not to prematurely glue the corrugation that adheres above the joint. The corrugation can be finally lowered after the speaker coil takes an axisymmetric position relative to the core of the magnetic system. There should be no obvious displacement of the axes visible to the eye. Then the corrugation is carefully pressed down with your fingers. This takes longer to explain than to do. To center, strips of paper are carefully pushed vertically into the gap between the coil and the core of the magnetic system evenly along the entire diameter. Then the centering washer is fixed with appropriate brackets. After fixing the strips of paper, remove them and check the alignment by lightly pressing your fingers on the four points of the diffuser. When pressed, no friction between the coil and the core should be heard or felt. After all this, it is nice to make sure that the tone from the audio frequency generator is heard clearly and smoothly. After this modification, both low and high frequencies sound cleaner, not to mention the mids. By the way, I found a good product as a viscous and non-drying mastic - putty for windows, white or tinted in pure colors. Tar putty will not work, it is too greasy. The second disadvantage of the 4A28 is the rather high frequency of the main resonance. This is due, first of all, to the rigidity of the suspension - the centering washer and the diffuser corrugation. It’s better not to touch the washer, but it makes sense to modify the corrugation. I haven’t found anything more effective than softening the corrugation with glycerin (bought at the pharmacy). But the diffuser and corrugation are impregnated at the factory with a special composition that glycerin cannot cope with; alcohol comes to its aid. All procedures are carried out with a thin brush. I decided to soak only the grooves of the corrugation, without touching its protruding ribs. This gives the necessary flexibility and maintains the shape of the corrugation. So, the flowing ribs of the corrugation are first moistened with alcohol, then the first layer of glycenin is applied over the wet one. Glycerin is absorbed in 0.5...2 hours. At the third, or even the second layer, you need to stop so as not to “overdo it,” because the density of the paper in different series may be different. Otherwise, if the corrugation becomes very messy, there is little good. After the third time, the frequency of the main resonance moves to 50...55 Hz. Then it’s a matter of taste, but it’s important to know when to stop and remember that theoretically it won’t be possible to go below 45 Hz. The last procedure is to apply a thin layer of viscous mastic to the outer diameter of the diffuser with a tape 5 mm wide. and not the last rib of the corrugation. All these procedures not only expand the low-frequency limit of the speaker's frequency range, but also smooth out the frequency response. Subjectively, overtones also decrease. I have already reported on the modification of the HF emitter cone. I just want to share the following considerations: •1) The lower part of the cone (top) is responsible for sound production at frequencies above 10 kHz. •2) The outer edge of the cone (base) is responsible for creating parasitic overtones. Therefore, I limited myself to coating only a narrow part of the cone with BF-6 glue, which did not bring about a noticeable expansion of the strip. And I covered the edge of the cone with a thin layer of putty. After this, the sound became more pleasant and the frequency response smoother. The most unpleasant thing I had to deal with was the frequency dependence of the acoustic impedance or frequency response of the horn HF emitter. The fact is that any horn is an analogue of a high-pass filter with its own main resonance frequency, which corresponds to the cutoff frequency. The dependence of the acoustic impedance or frequency response of a horn has the same features as electric filters corresponding to Butterworth, Bessel, Chebyshev... But the 4A28 horn seems to have a Chebyshev with an uneven frequency response in terms of acoustic pressure of 6...9 dB, and the first maximum occurs at 3 kHz, the following maxima are multiples of this frequency. The only thing that helps suppress resonances is to place an object with an area equal to the area of the horn opening at a height of about 5 cm from the opening. It’s not for nothing that Lafters glue “wooden bulbs” - diffusers - to their speakers. All this does not fit well with my speaker design. Looks like I won't be making any diffusers. All the work done made it possible to obtain the sound of the 4A28 Lomo speakers comparable to similar Hungarian speakers. This omits some of the details about muting speaker cabinets that I reported on earlier. Notes: As experience has shown, dust caps must be removed after removing the diffuser. This is very easy to do with isopropyl alcohol or lighter fluid (I used Royal Lighter Fluid). At the same time, the glued edges of the cap are evenly wetted, after a minute they are wetted a second time, and after another half a minute you can use your finger (you can easily reach the edges of the cap through the hole in the spool) to separate the cap from the cone. Both the first (using isopropyl alcohol) and the second (lighter fluid) methods made it possible to obtain caps without damage. Moreover, it is easier to separate with lighter fluid and the cap does not wrinkle.
After the diffuser is removed, you must immediately seal the gap in the magnetic system with tape or tape, otherwise metal filings tend to get there. If these insidious brats still get into the gap, do not be afraid to disassemble the magnetic system completely: it is very easy to center it even without a special centering tube. To do this, you need to measure the internal diameter of the hole around the core, cut the paper into strips 5-10 cm wide and, having disassembled (and cleaned) the magnetic system, wind strips of paper onto the core until you reach the measured diameter. After this, you need to unwind one to one and a half turns of paper and insert the resulting paper tube into the hole in the top plate (without removing the tube from the core, of course). After tightening the three screws, you can remove the tube. Voila - we have a centered magnetic system. Having sealed the gap, you need to coat all the joints of the magnet with the plates with “moment” type glue (88 is really disgusting, although in theory it should be much better than moment) and after drying, wrap it with electrical tape (they look very impressive). To do this, with an allowance of 5 mm outwards, tightly wrap the upper seam (the electrical tape will bend onto the surface of the outer plate of the magnetic system), then, without much tension, with an allowance of 1-2 mm, also wrap the lower seam, and finally stick the electrical tape in the center of the magnet on top both stripes. This will protect the magnet from all kinds of damage, and the appearance will improve. I’m not sure about the advisability of covering the diffuser holder body with rubber: in speakers, the speaker is attached to the outer ring, and not to the magnet, and if you put the speaker on the table with the magnet facing up and knock on the diffuser holder, no special ringing is observed... Although, who the hell is not joking? As soon as I find suitable rubber bands, I will paste them on and write... Part 5. Very briefly about the modification of 5GDSH4-4. For work you will need: 1. Window putty that does not dry out - less than a briquette; 2. Castor oil (sold at the pharmacy) - less than a bottle; 3. Glue BF-6; 4.Glue <88>; 5. Alcohol 96% - 10 grams (for external use); 6. A pair of stationery brushes; 7.Rubber seals of round section (5...6 mm). Any domestically produced speaker requires some kind of work to improve its properties. (I want to warn you that this does not improve the appearance.) This is good for some speakers, but for others it’s like hitting a wall. 5GDSh4 belongs to the first category. The good news is that this speaker does not require complete disassembly; you can limit yourself to cosmetics: 1. You need to peel off the dust cap - the main source of extraneous sounds (and never glue it again). This is done by generously wetting the edges of the cap with alcohol. After soaking the glue, the cap is carefully removed with thin tweezers or a scalpel. 2. It is necessary to strengthen the magnetic system by carefully gluing all external connections. To do this, dilute BF (BF-6) glue with 96% alcohol and pour it into the cracks and under the rivets with a soft brush. Dry for 12 hours. 3. Carefully cut off with a scalpel all the paper seals right down to the spine in the place intended for attaching the speaker to the speaker body. This must be done carefully, without damaging the corrugation. 4.The top of the diffuser cone (where the diffuser is attached to the coil) is coated with three layers of BF-6 glue. You need to start from the coil itself and end, not reaching 5 mm from the points of connection of the flexible conductors with the coil conductors. Drying time for each layer is 0.5 - 0.5 - 6 hours. 5. It is necessary to apply a 0.2 mm layer of viscous mass to the diffuser corrugation. This mass can be prepared from non-drying window putty, softened in castor oil. The quantities are small: a couple of pinches of putty and a few drops of oil. It is necessary to soften until a homogeneous mass is formed, the consistency of thick sour cream. This crap must be applied in a thin layer, extending 5 mm onto the diffuser itself and not getting into the place under the seal. 6. It is necessary to glue the rubber seal, regardless of the method of mounting the speaker (external or internal). The seal can be made up of tightly joined sections of plumbing, rubber, round seal (5...6 mm cross-sectional diameter). The seal is glued to glue <88>. The seal must be pressed tightly against the edge of the metal body of the diffuser holder. 7. Flexible conductors and the centering washer should be lubricated with castor oil using a thin brush. 8.If desired, you can cover the body with the remaining putty. Having an audio range generator, you can monitor the intermediate stages of work and the final stage by ear. To do this, you need to apply a signal from the generator with an amplitude of 0.5...2 V, a frequency of 70...80 Hz. The sound should be clear and free of rattling. The finished speaker will not be inferior in its frequency properties to the modified 4A28. The 5GDSh4's upper cutoff frequency extends even higher than that of the 4A28. Please do not forget the authors of the article. I haven’t forgotten - the article is not entirely mine. I took the materials from the net, changed and modified the contents.
The post was rewarded.
This material was written by a site visitor and was rewarded.