Estimated reading time: 11 minute(s)
Which wire is best to use to connect speakers? Single or stranded, flat or round? What thickness of wire should be laid in the wall when renovating a room in order to then connect acoustics?
Such questions are often found on forums and search engines. Today we’ll talk a little about wires that can be laid in the wall during repairs and then used with any acoustics.
Good afternoon to everyone interested! Thanks to everyone who reads and leaves comments, we are pleased to see that the article was not written in vain and it is useful to know your opinion about what you read.
Why is a subwoofer needed and what types of this speaker are known?
Whatever the subwoofer, its role is predetermined - it only complements the existing speaker system and is not needed for full bass reproduction. This means that without a subwoofer, some bass will play normally. For example, this applies to low frequencies of 80-200 Hz.
Installing a subwoofer in a VAZ 2114
Note. The best option for installing a speaker system with a subwoofer involves the following scenario: the presence of five speakers, located two in front and two in back. There is only one Subwoofer in this scheme. And one more thing: the advantage of such a connection is the presence of tweeters or special high-frequency loudspeakers with a rather small diffuser size.
There are two main types of subs: in a box and without it.
Let's start with case models:
- They are delivered in a box, the size (volume) of which may vary;
- In turn, such subwoofers can be either active or passive (see Which subwoofer is better: consider active or passive). The former initially have a built-in power amplifier along with a frequency divider or crossover, as it is also called. Subwoofer passive has neither an amplifier nor a crossover, but costs several times less than the first;
- The second type of subs comes without a housing. Such models crash into the rear parcel shelf or seat of the car.
Subwoofer in the wing of a VAZ 2114
For hatchbacks, such as the VAZ 2114, it is recommended to install an active subwoofer (see The best active subwoofers for cars and their review), since the shelf above the trunk will not prevent bass from penetrating into the body. The same applies to station wagons, but for sedans an open speaker embedded in the rear seat is more suitable.
Installation
The process of installing a subwoofer in the fourteenth VAZ model begins not with anything, but with the ShVI (unless, of course, sound insulation has already been carried out (see Soundproofing a VAZ 2114 with your own hands according to the instructions)).
Subwoofer in the trunk of a VAZ 2114
Unfortunately, the level of shvi of domestic cars, even new ones, is not of sufficient quality. And without the appropriate preparation, installing a speaker is tantamount to throwing money down the drain.
Vibroplast or other modern materials will be an ideal option for this operation. If you read the corresponding step-by-step instructions for conducting a ShVI, you will be able to conduct the event on your own.
Next you need to do the following:
- Lay the speaker wires specifically under the subwoofer. You need to know that the RCA runs on the left of the car interior, and the power cables run on the right.
Note. The power cable runs from the battery through the hood. To avoid making unnecessary holes in the partition, it is recommended to find a rubber plug, remove it and pass the cable through the finished hole.
Subwoofer in the trunk of a VAZ 2114
The following scenario for installing a subwoofer in the fourteenth VAZ model is suitable if the trunk of the car will be used for standard purposes for transporting goods. Thus, there will be no more space left for mounting a subwoofer and an amplifier.
Here's what we recommend:
- Buy an active subwoofer Mystery or some other one with a flat shape. A super-compact underseat speaker is also suitable for these purposes;
- Prepare a set of necessary wiring, including power and audio cables;
- The wire responsible for power supply is connected to the battery (a fuse must be used);
- The cable is brought into the cabin through a prepared hole made for the rear window washer hose. Further, already in the cabin, you will need to remove the plastic thresholds in order to “follow the tracks” of the hose;
- The same should be done with audio wires;
- The button responsible for adjusting the bass can be placed under the dashboard.
NYY-J cable
The NYY-JG cable is used for installation in the ground, in water, outdoors, in concrete, indoors, in cable ducts, for power plants, industry and switchgears.
Order
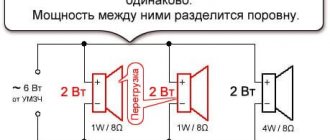
TIP: Be careful not to reverse the polarity of the cables. If the polarity is reversed, the bass will swing inward instead of outward. This is critical for sound. However, it will not affect the speakers.
Typically, the shorter the distance, the louder the speaker. Short wire paths are not always possible, especially at home. Then use a conductor with a suitable cross-section. Otherwise, you won't hear the full potential of the installations.
With your own hands
Installation of a VAZ 2114 subwoofer
Let's now consider the option of how to install a subwoofer in a VAZ 2114 with a homemade box. It is recommended to buy a Kransh ds-10 or similar subwoofer. This speaker looks like an ordinary one and doesn’t stand out in any way.
As for the box, it can be built from plywood or wood. The location for the amplifier is also selected initially.
Subwoofer for VAZ 2114
Now about the location. In principle, there is not that much free space. Again, we mean the trunk of a hatchback, where it is recommended to install the future low-frequency source.
Attention! You have to be extremely careful with the sizes. Redoing everything again due to your own carelessness is the last thing.
So, the future box must meet the dimensions of the space where it will be placed. However, it should not take up more space than required. For example, it should not be higher than the rear parcel shelf.
Let's get down to business:
- We take measurements and all other characteristics of the installation site;
- We buy the material and open it to prepare the box.
Note. You must be very careful when preparing the box, understanding that the thickness of the material is of great importance, because it is the basis.
- We make the back wall of the woofer, giving the box a trapezoidal shape;
- The sides and elements of the future product are fixed using “liquid nails”.
Advice. To give the entire structure sufficient reliability, the layout is secured with additional bars for reinsurance. Screwing in self-tapping screws will also help, although there may be problems with preparing the holes. But a comfortable drill in dexterous hands or a screwdriver should not fail.
- The most difficult part of the entire operation is making the 6th final wall. The difficulty is that this wall can “sag” deep into the original box. To prevent this from happening, stiffeners are used.
The result will immediately please you if all 6 walls are successfully pulled together. It should be remembered that it is wrong to hope that the last wall can be simply adjusted somehow.
At the final stage of the operation, do not forget to cut gaps in the wall for the connectors to which the speaker will subsequently be connected. This is not done on a finished structure, since the procedure is fraught with bad consequences.
To tightly fasten the subwoofer enclosure to the partition, you need to use an additional plywood pad.
Installing subwoofers on a VAZ 2114
Here's how to install the plywood trim:
- First of all, you need to apply a sealant;
- During the installation of the overlay, you should pay attention to the fact that its thickness may become too large due to the use of several layers;
Now about the most important thing - ensuring tightness:
- We should not forget that the high-quality sound of the future subwoofer depends on tightness. This is explained by a physical phenomenon;
- No do-it-yourself box will be sealed in any way until the required measures have been taken;
- It is recommended to cover the edges of the subwoofer box with special mastic. Then, after drying, you will need to fill the “container” with water. In this case, water should not leak anywhere (except for the holes made).
Regarding the cladding:
- It is recommended to make it from carpet. This is fairly common material;
- If you cannot find carpet, you can use another material - carpet.
You can learn more about how to install a subwoofer in a VAZ 2114 car, and which models are best suited for this, from other publications on the site. Videos and photos - materials, diagrams, instructions and tables with technical descriptions - can also provide useful information.
Re: VAZ 2114, what is the route for laying acoustic wires?
Good afternoon. VAZ 2114.
If you run the speaker wires from the trunk on the starboard side along the sills, then how do you route the wires to the left door and the HF rack? Is there a dashboard inside or what? Through which holes, and in general what is the optimal route? I searched, but did not find detailed information.
Good day.
I pulled along the roof on the right side, and then the wires, when reaching the right A-pillar, go to the left HF and MID. The car is right-hand drive. On the left side in the area of the thresholds there is power, on the right side there is an Ai-net wire and a wire for ROOKS.
Which wire is better to lay in the wall to connect acoustics?
Which wire is best to use to connect speakers? Single or stranded, flat or round? What thickness of wire should be laid in the wall when renovating a room in order to then connect acoustics?
Such questions are often found on forums and search engines. Today we’ll talk a little about wires that can be laid in the wall during repairs and then used with any acoustics.
Good afternoon to everyone interested! Thanks to everyone who reads and leaves comments, we are pleased to see that the article was not written in vain and it is useful to know your opinion about what you read.
Re: VAZ 2114, what is the route for laying acoustic wires?
Good afternoon. VAZ 2114.
If you run the speaker wires from the trunk on the starboard side along the sills, then how do you route the wires to the left door and the HF rack? Is there a dashboard inside or what? Through which holes, and in general what is the optimal route? I searched, but did not find detailed information.
I had nines and two 14s. In each car I installed it like this: left side (along the threshold) - power, Middle (along the tunnel) - rulers, Right side (along the threshold) - wires for acoustics, and on the left side I ran it along the floor, closer to the engine compartment. There were never any problems either during installation or during operation!
Prologue
Not all music lovers can understand all the intricacies of a good sound, or, in other words, the right sound. This is not taught in school. There are no courses offered in this subject. Good sound is achieved gradually, over time. When listening to different speakers through different amplifiers. When the difference between the sound of floor-standing speakers and bookshelf speakers (even the most expensive brands) becomes clear. All this comes with experience.
But while this experience is being gained... I would like to somehow speed up the process, to “jump” from the initial stage of the “ordinary listener” to the level higher – the “beginner music lover”. I don’t want to waste time gaining experience from purchasing low-quality equipment, and I also feel sorry for the money. Then you need to take the information for consideration and it is likely that you will be able to move on to the “next class” of the listener. But in order.
How to run wires for a VAZ 2114 subwoofer
Installation of a four-channel amplifier Blaupunkt GTA 475 in a VAZ 2110 car, under acoustics.
To connect the amplifier, we used the Mystery MAK 4.04 installation kit of wires.
The set of wires for connecting a four-channel amplifier consists of:
- Power cable red – cross-section 25 mm2 / length 5 m;
- Power cable black – cross-section 25 mm2 / length 1 m;
- RCA interconnect cable, for connecting a 4-channel amplifier, twisted pair / length 5 m;
- Control cable – cross-section 0.75 mm2 / length 5 m;
- Speaker cable – cross-section 3.5 mm2 / length 10 m;
- AGU fuse 60 A, with housing;
- Terminals – 4 pcs;
- Clamps – 6 pcs.
First of all, we crimp the power cables.
We insert a fuse into the gap in the positive cable; to do this, cut off 30 centimeters of the cable.
On one side we crimp it, and the other end into the fuse flask and clamp it.
We crimp one end of the long cable that will connect to the amplifier.
From the passenger compartment, through the rubber sealing ring, we insert the cable into the engine compartment.
Screw on the fuse and connect the cable to the fuse.
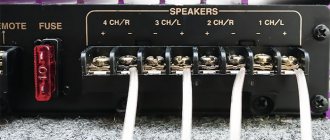
On the left side of the car, we lay the power cable and speaker wire from the front left speaker
We connect to the radio:
- RCA interconnect cable
- Control wire REM (blue)
- We only connect the chip with power to the ISO connector.
We lay the RCA, REM wires and the speaker wire of the front right speaker along the right side of the car.
We screw the amplifier to the rear shelf, the shelf is not factory. but something like this one, only without the hole for the subwoofer.
We took the ground for the amplifier next to the shelf.
We connect the amplifier power wires, REM wire and speaker wires.
On the other side of the amplifier, there is an RCA interconnect cable.
After everything is connected and checked, we connect the positive cable to the battery and proceed to setting up the amplifier.
About design
Wire in the wall. And its connecting parts also require attention. Here in the pictures below are examples of what the required unit on the wall might look like. One might say – beautiful and cute. But this external design factor is controversial. On the one hand, it makes no sense to focus on this, since this part of the audio system will be hidden from direct view.
Some people don’t really use the flight of design ideas, and don’t worry about it at all. They hide the wires in the wall and put out “sockets” to connect to their amplifier without being too bothered by the appearance. The main thing is that it is convenient to connect.
But on the other hand, even what may be hidden behind an equipment rack, behind a cabinet, or shelving requires attention. After all, this is your room, good equipment, furniture, designer renovation. And installing cheap terminals is not the best way to feel moral satisfaction from the fact that the wires are not lying on the floor along the baseboards.
In this option, the entire lower part of the wall will be covered by the rear wall with a cabinet for equipment. And all these terminals and wires will still not be visible. But there’s no need to talk about design here... The main thing is that it’s cheap and the wires don’t get in the way.
The “design” is approximately the same here. Everything is simple and inexpensive. A different type of terminal is used here, which is why the appearance and convenience are different.
A socket (terminal) for connecting acoustics at the place where it is installed (in the corners of the room behind the front and rear acoustics, for example) may look approximately the same. But here you can’t move the acoustics too much. Although nothing prevents you from making the wire from terminal to terminal a little longer than necessary, and you can move the acoustics as needed without problems. Don't forget about the thickness of these connecting wires. It should not differ greatly from the required section.
Posts 1 to 20 of 48
1 Topic by Max21093i 2009-03-31 08:34:56
- Max21093i
- User
- Offline
- Registered: 2009-03-25
- Messages: 34
- Reputation: [ 0 | 0 ]
Topic: Amplifier Connection
Hi all. Tell me, please. How to connect wires from the amplifier to the radio through the dashboard.
2 Reply from kentboy 2009-03-31 09:13:30
- kentboy
- User
- Offline
- Registered: 2008-11-09
- Messages: 526
- Reputation: [ 0 | 0 ]
Re: Amplifier connection
I ran the power wire along the driver's side, and the speaker wires along the passenger side. If the panel is high, then you take out the mayfun and there is an entrance on the passenger side on the right under the glove compartment. From there you pull it under the panel and into the mayfun hole. All)
3 Reply from Koldun 2009-04-01 05:02:36
- Koldun
- User
- Offline
- Registered: 2008-11-10
- Messages: 527
- Reputation: [ 0 | 0 ]
Re: Amplifier connection
You unscrew the plastic door sills and the tunnel and pull the linear (to the amplifier from the mafon), power (to the amplifier from the battery) and acoustic wires (from the amplifier to the front) separately.
4 Reply from Zimer 2009-04-15 19:36:30
- Zimer
- User
- Offline
- Registered: 2008-11-09
- Messages: 94
- Reputation: [ 0 | 0 ]
Re: Amplifier connection
Today I tried to connect the amplifier, I connect the power, but nothing happens, the lights don’t light up, I tried another one, the same thing. Maybe I'm doing something wrong. I connect directly from the battery.
5 Reply from Zimer 2009-04-15 19:59:55 (2009-04-15 20:05:40 edited by Zimer)
- Zimer
- User
- Offline
- Registered: 2008-11-09
- Messages: 94
- Reputation: [ 0 | 0 ]
Re: Amplifier connection
Got it, I'll try it tomorrow
6 Reply from Zimer 2009-04-17 11:58:59
- Zimer
- User
- Offline
- Registered: 2008-11-09
- Messages: 94
- Reputation: [ 0 | 0 ]
Re: Amplifier connection
It seems like I did everything, everything works, only the light on the amplifier is constantly on, as I understand it should go out when the radio is turned off. but this doesn't happen. And what is the small wire on the RCA cable for?
7 Reply from kentboy 2009-04-17 12:02:47
- kentboy
- User
- Offline
- Registered: 2008-11-09
- Messages: 526
- Reputation: [ 0 | 0 ]
Re: Amplifier connection
It seems like I did everything, everything works, only the light on the amplifier is constantly on, as I understand it should go out when the radio is turned off. but this doesn't happen. And what is the small wire on the RCA cable for?
here it is to the blue-white wire on the Mayfun block. This is an automatic power off of the amplifier after turning off the mayfun. on the amp you set it to Remote .
8 Reply from Zimer 2009-04-18 07:32:08
- Zimer
- User
- Offline
- Registered: 2008-11-09
- Messages: 94
- Reputation: [ 0 | 0 ]
Re: Amplifier connection
Everything is connected, thanks everyone. I finally realized that my speakers are rare shit (JBL front and back). I'll save up for something more decent, but more on that in another topic
9 Reply from freeman86 2009-06-09 20:55:43
- freeman86
- User
- Offline
- Registered: 2008-11-21
- Messages: 252
- Reputation: [ 0 | 0 ]
Re: Amplifier connection
Is the amp connected directly to the battery?
10 Reply from meSSershmiTT 2009-06-10 11:16:35
- meSSershmiTT
- User
- Offline
- Registered: 2008-11-11
- Messages: 172
- Reputation: [ 0 | 0 ]
Re: Amplifier connection
Is the amp connected directly to the battery?
Directly. Just don't forget to include a fuse in the circuit.
11 Reply from freeman86 2009-06-15 06:37:38
- freeman86
- User
- Offline
- Registered: 2008-11-21
- Messages: 252
- Reputation: [ 0 | 0 ]
Re: Amplifier connection
Is it possible to connect power to the amplifier from the wires that power the radio? There is no radio itself. The source will be different.
12 Reply from 595 2009-06-15 06:42:56
- 595
- User
- Offline
- Registered: 2008-11-10
- Messages: 276
- Reputation: [ 0 | 0 ]
Re: Amplifier connection
cross section is not enough to power the amplifier
13 Reply from kentboy 2009-06-15 06:43:37
- kentboy
- User
- Offline
- Registered: 2008-11-09
- Messages: 526
- Reputation: [ 0 | 0 ]
Re: Amplifier connection
Is it possible to connect power to the amplifier from the wires that power the radio? There is no radio itself. The source will be different.
IMHO it's not worth it. the wires to the amplifier are thick and it’s not just like that)
14 Reply from freeman86 2009-06-15 06:46:59 (2009-06-15 06:48:39 edited by freeman86)
- freeman86
- User
- Offline
- Registered: 2008-11-21
- Messages: 252
- Reputation: [ 0 | 0 ]
Re: Amplifier connection
How then do you route the wires from the battery into the interior? Where is the hole? And what section are needed? My amplifier is 30 watt x2
15 Reply from kentboy 2009-06-15 06:53:39
- kentboy
- User
- Offline
- Registered: 2008-11-09
- Messages: 526
- Reputation: [ 0 | 0 ]
Re: Amplifier connection
Buy a ready-made set of wires, for example Mystery (usually there is a PC, and power + fuse) - a cross-section of 5 mm will be enough for your amplifier.
If you want, you can find a hole there, you can drill it - look better). You run the wires around the cabin under the plastic (where the doors are) - ideally the power wire is on one side, and the acoustic wires are on the other. You take the negative power cable from any bolt in the trunk. The fuse is on the positive side closer to the battery under the hood.
16 Reply from MolotoK 2009-06-15 06:58:52
- MolotoK
- User
- Offline
- Registered: 2008-11-08
- Messages: 1,187
- Reputation: [ 0 | 0 ]
Re: Amplifier connection
Even all the amplifiers are hooked. I should also try my old Kenwood.
As I understand it, batt is a plus, and GND is a minus.
And what to attach here to the p.con remote and what to attach to the In plugs. line out?
Which wire goes to the radio?
17 Reply from freeman86 2009-06-15 07:04:51 (2009-06-16 18:55:18 edited by freeman86)
- freeman86
- User
- Offline
- Registered: 2008-11-21
- Messages: 252
- Reputation: [ 0 | 0 ]
Re: Amplifier connection
Well, since such a binge has begun, then tell me too!
amplifier Sony XM-3020. It has a combined connector: power supply and speaker outputs. Tell me which outputs and inputs are for what on the diagram, because I don’t really understand it myself.