Electrical analysis of the issue
Hooray! Here it is!!! Everything will be now!!! I can foresee how the reader gets excited with impatience, and how the “stubborn engineer” generally fidgets in his chair. Although they usually sit straight on their butt when they are pressed against the wall.
Well, I won’t languish. The “stubborn engineer”, saying that the influence of the cable is negligible, and that such huge reactances in the audible range cannot influence anything, miss, as in the case of my friend with the mirror, due to the “efficiency of human thinking”, one small detail . He has a hole in his head. Oh. They talk about using a cable under conditions of an ideal source and an ideal load - there, in fact, a cable with its “ideal nanocharacteristics” cannot affect anything. But in real conditions, the interconnect cable is not plugged into such a path at all.
An ideal signal source is a thing whose internal resistance (also called output resistance) is zero. An ideal consumer (aka load) is a thing whose input resistance is equal to infinity.
In reality, everything is a little different. When applied to a cable, although taking into account standing waves, an ideal load paired with an ideal source is also the wrong solution. An ideal cable load should have a resistance equal to the source resistance, and both should be equal to the characteristic impedance of the cable. But alas, a cable with such parameters will be the diameter of an elephant, or even a giraffe. And transistors in this mode will produce terribly unpleasant noise characteristics. So we have to look for compromises.
DIN-5
Cross ties: how to make your own internet cable
This still happens today.
To make a universal wire (for both input and non-output), you need to make a jumper between mines 1-3 and 4-5.
I really liked the REAN Connectors NYS322G - inexpensive and quite high quality. It’s better not to take any really cheap Chinese rubbish. The connectors are poorly soldered, you need a special flux, the plastic melts, the legs become crooked... It’s better to pay 100 rubles, not 30, and take a good DIN.
For DIN-5-RCA, the requirements are approximately the same as for TRS-RCA: a cable with four conductors, for example, Canare L-4E5C, a splitter on the RCA side is desirable and it is advisable to route the threads into it along with the wire for reliability.
In general, nothing difficult after some practice. The main thing is to understand what to use for what. All pinouts can be found on the Internet.
How to extend a tulip cable
› Wires and cables
Articles Loading...
Such RCA adapters have already had to be purchased more than once, both from local radio stores that sell radio components, and from Chinese sellers on the AliExpress website. Moreover, the manufacturer, no matter what, is China, and the manufacturer’s brand is not applied to the adapter in any way, and is not indicated on its packaging. RCA-RCA adapters from the radio parts store were somewhat better quality, but more expensive. And their twins from China are a little worse, but noticeably cheaper:
The adapters came from China in these plastic bags:
The seller they were bought from is called the store: PRO Consumer Electrolics Store. The price of a pair of such adapters in one lot from this seller today is 57 rubles, together with free delivery to the Russian Federation by the Cainiao Super Economy service. If you order more of them or with other related products from the same seller, a fee of 53 rubles will be added. for paid delivery to the Russian Federation using the AliExpress Saver Shipping service.
With this delivery method, the parcel will arrive more reliably and faster, since its track number will become trackable. Although the economical Chinese here also manage to make the fully tracked track of the delivery you paid for a track with simplified tracking, which again is not very convenient for the recipient. But they probably save 10-20 rubles on this.
However, such parcels also arrive quite reliably, because the Russian Post usually has order and respect for parcels with tracked track numbers.
Mini-jack (TRS) - RCA
Often you need to connect a phone or some other player to the equipment, which only has a mini-jack (TRS) at the input.
To do this, you should use a cable that has 4 signal wires + a screen. That is, Canare L-4E6S fits well:
It is also advisable to buy something like this:
I liked the mini-jack/TRS themselves:
They are just right for a 6mm cable. They look pretty high quality. Here's the result:
The main thing here when desoldering TRS is to calculate everything so that the soldered wires are of the required length. If possible, accurately select the length of the wire for the soldering location. So that if you pull the cable, all three wires will be stretched equally, and not one more, the rest less and... into a break...
Once they asked us to make TRS-TRS for headphones. Not a question either. Canare has wires in different diameters. I chose the 5mm Canare L-4E5C. Since it is very soft, it was very well suited for this task.
In the photo there is also a gray Mogami 2820-08 - a good cable, but a very hard wooden one...
Speaker connectors [ edit | edit code ]
A polarized, two-pin, unshielded connector designed to connect a loudspeaker to an audio power amplifier (or other device; many of the early portable tape recorders used such connectors) is known as the DIN 41529 loudspeaker connector. It comes in panel-mounted receptacle and wire-mounted receptacle/plug versions. The plug has a flat center contact and an off-center round contact. The round contact must be connected to the positive pole (red), and the flat contact to the negative pole (black) [4].
In the Soviet Union and now in Russia, it is unofficially called the “dot-dash connector” [5].
This connector can now be found mainly on older equipment such as 16mm film projectors and the Becker radio found in many Mercedes-Benz vehicles. The same connector is used to connect some halogen lamps to a power source, as well as in Soviet Hi-Fi amplifiers and German vintage acoustics and amplifiers/receivers.
While all other versions of DIN plugs are quite reliable, this two-pin DIN plug is listed in second place - due to the lack of an external shield, it is much easier to accidentally pull out the plug. It’s easier to bend or move the contacts. Also, the plug does not sit so firmly in the socket - used copies are known for their unreliability. It is often enough to push them slightly, and the contact is broken.
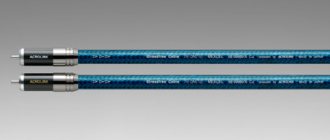
Back Rhodium Opus (3500 RUR/1 m)
DIY subwoofer for home
Design
Not thick and very flexible cable. The connectors with gold-plated contacts are small, tight, but comfortable. All markings are present. the conductors are made of tinned copper, the dielectric is rubberized silicone. The cable is unshielded.
Sound
Airy sound with a slight emphasis on the upper mids and treble. Solid, melodic, but a little less detailed and not as solid as the Black Rhodium Twist model. The character is similar, but everything is not so proportionally adjusted. There is a little less detail and readability of the after-sounds, due to this the presentation is more emotional, but at the same time more self-absorbed.
The frequency range is more or less correct, but sometimes it seems that there is a little more bass than we would like, and this makes the overall picture heavier. The scene is quite correct, but not very airy and dense. On complex recordings, the result remains more or less stable, except that sometimes the sharpness of the mid-upper range appears. In terms of use, there can be many options, but you should be careful both in the case of an overly sharp and in the case of an overly bassy system.
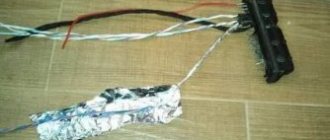
Tinning.
Tinning is a mandatory procedure if the electrical elements were not prepared for soldering at the production stage.
In order to tin the conductors and plug contacts, you can apply them one by one to a piece of rosin and heat them with a soldering iron. In this case, there should be a drop of solder on the working surface of the soldering iron.
When using liquid rosin-based flux, you need to moisten the conductors and plug contacts one by one with the flux, and then heat it with a soldering iron with a drop of solder on the tip.
The use of active flux is allowed only for tinning, but not for final soldering.
When using active fluxes, rinsing of the solder is required.
The tinned end of the cable should look something like this.
RCA-RCA
DIY installation of a computer (network) socket rj-45
Let's look at the most common interconnect cable - RCA-RCA:
For it, I choose Canare L-2T2S - it is inexpensive, there is a choice of cable colors, the shell is similar to silicone - very soft and pleasant to the touch, resistant to cracking and breaking even if damaged (well, actually, a studio cable). Inside, two signal wires are twisted into a spiral along with a cotton thread. This gives both strength and softness to the cable. High density braided copper screen. The screen copper is tinned. This screen structure also increases overall flexibility and reduces noise/interference during operation.
I mainly use Chinese Gold Snake as RCA. I really like it. Available, made of brass, plastic insulator fluoroplastic or something similar - even overheated greatly and nothing floated or bent. There is a recess in the middle for easy insertion and removal. Aluminium case. It fits neatly into 12mm heat shrink. The petals are brass and soft. The central pin is forked, like the tongue of a snake))) to ensure more reliable contact and at the same time enters the RCA terminal gently, without effort. The sound is not spoiled. It’s not easy to find so many positive properties. I threw away a lot of money until I found what I needed.
I also like AMPHENOL ACPR and ACPL. The same brass, manufacturer - Australia.
These are also good ones:
Search on Ali. The originals are too expensive and not much better. The ground only touches the RCA terminal at one point.
When soldering, the shield of such a cable is connected only on one side:
Audi 100 Avant Game › Logbook › DIY RCA cable...(Interconnect) Comparison of cables.
Solder Oyaide s-47
— 214r RCA male connector
Daxx t05
red 2pcs — 500rub RCA male connector
Daxx t05
White 2pcs — 500rub Microphone cable
Canare L-2T2S
GRN 5m — 705rub Microphone cable
Canare L-2T2S
BLK 5m — 705rub Microphone cable
Tasker c260
red 4m — 350rub Micro background cable
Tasker c260
yellow 4m - 350 RUR And I also forgot to buy 4 more RCA connectors, so I ordered Kicks 500 RUR 4 pcs. Total came out to 3824 RUR for two RCA Cables for a two-channel amplifier. (Expensive)
Now let's look and compare the cables, why there is such a difference in price... 1)Tasker c260
So, as you can see here, there is no copper screen at all... And what we see should be foil, but in my opinion, the only thing in common with foil is the color, since it feels like paper...
Let's open the wires further and see what awaits inside.
In the same order... 1) Tasker c260
How to make a high-quality wire yourself using a twisted pair cable
A minimal investment of money (a good one is always very expensive, remember that!) and proper adherence to the instructions is all that is needed. As a result, we get the right speaker cable that will give excellent sound:
- We take a regular twisted pair cable.
- We remove the main insulation and in front of us are 8 thin wires.
We remove the insulation from each wire, but do it extremely carefully. Now you need to get GOI paste (yes, the same one that is used for final sharpening of knives). We arm ourselves with a soft rag, apply a little paste to it and clean the copper wire. You need to ensure that the wire becomes mirror clean and very smooth.
- After each of the wires is cleaned to a shine, you need to take a regular medical bandage, always sterile.
- We connect all the wires back and wrap them with a bandage, and on top with electrical tape.
What does it give
It is worth remembering that you should wrap copper wires with a bandage because this improves the insulation. The fact is that cotton insulation has everything necessary for the rapid movement of current. Plain paper has the same properties, which can also be used instead of a bandage. As for the surface electrical tape, which runs on top of the bandage, it only serves as protection, preventing the fabric from fraying over time. Such wires always provide clear and high-quality sound. The bass is fast, and the highs and mids are simply super: not artificial and synthetic, as before, but smooth and clear.
What is a ready-made twisted pair speaker cable?
If you don’t have time to make the cable yourself, then let’s look at the twisted-pair speaker cable itself, which is sold ready-made on the market. Note that there are many varieties of it. Let's look at the most common ones.
Cable types:
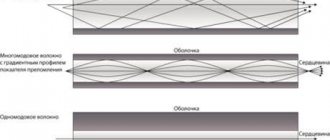
UTP - this type of twisted pair cable does not have a screen. This cable is also called unshielded twisted pair.
FTP or F/UTP is a twisted pair cable that has a common foil shield. This type of cable is also called a shielded pair, although in general this is not entirely true. There is a screen in such cables, but in the simple sense of the word.
- SF/UTP is again an unshielded twisted pair cable with a double braid. Often such a cable is designated as F2TP or F2/UTP.
- STP is a shielded twisted pair cable, where each wire has its own independent shield. In addition, such cables also have a mesh.
- S/FTP or SFTP is already foiled and shielded twisted pair. Each pair in this type is in a special braid and has an external copper screen.
RCA pinout
| Composite analog video—— | Composite | Yellow |
| Analog audio signal | Left/Mono | White |
| Right | Red | |
| Center | Green | |
| Left (surround) | Blue | |
| Right (surround) | Grey | |
| Left rear (surround) | Brown | |
| Right rear (surround) | Reddish brown ( tan ) | |
| Subwoofer | Purple | |
| Digital audio | S/PDIF | Orange |
| Component analog video (YPbPr) | Y | Green |
| P.B. | Blue | |
| PR | Red | |
| Component analog video/VGA (RGB/HV) | R | Red |
| G | Green | |
| B | Blue | |
| H (Horizontal Sync) / S (Composite Video Sync) | Yellow | |
| V (Vertical sync signal:) | White |
Different signals use a different connector color defined by a standard, but multichannel audio (7.1 onwards) still does not have standard colors.
If you use audio output to the TV speakers, it is converted to the left channel (white connector).
How to make a high-quality wire yourself using a twisted pair cable
Homemade speaker cable
A minimal investment of money (a good speaker cable is always very expensive, remember this!) and proper adherence to the instructions is all that is needed. As a result, we get the right speaker cable that will give excellent sound:
- We take a regular twisted pair cable.
- We remove the main insulation and in front of us are 8 thin wires.
We remove the insulation from each wire, but do it extremely carefully. Now you need to get GOI paste (yes, the same one that is used for final sharpening of knives). We arm ourselves with a soft rag, apply a little paste to it and clean the copper wire. You need to ensure that the wire becomes mirror clean and very smooth.
- After each of the wires is cleaned to a shine, you need to take a regular medical bandage, always sterile.
- We connect all the wires back and wrap them with a bandage, and on top with electrical tape.
What does it give
What is the best way to remove cable protection?
It is worth remembering that you should wrap copper wires with a bandage because this improves the insulation. The fact is that cotton insulation has everything necessary for the rapid movement of current. Plain paper has the same properties, which can also be used instead of a bandage. As for the surface electrical tape, which runs on top of the bandage, it only serves as protection, preventing the fabric from fraying over time. Such wires always provide clear and high-quality sound. The bass is fast, and the highs and mids are simply super: not artificial and synthetic, as before, but smooth and clear.
What is a ready-made twisted pair speaker cable?
Twisted pair acoustic cable
If you don’t have time to make the cable yourself, then let’s look at the twisted-pair speaker cable itself, which is sold ready-made on the market. Note that there are many varieties of it. Let's look at the most common ones.
Cable types:
UTP - this type of twisted pair cable does not have a screen. This cable is also called unshielded twisted pair.
Laying the speaker cable
FTP or F/UTP is a twisted pair cable that has a common foil shield. This type of cable is also called a shielded pair, although in general this is not entirely true. There is a screen in such cables, but in the simple sense of the word.
Twisted pair cable UTP category 6 German
- SF/UTP is again an unshielded twisted pair cable with a double braid. Often such a cable is designated as F2TP or F2/UTP.
- STP is a shielded twisted pair cable, where each wire has its own independent shield. In addition, such cables also have a mesh.
- S/FTP or SFTP is already foiled and shielded twisted pair. Each pair in such a shielded cable is in a special braid and has an external copper shield.
Shielded twisted pair
So you want good sound for very, very little money? If yes, then this article is for you!
If we prepare it correctly, we will get excellent sound + minimal investment of our money.
So let's start, take a twisted pair, remove the most important insulation, then we get eight thin wires. The main thing is to make sure that they are copper and not some kind of iron. Yes, there are also such
Now carefully remove the insulation from these “small wires”. As soon as this insulation is removed, take the green “GOI paste” and a soft rag and clean the copper wire. The most important condition is that the wiring is mirror-like and very smooth.
It is better to carry out this work wearing special fabric gloves. Otherwise there will be copper oxide. And all your work will then go down the drain. You need to ensure sterility, because you are making the wire with your own hands.
Once the copper wires are cleaned and polished to a mirror-crystal shine. We take a simple medical bandage (sterile) and then connect all your wires together and wrap it with a bandage, and then wrap it with electrical tape.
However, I will explain why it is necessary to clean and polish these twisted pair copper wires until they shine and wrap the wire with a simple bandage.
It’s simple: the HF and MF come from above along this copper wire, and the cleaner, more mirror-like and smoother these wirings are, the higher quality and without artificial embellishments we will get the mid and high frequencies.
It is necessary to wrap copper wires in order to improve the insulation, since cotton insulation has everything necessary to move current very quickly
. (However, you can also take paper).
By the way, electrical tape is simple external insulation so that the bandage does not fray at all over time
.
Good luck with all possible combinations!
I hope this explanation helped. Please leave comments below so I can get back to you. Don't be afraid of me and join me
Let's consider a technique for self-manufacturing an acoustic cable intended for use as part of a high-class sound-reproducing path. A cable made using the following method may well save you from the need to purchase high-quality and therefore expensive industrial cables. This cable was developed in accordance with numerous requests from enthusiasts who would like to have an acoustic cable as part of their tract, allowing them to fully appreciate the advantages of using an interconnect cable, the manufacture of which is described on the pages of this site. If you follow the recommendations of this technique, the cable you make will be comparable to its industrially manufactured counterparts, which cost $30-40 per meter and more.
DIY High Quality RCA Interconnect Cables on a Low Budget
This is a fairly simple DIY interconnect cable design, and one stereo pair of connectors can be assembled in about one hour. You won't need any fancy materials or special tools to assemble it. All you need is a few meters of good shielded instrument cable and high quality RCA connectors, a soldering iron and good flux solder, and a handy knife to prepare the wires for the soldering process.
Do it yourself and save!
The method presented here for making a connector at home was due to the fact that I no longer liked my standard jumper cables. I always had a bad feeling that the stock interconnects picked up a little noise and the sound seemed a little pinched to me. So, I decided it was time to try some new jumper wires.
After gathering some information and reading a number of comments and tips, I decided that I would use instrument wires. This type of interconnect, including the microphone cable, must be very well shielded to block noise and radio frequencies (RF). It is also designed to provide wide bandwidth. This is necessary because instrument jumper cables are used to connect guitars, microphones, and studio audio equipment.
Here I will share my experience of how I independently assembled interconnect cables with my own hands from available materials. In my stash for this purpose I found several RCA Neutrik Rean NYS 373 connectors with a reliable contact group. Their design is a tulip-type AV connector, assembled in a metal housing with gold plating, which guarantees better contact.
Actually, there are many types of connectors for such purposes, which may differ slightly in design from these, but I prefer the ones shown in the picture below. In addition, wires are easily soldered to them, and they retain their quality for a long time during operation. And their cost is quite reasonable, somewhere in the range from 70 to 130 rubles.
At the very beginning of the assembly, I had a problem; the fact is that the microphone cable I had with an outer diameter of 7 mm was somewhat too large and did not fit into the connector. I got out of the situation by removing the rubber seal at the end of the connector, although I could have tried simply widening this hole.
Structurally, this cable is made with two wires and a shielding braid, so I made one conductor as a signal conductor, and the other as a signal shield. The shielding braid itself was soldered only on one side of the case.
Next, we begin preparing the cable for desoldering, that is, from one end we remove the insulation to the shielding braid to the required length, and then from the wires, also to the required length. Although, you can remove the insulation a little more, so as not to make a mistake, and after tinning, the core can be shortened exactly to size.
When soldering wire, I usually use heat-shrink tubing to prevent the insulation on the core itself from melting due to the soldering temperature.
I put a piece of heat shrink on the central wire, and with the help of a lighter I shrink it into shape, and then I puddle the ends of the conductors and cut them to the required length.
This is what the result is
I place the shielding braid and the wire going to ground (it is blue in the picture) onto the connector body on both sides and solder it. The solder deposits need to be worked out using a needle file.
The product is shown here in an enlarged view.
To make it more professional, we also put heat shrink on this unit and seat it with a lighter
Due to the fact that I purchased a microphone cable that was slightly thicker than the RCA connectors allowed, it was problematic to fit it into the case and fix it. To get out of this situation, I threw out the plastic wire clamp from the case, and instead added another piece of heat-shrinkable tubing. (It is gray in the photo).
At this stage, we begin assembling the connectors at the other ends of the cable.
Then you need to do everything using the same method as above, focusing on the pictures presented.
The overall result was a reliable interconnect cable made with our own hands.
The entire process of making this product did not take very much time, one might say - very little, less than I wrote this publication.
How to make an interconnect connector
Interconnect cable
Selecting a cable to connect the subwoofer to the receiver
Cable for subwoofer to analogue receiver
A cable for a subwoofer and a receiver - also known as an interconnect cable - is a more complex product than speaker cables. This requires a different design of the wire itself, which uses a large number of innovations both in the conductor material used and in the field of dielectric coating, in contrast to conventional speaker wires.
The cable connecting the subwoofer to the receiver must have connectors at the ends and be presentable.
Types of cables
Today the market is full of “interconnect” wires of different colors, and the price will also satisfy everyone:
- Here everything depends not so much on the quality, but on the manufacturer’s brand (fame and reputation)
- We don’t need Super elite wires in gold-plated packages with velvet lining, so we’ll focus on affordable models
Interblock connectors are divided into two large categories:
- The first category, focused on the transmission of analog signals (“interconnectors” or “analog” wires)
- The second category is intended for transmitting exclusively digital data; for simplicity, they are called “digital” cables
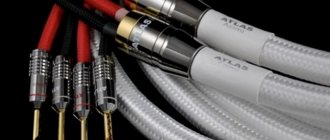
"Analog" wires
Example of wires for analog signals
This type of interconnects is designed to transmit low-current signals coming from a source to devices for processing it, an amplifier, a switch, and others:
- To ensure such a connection, a shielded audio wire is usually used, which is arranged according to the coaxial arrangement of its conductors - the central conductor will be protected from extraneous interference by a screen, which is usually made of a large number of thin metal veins
- This design allows you to avoid interference from electrical appliances located nearby and allows you to conduct a low-current signal with minimal losses
- When connecting such wires, convenient RCA connectors are used (popularly called “tulips” or “bells”)
- They are the most common in household appliances today.
- As a rule, the term “interconnect cable” means a connector that consists of two wires and 4 RCA connectors (in simpler terms, a “2-tulip to 2-tulip” wire), which is capable of transmitting signals from two channels of one component of your system to another
"Digital" wires
Digital type is divided into two types:
- Wires designed to transmit a digital signal in the form of electric current (colloquially they are called “digital coaxials”)
- The second type transmits a digital signal in the form of light (these are “optical” cables, also known as fiber optics)
Let's start in order:
- This wire is no different in appearance from the “analog” interconnect
- The difference is that it does not have a second connector
- “Digital coaxial” consists of only one wire at the ends with connectors (the connectors are usually RCA)
- Simply put, the cable turns out to be “1 tulip - 1 tulip”
- It is manufactured using a coaxial circuit (hence the name), but unlike the “analog” one, the “digital coaxial” must have a characteristic impedance of 75 Ohm
- It is desirable that its connectors have a characteristic impedance of 75 Ohm, however, this is not a necessary condition; it is usually fulfilled only in the manufacture of expensive “household” and all professional wires
Let's move on to fiber optic cables:
- The digital signal is transmitted through flexible optical fiber in the form of light.
- The fiber is made from a special polymer (used in inexpensive wires of the average price and quality category)
- Made from specially designed flexible glass (such cables are more expensive)
Optical wires have several advantages over electrical "coaxials":
- "Optics" is capable of transmitting a large amount of digital information
- Plus, optical fiber allows for ground isolation between the two components (which is important for connecting the computer system unit to the receiver)
- However, high-quality optical wire is very expensive, and its cheap implementation and data transmission scheme in budget equipment do not allow you to enjoy the benefits of “optics”
- Therefore, you should not overpay for a “digital” wire; it is better to pay attention to “digital coaxial”
- If we compare middle-class digital and coaxial components, there will be no fundamental difference in sound
- Most likely you will not hear the difference between “coaxial” and “optics”
- Of course, connect anything, it’s worth remembering that “coaxial” is always cheaper than similar “optics”
Maximum cable length
Some wires have a maximum length:
- Optical cable length - maximum 7 meters
- “Electrical coaxial” has no restrictions, since everything depends on the quality of the wire itself
- If you use a good quality wire, digital data can be transmitted without problems over 10-15 meters or even more
Choosing a speaker cable is important
Acoustic shielded cable
As a rule, most motorists do not think about which cable to choose and how important it is. In fact, a lot depends on it
Meanwhile, choosing an acoustic cable is not a tricky matter, and if a ready-made one comes with the speakers, then there’s nothing to think about. But it happens that you have to choose the cable yourself, and in this case only knowledge will help the owner not to make a mistake.