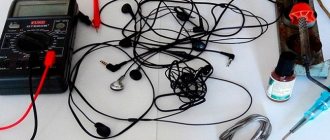
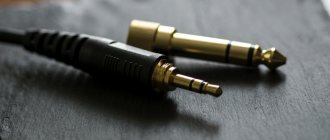
Everyone who uses headphones has sooner or later encountered the fact that they fail. As a rule, this manifests itself in the form of one non-working speaker. This kind of breakdown is typical for headphones, and it is due to the fact that their wires are constantly bent. Below in the photo, red circles show the areas most at risk of cliffs.
As practice shows, if such a breakdown occurs, in most cases performance can be restored. We'll tell you in detail how to solder your headphones so that they continue to delight you with clear sound.
5, 6 or more wires
Depending on the implementation option, there may be 5 or more wires inside the cable from the headset.
Up to 10! Be that as it may, they always try to make the signal wire from the microphone in its own “ground” braid. In short, if you gutted your cable and it looks something like this:
or even this: no one will immediately tell you how to properly solder the plug to such headphones. There can only be one piece of advice here: take a tester and test all the wires until you determine where the right ear is and where the left is. The remaining wires are to the microphone.
Determine by color which wires may be common and connect them all together. Solder all signal signals according to the connector pinout (see pictures above).
Then test the headphones and microphone. If something is wrong, look for the reason. No one will really tell you anything here; proceed using the scientific dildo method.
Good luck!
Sources
- https://masterpaiki.ru/kak-pripayat-shteker-k-naushnikam-vseh-tipov.html
- https://pro-instrymenti.ru/elektronika/kak-pravilno-payat-naushniki/
- https://stroy-podskazka.ru/naushniki/kak-payat/
- https://svaring.com/soldering/praktika/pajka-naushnikov
- https://headphonesbest.ru/faq/remont-provoda-24213
- https://electro-shema.ru/remont/kak-pripayat-naushniki-k-shtekeru.html
- https://myearphones.ru/instruktsii/kak-spayat-naushniki
Causes and diagnosis of malfunctions
With regular deformation of the connecting cables, the wires inside them fray and may break. The areas of greatest risk are the connection between the cable and the speaker or plug.
However, with a mechanical impact such as a strong blow (the fall of a heavy angular object - a box, for example) or compression (squeezing between the door and the jamb), this can happen to any place.
Diagnostics without special tools begins with probing the cable. Bend the wire at a right angle with your thumb. Move down and listen to the sound in your headphones. If at some point a sound appears or becomes louder, then this is the fracture site. Try twisting the plug and speakers using the same logic.
Read also: DIY oil burner
If you have a tester, then do the same, looking at the resistance values. If the wire is not damaged anywhere, then the readings will not change regardless of its position.
Pinout diagrams by manufacturer
Apple audio pinout
- 1 - left
- 2 - right
- 3 - ground
- 4 - microphone
iPod Nano (4th, 5th Gen), iPhone (1st, 2nd, 3rd, 4th Gen), iPod Shuffle (3rd Gen), Cell Phone Connection iPhone headphone (handsfree)
1 - left 2 - right 3 - ground 4 - microphone
Lenovo Thinkpad Edge & X Series Notebook audio
Samsung audio pinouts
1 - left 2 - right 3 - ground 4 - microphone
Samsung i300, i330, i500, i700 handsfree/headset connector
Samsung OEM EHS64 Headset for Samsung Galaxy SIII GT-i9305 and some others
Samsung Series 9 Notebook headset (NP900X3D-A02DE)
Samsung SPH-a420, a580, a640, m220, m240, m300, m320, m330, Rant m540, Exclaim m550 SCH-R451C headset Samsung headset P/N: AEP010SLEB/STD
Samsung SPH-A880, SCH-U620, SCH-U540, SPH-M500, SCH-A950, SCH-A870, SCH-A930, SPH-A920, SPH-A940, SCH-A970, SPH-A900 BLADE, A900M, SCH- A990, SCH-U740 AEP204VBEB/STD Headset/Music
Headphone repair: useful tips
An alternative method that allows combining varnish removal and tinning involves the use of fine-grained types of sanding paper. Small rosin is placed on the working side of the paper. On this piece we place the ends of the wires to be tinning. Apply solder to the tip of the heated soldering iron tool and press down the cable. After melting the rosin and heating the wire, using a little force, pull it out from under the soldering iron. With such manipulations, abrasive grains remove heated and slightly softened insulation residues. And at the same moment tinning is carried out. By repeating this procedure, the ends of the wire are evenly coated and are ready for soldering.
We carefully disassemble part of the body of the cut off headphones using a knife along the contour of the assembly lines. At the end of the heated soldering tip we place the contact section of the connection of the old wire
When the solder softens, it is necessary to remove the wires.
We pass the cables with the stripped ends into the holes of the headphone housings. Here it is necessary to provide for tying a safety knot. Thanks to it, the contacts remain intact with a slight jerk of the wires; it bears the entire main load.
As a result, all that remains is to solder the end, ready for soldering, to its contact place in the housing under the earphone. When performing these steps, it is necessary to take into account the correct connection of the contact according to its color markings.
Soldering headphone wires is quite simple if you use wooden clothespins as auxiliary tools. They will play a kind of role as mini-clamps, which will allow for a strong fixation of the workpiece, and will also save your fingers from unexpected injuries such as burns.
Also, similar actions should be followed in case of repairing the wire at the junction of the plug, step by step:
- cable cutting;
- stripping of insulation;
- tinning of mounting ends;
- disassembling the plug housing (if necessary);
- soldering the ends in place;
- carrying out reassembly.
By learning how to solder headphones, you can restore the devices’ functionality without any problems and save a lot of money on it. Don't be afraid, experiment and listen to your favorite music using refurbished headphones with your own hands.
Solder the wire to the speaker
There are times when wires break inside the speaker. Then you need to disassemble the ear housing and solder the wires directly inside. To avoid damaging parts, work carefully and do not shake or pull. Otherwise, you risk tearing off the board. To solder parts inside the speaker, follow the instructions:
- Inspect the inside of the earphone and look for damage.
- If there are broken cables, they will need to be soldered together.
- If the cable breaks directly at the entrance to the headphone and you cannot get it out, make a cut in this place. At a distance of 1.5-2 cm from the adapter, cut the cord.
- Remove the thick insulating layer approximately 8 cm from the end of the cut cable. Repeat this procedure with the inner layer of insulation, but do not touch the wires themselves.
- Clean and tin cable ends.
- Insert the cord into the back of the case and make knots from the wire approximately at the beginning of the thick insulating layer.
- Now let's move on to the soldering process. You will have to unsolder the old pieces of wires one by one and solder new ones in their place one by one, so as not to mix them up.
- Check your headphones.
But know that if the wires are damaged in this place, the problem may not be with the speakers. Therefore, if you cannot fix the headphones, first make sure that you did everything correctly, and then look for damage in other places (for example, inside the case with the microphone).
Additionally about the colors of wires in headphones
How to properly solder wires to a headphone plug is out of the question if you are not familiar with the colors of wires in headphones and their meaning (for example, do you know what the green wire is responsible for?)
A different number of wires may come to the headphone plug:
- 2 wires (for mono headphones);
- 3 wires (for mono or stereo headphones depending on the connection diagram);
- 4 wires (for stereo headphones);
- 5 or 6 wires (for stereo headset with microphone).
2 wires
I don’t think anyone needs to explain how to repair a headphone plug if they only have two wires. It is basically impossible to confuse anything here.
3 wires
There are always two wires coming from each ear - plus and minus, but sometimes the manufacturer combines the minuses of both speakers together and it turns out that only three wires come to the plug. To make it clearer, here is a soldering diagram for a headphone plug:
This picture explains even more clearly where to solder the wires to the headphone plug:
Most often, the wires are coated with varnish of different colors:
- red
- right channel; - green, blue or white
wire - left channel; - colorless varnish
- common wire (ground).
Of course, there are no strict standards and colors may vary. Here's what it looks like in real life:
Let's see how to properly solder a wire to the headphones (3 wires):
4 wires
If your plug has 4 wires, then there may be options.
Option one:
you have ordinary headphones without a microphone and without buttons (the plug has only 3 contacts). Then these four wires are simply two pairs of wires from each of the speakers. Their disadvantages are the same color (copper), and their advantages are different (usually blue and red or green and red):
In this case, common wires (those of the same color) are connected together and soldered to the common contact of the plug. You should immediately understand how to solder 4 wires from the headphones to the plug from the figure:
Here's how to solder headphones to such a jack:
Option two:
you have a full-fledged headset (i.e. headphones with a microphone) and the plug has 4 contacts. Then, most likely, these four wires are one wire from each speaker, one signal wire from the microphone, and one common wire for all.
Schematically, this can be indicated as follows:
And here's how to make a plug on the headphones (correct soldering of headphones when there are 4 wires):
Most often, a microphone wire only looks like one wire, but in reality it is two wires: a thin wire in white PVC insulation completely wrapped in enameled copper wire (in colorless enamel). Something like this: And in this case it would be more correct to say that the headphones have not 4 wires, but all 5.
5, 6 or more wires
Depending on the implementation option, there may be 5 or more wires inside the cable from the headset. Up to 10! Be that as it may, they always try to make the signal wire from the microphone in its own “ground” braid.
In short, if you gutted your cable and it looks something like this:
or even this: no one will immediately tell you how to properly solder the plug to such headphones. There can only be one piece of advice here: take a tester and test all the wires until you determine where the right ear is and where the left is. The remaining wires are to the microphone.
Determine by color which wires may be common and connect them all together. Solder all signal signals according to the connector pinout (see pictures above).
Then test the headphones and microphone. If something is wrong, look for the reason. No one will really tell you anything here; proceed using the scientific dildo method.
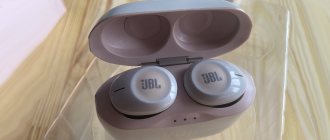
Various headphone breakdowns are a very common problem, especially if this device is used actively and not for listening to music at home. Most often, in-ear headphones break - earbuds and vacuum plugs, since they are usually used outside the home - for example, during active sports.
Typically, the likelihood of failure is influenced by the following factors:
- factory defects are the most common problem with cheap headphones;
- improper use - connecting the headphones to the wrong sound source can cause the speaker to break, and if you carry the sound source in your jeans or trousers pocket, the plug will be subject to constant pressure and sooner or later it will break.
If the headphones stop working, they may need to be taken apart. Of course, this is not always possible - for example, the most difficult thing to disassemble are earbuds and plugs that have a monolithic body. In addition, after disassembling these headphones, you may need new replacement parts.
In addition to the headphone body itself, you can disassemble the plug that connects to the sound source. But before you begin any operation, you should make sure that it is even necessary by diagnosing the breakdown.
Finding out the reasons that caused the headphones to break down
The most likely reason that can lead to breakdown is the consequences of chafing of the wire inside the connecting cable, caused by frequent kinks. Often this occurs in the same places: near the connection between the wire and the headphone, or at the junction of the wire and the plug. In some cases, the conductors inside the cable are damaged, but this can happen later due to one-time mechanical impacts, that is, the cable was pinched by something, for example, doors or a box.
It is quite easy to find out if a particular earphone is not working. If you turn on music, the speaker of the damaged one will be silent.
If the wire strands were not completely frayed, then you can use a multimeter to determine the location of the break. To do this, you need to measure the resistance value of the common wire and the wire that goes to the damaged speaker. To determine the location of the break, you need to measure the tester readings, changing the spatial position of the wire. If the contacts are not broken, then, no matter how you twist the wire, the resistance readings that are reflected by the multimeter will have a constant value. A different effect can be observed if the cable is partially frayed: the numbers on the device will change at the slightest deviation of the wire from the position in which it was originally.
In theory, you can even use so-called traditional methods. That is, to detect a headphone with faulty contacts, you need to pay attention to the presence of a characteristic crackling sound in the speaker, which is heard when the wire swings.
You should look for a fault in the earphone by running your hand and bending the wire from top to bottom, that is, from the point where the wire enters the earphone to the plug itself. The most typical places of failure are areas where wires and other elements are connected. If you know the location of the faulty channel and understand where the wires and speakers connect, you will most likely be able to pinpoint the faulty location.
Continuity of wires
If the cable breaks, as well as in other cases, it is necessary to determine which wires are connected to the headphones, microphone and control buttons.
There are certain wire color standards that manufacturers adhere to, although they may be violated:
- colorless (copper) – common wire;
- red – right channel;
- green – left channel;
- blue - microphone;
- other colors – control panel (buttons, or “rocker”).
Depending on the model, the wires to the microphone and control panel can be combined or separate, and in different elements of the headphones there can be one or more common wires. A shielded wire can go to the microphone.
Recommendations: How to solder a headphone plug
, How to disassemble headphones: instructions with step-by-step photos of repairing all elements of the headset
, Headphone pinout
Connecting a headset to mikro- and miniUSB plugs
In some phones, headphones are connected not to a 3.5 plug, but to a mikro- or miniUSB connector. There is also a standard when connecting to the terminals of such plugs. They are counted from left to right when viewed from the side where the wires are connected:
Read also: How to degrease a door before painting
2. microphone, as well as control buttons;
DIY headphone repair
Most often, small-sized models used in mobile communication devices fail. These are miniature capsules connected to a smartphone with a thin wire. The sound device includes the following elements:
- Sound emitters
- Volume control
- Connecting wires
- Plug
You can repair headphones for your phone at home. The most common defect is broken connecting wires. They are very thin and have poor insulation. In order to determine the break point, you need to connect the headphones to an audio device, turn on a piece of music and sequentially “wash” the entire connecting wire with your hands. At the break point, the sound will appear and disappear. Most often, a wire break occurs at the junction of the wire with structural elements. This is the wire entry into the plug body, the volume control input and output, the connection point to the left and right capsules, and the wire splitter into two channels. In addition to breaks at the connection points, the wire can be damaged by pets.
To repair headphones, it is not necessary to change the entire wire. It is necessary to localize the location of the contact failure, disassemble the specific unit and restore the integrity of the connection using soldering. How to fix headphones if the contact at the plug is broken.
The connector (plug) can be linear or “L”-shaped. In any case, it will not be possible to save the plastic cap, since it is not dismountable. It should be carefully cut with a sharp blade. Usually the contact failure is located at the plug itself. Before removing the wire, you need to remember the colors of the conductors soldered to the plug contacts. The wire is cut, the insulation is removed, and the individual conductors are stripped for soldering. The conductors in the veins are very thin and consist of a bundle of wires together with threads made of synthetic material. Each copper wire is varnished. It is difficult to remove the insulating coating with a sharp cutting tool without skill, so it is easier to burn the varnish in the flame of a lighter.
Then the cleaned ends of the wire need to be tinned. For this, rosin, an alcohol solution of rosin or a paste-like flux are used. Using a heated soldering iron, apply a small amount of solder to the flux-treated wire. Remnants of factory soldering are removed from the plug contacts. Before soldering, a small piece of heat-shrink tubing is placed on the wire. It will replace the cut plug housing. The prepared and tinned wires are soldered to the corresponding contacts of the connector. A heat-shrinkable tube is placed on the plug and heated with a household hairdryer or lighter. This way you can repair the headphones at home.
What to do if the headphones break at the sound capsule. To eliminate the defect, you need to open the case. Miniature sound emitters consist of two parts, which are connected with glue, since the manufacturer does not intend to disassemble the devices. A scalpel or office knife is used to separate the body. If the wire breaks off near the capsule itself, then it is enough to clean the broken end, tin it and solder it in place. Sometimes you have to cut the plastic case to find the break point. Breaks at the volume control and splitter are eliminated in the same way. You can repair headphones when the wire breaks in the middle. The torn section is cut out, and the conductors are stripped, twisted and connected by soldering. The main thing is not to confuse the colors, but to put insulating tubes on the twists. A heat-shrinkable tube is put on the place where the wire is spliced, which then heats up and tightly grips the joint.
If the wire is damaged along its entire length, then it can be replaced, but it is easier to purchase new devices.
Blog about electronics
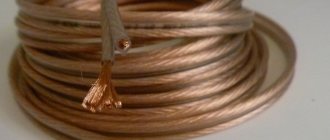
Continuing the topic of headphone repair, I would like to tell you how headphone wires are tinned. You can simply take and tin these wires, as it would seem there is nothing complicated about it. We take rosin, solder, a soldering iron, I use a regular Soviet soldering iron. We take a seemingly white wire, and in theory it should not be covered with anything. But we see that it doesn’t get wet at all. There is nothing strange in this, because our headset often bends, and in order for the wire to last longer and not break, it is made of very, very thin veins. And naturally, each vein is isolated from other veins with varnish. Just like the winding wire with which the transformer is wound. Naturally, when we try to solder something, the solder reaches the varnish, which prevents the solder from touching the copper. Naturally, solder cannot wet the varnish, but it wets copper well. To tinning the wire, we need to strip it somehow to get to the copper. In other words, clean the wire from varnish. There are several ways to do this, personally I use the following method. I buy acetylsalicylic acid at the pharmacy, it is also known as aspirin, but aspirin is a trade brand, and most likely it also consists of acetylsalicylic acid. These tablets are always called aspirin even though it is acetylsalicylic acid. The tablets cost pennies, and in order to strip the wire, one tablet will last for a very long time. We put the pill in. We take a soldering iron, make sure that there is solder on it, and if necessary, add a little so that there is a large fat drop of solder. Then we take the wire and put it on the tablet like on flux. We solder in the same way as with a regular piece of rosin. You also tin the wire with rosin, right? Here, rosin does not take it, but when acetylsalicylic acid is heated, it actively corrodes the varnish insulation, but at the same time smoke is released, which stinks very much and is acrid. Therefore, work in a well-ventilated area and keep your nose away, do not inhale the smoke, because indeed, it is a very acrid and nasty smoke. We continue to warm it up, and you see, this varnish coating has peeled off. Here it is, gathered into a droplet. Then I soak the wire in rosin so that all the remaining tablets remain inside the rosin. And there you have it, a beautiful tinned wire. We do the same with all the wires. Everything turns out quickly, beautifully, although there are a few smells. There is another way to remove varnish insulation that I know about, but I have never used it. To do this you will need sandpaper. I have a paper, four hundred. The paper should not be large. I tore off a small piece. Apply a little rosin to sandpaper. Take a soldering iron with solder. Then we take our wiring and put it on sandpaper where a drop of rosin was applied. We press the wire with a soldering iron, heat it up for a few seconds and pull out the wire. When heated, the varnish insulation softens and the wire tins faster. Press and pull out the wire again. That is, we mechanically scrape off the insulation from the wire. It all happened quite quickly, not as quickly as with aspirin, but it was also very neat and there was no strong terrible stench. There is such a method, if you are interested, take it into use too. I even find it more interesting than aspirin. Just like that, there is nothing complicated about it, no expensive equipment is needed, everything is done very quickly and simply. That's it, bye everyone.
12 comments
Hello, I have the same problem, only there are five wires: blue green red copper and copper with a blue stripe, four pins, a plug like at the beginning of your video about tinning, I have no idea where to go. thanks in advance
Please take a photo so that both the plug and the wires are visible. I'll take a look and draw what goes where specifically in your case.
Hello. Tell me how to insulate colored wires from each other after soldering? Thank you in advance.
Hello. They are insulated with colored varnish, which is why they are colored. And the soldering area itself can be insulated with electrical tape or heat shrink. I like heat shrink better.
How to disassemble Earpods anyway?
Unlike the previous Earpods model (on the fourth iPhone), the second one is much better in quality. For example, the headset in the area of the microphone and volume control is protected both at the top and bottom from kinks by thickening. Opening this part of the wire is not difficult: just use a pick or something thin that can be pryed, for example, with a scalpel.
To partially open the funnel, remove the layer of glue using a scalpel. What we see after opening:
- paper membrane;
- postings;
- voice coil.
The case also contains one very important component - a magnet, which ensures sound quality.
Let's get started!
If the soldering iron gets hot, you need to place a small drop of tin on the end of its tip, i.e. melt some tin solder with the tip so that some of the solder transfers to the tip.
In order for this to happen, the end of the soldering iron tip must be cleaned of carbon deposits and moistened in rosin, i.e. Poke a hot soldering iron into the rosin. Rosin improves wetting and tin adheres better to copper.
Therefore, we place the twist of the wires on a piece of rosin and lightly press it with the tip of the soldering iron so that it literally dips into the rosin for just a moment.
Next, you need to move the tip of the soldering iron over the place to be soldered so that a drop of tin transfers to the copper and envelops the wires. We try to make sure that the tin evenly covers the entire part of the wire exposed from varnish.
Thermal tube instead of tape
Using tape is not entirely kosher. Therefore, I propose to improve the technology a little, again without a soldering iron.
You will have to buy a heat-shrinkable tube, also known as thermal casing, at an electronics store or hardware store. This is such a clever tube that can shrink in diameter by at least half when heated. This miracle costs about $0.1 - $0.5 per meter.
We will need two thermal tubes with different diameters: 1-2 mm for the first and 4-5 mm for the second.
We put pieces of thin thermal tube on our twists. We cut the pieces with one and a half margin.
Now you need to heat the thermo tube. Usually I did this with a soldering iron, but we agreed that I didn’t have one, and the story was about how to fix headphones without a soldering iron, so I had to get out.
The method turned out to be quite effective and the thermo-tubes shrank. You can also use any other heater or put them in boiling water like Easter eggs. In principle, people can do it with a regular hairdryer.
While the thermotube is still hot, you can further flatten it with your fingers, then it will slightly stick together inside.
This thermo-tube must subsequently be put on the joint and also compressed with the heat of the lamp. In general, you can squeeze lighters on fire, but you can accidentally set fire to excess.
I used a piece 8-10 cm long. To strengthen the structure, the end of the thermal tube was put directly on the elastic band of the connector.
We will need:
- The soldering iron itself . I prefer the power of 40 honest Soviet watts. A soldering iron of this power is quite versatile and is suitable for both soldering thin wires and relatively massive connections.
- Solder , or as people say - tin
.
In fact, solder is usually tin-lead, and its melting temperature depends on the ratio of metals. When purchasing, ask for a low-melting one and better yet, one that is in the form of a wire with rosin inside , it is much more convenient to solder this way. - Rosin .
Good rosin has a uniform cognac-amber color, without cloudiness when exposed to light. But in principle, any will do. - Desire
, but since you are already here, it means it exists and it makes you happy!))
Repair of a headset with a sound boost function and a microphone
Headphones equipped with a microphone do not differ fundamentally from the standard system. However, to know how to make them work, you need to understand some of the nuances of their operation. The causes of problems in such a headset, as in conventional headphones, can be broken wires, failed plugs or broken headphone membranes that require replacement.
Sometimes exotic breakdowns occur in the form of stretched wires. This situation is not typical, since in ordinary life wires are more likely to be crushed than stretched. In this case, the damaged section of the cable can be easily felt - a strong thinning of the core will be noticeable in this section. You can fix the damage using your usual soldering iron. Remove the insulation and protective varnish from the wire. Experts say that this can be done with a candle or lighter. After this, their ends are tinned and reliably soldered - the DIY headphone repair is complete.
Repairing broken headphone wires is easier than it seems, but it will take some time. Stock up on all the necessary materials so as not to interrupt the process and not leave exposed parts unattended. Be careful with small wires, because they are very easy to damage with wire cutters or a knife.
Regardless of the cost of the headphones, they may become unusable as a result of improper handling or force majeure circumstances. Sometimes you need to carry out repairs right away, and in most cases without having the necessary tools at hand. To do this, it is enough to know how to repair headphones without a soldering iron.
Advice from professionals
- When buying cheap headphones, expect a year of service life. Almost no one has them for longer.
- If you are repairing an expensive pair, you will need a good soldering iron with a thin tip so as not to fill everything around with solder.
- Copper, silver, gold - all this is clearly better than tin. Good sound requires good materials.
- Reinforcement of headphones greatly extends their service life.
- You can tin your contacts not only with aspirin. There are many ways. If the reader is repairing expensive studio headphones, you can clean them with a knife, since the thickness of the copper will allow this to be done.
Problem Definition
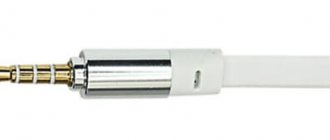
So, a TRS type connector is intended for connecting devices, for example, headphones and a player, with each other.
Next we need to tin our wires. Be that as it may, they always try to make the signal wire from the microphone in its own “ground” braid. A different number of wires can be connected to one plug - it depends on the class of headphones: mono - 2 wires, it’s difficult to confuse something here; stereo and mono - three wiring and different connection diagrams; stereo headsets - 4 pcs.
In the photo below, the clamp is marked with a red circle on the unsoldered connector; The cable clamp is marked in red. For greater reliability, we insulate the contacts with electrical tape, and at maximum proximity to them we recommend tying a knot on the cable.
If you connect to an MP3 player to listen to music, you can use the balance to check how each channel works. If they are ringing with stereo headphones, then this is the control panel, and the microphone and both wires are connected to the microphone output; 7 cores Additionally about the colors of wires in headphones. How to properly solder wires to a headphone plug is out of the question if you are not familiar with the colors of wires in headphones and their meaning. So, for example, do you know what the green wire is responsible for?
Here the plug has 4 types of contacts: one from each speaker, one for the microphone, and there is room left for soldering a common wire or ground. You need to solder in full accordance with the colors of the wires in the headphones; we remember where which color was soldered or look for our piece of paper where everything is written down: Don’t forget to first attach the housing and heat shrink to the wire! Here's what it looks like in real life: Let's see how to properly solder a wire to headphones 3 wires: 4 wires If your plug has 4 wires, then there may be options. Let's make sure everything works.
On the Internet, of course, you can find a method on how to connect the wires in headphones without a soldering iron, but this cannot be compared with the reliability of soldering. Headphones with a microphone are connected via 4 wires. If after work there is still no sound, even after checking all the wires for solder, then the damage to the wires may be near the speaker itself.
We twist the screen of the right and left channels together; as mentioned above, it can be three wires, two of which are channels, and one is a common screen, in this case we simply remove the insulating varnish from them; we disassemble the new connector, do not forget to thread the stereo headphone wires through its base, as shown in the photo, otherwise you will have to redo everything; An important point: the wire must be threaded into the base of the connector; we proceed to soldering the wires to the connector. Otherwise, you can call the wires using an ohmmeter multimeter, an electronic tester, or determine by selection the simplest option - insert the plug into the player and apply the wires to it one by one until the correct combination is found
Also pay attention to the 3rd plate, which is located on the back of the headphones. As a result of this, we can state that the problem lies precisely in the plug. However, the procedure carried out using a soldering iron guarantees better quality work.
However, the procedure carried out using a soldering iron guarantees better quality work.
As you can see, in two out of three cases the problem is solvable. It is for such situations that special adapters have been developed. To solder them to the plug, we need to strip them of the insulating varnish by about a mm, but no more than is required for soldering to the contacts, so that when soldering we do not accidentally short-circuit the exposed wires.
How to do without a soldering iron
If you don't have a soldering iron, then this is not critical. The described technique is perfect for ordinary headphones without a microphone and control buttons. Unfortunately, it is useless if the cord breaks near the speaker.
List of what you need:
- knife;
- lighter;
- scotch;
- working AUX cable.
Cut off a part of the cable with a connector no shorter than 7 cm, remove the rubber braid with a knife, exposing about 2 cm. You can clean the varnish using sandpaper or a lighter. In order not to damage the wiring, the fire must be extinguished periodically. The carbon deposits can be easily removed with your fingers, but you need to wait until it cools down.
Make an incision a few centimeters above the plug to ensure that the erased area is removed.
Twist all paired wires as tightly as possible. If there are more than three of them, then the two extra ones (responsible for the microphone) can be hidden or cut off, and the sound input will stop working. Sometimes the colors match, but it’s better to check the combination by inserting the connector into the socket of the player with music turned on.
For insulation, use electrical tape, treating each individual pair. After this, they are connected and wrapped in 3-5 layers. You can use wide tape (painting tape will also work) or thin thermal tubes.
How to strengthen the headphone wire
The easiest way is to make additional winding, especially in the place where the wires are connected to the plug. This is where wire chafing most often occurs. Soviet headphones were made from dense copper veins, which were difficult to cut. Modern cheap headphones have extremely thin wires that can be cut.
On expensive models, you can notice reinforced fiber at the bend of the wires or a thicker elastic layer. Such protection will ensure smooth deformation of the wires and prevent them from being torn off.
Historical reference
The first models of studio headphones had reinforced wires. Producers and sound engineers could not afford to miss any moment during the performance, so they wrapped the wires with an additional layer of insulation. They did the same with microphones. If you look at photos of pop music concerts (especially rock music) of the late 20th century, you will notice a solid layer of winding on the microphones. The modern music industry is moving to a wireless option and soon there will simply be no need to repair plugs.
Why do headphones break?
The main reason is “factory settings”. Each model is designed for a specific service life. Good headphones are not the ones that don’t break, they are the ones that people buy all the time. Therefore, if your favorite couple breaks down, don't blame yourself. These are all the tricks of greedy manufacturers and monster engineers who profit from unhappy customers.
Expensive headphones last longer, but they also break. Their price is determined not only by quality. Premium technology costs what consumers are willing to pay for it.
How to solder headphones with a microphone
To properly repair headphones with a microphone, you need to know the connection circuit and the purpose of the jack pins. A typical diagram of a microphone plug and button in a stereo headset is shown in the picture below.
For most manufacturers of simple headsets, the microphone should be soldered as in the picture.
How does a four-pin jack work?
has the same device as . Coaxial design and separation by plastic bushings with standard sizes into 4 wires is present on all TRRS plugs. The pinout of 4-wire plugs differs by manufacturer. There's a lot of people here. To correctly replace the plug, look at the pinout of the minijacks in the picture.
The picture shows the following symbols: M - microphone, G - common contact, R - right channel, L - left channel. Now it’s clear that soldering headphones is not an easy task. The wiring diagram of the plug greatly depends on the brand of the headset.
How to replace the plug on a headset
The entire repair technique given for headphones is also suitable for a headset. The only difference is the presence of an additional wire going to the microphone. It is usually black or white in color. Since there is an additional wire, it means that there must be one more contact on the plug - the fourth:
Diagram of connecting the headset to the plug
If you have a tester at your disposal and know how to use it, then you can “calculate” which wire goes where by ordinary testing. In this case, the resistance of each headphone will be in the range of 24-35 Ohms, and the microphone - several kOhms. When you press the answer button, the microphone resistance should drop sharply to several tens of ohms or even to zero. How can I determine by dialing where the left speaker wire is and where the right one is? Aurally. When a call is made, the corresponding loudspeaker will make clicking sounds. Just put the headphones on your head and make a call.
Typical headset layout, where:
- 1 – right headphone output;
- 2 – left headphone output;
- 3 – common wire;
- 4 – microphone wire and answer button.
One final note. There are headsets in which the microphone wire and the general wire are swapped. If your headset does not work after repair, simply swap the wires indicated in the figure above as 3 and 4.
Second soldering method
The second method, which tells you how to solder headphones by tinning the wires with sandpaper:
- The sandpaper grains should not be particularly coarse. You will need a small piece of the material itself.
- Apply a little rosin to the material, then place the wiring on it.
- Warm it up properly with a soldering iron and pull it out. The varnish on the wire will begin to soften.
- Repeat the pulling procedure until the insulation is completely scraped off.
- After repairs, insulate the area with heat shrink or electrical tape.
Some people remove the insulation using a lighter, then remove carbon deposits with alcohol and flux.
Soldering wires with plug
It's easy to solder headphones with your own hands. The instructions given are relevant for a minijack, but the principle is little different in the case of other connectors.
First you need to prepare the entire tool:
- soldering iron;
- solder;
- liquid flux or rosin;
- stationery knife;
- plug
The soldering iron is plugged in to allow it to heat up. Make an incision 5-15 mm above the plug to protect yourself from a potentially worn area.
There are 3 to 4 wires inside. Before soldering, they must be cleared of 10-15 mm of rubber insulation, and 3-4 mm of insulating varnish must be removed. This can be done using a utility knife or fine-grained sandpaper.
Then you need to take a new plug, disassemble it and thread the wires into the housing. If you want to keep the old plug, you will have to carefully remove the insulation from it.
Next, select a heat-shrinkable tube of suitable diameter and hide the wires in it. The excess length is cut off in advance. (You can skip this step.)
To solder, you need to tin the wires and contacts from the headphones - cover the tip of the soldering iron with solder, touch each wire that was initially attached to the rosin with it, and treat the contacts in the same way.
When connecting contacts, do not confuse the position of each wire.
Diagrams for connecting headphones to standard plugs
After soldering, the headphones are connected and their functionality is checked. If everything is in order, then insulate the exposed part with heat shrink or electrical tape. You just need to assemble the new plug, and put the rubber tip from the handle on the old one (you can secure it with glue).
Standard plugs
Before we begin the repair, let's look at the most common types of headphone jacks, as well as their connection diagram. This will help us decide how to solder the headphone wires if the cable has 4 wires (headset with microphone) or 3 wires.
Below is a classic diagram for connecting headphones connected to each other by a common ground. In quality devices such as Koss Porta Pro, Philips, Sony, Sennheiser, etc. a separate shielded wire is used for each channel; in more budget implementations, there may be a common shield for two channels.
Connecting headphones to a standard plug
For headphones with a microphone, the plug has an additional contact pad; a diagram of such a connection is shown below.
Diagram for connecting headphones with a microphone to a standard plug
Note that many manufacturers of mobile devices can use non-standard connectors; we will consider this topic at the end of the article.
Non-standard connectors
We have already mentioned that many manufacturers produce devices where the input on the headset differs from the standard one. For example, some models of Nokia, Samsung, Ericsson, etc. It is also common to find headsets where a USB connector is used instead of a standard plug, for example, WH-205.
As for the technology for repairing such headphones, it is practically no different from the usual one. The only exception may be searching for an original plug for a particular phone model. But, given the increased number of “left” manufacturers of original spare parts, it is not difficult to buy such a connector.
In addition, do not forget that to connect a standard headset to a non-standard connector, you can use an appropriate adapter, for example, such as shown in the photo.
Adapter for Samsung phone, for standard headset
If desired, such an adapter can be soldered independently, but given the low cost of Chinese products, this is not particularly necessary.
As you can see, soldering headphones correctly is not difficult; all that is needed for this is accuracy and skills in working with a soldering iron. Even if you didn’t manage to make the repair the first time, don’t be upset, check everything again.
Wiring diagrams for wires with more than two cores
Users often wonder whether it is possible to repair headphones of a more complex design when there are more wires inside? A different number of wires may be suitable for one plug - this depends on the class of headphones:
- mono - 2 wires, it’s difficult to confuse anything here;
- stereo and mono - three wiring and different connection diagrams;
- stereo headsets - 4 pcs.;
- headsets or headphones with microphone - 5-6 pcs.
Now we will tell you in more detail about each class, except the first.
Three cores
Each earphone must have two wires in the same braid or in different ones - this is a plus and a minus. Sometimes at the end, when connecting to a plug, designers combine the negative ones into one harness and get 3 pieces at the output. To make it clear to all users, we provide a detailed wiring diagram for the plug, where you can see exactly where the wires need to be soldered according to their color design.
Four wires
There are two different options here.
- Ordinary headphones without a microphone and control buttons. 4 wires are connected to the plug: a minus from each copper-colored speaker and a plus (blue with red or green with red). For convenience, the negatives are twisted into one bundle and the result is three wires that need to be soldered to their specific places.
- Headset with microphone. Here the plug has 4 types of contacts: one from each speaker, one for the microphone, and there is room left for soldering a common wire or ground. Schematically, such soldering looks like this:
5 cores or more
Different types of headsets of the latest class may have from 5 to 10 separate veins, so it will be much more difficult to navigate. The signal wire from the microphone is always braided in one color, and the rest come in all sorts of shades. No specialist can tell you exactly which wire should be soldered where. How to replace the wire from the plug on the headphones in this case? The only method that works here is this: we check each vein with a multimeter to determine whether it goes to the left or right speaker, then we find the common ones and combine them into one flagellum.
You need to solder it to the plug according to the diagrams that we showed, or find a separate diagram on the Internet that is suitable for your case.
Repair your headset or headphones for your mobile phone using this method and save money from your home budget.
Connecting wires using a soldering iron: instructions with step-by-step photos
A gap has been found and must be repaired. The most effective way to connect wires is soldering. It can be considered lucky if only one core breaks and this section is accurately detected. The wires are soldered together without cutting the entire cable. Serious damage is eliminated by cutting off the problem area, soldering the wires and applying a bandage.
The step-by-step soldering process looks like this:
Use pliers or a knife to cut off the damaged area. At one end of the cable, 2–3 cm of braiding is peeled off to free the cores. The number of wires depends on the headphone model. A headset with a microphone has 4–5 wires. Simple headphones are connected with 3–4 wires.
Don't be afraid. The wires are covered with multi-colored insulation, so it is impossible to mix them up when soldering. There are two twisted wires going to the microphone: signal and ground. They are immediately visible under the braid. The ground conductor usually has yellow insulation.
A similar procedure is performed with the second end of the cable. When all the cores are freed from the braid, insulation 5 mm long is removed from their ends. You will see a strand of thin copper hairs that are twisted clockwise with your fingers.
The contacts are briefly burned with a lighter. The fire will remove the protective varnish from the veins. The firing process is required. Varnish not only interferes with soldering, but is also a dielectric. If the protective layer is not removed, good solder will set, but the contact between the connected wires will be poor.
All ends of the cores must first be tinned with tin. A piece of thick heat-shrinkable tubing is placed over the cable braid. This will be the insulation of the bandage. Pieces of thin heat-shrinkable tube are similarly placed on each core. This will be contact insulation.
The ends of the tinned wires are twisted, matching the color of the insulation. Each twist is heated with a soldering iron until the tin completely surrounds the connection of the wires.
After soldering is completed, the functionality of the headphones is checked. If sound appears in the speakers, proceed to applying the bandage. First, thin heat-shrinkable tubes are placed over the twists and heated with a lighter. The insulation will protect the soldering of the cores from short circuiting. The resulting wiring harness is tied with a harsh thread, a thick heat-shrinkable tube is pulled over the cable braid and heated with fire.
Soldering with speaker
Sometimes the contact breaks inside the speaker. In such cases, repairs begin with disassembling the headphones. They try not to shake or tug the device to avoid tearing off the board, inspect the structure and find the damaged area. All broken wires will have to be soldered.
If the cable breaks at the “input” of the earphone, and due to the structure of the case it is impossible to pull it out, then it is better to make a cut at the base. Cut the cord 20 mm from the end of the adapter. It is necessary to remove 80 mm of the thickest insulating layer. Do the same with the internal insulation, but be careful not to touch the wires. Next, the ends are cleaned and tinned according to the standard procedure.
Insert the cord into the housing and unsolder the old wires one by one, soldering new ones in the same places. After soldering is completed, the earphone is assembled and immediately tested for functionality. If the sound is of poor quality or completely absent, then disassemble the case and re-inspect the contacts. The possibility of damage not related to the speakers cannot be ruled out.
Types of breakdowns
Headphones come in different designs. However, the most common breakdowns for all types of headphones are similar. Most often, damage to one of the cores inside the cord occurs. This usually occurs due to chafing or constant bending of the wire in one place. This is due to intensive use.
The cord may also break at the plug. This happens when there are strong bending loads on the cable at the base of the plug. The wire there may break if it is pulled sharply.
The wires break not only at the plug, but also in the headphone housing. This can happen due to a strong jerk if the wire gets caught on something.