Estimated reading time: 10 minutes(s) In continuation of the article about “Test signals for checking and setting up audio equipment,” we will continue to select and describe the necessary test signals for setup, and, by and large, just for checking your acoustic systems (speakers) and acoustics premises. We have talked about room improvements many times here: “How to measure the acoustics of a room?” and here “Acoustic preparation of the room. What is this?”, and in several other articles.
The time has come and you decided to find out how well your speaker systems work. While listening to our new speakers, we began to notice that something was “buzzing”, somewhere they were “ringing” excessively. After studying the topic, we decided to also check the acoustics of your room. Or maybe it became clear that you need to calibrate your monitors.
Test signals will help you understand where it is playing wrong, why, and it will be clear what to fix – the acoustics (speakers), the acoustics of the room, or both. Also, you will be able to evaluate your equipment and test its capabilities. Even your hearing can be tested!
Collection LET'S TEST – First part of the disc
It has a name - “LET'S TEST”, was released as a CD supplement to the magazine “AV Salon” No. 7 in 2002. I will share information about this famous collection of test signals. At the end of the article I’ll tell you where to get a “snapshot” of the disk. Two parts of articles about this disk with test signals are planned.
The disk consists of two parts. For the first, test signals were selected in the form of musical fragments that make up the classics of performing arts and sound engineering. These tracks will show how adequately your system reproduces music and will allow you to subjectively evaluate the correct selection of components. The material was selected from the archives of the Moscow company Boheme Music.
The second part of the disk is a set of test signals specially synthesized for the project: calibrated tone, noise and filtered pseudo-noise - the most accessible means of measuring the frequency response of a system.
The disc, with a total playing time of about 50 minutes, consists of two parts approximately equal in duration, but not in the number of tracks. If you have it, then you are in luck, as it was released back in 2002 and has not been re-released. You can, of course, record the contents of a disk “imprint” from a flac file onto a blank. And I draw your attention to track No. 7 - only for CD owners.
List and summary of tracks
- Peter Ilyich Tchaikovsky. "Seasons". "November". “At three.” Duration - 2:48;
- Frederic Chopin. “Ballad No. 1.” “G minor, op.23.” Duration – 8:42;
- Franz Schubert. “Impromptu, op. 90, No. 2.” Duration – 4:28;
- Franz Joseph Haydn. “Symphony No. 45, F sharp minor.” “Proshalnaya”, part 3, “Minuet”. Duration – 3:49;
- Richard Wagner. “Flight of the Valkyries from the opera “Valkyrie”. Duration – 4:25;
- Edvard Grieg. “Procession of the Dwarves.” Duration – 3:40;
- Warning: REDUCE VOLUME!! , Duration – 0:25.
Clarification about track 7.
After listening to all six music tracks, you will hear “silence” in the seventh. In reality, it is so, it’s just a 25-second track that doesn’t contain any sounds. This track is needed in order to have time to turn down the volume on your equipment.
Why do this? Explanations : the next one, after track No. 7 (25 second pause), the signal has a higher level compared to the music recordings just listened to. And track number 8 will seem very loud.
While you are “listening” to track No. 7, pause the player and reduce the volume of your amplifier. Don't be lazy and you won't regret it later. In general, to begin with, you should familiarize yourself with the description of the signals that will be played further and what can be done with their help.
If you are lucky and have this CD, then be careful with this moment! This can lead to unexpected discoveries. Many “jambs” of your audio system will become obvious. If you used to listen to your favorite tracks and didn’t notice these “flaws,” now everything will “come out.”
Various unpleasant sounds and rattling sounds will be detected. Hear changes in the frequency response - “you will feel humps and dips.” Previously, you simply didn’t hear or notice “it” when enjoying your favorite performers. Almost everyone will be able to notice the difference, except for those with “perfect acoustics” and premium amplification and reproducing equipment. Their price category of equipment does not allow such “nuances” during production, assembly, and, in principle, there should be no “hissing”, “tinkling”, “rattling”.
But I see no reason to be upset about this! After all, you never suspected or heard that your audio system was doing something wrong! You will not listen to the “whistle” and “hiss” of test signals, but to your favorite music.
If you don’t clearly hear some distortion, rattling, or “humming”, this does not mean that they do not exist or that they are not audible at all. The style of music, the instruments used, the volume of the sound, the dynamics of the music itself - all this may not make it possible to understand (where and what is wrong) and hear exactly all the defects, but they still remain there. "Is there something wrong! But what is not clear” is all that can be said. But with the help of test signals, all these nuances and errors can be “caught.”
Track 1: Pyotr Ilyich Tchaikovsky. Seasons. November. On the three.
Purpose of the track: Sound stage, system resolution in the HF range. Duration – 2 min. 48 sec. Test signals for your reference!
Performed by the USSR State Academic Symphony Orchestra, conductor Evgeny Svetlanov.
This track is perfectly balanced in recording level. Recorded specifically for radio broadcast. When switching the amplifier to mono mode, the overall perception of the sound image should not deteriorate in any way. Only the perception of spatial information can change - that same effect of presence.
Also, individual instruments should not “fail”, and there should be no noticeable change in the tonal balance. If the sound “collapses,” it means there are problems with the linearity of the phase characteristics. It is likely that the “plus” and “minus” on one acoustic speaker are mixed up, or one of the speakers is reversed (this happens even in new acoustics).
In “stereo” mode, the stage is evenly lined up from edge to edge, with a clear arrangement of groups of instruments: strings slightly to the left of center, winds slightly to the right. At the same time, none of the groups of instruments “crawls out”, and the picture should not shift to either forte or piano. When mixed in the studio, the stage depth of this recording (stereo effects) is somewhat simplified. But you should hear that “virtually” the instruments go beyond the line by 40 - 50 cm.
The bells are recorded with very contrast, they do not fade or get lost against the general background, a wide spectrum with characteristic metallic overtones is clearly audible. The triangle that enters at the 50th second literally sparkles in the air and fades out very smoothly.
Track 2: Frederic Chopin. Ballad No. 1 in G minor, Op. 23.
Purpose of the track: Tonal balance, system resolution in the midrange. Duration – 8 minutes. 42 sec. Test signals for your reference!
Performed by: Viktor Eresko, piano.
The phonogram itself was carefully restored, without abuse of limiters and noise suppressors. On the recording, especially at the beginning, the noise of the master tape can be clearly heard, but it practically does not interfere with listening. If you still experience a feeling of discomfort, it means that the tonal balance is shifted to the region of 5 - 6 kHz. Listen to the reverberation of the room - there should be no booming or unpleasant overtones in the lower middle.
The sound of individual notes lasts for a very long time, the after-sounds are not lost. The string's sound spectrum is rich in shades. Simplification indicates that the level of the CD player is not high enough, and “eating” reverberations may indicate that the quality of the speaker cable is not high enough. The recording is incredibly rich in details; they are clearly visible, but do not distract attention when listening.
3 track. Franz Schubert. Impromptu, op. 90 No. 2.
Purpose of the track: Emotional performance. Just for listening. Duration – 4 minutes. 28 sec. Test signals for your reference!
Performed by: Maria Yudina, piano.
Let's take a break from the formal evaluation criteria and just listen to this fragment. Try to catch and feel the difference in performance compared to the previous track. Absolutely different style of play, temperament, energy. Maria Yudina was a deeply religious person and never hid it. It is not surprising that her work was not officially recognized for a very long time. She had nothing but music, so each recording was a holiday for her, an opportunity to speak out. Do you get the mood, the emotional uplift after listening? Do you really have a sense of impromptu?
4 track. Franz Joseph Haydn. Symphony No. 45 in F sharp minor “Farewell”. Minuet.
Track purpose: Harmonic spectrum. Duration – 3 minutes. 49 sec. Test signals for your reference!
Performed by: Moscow Chamber Orchestra, conductor Rudolf Barshai.
Amazing recording of violin parts and woodwinds. The violin is one of the most difficult instruments for the digital circuit. As a rule, any attempt to simplify the DAC leads to a violation of the harmonic spectrum. To the ear, this is perceived as an unnatural sound, loss of “velvet,” or shrillness.
Starting at the 1:40 mark, the timbral harmony between the strings and winds is surprisingly well expressed. The overly bright sound of the latter, their dominance in the general chorus, indicates the predominance of the second harmonic in the tract. As a rule, the third is to blame for the loss of musicality, expressiveness and warmth.
Track 5 Richard Wagner. "Ride of the Valkyries" from the opera "Valkyrie".
Track purpose: Dynamic range. Duration – 4 minutes. 25 sec. Test signals for your reference!
Performed by: Honored Ensemble of Russia, Academic Symphony Orchestra of the Leningrad State Philharmonic. Conductor Evgeny Mravinsky.
A work built on stunning dynamic contrasts. Colossal sound energy is transmitted to fortissimo. This track managed to maintain a recording level of 98.8% (exactly 0.1 dB below the absolute digital maximum). There is no digital clipping on the disc, and if you hear distortion, it is the fault of the amplification path. If clipping is heard, the maximum level signal, which is available in the second part of the “LET'S TEST” disc with test signals, will help you find the source.
When listening to “Flight”, on some systems, you may feel some tightness and restraint in the brightest places. It’s possible that the amplifier’s power supply is severely “sagging”, that dynamic compression associated with heating up the speaker’s voice coils is affecting it, or that compression is being caused by the protection elements of the HF heads.
Edvard Grieg, "Procession of the Dwarves."
Purpose of the track: Macro- and microdynamics. Duration – 3 minutes. 40 sec. Test signals for your reference!
Performed by: Big Symphony Orchestra of the All-Union Radio and Central Television. Conductor Gennady Rozhdestvensky.
Can you hear the bass drum well in the first few seconds of the recording? If it's good, then that's not bad. It’s very good when it doesn’t disappear even when the orchestra switches to tutti... The violin at the 1:07 mark appears as if from afar, but despite the fact that at this moment it is barely audible, the sound should be distinct, with characteristic details. The bass is very deep, it is perceived by the diaphragm, but does not clog other instruments. The instruments do not merge at either large or small levels; each of them can be easily selected if desired. Evaluate the atmosphere of the hall, the feeling of air.
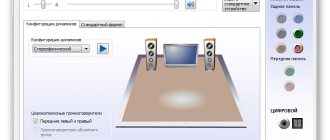
Step-by-step setup
Setting up the radio is described in detail in the 2022 Pioneer DEH-1900UB instruction manual. It will be carried out in this way also when changing the factory settings of other similar devices. The exception will be processor devices, the configuration of which is more difficult.
When changing sound settings, it is important to pay attention to the following indicators:
- low frequency sounds;
- balance of front and rear speakers;
- distribution of the sound signal between the speakers on the right and left sides.
Equalizer
Setting the equalizer on the radio helps improve sound quality, even when using a low-quality speaker system. This device helps regulate the frequency of sound.
The equalizer (EQ) can be found in the menu section called "Audio". At this point, it is not the entire sound range that is regulated, but the required frequency bands (in Pioneer radios there are 5 of them: 8 kHz, 2.5 kHz, 800 Hz, 250 Hz, 80 Hz). The frequency at which the filter gain changes is called the speaker cutoff threshold.
Pioneer car radios provide several options for standard equalizer settings and 2 sets of custom settings that the owner can create himself. Switching between these versions is done from the menu or with the EQ key.
To configure the radio yourself, you need to confirm the selection of the “Equalizer” item in the “Audio” section by pressing the joystick. By turning it, you can select the desired frequency and press the center of the knob again, setting the position in the range from -6 to +6. This will change the volume of the selected frequencies.
The consumer himself determines which sound parameters to set. There are several recommendations that will allow you to make the right choice of characteristics:
- to play rock music, it is better to increase the bass volume (80 Hz) to +2;
- percussion instruments sound good at a frequency of 250 Hz;
- voice transmission parameters are adjustable to 250-800 Hz;
- frequencies for electronic music - 2.5-5 kHz.
After completing the parameter changes, swing the knob to the left to access the main menu.
High pass filter
After this, the music is configured in the HPF menu item, the full name of which is High Pass Filter. It stops sound from the speakers that is higher than the set value to reduce the amount of melody distortion.
If the system does not have a subwoofer, it is better to set the HPF threshold at frequencies of 50-63 Hz. It is recommended to check the result at a volume of 30.
If you have a subwoofer, you can raise the lower threshold to 80-120 Hz and higher without degrading the sound quality.
This will cause the music playback volume to increase.
When adjusting the frequency attenuation rate, it is recommended to select 24 dB per 1 octave.
Low pass filter
Using a low-pass filter, you can configure the car radio for a subwoofer in the corresponding menu section.
It provides 3 subwoofer mode values:
- The cutoff frequency of the subwoofer, which can be set at the owner’s request, in the range of 63-100 Hz.
- Speaker volume on a scale from -6 to +6. It is recommended to set the parameter to the same value as when setting the equalizer.
- Slope of frequency attenuation. It is better to choose the value selected in the HPF item (12 or 24 dB).
If the settings are consistent, the high and low frequencies in the melody will be balanced, and the person using the speaker system will not experience discomfort when listening to it.
Radio setup
To set up a radio in a Pioneer radio, you need to select a band, find and save the desired radio stations. This can be done in several ways:
- Automatic search for radio stations. In the main menu you should find the BSM section; in it you can start a search for stations with the highest frequency in the radio range. After this, you need to save it, assigning the button value from 1 to 6 to it. Then the search for stations will continue. In the hidden menu, you can change the search step from 100 kHz to 50 kHz to expand the range of the operation.
- Semi-automatic search for radio stations. If you press the Right key in radio mode, a search for stations will start.
- Manual radio tuning. Pressing the “Right” button on the control panel several times while in radio mode will switch to a frequency. The found station is saved in the device memory.