Headphones break down over time. In most cases of breakdown, the headphones themselves are still working, but the cable that transmits the signal to them along the path from the plug to the speakers is damaged somewhere, due to which one or both headphones lose some of the volume, they work only at a certain position of the cable and stars in the sky, or stop playing altogether. But don’t be upset, and especially don’t rush to throw away your device! If you know what a “soldering iron” is and don’t want to buy new headphones (no matter cheap or expensive) because some small wiring is broken, then it’s quite possible that your headphones/headset can be repaired! The subject that allows you to do this will be discussed today.
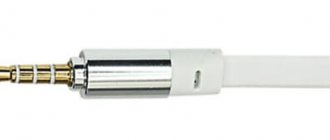
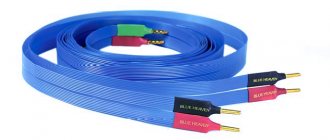
The subject of this review is a wire connected via a 3.5mm jack. On this wire:
- 3.5mm plug for connecting to an external source
- The wire of the right earphone contains a headset unit with a microphone and a control button;
- At the end of the wires there are exposed small wires (+ and -) for soldering to the headphone speakers. Each of the wires is already prepared for soldering.
This cable is suitable for:
- Fixing broken headphones;
- “Modernizations” of existing ones, which do not have a button and a microphone;
- Replacing the cable on a headset that has not yet broken.
A few words about the “client”
Our current client is Sony Ericsson Bass REFLEX headphones found in a box, which got there in the late 2000s “until better times”, because... The right earphone stopped working. They only worked for a year, but it was a pity to throw it away because of the 800 “those” rubles spent on them. “We found it” by chance during the pre-New Year spring cleaning. I just needed non-vacuum earbuds suitable for both music and video. The rubbish that comes with smartphones as a headset was not suitable for this role, but buying separate ones “strangles the toad.”
Is it worth extending the headphone cord?
When extending the headset, the following problems may occur:
- Deterioration in sound quality. The quality of the transmission may change, some of the frequencies will sound bad or completely disappear.
- Fast breakdown. Any manipulation that damages the integrity of the wire will quickly render it unusable.
You can extend the headset cord using any method. When choosing, focus on the quality of the headset itself, as well as the quality of the required sound. If you need to get good sound from professional equipment, use the appropriate extension method.
Go!
Purpose of the task: Replacing the cable while maintaining the headphones themselves intact and functional.
Stage 1: Release
The original SE headphone wire was:
- a) not symmetrical;
- b) short (it was supposed to be connected to a separate block with a button, which was connected to the phone);
- c) broken (the right earphone only worked in a certain position).
Conclusion; There is no point in preserving and repairing the original cable.
No additional tools were needed for disassembly (not plugs!). After removing the rubber caps and prying up the speakers, they came out of the housing without any problems. I then carefully pulled the wires through the case to a comfortable distance for soldering. Yes, they could have simply been cut off with scissors and pulled out immediately, but I’m a stickler for neatness.
Well, then I unsoldered the wires, untied the knot (made by the manufacturer so that the cable does not tear off the speakers ahead of time), and pulled out the old wire.
Ready!
Stage 2: New home
The wires of the new cable are 1.5-2 times thicker than the original ones. The rubber feet at the bottom of the headphones did not allow them to be pulled out. I had to carefully pull them out.
The process of soldering the wires to the speakers went without any problems. Alas, I forgot to take a photo. The most difficult step was to tie knots near the solder joints, as headphone manufacturers do. Difficult because The wires of the new cable are thicker than the original ones, as a result the speakers were not fixed in the housing. We’ll probably leave these moments of fine motor skills, swearing, and such and such a mother behind the scenes.
Stage 3: Verification
A few photos of a client with a new cable:
So, the client is assembled and ready for verification!
The very first thing is that both headphones work! Hooray! The volume level on both sides is the same, in any position of the wires. Next, on the right wire there is a headset with a button, check it. The phone responds, and so does the player. I have not yet checked the quality of voice transmission. The button is nice, with two dots and a hard click. The small microphone hole is located on the opposite side of the button.
Sound quality. Tested on FiiO X1 II. In this case, our headphones are not earplugs, so we immediately say goodbye to passive sound insulation. The sound quality is many times better than the garbage headphones that come with smartphones, and these orange earbuds are almost 10 years old! Even the bass is present, Bass REFLEX!
DIY: silicone headphone cable
I decided to make my own cable, with blackjack silicone and reinforcement, because... Shortcomings in the old cable caused some inconvenience during use. The goal was achieved and I am very pleased with the result. Details under the cut. Brew some tea, sit back, there will be a lot of fun. Given:
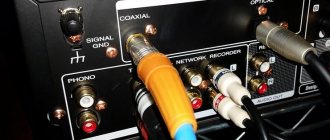
a reliable double-sheathed cable that has been working for 5 years and still doesn’t want to break, and the most I’ve gotten it to is the bursting of the outer (general) insulation and the cambric near the jack - the solidity of the structure was restored with the help of thermal nozzles. I bought a cool corner minijack a long time ago to replace the standard one, but that scoundrel stubbornly refuses to die. The cable has 3 wires (from the jack to the divider), each in separate insulation, twisted together, and then placed in a second layer of insulation (most likely heat shrink). The problems with it are mainly mechanical: it is already quite rigid, and in the cold it generally turns into stone, and besides, the divider is very prominent: I wear the cable behind my back and when I lean my back on the back of the chair during sedentary work, the divider crashes into the back, as if trying to avenge his brother Mitka, the sentenced minijack. There is also a commercial KZ cable available. Complaints about it: It's thin, but it's also tough, and after a relatively short period of use, the outer insulation began to peel off. It also gets numb in the cold. Photo
By the way, the old cable has an interesting wire design: each wire under the insulation has a textile thread as a base, on which a thin flat copper tape is spirally wound. And there are 7 such threads in each wire (photo of another instance). Task:
to make a cable with the following characteristics: soft, not tanning in the cold, with a more humane divider, preferably thinner than the old one, with a minimal microphone effect (here I do not mean the conversion of vibrations into an electrical signal, but the transmission of vibrations caused by the friction of a hard cable against body, onto the earphone body and then directly onto the bones/cartilage of the hearing aid).
Cast:
— Silicone cable, 30AWG, S=0.064 mm2 (11 conductors d=0.08mm). $0.11-$0.37/m, the price depends on the chosen footage. — Two-pin angled connectors, $4.75 per pair. — Minijack Neutrik NTP3RC, price now ~$7, bought a long time ago. - Silicone heat shrink - something like this, I charged $0.15-$0.30/m offline, depending on the diameter.
In episodes:
glue B-7000, hot glue, solder, soldering iron.
Soft and non-damaging - this is about silicone cables (silicone insulation). But since this type of insulation layer is usually quite thick, I decided to start with small gauges and bought 28AWG(16x0.08mm, 0.81mm2) and 30AWG(11x0.08mm, 0.064mm2) wires, conductors - tinned copper, outer diameter of insulation 1.2mm and 0.8mm respectively.
And while the wires were traveling, I was thinking about how I should braid the cable: 3 wires in a flat braid, or 4 wires in a diamond shape - both options have their pluses/minuses. A triple braid has a more beautiful shape and less material consumption, but the bendability of a flat linen in one and the other dimension will be very different, and you will have to solder at the bifurcation point. The quad braid doesn't look very good, but it bends evenly in any orientation, there is no need for soldering in the middle, and besides, you can then, if desired, turn the cable into a balanced one by replacing the regular stereo jack with a balanced 4-pin TRRS. I finally settled on a 4-wire pigtail - I really didn’t want any extra soldering.
I wove small fragments as prototypes. I decided to start with 28AWG, because... the thicker the conductor, the lower the resistance of reserved seat passengers. The cable turned out to be a bit thick, so I decided to weave it from 30AWG - it turned out much better. In the photo: 28AWG/4, 28AWG/3, 30AWG/4, 30AWG/3:
The sample passed the test in the freezer at -20°C brilliantly - no hardening! The “shrinkage” of wires during weaving is ~15% (may vary slightly depending on the tightness of the turns), i.e. from meter-long pieces of wire we get 85cm of braided cable.
But a new problem opened up: silicone insulation is so soft and pliable that its contribution to the elasticity of the cable is practically zero, and therefore the cable turned out to be very soft (which was expected) and “plasticine” (which I did not take into account): bend it in the shape of steps and put it on table - it will remain lying in the form of steps, almost not straightening up.
Another problem is mechanical reliability: 4-wire weaving gives a small tensile reserve and slightly distributes the load between the wires, but for such a thin wire this seemed too little to me, and I began to think about how to reinforce it without losing its softness. To begin with, I ordered a fishing line made of ultra-high molecular weight polyethylene (UHMWPE) - it is very durable, does not absorb water, and has a very low coefficient of friction (lower among plastics is fluoroplastic). There are useful comparison tables for plastics here. But I don’t know how to check what exactly the Chinese sent me - maybe they have cheaper HDPE (its strength is also sufficient, but UHMWPE works at much lower temperatures). The fishing line can be 4-strand (rougher texture) and 8-strand (smoother, almost cylinder in appearance). I ordered an 8-thread thread with a diameter of 0.5mm, but it arrived in fact 0.7mm. The fishing line also turned out to be completely inelastic.
While the fishing line was moving and I was thinking about how to weave it, an alternative option came to my mind - to roll up the entire cable in heat shrink (as was done in the old one). But this will automatically make it hard almost like the old one. Then I remembered that while looking for heat shrink for cable ear hooks, I came across a silicone one that was said to remain soft when shrinked. And, of course, I was still worried about behavior in the cold. I found silicone shrinkage offline in the local market at a price of $0.15/m depending on the diameter, and the testing process began. To begin with, I pulled and shrunk a test sample of the cable and compared its stiffness with the old cable - the new one turned out to be noticeably softer. Then I threw them, along with the old cable, into the freezer for half an hour. When removing it, I quickly tried to bend both options. The old cable, as expected, pretended to be steel reinforcement. But the silicone cable in silicone shrinkage behaved “in the cold” almost indistinguishably from a warm one. The second experiment involved walking down the street in -15°C with two cables hanging from my pocket and periodically feeling them (don't ask what it looked like from the outside; anyway, it was at night). The challenger performed very well again. During the checks, another pleasant surprise awaited me: the silicone shrinkage added so much elasticity to the finished cable that now, when there is no load, it tries to take the shape of an even cord. Moreover, this is the “correct” elasticity - practically without compromising softness.
At the same time, the problem of earbuds with a memory effect was also solved: usually a thin wire about 10 cm long is inserted into the cable near the connectors and this segment of the cable is compressed with heat shrink - thus this section of the cable above the ear “remembers” its shape. In my case, a separate shrinkage for the earhooks is no longer needed and the wire goes under the main shrinkage, which covers the entire cable. I took the wire from those used to connect cables in electronics - there are at least 2 types of them that differ in diameter (stiffness). I took a thicker version and bent it in half - and the “memory” was stronger, and the problem of a sharp end that could damage the cable/shrinkage was solved (this is usually solved by bending the loop at the end if the wire is single). The photo shows prototypes with single and double wire under shrinkage.
Next, I had to tinker with pulling the owl onto the globe and shrinking it onto the finished cable. I had 3mm and 4mm tubes, I wanted to use 3mm because... 4mm will shrink more and become thicker, which means the final cable will be stiffer. But the three-ruble ruble only fit on the very beginning of the cable, and even then with difficulty, so I bought ski wax offline, aerosol silicone grease, coated the cable itself and blew it through the shrink tube inside. But even so the process was difficult. I had concerns that the conductors might break when stretching like this, but everything worked out. The photo shows a comparison of 4 and 3 mm tubes before and after shrinkage. As you can see, the fit on the churchkhela on the left is loose in some places. Churchkhela on the right has a more attractive appearance.
But then the fishing line arrived and I figured out where to use it. There is a network of 4 wires leading up to the divider, but then only a couple of wires go to the left/right channels, i.e. It won’t be possible to braid them - just twist them somehow. And then I decided to fill 2 missing wires with this fishing line, and to make 2 fishing lines pass through the bifurcation point: from the pins for the left earphone to the pins for the right earphone - in a continuous pair of threads. This solved the problem of mechanical reliability and gave the cable a uniform appearance along its entire length. The photo shows an experiment with a thinner thread (0.3mm) and an unsuccessfully chosen alternation of threads - I had to unravel it.
After forming the main cable, it is time to form the “divider”. In fact, these are just several cambrics of the same silicone heat shrink, stretched one on top of the other to give rigidity to this assembly. Two layers on each channel, two layers on the common wire, and two layers of overlap, overlapping both. Red risks I'm about.
Before soldering, the main thing is not to forget to put heat-shrink tubes on the wire - this is what I forget to do time after time in my crafts: I solder, notice, swear, unsolder, pull the tube and solder again. But this time everything went surprisingly right. The slider that tightens the wires of the left and right channels is also not forgotten - when wearing the cable behind your back, it is used to tighten the wire at the back of the head - this is very convenient. The runner (pictured above) is also made from heat shrink.
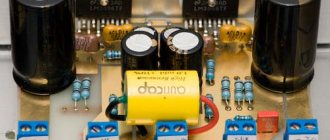
Headphone connectors are perhaps the most overrated part of the purchase. I have a standard two-pin connector, as on most headphones a la KZ. I specifically wanted corner connectors, because vertical metal barrels only cause misunderstanding for me. There are quite a few offers of collapsible corner connectors, so the price for them remains high. Inside the connector, the pins are solid (not hollow tubes). There is a place to get drunk, but you won’t have much fun. The design is unsuccessful - it could have been made more comfortable. Photo of the transparent one from the seller’s page (I took the black one, but it was already assembled):
So, the wire, wrapped in heat shrink and with a wire sticking out of it, is inserted into the connector “as a keepsake.” The wire is soldered, the end of the wire protruding from under the heat shrink is bent into a hook, and all remaining voids inside the connector are filled with hot glue. The glue also envelops the wire hook, forming a plaque and preventing the wire from being pulled out of the connector. The connector halves are glued onto glue—everyone’s favorite B-7000—so that you can disassemble it if desired without breaking anything. There are blue and red tubes dangling on the wires - this is the color differentiation of the pants, marking the channels - move them close to the connector, heat them up - you're done. Then we take pieces of heat shrink of a larger diameter, stretch them additionally with needle-nose pliers, pull them onto the connector itself and heat it - voila - the connector is smooth and there is no seam between the halves. The last modification was that the fit of the connector in the earphone was incomplete, so I used a drill to select some material around the pins (I made the protruding rectangular part longer). But something had to go wrong. Oh, yes - the flux is not about class=”aligncenter” width=”800″ height=”600″[/img] The audio jack is wonderful. Unlike Chinese connector developers, Neutrik engineers know their stuff well—everything inside is well thought out. I took it many years ago to repair some cable, but it was never useful, so it was lying around in a drawer for many years, and now its finest hour has finally come. It cost some absolutely inhumane money, and it makes sense to take it if you put ease of soldering and reliability at the forefront. But you can also install some cool-looking Chinese jack, which sells for 3 pieces per dollar - there will be no difference in sound, and when it wears out, just replace it with a new one - even with annual replacement it will be cheaper. The only noticeable drawback is that the black coating on the metal wears off quite quickly.
Assembled:
So, all the work is finished. So it's time to check the sound.
Compared to the old cable, the bass became more concentrated and clear, but at the same time there was some additional depth. The middle has also been enriched: microdynamics and separation of images have improved, now not a single detail will escape the picky ear. The highs became simply transparent and airy, simply dancing, and the sibilances... wow, wow, stop! Are you still reading this nonsense? Well, of course, nothing has changed in the sound, as expected. Let's move on to measurements.
Now, wealthy moles, let's do the math.
Length: The old cable is 170cm long. It is loosely curled, almost straight. I'll give him 5cm to match mine. The KZ cable is only 125cm long, the pairs are poorly connected, but there is a second level - twisted pairs are formed into a metapair. I’ll throw him 15cm - that’s a bit much. The length of my cable is ~150cm, and taking into account the previously measured “shrinkage”, let’s put the length of the wires at ~175cm.
Resistance, left/right channels, full length (pins on the connector are closed, I apply the pins to the audio jack contacts). Old: 3.35/3.11 Ohm KZ: 2.75/1.65 Ohm Mine: 1.21/1.26 Ohm
The KZ cable appears to be damaged somewhere, because... The difference between the channels is too big. By the way, it is not felt by ear. The slight difference between the channels in my cable is apparently caused by uneven lengths during braiding, or different contact resistances. There are no wire breaks, because with 11 conductors, a break in one is a difference of 9%, but here it is only 4%.
A low capacitance cable is considered somewhere between 50-100 pF/m. By measuring the capacitance and dividing by the length, you can estimate these values for the cables (the difference between channels is insignificant, so I give one value). Old: 213/1.75 = 122 pF/m KZ: 115/1.40 = 82 pF/m Mine: 111/1.75 = 63 pF/m
I couldn't measure the inductance. The tester has a minimum detectable value of 0.01 mH; it could not identify any of the cables as inductance.
So, the resulting numbers are so insignificant that they can be neglected. For example, let's see how capacitance will affect the frequency response of the signal. To do this, we determine at what frequency this capacitance will cause the highs to fall by -3dB, using this formula: player output impedance 0.6 Ohm, cable capacitance 63pF/m, length 1.75m. We get a frequency of 2.4 GHz - this is slightly above the human hearing threshold, so there is no need to worry. You can also calculate the inverse value: what should be the cable length to get, say, a -3dB rollover at 20 kHz: substituting the same values, we get 210 km.
One more question: does it make sense to use Litz wire? This can be calculated as follows: the radius of an equivalent solid conductor for 30AWG would be 0.128mm. For a frequency of 20 kHz, the thickness of the skin layer for copper will be 0.467 mm - i.e. The thickness of the skin layer is several times greater than the conductor itself. The skin layer will become thinner than the radius of the conductor only at a frequency of approximately 250 kHz. Conclusion: there is no point in using Litz wire for a headphone cable.
Well, now the most important thing: compliance with the purposes for which the cable was created. After using this cable for a week, the whole range of sensations can be described by the Sweet Jesus meme: It doesn’t dull in the cold, it’s soft, and as a result, the microphone effect is noticeably lower. The divider does not feel like a separate entity from the cable. The thickness was the same as the old one, but due to the softness, the thickness is not felt at all as a disadvantage.
I would be glad to hear in the comments other methods or techniques for achieving a similar result. Because there is no limit to perfection.
Diagnostics of parts for performance
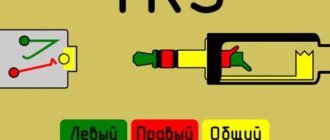
When assembling headphones from old parts, they are checked for functionality. It is better not to ignore the procedure, because with the assembled headset it will be more difficult to identify a non-functioning element. Diagnostics is performed with a multimeter. First, check the passage of current through all cable cores. It wouldn’t hurt to check the contacts on the plug for closedness. If the dielectric ring is damaged, the headphones will not work.
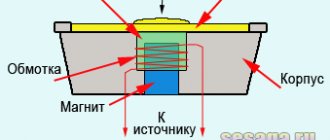
The speakers are checked in the same way as the wire. The multimeter probes are placed against the contacts. If the speaker of the working device gives a signal.
How can you lengthen the headphone cord?
Now let's talk directly about possible methods. There are only two of them. Let's look at each of them in detail.
Using special devices
This option is the safest and is even suitable for use with high-quality equipment. It involves the use of special extension cords.
On a note! This method is also well suited in cases where it is necessary to switch to a connector of a different diameter.
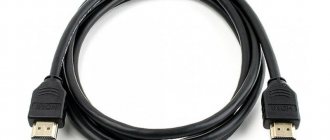
Such extension cords are made up to 10 m, and they can easily be found on sale. On store shelves you will find extension cords with jacks:
- 6.3 mm;
- 3.5 mm;
- 2.5 mm.
Any extension cord has an aux output on one side and a jack on the other. Each of these sides has certain parameters. Choose sizes that match the jack of your headphones and the input size of your audio equipment.
Using improvised means
Teenagers usually resort to this method in order to test their skills, and out of idle interest. You can perform lengthening using improvised means, following the instructions.
- Take a cord identical to the existing one or a wire from other headphones.
- Cut it off on both sides and clean it up.
- Cut the plug on the original headphones and strip the cord.
- Connect the two cords as close as possible and so that the contacts meet.
- Rewind the connection with electrical tape.
- On the other side, connect the wire to the plug in the same way.
Ready! You can test the performance and quality of your innovation.
Subscribe to our Social networks